COOKERS - SP - LINE INSTRUCTIONS MANUAL Installation - Use - Maintenance GB
INSTRUCTIONS MANUAL INDEX 1 INTRODUCTION 03 GENERAL WARNINGS 04 IINSTALLER'S GUIDE 06 2.1 COOKER INSTALATION 06 2.2 GAS CONNECTION 08 2.3 ELECTRIC CONNECTION 09 2.4 CONVERSION TO OTHER TYPE OF GAS 10 2.5 GAS TAPS / VALVES MAINTENANCE AND CLEANING 12 USER'S GUIDE 12 3.1 PRELIMINARY ADVIC'ES 12 3.2 HOW TO USE BURNERS OF THE COOKING TOP 14 3.3 THE VITRO TABLE USE 15 3.4 HOW TO USE THE GAS OVEN AND THE GAS GRILL 16 3.5 HOW TO USE THE GAS OVEN AND THE ELECTRIC GRILL 17 3.
INSTRUCTIONS MANUAL 1 INTRODUCTION Dear customer, You just purchased one product of our wide range. We thank you for your choice, expressing trust and deference for our mark. We are convinced that, as time goes by, you will agree your trust was motivated. The rigour we ask for the materials, manufacture and control, results in a quality product that will satisfy your requirements completely.
INSTRUCTIONS MANUAL the surface, which may result in shattering of the glass. - WARNING - Ensure that the appliance is switched off before replacing the lamp to avoid the possibility of electric shock. The appliance is not intended to operated by means of an external timer or separate remote-control system. The appliance is not intended to be operated by means of an external timer or separate remote-control system. Details indicating the correct installation of the shelves.
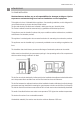
INSTRUCTIONS MANUAL 2 INSTALLER'S GUIDE 2.1 COOKER INSTALLATION The Manufacturer declines any an all responsibilities for damages to things or injuries to persons or animals deriving from incorrect installation or use of equipment. This appliance is class 1: isolated kitchen appliance, free-standing installation, and is designed for non-professional use by private, adult and inside houses. The gas and electricity conditions are indicated in labels near the gas / electricity inlets.
INSTRUCTIONS MANUAL The furniture sided the cooker, if higher than the cooking plan, must be at a minimum distance of 150 mm from the side of the appliance - unless that surface is constructed of a suitable non-combustible material for the entire length of the cooking surface. Any horizontal surface situated within 200mm from the edge of any hob burner must be a minimum of 10mm below the cooking surface or else comply with the above.
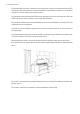
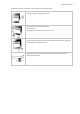
INSTRUCTIONS MANUAL Install the cooker firmly and level it - some models with a small levelling feet Get leg accessories in polybag inside oven Ask one person to lift one side of the unit. Never invert unit. Screw leg at corner holes below unit one at a time Ask your assistant to lift the other side of the unit.Now, screw thw other two leg the same way before at different corners. Adjust height of leg by turning lower portion clockwise or counter-clockwise.
INSTRUCTIONS MANUAL 2.2 GAS CONNECTION The cooker is provided with a label placed on the rear panel near the gas inlet, showing the type of gas and pressure for which the appliance has been originally adjusted. Before connecting this appliance check if is prepared for the type of gas and pressure available in your home. If not, it is necessary to convert the appliance to another gas as indicated in section 2.4. This appliance is suitable for connection to Natural and Propane Gas.
INSTRUCTIONS MANUAL 2.3 ELECTRIC CONNECTION VERY IMPORTANT: The appliance must be always connected to the ground, according to actual regulations. The electric connection, should be executed only by qualified personnel who are aware of installation regulations in force. Before the connection, check if the electric network is prepared for the required power (see the data plate, or table of technical characteristics).
INSTRUCTIONS MANUAL 2.4 CONVERSION TO OTHER TYPE OF GAS This operation must be executed always by qualified and authorised personnel. This appliance has been designed to function with Propane or Natural gas. This appliance is provided with a label on the rear panel, near the gas inlet, indicating the type of gas and pressure for which the cooker has been adjusted.
INSTRUCTIONS MANUAL 4 - Grill 4.1 - Open the oven door and remove all internal accessories. 4.2 - Remove the burner / reflector unit by loosing the screw fixing the reflector and remove all elements from the injector support by turning downwards 4.3 - Unscrew and remove the injectors and replace them those corresponding to the available gas see table 1 4.4 - Screw the burner / reflector and put in place the internal accessories. 5 - Regulating the primary air - only the oven burner and / or grill 5.
INSTRUCTIONS MANUAL 2.5 GAS TAPS / VALVES MAINTENANCE AND CLEANING If the gas tap / valve is hard to turn, do not force it.
INSTRUCTIONS MANUAL Before removing the saucepans turn off the burners The user must not change the appliance electricity supply cable. For replacement contact only a qualified person. The use of a gas appliance requires a regular exchange of air. Make sure that the installation complies with the Installation section 2.1.
INSTRUCTIONS MANUAL 3.2 HOW TO USE BURNERS OF THE COOKING TOP If you use the burners properly, the consequence will be a maximum efficiency, thus saving energy. The power of the burners is shown on table 1. In order to obtain this, you must choose pans according to the size of the burner see the table 2. If the flame is wider than the pan you are wasting energy.
INSTRUCTIONS MANUAL 3.3 THE VITRO TABLE USE If the bottom of the pan you use is plane, It's possible user glass recipients or porcelain recipients The pans diameters should be accorded to the diameter of the work area. Don't use recipients with a inferior diameter to the work area. Cover the recipients during the cooking, for economise energy. How to use the work area: The functioning of the work area is realised turning the handle in 3 positions, to the selected position ( 1 - minimum ; 3 - maximum ).
INSTRUCTIONS MANUAL 3.4 HOW TO USE THE GAS OVEN AND THE GAS GRILL ( G MODELS ) If the gas supply is deficient or if the flame is extinguished accidentally, the gas circuit will be automatically closed. To restart is necessary an user intervention. In this case and after verify that isn't a gas supply problem, wait at least one minute and repeat the lighting. For ignite this type of burner it's necessary maintaining the knob under pressure for 10 seconds.
INSTRUCTIONS MANUAL 3.5 HOW TO USE THE GAS OVEN AND THE ELECTRIC GRILL ( M MODELS ) For security reasons the design of the appliance do not permit the work of the gas oven and the electric grill at the same time (if fitted). For use the gas oven, procede like 3.3.
INSTRUCTIONS MANUAL 3.6 HOW TO USE THE MULTIFUNCTION OVEN ( EV MODELS ) Various cooking options can be selected by the use of switching of different elements, and temperature that is controlled by a thermostat. Oven light In this position only the light is in operation. The light stays on the other seven use positions. Fan forced The circular heating element and fan come into operation and the heat is spread evenly to all shelf positions.
INSTRUCTIONS MANUAL 3.7 HOW TO USE THE TURN-SPIT In this model with turn spit put the aliments in the center of the spit Put the support grill in the two sides of the oven. Introduce the spit rod in to the motor shaft hole obtained in the back wall and check the rearend is well set.
INSTRUCTIONS MANUAL 3.10 ELECTRONIC PROGRAMMER SETTING UP THE ACTUAL HOUR: Once the electrical connection is made to the oven, the display blinks and shows 0.00. Press keys (1) and (2) at the same time, then press keys (-) and (+) to set up the actual hour within 4 seconds; the oven remains in manual operation and no programming is necessary. GENERAL REMARKS: - Between 10.00 p.m and 6.00 a.m. the display intensity dims automatically.
INSTRUCTIONS MANUAL Semi-automatic Operation The oven can be programmed to switch off automatically. To do this proceed as follows: 1. Select the required function and temperature using the cooking function selector and the thermostat dial. 2. Press key (2) and set the cooking time by pressing keys (-) and (+) within the next 4 seconds. The actual time reappears and pilot lights (A) and (AUTO) remain ON.
INSTRUCTIONS MANUAL 3.11 DIGITAL TIMER Time of Day Adjustment Press the + and - buttons together. The point between the hours and minutes will start to flash. Using the + and - buttons, you can adjust the current time of day. Long presses of those buttons will enable fast adjustments. Pressing the + and - buttons a long time, until the hour and point between the hours and minutes start to flash, will enable you to adjust just the hours portion of the display.
INSTRUCTIONS MANUAL 3.12 RECOMMENDATION TO USE THE OVEN AND THE GRILL The accessible parts of the cooker could be hot, if the oven or the grill is in operation. Do not let children close to the appliance. Don't let children sit down or play with the oven door.
INSTRUCTIONS MANUAL 4 INSTRUCTIONS FOR MAINTENANCE AND CLEANING Warning: Servicing should be carried out only by authorised personnel. Before maintenance or cleaning your cooker, switch off the circuit breaker, turn off the isolating gas valve or the gas mains and allow the cooker to cool down. GENERAL CLEANING Adequate maintenance and cleaning will prolong the life of the appliance, as well as ensure trouble-free service.
INSTRUCTIONS MANUAL OVEN CLEANING The oven should be washed with warm water and a nylon pad soaked in ordinary detergent. The oven is " Easy to Clean " enamel, don't need abrasive detergent for cleaning.
INSTRUCTIONS MANUAL Protection Filter of the Oven Fan During the cooking, to minimise fat/debris going on to the fan, install the filter cover. When cooking is complete, remove the filter and wash it. To install the filter, mount the filter leaning it against the rear wall at the same level of the fan, then push the "tang" downwards. Reverse this operation to remove the filter.
INSTRUCTIONS MANUAL 5 CONTROL OF THE PRODUCT The producer certifies that this appliance has undergone the following verifications: - Electric unit operation - Dielectric rigidity - Earthing continuity - Operation with one type of gas - Leak control - Operation of the safety valves - Aesthetic control Manufacturer address: Apartado 17 - EC Valongo 4444-909 Valongo Portugal www.meireles.
INSTRUCTIONS MANUAL 6 TABLES TABLE 1 - BURNERS BUTAN GAS PROPAN GAS NATURAL GAS Pressure nominal operation, mbar 28 - 30 37 20 Pressure nominal operation, mbar 35 45 25 Pressure nominal operation, mbar 20 Power W (P.C.S.
INSTRUCTIONS MANUAL 7 TECHNICAL CHARACTERISTICS SP LINE BURNERS POWER, W GAS 100X60 ELET 70X60 G 9558 SP M 9558 SP G90 SP M 90 SP G 100 SP M 100 SP G 70 SP M 70 SP EV 70 SP Auxiliary 1 000 --- 1 1 1 1 1 Semi-rapid 1 750 --- 2 2 2 2 2 Rapid 3 000 --- 1 1 --- --- --- Triple 3 500 --- 1 1 1 1 1 Oven 2 750 1 100 / 1 500 --- --- G G E Grill 4 000 --- G G --- --- --- --- 1 500 --- --- --- --- E 1 800 1 600 --- --- G E --- 2 800 2 000 G E
INSTRUCTIONS MANUAL BURNERS POWER, W SP LINE 60X60 GAS ELET EV8 3640 SP EV8 3604 SP M 3640 SP VITRO G 3640 SP Auxiliary 1 000 ---- 1 --- 1 1 Semi-rapid 1 750 ---- 2 --- 2 2 Triple 3 500 ---- 1 --- 1 1 --- 1200 --- 2 --- --- Vitro plate 145 mm Vitro plate 180 mm --- 1800 --- 1 --- --- Vitro plate 120/210mm --- 2100 --- 1 --- --- Oven 2 750 1100 / 1500 E E G G Grill 1 800 1500 E E --- G 1600 --- --- E --- --- 2300 E E --- --- 54 54
The Producer is not responsable for spelling mistakes. The Producer has the right to modify the appliance if the alterations will not prejudice the functioning and the safety of the appliance.
PGQ1951/0