
User's Guide


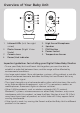


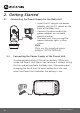
Table Of Contents
- _bookmark1
- _bookmark2
- _bookmark3
- _bookmark14
- 1. Safety Instructions
- 2. Getting Started
- 3. Using the Baby Monitor
- 4. Parent Unit Menu Options
- 5. Wi-Fi® Internet Viewing
- 6. Camera Functions
- 7. Working with PC/Notebook
- 8. Procedure for Resetting the Camera
- 9. Disposal of the Device (environment)
- 10. Cleaning
- 11. Help
- 12. General Information
- 13. Technical Specifications
- 空白页面
- 空白页面
- LUX64_IFU_US EN_v1_20200117.pdf
- _bookmark1
- _bookmark2
- _bookmark3
- _bookmark14
- 1. Safety Instructions
- 2. Getting Started
- 3. Using the Baby Monitor
- 4. Parent Unit Menu Options
- 5. Wi-Fi® Internet Viewing
- 6. Camera Functions
- 7. Working with PC/Notebook
- 8. Procedure for Resetting the Camera
- 9. Disposal of the Device (environment)
- 10. Cleaning
- 11. Help
- 12. General Information
- 13. Technical Specifications

10
Getting Started
2. Getting Started
2.1 Connecting the Power Supply for the Baby Unit
• Insert the DC plug of the power
adapter into the DC socket on the
back of the Baby Unit.
• Connect the other end of the
power adapter to a suitable
electrical outlet.
• The baby unit turns on and the
power indicator lights in Blue
colour.
Note
Only use the supplied power
adapter (DC5V/600mA).
A rechargeable battery (Lithium ion battery 1200mAh)
inside the Parent Unit allows you
to move it without losing
the link and picture from the Baby Unit. We recommend
charging the for at least 16 hours before first use, and
when the Parent Unit indicates the battery is low.
2.2. Connecting the Power Supply of the Parent Unit.