
User's Guide


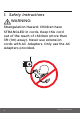
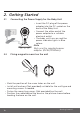
Table Of Contents
- _bookmark1
- _bookmark2
- _bookmark3
- _bookmark14
- 1. Safety Instructions
- 2. Getting Started
- 3. Using the Baby Monitor
- 4. Parent Unit Menu Options
- 5. Wi-Fi® Internet Viewing
- 6. Camera Functions
- 7. Working with PC/Notebook
- 8. Procedure for Resetting the Camera
- 9. Disposal of the Device (environment)
- 10. Cleaning
- 11. Help
- 12. General Information
- 13. Technical Specifications

10
Getting Started
2. Getting Started
2.1 Connecting the Power Supply for the Baby Unit
• Insert the DC plug of the power
adapter into the DC socket on the
back of the Baby Unit.
• Connect the other end of the
power adapter to a suitable
electrical outlet.
• The baby unit turns on and the
power indicator lights in Blue
colour.
Note
Only use the supplied power
adapter (DC5V/1000mA).
2.2 Fixing magnetic mount on the wall
Pair button
• Mark the position of the screw holes on the wall.
• Install wall anchors (Not provided) suitable for the wall type and
mounting screws if needed.
• Fasten the mounting screws (Not provided) on the wall.
• Position the cable behind the base as the picture shown before
hooking the base on the wall.