
Specifications


11. Check the tightness of the top socket head cap screw and recheck the
adjustment by performing the ink wipeoff test once again.
Cut Threads
When you are satisfied with the ink wipeoff test, you may check the thread cutting
ability by performing actual thread cuts at several locations across the cutting range
of the knives. To do this refer to the following steps:
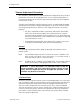
12. With the machine turned off, disconnect the connecting link from the movable
knife drive arm by lifting it from the front pin (see Figure 4-12).
13. Pull the movable knife forward with a small hex wrench hooked behind it.
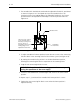
14. Obtain a piece of upper thread from the tensioner assembly and drape it over
the movable knife (see Figure 4-15).
15. With the thread draped over the movable knife from back to front, gently hold
the thread so there is some slack and then push the knife back until the thread
is cut. This cut should be clean, and should not be frayed.
16. Repeat the previous step with the thread positioned at different locations across
cutting surface.
17. If the thread is frayed at any location you may need to replace the adjustable
fixed knife, movable knife, or both. You must readjust the adjustable fixed knife.
Movable Knife
Home Position
The movable knife home position is where the knife stops under the adjustable
fixed knife after completing a trim cycle. This position is shown in Figure 4-18.
Notice that when properly positioned, the part of the rear tip of the movable knife
that slopes away from the top surface is showing in front of the leading edge of the
adjustable fixed knife.
To check that the movable knife is at home position, perform these steps:
1. If the front bed plate is not installed, install it now.
2. Turn the machine power ON.
WARNING! Keep clear of the moving parts that are exposed
during the operation of the next steps.
3. Set "home" when prompted to set home on the display.
4. Go to the TRIM MENU and perform a TRIM IMMEDIATE command.
Movable Knife 4 - 21
110279-01, Rev B 4. Trimmer Maintenance