
Manual


Electronic Aqua Timer
™
Model 3020
Operating Instructions
Battery Installation
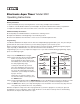
1. Open rear battery door by removing the three screws using a Phillips head screwdriver.
2. Install two new AA alkaline batteries (not included) in the position indicated in the battery compartment.
3. Replace the battery door and secure with screws. The motor may activate to reset the unit.
Additional Battery Information:
■
Good quality, fresh alkaline batteries should last one watering season.
■
Replace the batteries at the beginning of each watering season.
■
Remove the batteries when the timer is not in use for an extended period of time.
Programming
Your Melnor 3020 Electronic Aqua Timer™ offers two independently programmable cycles. They are each pro-
grammed in the same manner. However, you must always program Cycle 1 before Cycle 2.
Before you begin the program process, determine what you want to program. Reading through the program
steps may help you determine this. You also will need to know the current time.
Programming Cycle 1 is a very simple four-step process. If you make a mistake during programming, simply
press reset and begin again.
Step 1.Press the RESET button to begin.
Step 2.Set the start time by pressing the START
button. If you press it only once, the
timer will begin the first watering cycle
immediately. (15 seconds after you finish
the final programming step)
To delay the start time by one hour,
press the start button twice. Pressing
three times will delay the start time by
two hours. By repeatedly pressing the
start button, you can delay the start time
by up to 12 hours.
Remember, the amount of delay is one
less than the number of times you press
the START button.
Step 3.Set the watering duration with the DURATION button. Press the button once for every 15 minutes you want
to water, up to four hours. So, if you press the button three times, you will be watering for 45 minutes.
Step 4.The SKIP button allows you to skip watering days. Press the button once to water every day, twice for
every other day, and three times for every third day.
With the completion of Step 4, the timer is programmed. If you wish to program a second cycle, proceed
immediately to Cycle 2. Otherwise, make certain the timer is on the faucet securely, the hose and watering
attachments are in place and the faucet is open.