
User's Instructions


2
Set Moisture Levels:
B
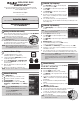
luetooth® Moisture Sensor pairing instruction
1
Bluetooth® Moisture Sensor Pairing :
You can add Moisture Sensor (not included) to pair with your Bluetooth®
Timer.
The moisture sensor can be used to reduce your water use. Pairing can only
be done with one zone at a time.
First, obtain 2 fresh AA alkaline batteries and insert them into the battery
tray of the sensor. Once they are inserted, press the button on your sensor
for about 5 seconds to start the pairing with the timer. Press the co-ordinat-
ing zone button on your timer for 5 seconds. You will notice on your timer
that the sensor has been paired. The indicator light will flash blue. Repeat
this step for every sensor you want to add for the rest of valves.
Then place the sensor into the soil at the location you want to monitor the
moisture from. The sensor will show the moisture levels after a few minutes
have expired.
Additional sensors can be added for multi zoned timers using the same
above instructions.
You can setup the moisture levels according to your soil requirement. 10%
increments are selectable up to 100%.
The current status will be shown once a Bluetooth® moisture sensor is
connected. Please wait three minutes to receive a sensor reading.
Noted that more Moisture Sensors are connected to the timer, the more
battery use will be used. The center light is a battery indicator. If it is flashing
red, change the batteries.
NOTE:
moisture sensor is specific designed and programmed to
work with the brand Bluetooth® Timer only. Other brands
moisture sensor will cause the timer/the App work incorrectly.