Mac OS X User Guide Mac v1.
Read this before you go any further The following symbols are used in this document to highlight warnings, potential hazards, or best practice procedures, and have the following meanings: Danger – potential risk of personal injury, including electrical shock, burns etc. Warning – potential risk of damage to printer and/or surroundings. Important – what you need to know to get the best from your printer. 5 December 2012 – v1.
C6010 Safety Safety Risk to personal safety Do not disassemble any part of your printer. Electrical shock hazard. There are no user-repairable parts inside your printer. Disassembly of any part of your printer will void all warranties. Keep your printer well away from all heat sources and flammable substances. Fire hazard. Switch your printer off immediately and unplug the power cord from the wall socket if: you see smoke rising from your printer.
C6010 Safety Use only appropriate paper Inappropriate paper may cause damage to your printer. In particular, you should not use: transparencies kinked, curled or cockled paper paper which is too thick paper with any staples or pins in it. Clear paper jams promptly To avoid further problems, attend to all paper jams and any other cause of printer failure promptly.
C6010 Table of Contents Table of Contents Getting to know your C6010 printer 9 What is in the box 9 Main components 10 Printer 10 Printhead cartridge 13 Ink tanks 14 Features 15 Control Panel 15 Connector bay 15 Setting up your C6010 printer 16 Unpacking your new printer 16 Locating the printer 18 18 Installing the ink tanks 18 Installing the printhead cartridge 24 Loading paper 21 Loading A4/Letter size paper 21 Loading US Legal size paper 23 Using intermediate paper
C6010 Table of Contents Print dialog box 42 Printing a test page 41 Cancelling a print job 41 Using print options 42 Print dialog box 42 Print Preview pane 44 Common pane 46 Variable pane 45 Selecting your printer 45 Printer presets 46 Printer dialog Help 46 Page orientation 47 Custom paper sizes 47 Multi-page (N-up) 48 Two-sided 48 Booklets 52 About resizing 53 Using Tray 2 53 Common printer messages and alerts 58 Paper out 58 Ink low 59 Out of ink 59 Paper jam
C6010 Table of Contents SNMP Configuration Toolbox Troubleshooting screens 71 73 Event Log 73 Maintenance 74 C6010 maintenance 75 Extended maintenance activity 75 Restoring print quality 75 Printhead cleaning via the Menu button 75 Printhead cleaning using Printer Properties Services tab 76 Printhead cleaning using the Toolbox 76 Resetting original configuration settings 79 Factory default printer settings 79 Factory default printer driver settings 79 Supplies and accessories Pap
C6010 Table of Contents Paper jams due to paper curl 90 Can no longer print to a networked printer 90 Print options greyed out 91 Cannot access Toolbox Home Page 91 Toolbox links are not working 91 Printer slows down between pages 91 Error/operational status messages 92 Status messages on your printer's LCD screen 92 Alert windows status messages 92 Specifications 94 Appendices 95 Relocating your C6010 printer 95 Local relocation 95 Remote relocation 96 Unpacking your printer
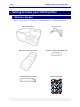
C6010 Getting to know your C6010 printer Getting to know your C6010 printer What is in the box When you open the box containing your new C6010 printer, you will find the following: The C6010 printer A power cord Ink tanks in their blister pack A software and documentation CD A C6010 printhead cartridge A Quick Start Guide 5 December 2012 – v1.
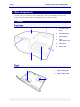
C6010 Getting to know your C6010 printer Main components Use this section as a reference when reading this document. It identifies and locates the components that will be mentioned throughout the rest of this document. Printer 2 1 3 1 Ink tank access cover 2 Printhead cover 3 Control panel 4 Tray 1 (Main paper tray) 5 Output tray 6 Paper stop 6 4 5 1 1 Paper width guide 2 Paper length guide 2 5 December 2012 – v1.
C6010 Getting to know your C6010 printer Tray 2 (Multi-purpose tray) closed 6 1 2 5 3 4 1 USB port 4 Side access door 2 Ethernet port 5 Side access door latch 3 Power socket 6 Tray 2 (Multi-purpose tray) Tray 2 (Multi-purpose tray) open 4 1 2 3 1 Side access door 3 Tray 2 (Multi-purpose tray) 2 Paper feed open tab 4 Paper guide 5 December 2012 – v1.
C6010 Getting to know your C6010 printer 4 5 6 7 6 1 Ink tank access cover 6 Printhead 2 Ink tank cover (open) 7 Printhead latch 3 Ink tank cover (closed) 8 Ink tank (in slot) 4 Fluidic couplings 9 Ink tank coupling 5 Printhead cover 5 December 2012 – v1.
C6010 Getting to know your C6010 printer Printhead cartridge 1 2 3 8 4 4 5 6 7 1 Printhead handles 5 Protective cover 2 Electrical contacts tape 6 Foil vacuum bag 3 Nozzles protective tape 7 Cardboard packing box 4 Protective cover flaps 8 Cover retaining clip 5 December 2012 – v1.
C6010 Getting to know your C6010 printer Ink tanks 1 2 5 December 2012 – v1.
C6010 Getting to know your C6010 printer Features The features of the printer that you will use most frequently are highlighted in this section. Control Panel The Control Panel has six control buttons along with one LCD screen and one attention lamp to communicate printer status information. The Power On/Off button is also backlit, as shown below.
C6010 Setting up your C6010 printer Setting up your C6010 printer Printer installation consists of: Removing your printer from its packaging. Installing your printer on a desktop (see page 18). Powering up your printer (see page 20). Installing the ink tanks (see page 18). Installing the printhead (see page 24). Loading paper in the front paper tray (see page 21). Installing the printer driver (see page 28).
C6010 Setting up your C6010 printer Before loading any paper into the paper tray for the first time, remove the packaging material used to lock the paper picker during transport. (Also remove the tape from the paper stop.) DO NOT dispose of this packing material. Should you need to repackage the printer for transportation to a remote site, you will need to re-use this to avoid damage to the paper picker.
C6010 Setting up your C6010 printer Locating your printer Your printer must be located on a firm, flat level surface. Failure to do so may cause leaking of ink in the printer and onto surroundings, possibly resulting in a damaged and unusable printer. To ensure proper access to the printer and adequate ventilation during use, refer to the figure below for the various clearances required on each side of the printer.
C6010 Setting up your C6010 printer 2. Carefully remove the ink tanks from the blister pack, ensuring you do not drop or otherwise damage them. 3. Remove the pull tab attached to each ink tank (see the Ink tanks section on page 14) before inserting it into its slot on the printer. 4. There is a specific ink tank slot for each color. Check the color coding on the ink tank and the slot, and insert each ink tank into its respective ink tank slot, as shown.
C6010 Setting up your C6010 printer 5. Close the ink tank covers, ensuring they snap down firmly. 6. Close the printer cover and allow at least two minutes for the ink to fill the ink channels in the printer. The power lamp on the control panel will continue to blink throughout this process. This is normal. You can now proceed with the installation of the printhead cartridge. Powering up your printer To power up your printer: 1.
C6010 Setting up your C6010 printer 2. Connect the other end of the power cord to the power source. Your C6010 printer power supply is auto-sensing, there is nothing to adjust. For specifications, see page 94. 3. Press the Power On/Off button until your printer is powered up. When first installing your new printer, the power lamp will be blinking. Loading paper Your C6010 printer has a main paper tray called Tray 1, which may be removed from the main body of the printer as shown in Figure 1 on page 17.
C6010 Setting up your C6010 printer 4. Prepare a stack of up to 250 sheets of paper (all of the same size) for insertion into Tray 1 as follows: Flex the sheets back and forth to loosen them, then fan them a few times (do not crease the paper). Remove any obvious loose paper dust from the surface or edges of the paper. Align the edges of the sheets on a level surface. 5. Load the paper stack into the Tray 1, with the recommended print side facing down. 6.
C6010 Setting up your C6010 printer Loading US Legal size paper US Legal paper, at 8½” 14” is considerably longer than US Letter or ISO A4, and to accommodate it Tray 1 incorporates a sliding section which can be extended to increase its total length. Figure 3 Tray 1 showing adjustable width and length guides To load US Legal-sized paper: 1. Use recommended paper types. 2. Remove Tray 1 from the printer, ensuring that any packing material has been removed (see Figure 1). 3.
C6010 Setting up your C6010 printer Using intermediate paper sizes Tray 1 should be loaded only with ISO A4, US Letter or US Legal paper sizes and is designed to take paper from 70 gsm (19 lb) to 120 gsm (32 lb) weight. However paper properties can vary widely between manufacturers, so if the heavier weight paper you have chosen does not feed well from Tray 1, use Tray 2 instead. Intermediate size paper up to US Legal size that cannot be loaded in Tray 1 should be printed via Tray 2.
C6010 Setting up your C6010 printer Always lift the printhead latch as far as possible. It should be vertical when fully opened. 6. Remove the fluidic cap protectors from the two fluidic couplings. 7. Open the end of the printhead package outer box and slide out the foil bag. 8. Inspect the integrity of the foil vacuum sealing. The foil bag should be formed tightly to the contours of the printhead cartridge as shown above. If the foil is loose to any degree then the seal has been compromised.
C6010 Setting up your C6010 printer 10. Remove the printhead cartridge from the foil bag. 11. Remove the orange protective plastic cover from the printhead cartridge. Holding the printhead cartridge by the handle: Release the flaps covering the ink ports (1 and 2). Release the clip retaining the cover near the center of the printhead cartridge (3). Carefully remove the protective cover (4). 12. Remove the protective strip from the electrical contacts.
C6010 Setting up your C6010 printer Dispose of the removed strip immediately and do not allow the removed strip to contact the electrical contacts or the printhead nozzles. 14. Raise the printhead latch fully until it is upright so you can insert the printhead into the printer at an angle. 15. When the printhead cartridge is fully inserted into the printer, rotate it to a vertical position as shown until it clicks into place. 16. Slowly close the printhead latch until a click is heard.
C6010 Setting up your C6010 printer 17. When the printhead cover is closed, the printer will prime, clean and cap the printhead automatically. This operation will generally take a minute or two, and will be obvious from sounds emanating from the printer. The power lamp will be blinking during this process. When the power lamp stops blinking, your printhead cartridge has been installed and primed.
C6010 Setting up your C6010 printer To do so: 1. Open the Print & Fax window from your System Preferences window. 2. Select printers you wish to remove appearing in the Printers pane on the left of the window and click on the Delete button . Installing drivers on your Mac To Install a C6010 printer driver on your Mac, execute the followings steps. 1. Ensure your printer is powered on (see page 20) and connected.
C6010 Setting up your C6010 printer 4. Another window will be displayed showing a file ending in “.mpkg” This file is the driver installer package (labelled as such in your Finder screen). Double click on that file to install the C6010 printer drivers. 5. The Welcome screen appears. This will guide you through the installation of your driver. Click Continue. 6. A Software License Agreement window will be displayed.
C6010 Setting up your C6010 printer 7. The Standard Install screen provides options to install part of the driver or change the location where the printer driver is loaded. Unless you have been directed otherwise, you should not change the install location. If you are installing a local, USB-connected printer, simply click Install and go to Step 8 on page 32. If you are installing a networked printer, check with your support personnel whether you should update the firmware on your networked printer.
C6010 Setting up your C6010 printer 8. Irrespective of your choice about firmware updates, the host driver software will continue to load on your Mac, and successful installation will be communicated to you via a window similar to the one shown below. At this point DO NOT disconnect or switch off your USB-connected printer. The installation may not be finished if a firmware update is necessary.
C6010 Setting up your C6010 printer Click Yes to confirm your choice. The firmware in the printer you selected will be updated only if the firmware on your CD is later than the one in the printer. If the firmware update proceeds, the above confirmation window will be replaced by the following warning one: Follow the instructions in the warning window. Disconnecting cables or switching the printer off may cause your printer to cease functioning altogether.
C6010 Setting up your C6010 printer This is the method outlined in OS X Help. 1. Choose Apple > System Preferences > Print & Fax. The dialog shown below should be displayed. 5 December 2012 – v1.
C6010 Setting up your C6010 printer 2. Click the Add Printer button . Select Default, the topmost left icon in the dialog that pops up. You should see a list of printers similar to that shown below. 3. Select the USB printer from the list, as shown above. Make sure the Print Using field shows C6010 printer along with version information. 4. Click Add. You should see C6010 printer displayed in the Printers pane of the Print & Fax dialog.
C6010 Setting up your C6010 printer Using Bonjour 1. Choose Apple > System Preferences > Print & Fax. The dialog shown below should be displayed. 2. Click the Add Printer button at the bottom of the Printers pane. The Add Printer dialog will be displayed, showing a list of all the printers in your network, as shown below. If the dialog on your screen does not match that shown below, ensure the Default icon is selected, at the top left of the dialog.
C6010 Setting up your C6010 printer If your printer is not listed, check that: your printer is connected to the network. it is turned on. the power lamp is lit and steady. If you still cannot see your printer listed, contact your support personnel. 3. Highlight the printer you wish to use and click Add. 4. Your new printer will be displayed in the Printers pane of the Print & Fax dialog, as shown. It is recommended that you test your printer when it is ready to print.
C6010 Setting up your C6010 printer Using IP address This method requires you to know the IP address of your C6010 printer. This would normally be supplied to you by your support personnel. If you wish to use this method without reference to a support personnel, see Identifying your printer on page 86 for an explanation of how to obtain your C6010 printer’s IP address. If you are using this method without support personnel support, ensure the printer’s IP address is reachable from your Mac.
C6010 Setting up your C6010 printer 3. Click the Protocol arrow and select HP Jetdirect – Socket. 4. Key in the IP address of your printer in the Address field. 5. Click the Print Using arrow and select Select Printer Software. From the resulting window (shown here) select the appropriate C6010 printer in the list. To narrow down the number of printer software drivers listed, type “C6010” in the search field in the top right hand of the window. 6. Click OK.
C6010 Printing with your C6010 printer Printing with C6010 The OS X 10.6 print architecture has standardised numerous print options and contains context-sensitive Help text to help you navigate these options. This section contains C6010-specific information you will need to obtain an optimum printout, but will point you to the built-in OS X context-sensitive Help for further information on standard options. All examples in this section have been obtained using OS X 10.6 operating system.
C6010 Printing with your C6010 printer Print dialog box options vary according to the application used to launch the Print command. For more information, see Using print options on page 42. Printing a test page To test your printer is working, you may print a test page at any time. There are three ways in which you can print a test page: using the buttons on your printer Control Panel. using the built-in Print Test Page button on the printer driver on your Mac.
C6010 Printing with your C6010 printer 1. Double click the printer icon in the Dock while the print job is running. A C6010 printer window similar to the one shown below will be displayed. 2. Select the print job you wish to cancel and click Pause Printer in the window menu bar. 3. Once the printer has been paused, click on Delete in the window Menu bar. The selected job will disappear from the window.
C6010 Printing with your C6010 printer Figure 4 Preview application Print dialog box The Print dialog box consists of three panes: Print Preview pane Common pane Variable pane Below these the Print dialog Help icon as the usual Pint and Cancel buttons. 5 December 2012 – v1.
C6010 Printing with your C6010 printer The contents of this dialog box will vary depending on the application you are printing from. The Print dialog box for Word for Mac 2011 is reproduced below as an example of the different layouts displayed by the different applications. Print Preview pane The Print Preview pane in the upper left displays a graphical representation of the document as it would look when printed using the currently selected print options.
C6010 Printing with your C6010 printer Paper orientation Variable pane The area under the horizontal line topped by the Preview button can contain a number of different options overlayed in that pane. To see the available options click on the Preview arrow. A print options pop-up menu similar to the one shown below should be displayed. As you select an option, a different pane will open and be displayed under the selection arrow. These panes will, in turn, show more options as required.
C6010 Printing with your C6010 printer 1. Click in the Printer field. A list of available printers will be displayed, as shown above. 2. Select the appropriate printer. Current C6010 printers default to the name C6010 printer or some variation of those words. See the the standard Print dialog Help instructions for information on print settings present. To access the the standard print dialog Help instructions: 1. Click Preview in your print dialog box. This will display a print preview of your document.
C6010 Printing with your C6010 printer This User Guide will direct you to the standard print dialog Help instructions wherever possible. Where the standard Print dialog Help instructions conflict with information contained in this User Guide, follow the instructions in this User Guide. Page orientation Page orientation in your C6010 printer can be set up in a variety of ways depending on your application. In Preview: 1.
C6010 Printing with your C6010 printer If the Destination Paper Size does not contain the size you require, you can try creating a Custom Page size. For information on doing so, see Mac Help for “Creating a custom page size”. Multi-page (N-up) You can print up to 16 pages of your document on one sheet on your C6010 printer. This option is sometimes called N-Up printing and can be accessed as follows: 1. Open a document in Preview. 2.
C6010 Printing with your C6010 printer For example, try this: 1. Open a Word document of four pages. 2. Select File > Print. 3. Select your C6010 printer and select Layout from the Preview print options pop-up menu. 4. Click the Two-Sided arrow and select the binding location from the pop-up menu, as shown in the picture below. 5. The Two-Sided tick box in the Common pane will automatically be selected. 6. Click Print. You will see that: Two sheets will be printed.
C6010 Printing with your C6010 printer Instructions will be displayed in your printer queue window (as shown below). (When using Tray 1) (When using Tray 2) 7. Follow the instructions in the message window to proceed. For best results ensure the printed pages are dry and very flat before re-inserting them into the paper tray. 8. Close the paper tray and press the OK/Resume button. The same two sheets will be printed, on the reverse side.
C6010 Printing with your C6010 printer Watermark Your C6010 printer driver features text-only watermarks. These consist of text which can be printed on all pages using selectable font size and color a well as varying opacity (to make your watermark appear transparent). For example, try this: 1. 2. 3. 4. Open a document in Preview. Select File > Print. Select your C6010 printer and click the Preview arrow to display the options available. Select Watermark.
C6010 Printing with your C6010 printer Booklets Booklets are generated by folding in half sheets which have been printed on both sides, so when you choose to print a booklet, you automatically select two-sided printing and 2 pages per sheet. As a result the Pages per Sheet option is ignored, and if you have not chosen the correct duplex print option, a message will be displayed. Booklet printing is best used for text and light color applications.
C6010 Printing with your C6010 printer 7. Click Print. You will see that: Two sheets will be printed. Instructions will be displayed in your printer queue window (see below). 8. Follow the instructions in the printer queue window to proceed. For best results ensure the printed pages are dry and very flat before re-inserting them into the paper tray. 9. Close the paper tray and press the OK/Resume button. The same two sheets will be printed, on the reverse side.
C6010 Printing with your C6010 printer Tray 2 can hold up to 20 sheets at a time. To print from Tray 2: 1. Remove the external packing tape as illustrated below if you have not done so, and then open Tray 2 to load papers. 2. Raise Tray 2 into position as shown, using the paper feed open tab. Tray 2 should lock into place. 5 December 2012 – v1.
C6010 Printing with your C6010 printer 3. Remove the external packing tape as illustrated below. 4. Pull the tray extension as shown below. 5 December 2012 – v1.
C6010 Printing with your C6010 printer 5. Place the required number of papers onto Tray 2 holding them against the side. Then, slide the the Width Adjustment guide until the papers rest against the side. 6. Issue a Print command from your application. 7. Select your C6010 printer and select Printer Features from the Preview print options pop-up menu. 8. Click the Source arrow and select Tray 2. 9. If you are using custom paper sizes, refer to Custom paper sizes on page 47. 10.
C6010 Printing with your C6010 printer To see the instructions, click on your C6010 printer icon in the Dock and enlarge the window until your can see the text as shown in the following illustration. Follow the on-screen instructions to proceed. 5 December 2012 – v1.
C6010 Printing with your C6010 printer Common printer messages and alerts This section covers some of the most common messages and alerts you will encounter in the course of printing and indicates normal user responses required. There are two ways in which common printer messages and alerts are communicated: Through the LCD screen on the Control Panel of your C6010 printer. Through an Alert message on your C6010 print queue window.
C6010 Printing with your C6010 printer The printer will resume printing any print jobs in its print queue. Your C6010 printer uses separate ink tanks for each color. Whenever you are running low on ink, the messages similar to the following will appear on both your Mac and printer, indicating which color is running low. Alert message on your Mac Message on your printer’s LCD screen K ink low The messages above may vary depending on which ink tank is running low.
C6010 Printing with your C6010 printer Once you run out of ink, the printer will not print any longer. Action Required: 1. Remove the empty ink tanks. 2. Install new ink tanks. See Installing the ink tanks on page 18. 3. Press the OK/Resume button on your printer. After a while, the printer then executes a quick flush and any pending print jobs are automatically resumed. It is imperative that paper jams and any other cause of printer failure be attended to promptly.
C6010 Printing with your C6010 printer DO NOT re-insert Tray 1 until you have finished. Re-inserting Tray 1 beforehand may cause the jammed paper to rip and leave paper scraps in the printer. 2. Open the side access door by pushing up on the door latch as shown. You DO NOT need to switch off the printer before opening the side access door. It is quite safe to access the side door of the printer, as there are NO HOT OR ELECTRICALLY CHARGED AREAS EXPOSED when the side door is open. 3.
C6010 Printing with your C6010 printer Do not ignore an Excessive Tilt warning! Prolonged excessive tilt can cause the printhead to deprime, giving rise to print quality problems. Your C6010 printer must be located on a level surface. Should this not be the case, you will be notified and the printer will stop printing until the error is cleared. The next time you issue a Print command, the following messages will appear on both your Mac and printer.
C6010 Managing your C6010 printer Managing your C6010 printer Your C6010 printer comes with an embedded Web Server application, which will allow you to use your Web browser to query the printer for information and to change some printer settings. The application which furnishes these facilities is called the Toolbox application. Toolbox information pages allow you to: view information on printer supplies and usage. view and change current printer settings. perform some simple troubleshooting.
C6010 Managing your C6010 printer 2. Select a local C6010 printer and then Options and Supplies. A window similar to the one shown here should be displayed. 3. Select Utility.> Open Printer Utility. Your default Web browser should open, displaying the Toolbox Device Service Selection Utility page, as shown. 4. Select your locally connected C6010 printer. The Toolbox Home Page will be displayed and should look similar to the window shown here.
C6010 Managing your C6010 printer For a networked printer There are two ways to access the Toolbox application on your Mac for networked C6010 printers: Via the Show Printer Webpage button (on Bonjour-connected printers only) Directly using the printer’s IP address If you have connected your networked C6010 printer using the Bonjour method (see 5 December 2012 – v1.
C6010 Managing your C6010 printer Using Bonjour on page 36) you can access the Toolbox application by the following steps. 1. Choose Apple > System Preferences > Print & Fax. A window similar to the one shown here should be displayed. 2. Select your networked C6010 printer and then Options and Supplies. A window similar to the one shown here should be displayed. 5 December 2012 – v1.
C6010 Managing your C6010 printer 3. Select General > Show Printer Webpage in the resultant window. Your default Web browser should open, displaying the Toolbox Home Page as shown. There may be minor variations in layout depending on the browser you are using. If you know the printer’s IP address, you can access the Toolbox application directly. Simply key in your C6010 printer’s IP address in the URL field of any Web browser to bring up the Home Page of the Toolbox application.
C6010 Managing your C6010 printer Toolbox information screens The following information is currently available through the Toolbox information screens. Navigation instructions all commence from the Toolbox Home Page. The Supplies Information page shows a summary of your current ink and printhead pages. To access the Supplies page from the Home Page, click Supplies Info. The percentages displayed on this page are accurate to the nearest five percent.
C6010 Managing your C6010 printer An information page for each ink color is provided. Each page shows the amount of ink remaining(accurate to about 5%), ink tank information and your ink tank supplier’s Web page. To access an Ink detail information page from the Home Page, navigate to the Supplies page, then click one of the Ink Level links or select one of the Ink Details color from the Select a supplies page arrow. The Black Ink Information page is shown below.
C6010 Managing your C6010 printer Toolbox settings screens Using these screens, various printer and network settings may be viewed, and some settings changed. The printer configuration settings information provided on this screen may be required when you are seeking support. Using this screen you may also change the language used in all Toolbox screens. To do this click the Language arrow and select your language, then click Save. Your printer driver language will not be affected by this change.
C6010 Managing your C6010 printer To access the Network Settings page from the Home Page, select Network Settings. Do not change these settings without reference to your support personnel. This screen allows you to view and change IP configuration settings on your printer. Changing printer settings through this screen may cause your printer to become unusable. Always refer to your support personnel first before making any changes.
C6010 Managing your C6010 printer Changing printer settings through this screen may cause your printer to become unusable. Always refer to your support personnel first before making any changes. To access the IP Configuration settings page from the Home Page, select Network Settings, then click the Select a Network Configuration Page arrow and select SNMP Configuration. 5 December 2012 – v1.
C6010 Managing your C6010 printer Toolbox Troubleshooting screens The following screens may help in troubleshooting problems with your C6010 printer. Your C6010 printer logs errors into a special buffer in printer memory. The Event Log screen displays any errors logged by the printer as it responds to your commands, or performs maintenance functions. This window will list the last 100 events that have occurred. If you need to contact support personnel, you may be asked to open this window on your Mac.
C6010 Managing your C6010 printer The Maintenance page allows you to clean the printhead and print various diagnostic pages that can be useful in determining printer problems and helping to solve them. To access the Maintenance page from the Home Page, select Maintenance. For information on how and when to use the various Clean Printhead buttons, refer to Printhead cleaning using the Toolbox on page 76.
C6010 Managing your C6010 printer C6010 maintenance Your C6010 printer does not require any user intervention for routine maintenance. Maintenance is generally carried out in the background and is interrupted when printing. There is only one exception to this, when the printer enters an extended cleaning function. See Extended maintenance activity below.
C6010 Managing your C6010 printer All cleaning operations consume ink. The more thorough the cleaning operation, the more ink is consumed. It is recommended you always print one or more test pages at this point. 4. If the problem persists, repeat step 1 within 10 minutes to initiate a more thorough printhead cleaning sequence, and then select Normal maintenance. Again, wait until the power lamp stops blinking and the Ready message appears on the LCD screen. 5.
C6010 Managing your C6010 printer Before wiping the printhead you will need: A clean, lint free cloth or similar Clean water Suitable Cleaning Cloth Clean, lint free cloth Spectacle / glasses wipe Clean sponge (unused) Do not use – Toilet paper, newspaper, paper towels or cleaning wipes containing soap/chemicals/scents Suitable Water Bottled drinking water (non carbonated) Clean tap water (cold or warm) Do not use – Mineral water, soap, chemicals or hot water The cloth used to wipe
C6010 Managing your C6010 printer 1. Source a clean, lint free cloth and moisten it with clean water. The cloth should not be dripping wet. Remove the printhead from the printer as described in Replacing the printhead cartridge on page 83. 2. Hold the printhead facing down as shown in the diagram. 3. Using a clean, moist lint free cloth, gently wipe the printhead along the direction of the nozzles. 4. Using another clean area on the cloth, gently wipe the printhead in the opposite direction.
C6010 Managing your C6010 printer Resetting original configuration settings Factory default printer settings If, for any reason, you need to reset the printer settings back to their factory defaults, press the Menu button on your printer’s Control Panel, use the Up or Down button to select Reset defaults, and then press the OK/Resume button. Press the OK/Resume button again to confirm. A number of setup parameters in your printer will change, including: Language IP Configuration.
C6010 Supplies and accessories Supplies and accessories This section contains information about: paper, inks and other consumables that are suitable for your C6010 printer. how to replace consumables. how to care for them to get the best out of your printer. For information on sourcing new ink tanks or printheads, contact your supplier. Paper Your C6010 printer is a plain-paper printer. The paper that you print on directly affects the quality of the output.
C6010 Supplies and accessories Choosing the right paper Use one of the recommended paper types listed above. If you need to use different paper, contact the supplier of your C6010 printer. Treated paper is not recommended for use in your printer.
C6010 Supplies and accessories Ink You must use only C6010-compatible ink in your C6010 printer. C6010 ink cartridges carry information about the ink they hold. This information is used by the printer to optimise printing on various paper types. Sourcing new ink Contact your supplier to source new ink tanks. Ink storage and handling C6010 inks do not require special storage and handling. Common recommendations are listed below, but your particular location may require further considerations.
C6010 Supplies and accessories Printhead cartridge storage and handling Once installed, your printhead cartridge should remain in the printer. Removing the printhead cartridge is not recommended, even while transporting the printer. If you need to remove the printhead cartridge and store it for any specific reason, protect the printhead cartridge at all times from contamination by air-borne or surface contaminants such as dust or fibres.
C6010 Supplies and accessories 5. Press the OK/Resume button again to confirm. This will open the printhead latch automatically. If the printhead latch cannot be released automatically as described, contact support personnel. DO NOT attempt to release the printhead latch in any other manner by yourself. 6. Rotate and lift the printhead latch as shown to reveal the printhead cartridge. Always lift the printhead latch as far as possible. It should be vertical when fully opened. 7.
C6010 Supplies and accessories 8. Gently lift the printhead cartridge away from the printer as shown. Lift until the old printhead cartridge is clear of the printer. If you have kept the protective cover (see the Printhead cartridge section on page 13), use it to cover the old printhead cartridge, as there is always a chance some ink will remain in the printhead cartridge. 9.
C6010 Specifications Troubleshooting This section contains a set of error conditions you may experience in various situations, and suggestions for how to deal with such errors. Should the suggestions found in this section not fix the problems you may be encountering, contact support personnel.
C6010 Specifications You will find both Device serial number and IP address on this page, which will identify that printer uniquely. Initial checks You should always attempt to fix any problems that may arise. This section lays out a suggested checklist you should perform before contacting support personnel. Check that: The power cord is properly connected to the power socket on your printer and the mains power. And the printer is switched on.
C6010 Specifications 3. Install the printer drivers again (see Installing drivers on your Mac on page 29). If you still can’t see your USB printer, contact support personnel. Your printer is meant to be installed on a flat, level surface. Should the surface on which the printer is sitting not be level, the following Alert window will appear on your Mac when you attempt to print: The Tilt error message will also appear on your printer’s LCD screen.
C6010 Specifications Clicking on Finish will return you to the initial installation dialog box. Printing problems The most common printer problems are covered in the Common printer messages and alerts section on page 58. This section covers other issues that may arise in the course of operating your C6010 printer. The most common causes of paper picking problems are: Paper sheets sticking together. Paper dust. Single-sided paper loaded into the printer tray the wrong way up.
C6010 Specifications Fan them a few times to ensure sheets are free (do not crease the paper). Remove any obvious loose paper dust from surfaces or edges of the sheets Align the edges of the sheets on a level surface before insertion into the paper tray. The paper tray should be kept clean for optimum printer performance. Loading single-sided paper Single-sided paper has a specially treated side, to improve print quality.
C6010 Specifications If your networked printer has been installed to run as a Service from a print Server in your organization, all the following features will be greyed out: My Print Settings. Custom Sizes. Custom Watermark. These features require the user to have write access to the host system’s Windows Registry, and this is generally not available to clients on Servers. If you have tried to access the Toolbox Home Page and failed, the most common reason is that the printer is switched off.
C6010 Specifications Error/operational status messages This section lists all the status messages that you can encounter when using your C6010 printer. Status messages can be conveyed both through the LCD screen on the Control Panel of your C6010 printer and through Alert windows on your Mac screen. In some situations both avenues are used together. See Common printer messages and alerts on page 58 for some examples.
C6010 Specifications Such messages are intended to help you understand the nature of the problem. This table lists all Alert window messages and suggests what action you can or should take. Should the suggested course of action not have the desired effect, contact support personnel. Alert windows carrying critical alerts will not close until you choose to close them and, if closed, may re-appear at the next print action if the error has not been fixed.
C6010 Specifications Specifications Specifications are subject to change without prior notice.
C6010 Appendix - Relocating Appendices Relocating your C6010 printer Once your printer is set up and working to your satisfaction, you should not move it but leave it connected and switched on for best performance. If you need to move it to another location in the house or in your office, read the section labelled Local relocation below. If you need to relocate it to a different building or office, read the section titled Remote relocation on page 96.
C6010 Appendix - Relocating When transporting your C6010 printer to a remote location, your printer will need to be repackaged. To minimise the chance of ink leakage due to incorrect handling, your printer must be placed in ‘transport mode’ before repackaging. This requires you to switch off the printer as set out below: 1. To place your printer in ‘transport mode’, see page 95. 2. To repackage your printer: 1.
C6010 Appendix - Unpacking Unpacking your printer This section provides a simple visual guide to unpacking your new C6010 printer. See Setting up your C6010 printer on page 16 for detailed information on how to proceed after unpacking. 5 December 2012 – v1.
C6010 Appendix - Repacking Repackaging your printer This section provides a simple visual guide to repackaging your printer for transport, as discussed in Remote relocation on page 96. 5 December 2012 – v1.
C6010 Appendix - Notices and Regulatory statements Notices and Regulatory statements FCC Compliance Canadian DOC Regulations: Complies with Canadian EMC Class B requirements 5 December 2012 – v1.
C6010 Appendix - Notices and Regulatory statements Consumables Part Number 10002597 10002601 10002602 10002603 10002604 10002605 Consumable Description C6000 series Printhead C6000 Black Ink Tank C6000 Cyan Ink Tank C6000 Magenta Ink Tank C6000 Yellow Ink Tank C6000 Rainbow Pack New Tanks (C, M, Y, K) Memjet Support In North America: Memjet Home and Office, Inc 1001 South Bridgeway Place Eagle, Idaho 83616 In Europe: Memjet Operations, Ltd (dba Vandini, Ltd) Fitzwilliam Square Dublin 2, Ireland Worl