
Washer User Manual


Rev: 07/2010
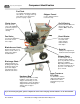
Brush Master™ Chipper/Shredder with 2-Way Feed
7
Heavy Duty Power Equipment
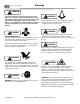
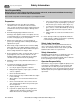
Assembly
Required tools: A Philips head screw driver
Approximate assembly time: 10 minutes
1. Remove the chipper from its carton.
Remove staples, break glue on top flaps, or cut tape at
carton end and peel along top flap to open carton.
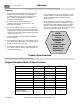
2. Verify all parts are in the chipper
carton.
Chipper Funnel
Chipper engine
and box
assembly
(pre-assembled)
Chipper Chute
Hardware Bag
Trailer hitch and
funnel handles
packaged
together
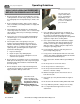
3. Disconnect the spark plug wire.
Before setting up your chipper/shredder, disconnect the
spark plug wire from the spark plug and ground against
the engine to prevent inadvertent starting. This step
should be taken as a precaution whenever you are
working on this machine.
4. Attach the chipper funnel.
First, attach the two handles to the sides of the funnel
using the wrench provided and a Phillips head screw
driver. Tighten the nuts securely.
Second, place the funnel over the opening on the
chipper box, ensuring the rubber gasket is correctly
aligned. Secure the funnel with the two “swing up bolts”
and the one fixed bolt using the wrench provided. Tighten
the nuts securely.
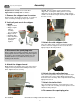
5. Attach the side chipper chute.
Place the chipper chute over the four bolts protruding
from the side of the chipper box and secure the nuts
tightly using the wrench provided.
6. Attach the chip collection bag.
Place the metal grommets of the bag over the wire loops
located at the base of the engine. Wrap the bag under
the bottom of the discharge chute and pull the draw string
tightly and secure it.
7. Attach the trailer hitch.
Place the trailer hitch into the socket at the base of the
chipper over the axle assembly. Insert the pin and secure
with the locking cotter pin.
8. Re-connect the spark plug wire.