COMBINATION 13" COLOR TELEVISION AND VIDEO CASSETTE RECORDER COMBINÉ TÉLÉVISEUR COULEUR 13" ET MAGNÉTOSCOPE DBVT1341 ATTENTION If you purchase a universal remote control from your local retailer, please contact the remote manufacturer for the required programming code.
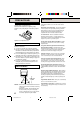
ENGLISH CAUTION RISK OF ELECTRIC SHOCK DO NOT OPEN CAUTION: TO REDUCE THE RISK OF ELECTRIC SHOCK, DO NOT REMOVE COVER (OR BACK). NO USER-SERVICEABLE PARTS INSIDE. REFER SERVICING TO QUALIFIED SERVICE PERSONNEL. The lightning flash with arrowhead symbol, within an equilateral triangle is intended to alert the user to the presence of uninsulated dangerous voltage within the product's enclosure that may be of sufficient magnitude to constitute a risk of electric shock.
9. VENTILATION Slots and openings in the cabinet back or bottom are provided for ventilation, and to ensure reliable operation of the unit, and to protect it from overheat- 13. LIGHTNING To protect your unit from a lightning storm, or when it is left unattended and unused for long periods of time, unplug it from the wall outlet and disconnect ing. These openings must not be blocked or covered. The openings should never be blocked by placing the unit on a bed, sofa, rug, or other similar surface.
IMPORTANT SAFEGUARDS 19. DAMAGE REQUIRING SERVICE Unplug this unit from the wall outlet and refer servicing to qualified service personnel under the following conditions: a. When the power-supply cord or plug is damaged. b. If liquid has been spilled, or objects have fallen into the unit. c. If the unit has been exposed to rain or water. d. If the unit does not operate normally by following the operating instructions.
PRECAUTIONS ■ WHAT IS MOISTURE CONDENSATION? When a cold liquid is poured into a glass, for example, water vapor in the air will condense on the surface of the glass. This is called moisture condensation. ■ MOISTURE WILL CONDENSE ON THE UNIT IN THE FOLLOWING CASES: • When you move the unit from a cold to a warm place. • After heating a cold room or under extremely humid conditions.
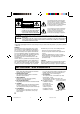
FEATURES PRECAUTIONS BATTERY INSTALLATION Slide the battery compartment cover. Install two “AAA” batteries (not supplied), paying attention to the polarity diagram in the battery compartment. Color TV With Video Cassette Recorder - Unique space saving design combines a color TV and a video cassette recorder. High Quality Picture Technology - This TV/VCR equipped “HQ” incorporates VHS High Quality technology.
TABLE OF CONTENTS One-touch Timer Recording (OTR) - Simply by pressing the REC/OTR button, the TV/VCR can be programmed for up to 5 hours of recording with an immediate start. Audio/Video Input Jacks - A VCR or other video device may be hooked up to this TV/VCR for dubbing or playback purposes.
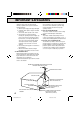
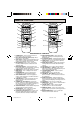
LOCATION OF CONTROLS FRONT REAR 1 ANT. 3 2 4 5 6 7 8 Rec/Otr Volume Channel Phones Power Stop/ Eject Rew Play F.Fwd 15 16 T-Rec Rec/Otr Video – In – Audio 9 10 11 12 13 14 DESCRIPTION OF CONTROLS FRONT: 1. Cassette Loading Slot - To insert or remove a video tape. 2. POWER Button - Press to turn the TV/VCR on or off. 3. STOP/EJECT Button - Press once to stop the tape in any mode. Press again to eject the tape. 4. PLAY Button - Press to play a prerecorded tape. 5.
REMOTE CONTROL POWER 2 SLEEP TV MONI. 1 2 3 4 5 6 7 8 9 17 22 EJECT POWER 11 CHANNEL SLEEP TV MONI. 1 2 3 4 5 6 7 8 9 EJECT CHANNEL + 3 + – 12 VOLUME + CALL 0 18 CALL – MUTING REC/OTR PAUSE/STILL 13 – VOLUME + QUICK VIEW INPUT SELECT ENGLISH 10 1 0 23 QUICK VIEW – INPUT SELECT MUTING REC/OTR PAUSE/STILL 4 19 PLAY REW F.
ANTENNA CONNECTIONS If you are using an indoor or outdoor antenna, follow the instructions below that correspond to your antenna system. If you are using a cable TV service (CATV), see page 11 for Cable TV connections. Combination VHF/UHF Antenna (Single 75 ohm cable or 300 ohm twin-lead wire) Connect the 75 ohm cable from the combination VHF/UHF antenna to the Antenna Jack. If your combination VHF/ UHF antenna has a 300 ohm twin-lead wire, the use of the 300-75 ohm Matching Transformer may be necessary.
This TV/VCR has an extended tuning range and can tune most cable channels without using a Cable TV converter box. Some cable companies offer "premium pay channels" in which the signal is scrambled. Descrambling these signals for normal viewing requires the use of a descrambler device which is generally provided by the cable company.
AUTO CLOCK SETTING The Auto Clock function will automatically set the built-in clock (Month, Day, Year and Time) when the TV/VCR is connected to an Antenna or Cable system and it is turned off. As the TV/VCR searches for a receivable station in your area, it will also receive a broadcast signal for Auto Clock which will automatically set the clock and date.The Auto Clock needs several minutes to set itself.
MANUAL CLOCK SETTING 1 To turn on the TV/VCR, press the POWER button. 2 Adjust the volume level by EXAMPLE: Setting the clock to “8:30 AM”, 29th (FRI) March, 2002. 1 Press the MENU button. MENU TIMER REC SET TV SET-UP CH SET-UP AUTO REPEAT ON OFF SYSTEM SET-UP Press the SET/TRACKING + or – button to select the SYSTEM SET-UP option, then press the ENTER button.
TV OPERATION MUTING QUICK VIEW Press MUTING button to switch off the sound. The TV/VCR’s sound will be silenced and “MUTING” will briefly appear on the screen. The sound can be switched back on by pressing this button again or one of the VOLUME Up or Down buttons. MUTING CHANNEL UP / DOWN CH 012 CALL Press the CALL button. The clock, date, channel number, real time tape counter, tape speed and VCR operation will be indicated. Press CALL button again to remove the call display.
Captions: This Closed Caption Mode will display text on the screen in English or another language (depending on the setting of the Closed Captions CH. 1 or 2). Generally, Closed Captions in English are transmitted on Captions Channel 1 and Closed Captions in other languages are transmitted on Captions Channel 2. Text: The Text Closed Caption Mode will usually fill the screen with a programming schedule or other information.
TO MEMORIZE CHANNELS V-CHIP SET menu appears. TO ADD/DELETE CHANNELS 1 Press the MENU button. 2 Press the SET/TRACKING + or MENU TIMER REC SET TV SET-UP CH SET-UP AUTO REPEAT ON OFF SYSTEM SET-UP – button to select the CH SET-UP mode, then press the ENTER button. 〈+/–/ENTER/MENU〉 3 Press the SET/TRACKING + or CH SET-UP TV CATV AUTO CH MEMORY ADD/DELETE – button to select the ADD/ DELETE mode, then press the ENTER button.
5 Press the SET/TRACKING + or V-CHIP SET V-CHIP : OFF TV RATING : TV—PG MOVIE RATING : PG—13 CHANGE PASSWORD – button to select V-CHIP. 6 Press the ENTER button to display ON. 〈+/—/ENTER/MENU〉 7 Press the MENU button until the V-CHIP SET V-CHIP : ON TV RATING : TV–PG MOVIE RATING : PG–13 CHANGE PASSWORD MENU screen is cleared. 〈+/–/ENTER/MENU〉 NOTE : The V-Chip function is activated only on programs and tapes that have the rating signal. To use the TV after the TV is protected.
TO SET THE OFF TIMER This feature allows you to have the TV/VCR turn “OFF” automatically at a predetermined time. If you program the OFF TIMER once, the TV/VCR will automatically turn off at the same time everyday. 4 Press the SET/TRACKING + or – button to set the desired hour, then press the ENTER button. 5 Press the SET/TRACKING + or – button to set the desired minute, then press the ENTER button. EXAMPLE: Turning off the TV at 11:30 PM.
LOADING AND UNLOADING Use only video cassette tapes marked . PLAYBACK To play a prerecorded tape. AUTOMATIC POWER ON AND PLAY When loading a cassette tape without the erase prevention tab intact, the TV/VCR will turn on automatically and playback will start immediately. Insert the cassette with its labeled side facing you. An inverted video cassette cannot be inserted. UNLOADING ENGLISH TO START PLAYBACK LOADING Push the center of the tape until it is automatically retracted into the TV/VCR.
SPECIAL PLAYBACK RECORDING A TV PROGRAM TO VISUALLY SEARCH FOR DESIRED POINTS RECORDING AND VIEWING THE SAME TV PROGRAM When either the F.FWD or REW button is pressed in the PLAYBACK mode, the speed search picture will appear. When pressed twice, the search picture will increase speed. Speed search time depends upon the speed used (SP, LP or SLP) during recording. See chart below. To visually search backward or forward, press the REW or F.FWD button once or twice in the PLAYBACK mode.
ONE-TOUCH TIMER RECORDING (OTR) The One-Touch Timer Recording feature provides a simple and convenient way to make a timed recording. EXAMPLE: One-touch Timer Recording for 30 minutes. 1 Press the POWER button to turn on the TV/VCR. 2 Load a video cassette with the erase prevention tab intact. select the desired tape speed (SP or SLP). SP or SLP will appear on the screen.
USING THE REAL TIME TAPE COUNTER TIMER RECORDING TO SET DAILY/WEEKLY TIMER When setting the date in the step 4 on page 21, press the SET/ TRACKING – button repeatedly when the current day is displayed. The setting changes as follows: Example The current day (Friday) One month later minus one day WKL-WED (Weekly Wednesday) The On-Screen Real Time Tape Counter shows the tape running time in Hours, Minutes and Seconds.
DUPLICATING A VIDEO TAPE If you connect the TV/VCR to another VCR or Camcorder, you can duplicate a previously recorded tape. Make all connections before turning on the power. CONNECTION TO VCR 1 2 Insert a blank cassette with the erase prevention tab intact into the TV/VCR. Insert a previously recorded cassette into the playback VCR or Camcorder. Press the INPUT SELECT button twice to select AUDIO/VIDEO input position. The "LINE " will appear on the screen.
TROUBLESHOOTING GUIDE Check the following chart before requesting service. SYMPTOM CAUSE POSSIBLE SOLUTION PAGE POWER No power. Although the power is on, the TV/VCR does not operate. The AC power cord is not connected. Connect the AC power cord to the AC outlet. Cassette is not inserted. Insert a video cassette. TIMER REC button is depressed. Press the TIMER REC button. 19 21 TV station experiencing problems. Try another channel. 13 Picture control is not adjusted.
CAUSE POSSIBLE SOLUTION PAGE TV station experiencing problems or program tuned is not closed captions. Try another channel. TV signal is weak. Check CATV connection of VHF/ UHF antenna, reposition or rotate antenna. 10,11 The TV/CAP/TEXT button is not depressed. Press the TV/CAP/TEXT button to turn on the closed caption. 14 TV recording does not work. The video cassette's erase prevention tab is broken off. Place a piece of vinyl tape over the hole. 19 Reset the present time.
RECEPTION DISTURBANCES Most types of television interference can be remedied by adjusting the height and position of the VHF/UHF antenna. Outdoor antennas are recommended for best results. The most common types of television interference are shown below. If one of these symptoms appear when the TV/VCR is connected to a Cable TV system, the disturbance may be caused by the local Cable TV company broadcast.
SPECIFICATIONS Horizontal Resolution: Tuner Type: Receiving Channels: 13" (measured diagonally) Antenna Input: 220 lines Quartz PLL Frequency Synthesized VHF 2-13 UHF 14-69 CATV 14-36 (A)-(W) 37-59 (AA)-(WW) 60-85 (AAA)-(ZZZ) 86-94 (86)-(94) 95-99 (A-5)-(A-1) 100-125 (100)-(125) 01 (5A) VHF/UHF In 75 ohms coaxial Speaker: Audio Output Power: 1-1/2" x 2-1/2", 8 ohm x 1 1.5W VCR Video System: Video Signal: Cassette Tape: Audio Track: Tape Speed: F.
LIMITED WARRANTY Memcorp Canada, warrants this product to be free from manufacturing defects in material and workmanship under normal use and conditions for a designated period from date of original purchase in Canada as follows: (Unless otherwise specified) WARRANTY: • COLOUR TV’s BELOW 25": 2 Years Parts, 90 Days Labour, 4 Years Picture Tube • COLOUR TV’s 25" and ABOVE: 1 Year Parts, Labour, 4 Years Picture Tube • ALL TV/VCR AND TV/VCR COMBINATION: 1 Year Parts (6 Months Video Heads), 90 Days Labour, 4 Ye
○ ○ ○ ○ ○ ○ ○ ○ ○ ○ ○ ○ ○ ○ ○ ○ ○ ○ ○ ○ ○ ○ ○ ○ ○ ○ ○ ○ ○ ○ ○ ○ ○ ○ ○ ○ ○ ○ ○ ○ ○ ○ ○ ○ ○ ○ ○ ○ ○ ○ ○ ○ ○ ○ ○ ○ ○ ○ ○ ○ ○ ○ ○ ○ ○ ○ ○ ○ ○ ○ ○ ○ ○ ○ ○ ○ ○ ○ ○ ○ ○ ○ ○ ○ ○ ○ ○ ○ ○ ○ ○ ○ ○ ○ ○ ○ ○ ○ ○ ○ ○ ○ ○ ○ ○ ○ ○ ○ ○ ○ ○ ○ ○ ○ ○ ○ ○ ○ ○ ○ ○ ○ ○ ○ ○ ○ ○ ○ ○ ○ ○ ○ ○ ○ ○ ○ ○ ○ ○ ○ ○ ○ ○ ○ ○ ○ ○ ○ ○ ○ ○ ○ ○ ○ ○ ○ ○ ○ ○ ○ ○ ○ ○ ○ ○ ○ ○ ○ ○ ○ ○
FRANÇAIS Le signe représentant un éclair dans un triangle équilatéral a pour but d'avertir l'utilisateur du danger présenté par des pièces non isolées à l'intérieur de l'appareil et dont la tension est suffisante pour provoquer des décharges électriques dangereuses. Le point d'exclamation dans un triangle équilatéral a pour but d'avertir l'utilisateur que des instructions importantes relatives à l'utilisation et à l'entretien se trouvent dans le manuel accompagnant l'appareil.
8. Emplacement de l’appareil Ne placez pas cet appareil vidéo sur un chariot, support, trépied ou table instable, car il pourrait en tomber, se casser et blesser sérieusement quelqu’un se trouvant à proximité. 8A. Si vous voulez déplacer l’appareil avec le chariot sur lequel il est placé, procédez avec prudence, car des arrêts brusques, une force excessive ou des surfaces inégales peuvent causer le renversement de l’appareil et du chariot. 9.
IMPORTANTES MESURES DE SÉCURITÉ 19. Dommages exigeant des réparations L’appareil doit être débranché de la prise électrique et confié à un réparateur qualifié si: a. La fiche ou le cordon d’alimentation a été endommagé; b. Un objet est tombé ou un liquide a pénétré à l’intérieur de l’appareil; c. L’appareil a été exposé à la pluie; d. L’appareil ne fonctionne pas convenablement quand vous suivez les instructions.
PRÉCAUTIONS ■ QUE SIGNIFIE LA CONDENSATION? Par exemple, quand on verse un liquide froid dans un verre, de la vapeur d’humidité se condense sur la surface du verre et forme de la buée. C’est de la condensation. ■ DANS LES CAS SUIVANTS, DE LA CONDENSA TION PEUT SE DEPOSER SUR L’APPAREIL: • Quand vous déplacez l’appareil d’un endroit froid à un endroit chaud. • Après avoir chauffé une pièce froide ou si l’humidité ambiante est très élevée.
PRÉCAUTIONS CARACTERISTIQUES INSERTION DES PILES Ouvrez le couvercle du compartiment à piles. Insérez deux piles "AAA" (non fourni) en observant leurs polarités, tel qu'indiqué sur le diagramme. Téléviseur avec magnétoscope - Conception unique en son genre pour économiser l'espace qui combine un téléviseur et un magnétoscope. Technologie à image de haute qualité - Ce téléviseur/ magnétoscope portant l'indication "HQ" incorpore les derniers progrès de la technologie VHS de pointe.
TABLE DES MATIERES ATTENTION IMPORTANTES MESURES DE SÉCURITÉ ............. 2 PRÉCAUTIONS ......................................................... 5 Prises d'entrée audio/vidéo - Un autre magnétoscope ou un autre appareil vidéo peut être raccordé à cet appareil, pour la copie ou la lecture de bande.
EMPLACEMENT DES COMMANDES VUE AVANT VUE ARRIERE 1 ANT. 2 3 4 6 7 8 5 Rec/Otr Volume Channel Phones Power Stop/ Eject Rew Play F.Fwd 15 16 T-Rec Rec/Otr Video – In – Audio 9 10 11 12 13 14 DESCRIPTION DES COMMANDES AVANT: 1. Compartiment à cassette - Insérez la vidéocassette dans ce compartiment et retirez-la après son éjection. 2. Interrupteur d'alimentation (POWER) - Pour mettre l'appareil en ou hors circuit. 3.
10 POWER 2 SLEEP TV MONI. 17 22 EJECT POWER 11 CHANNEL 1 2 3 4 5 6 7 8 9 0 QUICK VIEW SLEEP TV MONI. EJECT CHANNEL 1 2 3 4 5 6 7 8 9 0 QUICK VIEW + 3 + – 12 VOLUME + CALL MUTING 13 – 23 VOLUME + CALL – INPUT SELECT 18 – INPUT SELECT MUTING FRANÇAIS 1 4 REC/OTR 19 PAUSE/STILL PLAY REW F.
RACCORDEMENTS DES ANTENNES Si vous utilisez une antenne intérieure ou extérieure, suivez les directives ci-dessous, qui correspondent à votre genre d'antenne. Si vous êtes abonné à un service de câblodistribution (CATV), voyez les directives de la page 11. Antenne combinée VHF/UHF (câble unique de 75 ohms ou fil jumelé de 300 ohms) Raccordez le câble de 75 ohms de l'antenne combinée VHF/UHF à la prise d'antenne.
RACCORDEMENT A LA CABLODISTRIBUTION Ce téléviseur/magnétoscope a une gamme de syntonisation étendue et peut capter la plupart des canaux sans utiliser un convertisseur. Certaines compagnies de câblodistribution permettent le visionnement de "canaux payants" dont le signal est brouillé. Pour regarder ces signaux, un débrouilleur, en général fourni par la compagnie, est nécessaire.
RÉGLAGE AUTOMATIQUE DE L’HORLOGE La fonction de réglage automatique de l’horloge ajuste automatiquement l’horloge intégrée (mois, jour, année et heure) quand le téléviseur/magnétoscope est connecté à une antenne ou à un système de câble et est hors tension. Lorsque le téléviseur/magnétoscope recherche une station émettant dans votre région, il reçoit également un signal de transmission pour Auto Clock (Horloge automatique) qui règlera automatiquement l’horloge et la date.
RÉGLAGE MANUEL DE L’HORLOGE FONCTIONNEMENT DU TÉLÉVISEUR EXEMPLE: On veut régler l'horloge à 8h30 du matin”, le 29 (VEN) mars, 2002. 1 Pressez la touche MENU. MENU TIMER REC SET TV SET-UP CH SET-UP AUTO REPEAT ON OFF SYSTEM SET-UP Pressez la touche SET/TRACKING + ou – pour choisir le mode SYSTEM SET-UP, puis pressez la touche ENTER.
FONCTIONNEMENT DU TÉLÉVISEUR MISE EN SOURDINE (MUTING) Pressez cette touche pour couper la reproduction sonore de l'appareil. Le mot "MUTING" apparaît brièvement à l'écran. Pour rétablir le son, pressez de nouveau la touche MUTING ou une des commandes de volume Dessus ou Bas. REVUE RAPIDE (QUICK VIEW) MUTING TOUCHES DE SELECTION DE CANAUX Dessus ET Bass Pressez et relâchez la touche CHANNEL Dessus ou Bas. CH 012 L'appareil passe automatiquement au prochain canal mis en mémoire.
Sous-titres (CAPTIONS): Ce mode fait afficher le texte à l'écran en anglais ou en une autre langue (suivant le réglage du sélecteur CH.1 ou 2). En général, les émissions à sous-titres anglais sont transmises au canal 1 et les émissions à sous-titres en une autre langue sont transmises au canal 2. Texte (TEXT): En général, ce mode fait apparaître tout un texte à l'écran, affichant un horaire des émissions ou d'autres informations.
MISE EN MEMOIRE DES CANAUX UTILISATION DE LA PUCE V POUR AJOUTER/ANNULER DES CANAUX 1 Pressez la touche MENU. MENU TIMER REC SET TV SET-UP 2 Pressez la touche SET/TRACKCH SET-UP ING + ou – pour choisir le mode CH SET-UP, puis pressez la touche ENTER. AUTO REPEAT ON OFF SYSTEM SET-UP 〈+/–/ENTER/MENU〉 3 Pressez la touche SET/TRACK- CH SET-UP TV CATV AUTO CH MEMORY ADD/DELETE ING + ou – pour choisir le mode ADD/DELETE, puis pressez la touche ENTER.
POUR RÉGLER L’HEURE DE MISE SOUS TENSION V-CHIP SET V-CHIP : OFF TV RATING : TV—PG MOVIE RATING : PG—13 CHANGE PASSWORD ING + or – pour choisir le mode V-CHIP. 6 Pressez la touche ENTER pour 〈+/—/ENTER/MENU〉 afficher ON. V-CHIP SET V-CHIP : ON TV RATING : TV–PG MOVIE RATING : PG–13 CHANGE PASSWORD 7 Appuyez sur la touche MENU jusqu’à ce que l’écran MENU disparaisse.
POUR RÉGLER L’HEURE DE MISE HORS TENSION Cette fonction vous permet de mettre le téléviseur hors tension automatiquement à une heure réglée. Si vous programmez une fois la minuterie de mise hors tension, le téléviseur se mettra hors tension tous les jours à la même heure. EXEMPLE: Mise hors tension du téléviseur à 23h30 (11: 30 PM). MENU TIMER REC SET TV SET-UP CH SET-UP AUTO REPEAT ON OFF SYSTEM SET-UP 1 Pressez la touche MENU.
Utilisez seulement des vidéocassettes de format . INSERTION Pressez délicatement le centre de la cassette jusqu'à ce qu'elle soit chargée automatiquement dans le compartiment. LECTURE AUTOMATIQUE Quand vous insérez dans le compartiment une cassette sans languette de protection, la lecture commence immédiatement. Insérez la cassette avec le côté portant l'étiquette vous faisant face.Il est impossible d'insérer la cassette à l'envers. RETRAIT LECTURE Pour la lecture d'une bande pré-enregistrée.
MODES DE LECTURE POUR RECHERCHER VISUELLEMENT UNE PORTION SPECIFIQUE DE LA BANDE En mode de lecture, si on presse la touche d'avance rapide (F.FWD) ou de rebobinage (REW), l'image défile rapidement. Pressez deux fois et la vitesse de défilement augmente. La vitesse de la recherche visuelle dépend de la vitesse utilisée pour l'enregistrement (SP, LP ou SLP). Voyez le tableau ci-dessous. Pour le rebobinage ou l'avance rapide, pressez d'abord la touche STOP, puis la touche F.FWD ou REW.
L'enregistrement simplifié une touche offre un moyen simple et pratique d'effectuer un enregistrement programmé. Exemple: Enregistrement simplifié pour une durée de 30 minutes. 1 Pressez l'interrupteur pour mettre l'appareil en circuit. 2 Insérez une vidéocassette dotée de la languette de protection. 00:00:00 SP mode TV/CATV est réglé à la position qui convient.
UTILISATION DU COMPTEUR CHRONOLOGIQUE ENREGISTREMENT PROGRAMME ENREGSTREMENT PAR MINUTERIE QUOTIDIEN/HEBDOMAIRE Lorsque vous réglez le date au cours de l'étape 4 de la page 21, pressez la touche SET/TRACKING – de façon répétée quand le jour actuel est affiché. Le réglage change comme suit: Exemple Le jour actuel (vendredi) SUN-SAT (dimanche à samedi) Le compteur chronologique montre à l'écran la durée de défilement de la bande en heures, minutes et secondes.
COPIE D'UNE VIDEOCASSETTE 1 Insérez une cassette vierge dotée de sa languette de protection dans cet appareil. Insérez une cassette pré-enregistrée dans le magnétoscope ou le caméscope lecteur. 2 RACCORDEMENT A UN MAGNETOSCOPE Téléviseur/magnétoscope enregistreur Magnétoscope lecteur LINE Pressez la touche INPUT SELECT fois pour choisir l’entrée AUDIO/VIDEO. “LINE” apparaît sur l’écran.
GUIDE DE DEPISTAGE DES PANNES Vérifiez d'abord les points suivants avant de faire appel à un service de réparation. PROBLÈME CAUSES PROBABLES SOLUTIONS POSSIBLES PAGE ALIMENTATION Pas de courant. Le cordon du CA n'est pas branché. Raccordez le cordon sur une prise de courant alternatif. 5 La cassette n'est pas insérée. Insérez une vidéocassette dans l’appareil. 19 La touche TIMER REC est pressée. Pressez la touche TIMER REC afin de désactiver la fonction d’enregistrement programmé.
Le téléviseur s'éteint. Pas de réception CAUSES PROBABLES La station de TV a cessé de transmettre. SOLUTIONS POSSIBLES 13 L'arrêt différé a été programmé. Réglez l'arrêt différé à "0". 14 La minuterie d’arrêt (OFF) est réglée. Annulez minuterie d’arrêt (OFF). 18 Réinitialisez votre mot de passe. Réinitialisez votre mot de passe. 16 La station de télévision a des problèmes Essayez un autre canal. ou cette émission n'a pas de sous-titres. Le décodeur de soustitrage ne fonctionne pas.
PROBLEMES DE RECEPTION Il est possible de remédier à la plupart des interférences à la télévision en réglant la hauteur et en changeant la position de l'antenne VHF/UHF. Pour obtenir les meilleurs résultats, il est recommandé d'utiliser une antenne extérieure. La plupart des interférences sont expliquées ci-dessous. Si un de ces symptômes apparaît quand le téléviseur est raccordé au système de câblodistribution, le problème peut être causé par votre compagnie de câblodistribution locale.
FICHE TECHNIQUE Entrée d'antenne: Haut-parleur: Puissance de sortie audio: 13" (mesuré à la diagonale) 220 lignes A synthétiseur de fréquences à boucle d'asservissement à quartz (PLL) VHF 2-13 UHF 14-69 CATV 14-36 (A)-(W) 37-59 (AA)-(WW) 60-85 (AAA)-(ZZZ) 86-94 (86)-(94) 95-99 (A-5)-(A-1) 100-125 (100)-(125) 01 (5A) Câble coaxial VHF/UHF 75 ohms 1-1/2" x 2-1/2", 8 ohms x 1 1,5W FRANÇAIS TÉLÉVISEUR Tube image: Résolution horizontale: Syntonisateur: Canaux captés: MAGNETOSCOPE Système vidéo: Signal vidéo
Garantie limitée Memcorp Canada garantit ce produit contre tout défaut de fabrication ou de main d'oeuvre, dans la mesure où il est utilisé dans les conditions normales. Cette garantie court à partir de la date originale d'achat au Canada et s'étend sur les périodes ainsi précisées (sauf indication contraire): Garantie •Télécouleur de moins de 25": 2 années pour les pièces, main-d'oeuvre 90 jours, 4 années pour le tube image.