Job # MiHTS5005 manual cover Colors: 1-color print FO LD Pantone 533c User Guide Guía del usario DVD home theater system for iPod® Sistema de cine en casa DVD para iPod www.memorexelectronics.com Imation Electronics Products, A Division of Imation Enterprises Corp. Weston, FL MiHT5005 Printed in China / Imprimé dans Chine / Impreso en China Memorex, the Memorex logo, and "Is it live or is it Memorex?" are trademarks of the affiliates of Memorex Products, Inc.
CONTENTS Contents...........................................................1 Important Safety Instructions ........................2 Precautions......................................................5 Power Source ..................................................6 Location of Controls .......................................6 • Front .............................................................6 • Rear..............................................................7 • Remote .................................
IMPORTANT SAFETY INSTRUCTIONS CAUTION RISK OF ELECTRIC SHOCK DO NOT OPEN CAUTION:TO REDUCE THE RISK OF ELECTRIC SHOCK, DO NOT REMOVE COVER (OR BACK). NO USER-SERVICEABLE PARTS INSIDE. REFER SERVICING TO QUALIFIED SERVICE PERSONNEL. This Caution Marking was located at the rear enclosure of the apparatus.
IMPORTANT SAFETY INSTRUCTIONS (CONTINUED) Before using the unit, be sure to read all operating instructions carefully. Please note that these are general precautions and may not pertain to your unit. For example, this unit may not have the capability to be connected to an outdoor antenna. 1. READ INSTRUCTIONS All the safety and operating instructions should be read before the product is operated. 2. RETAIN INSTRUCTIONS The safety and operating instructions should be retained for future reference. 3.
IMPORTANT SAFETY INSTRUCTIONS (CONTINUED) 17. OUTDOOR ANTENNA GROUNDING If an outside antenna is connected to the product, be sure the antenna system is grounded so as to provide some protection against voltage surges and built-up static charges.
NOTES ON HANDLING: • • • • PRECAUTIONS TO OBTAIN A CLEAR PICTURE: The DVD player is a high technology, precision device. If the optical pick-up lens and disc drive parts are dirty or worn down, the picture quality becomes poor. To obtain a clear picture, we recommend regular inspection and maintenance (cleaning or parts replacement) every 1,000 hours of use depending on the operating environment. For details, contact your nearest dealer.
POWER SOURCE Insert the AC plug (with the 2 blades) into a conveniently located AC outlet having 120V, 60Hz. NOTE: The AC plug supplied with the unit is polarized to help minimize the possibility of electric shock. If the AC plug does not fit into a nonpolarized AC outlet, do not file or cut the wide blade. It is the user’s responsibility to have an electrician replace the obsolete outlet. 2 3 4 9 10 11 12 13 14 15 16 17 18 1. 2. 3. 4. Open/Close Button Disc Compartment Remote Sensor Display 19 12.
LOCATION OF CONTROLS (CONTINUED) REAR 1 1. 2. 3. 4. 5. 2 3 4 5 AC Power Cord Speaker Output Terminals AUX IN Left/Right jacks DOCKING AUDIO IN Jack HDMI OUT Jack 6 6. 7. 8. 9. 7 8 9 Component Video (Y, PB, PR) OUT Jacks VIDEO OUT Jack S-VIDEO OUT Jack FM Antenna Jack The following items are not shown, but are available for purchase, see page 47 to order. Video RCA Cable - PART NO. 0701-100000-00100 Video Cable (one end is 3.5mm plug and the other end is RCA) - PART NO.
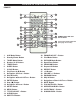
LOCATION OF CONTROLS (CONTINUED) REMOTE 1 3 2 22 21 23 4 5 7 9 12 11 14 17 16 19 24 26 25 27 6 28 8 29 10 30 13 32 15 34 18 36 31 REMOTE PART NO. 0861001200-00000* 33 35 *Consumer Replaceable Part (See page 47 to order.) 20 1. 2. 3. 4. 5. 6. 7. 8. 9. 10. 11. 12. 13. 14. 15. 16. 17. 18. 19.
REMOTE CONTROL BATTERY INSTALLATION 1. Remove the Battery Compartment by pressing in on the tab and then sliding the compartment out. 2. Install a CR2025 battery, paying attention to the polarity diagram in the compartment (positive side up). 3. Replace the Battery Compartment. BATTERY PRECAUTIONS Follow these precautions when using a battery in this device: 1. Warning–Danger of explosion if battery is incorrectly replaced. Replace only with the same or equivalent type. 2.
CONNECTION CONNECTING THE INCLUDED SPEAKERS This unit comes with a center speaker, two front speakers, two rear speakers and a subwoofer. Follow the steps below to connect the speakers to the unit, if desired. 1 2 The left front speaker has white and black wires, the right front speaker has red and black wires.
CONNECTION (CONTINUED) CONNECTING THE DVD TO A TV USING THE VIDEO OUTPUT JACK To Video In Video Cable (Included) From Video Out CONNECTING THE DVD TO A TV USING THE S-VIDEO OUTPUT JACK To S-Video In S-Video Cable (Not Included) From S-Video Out NOTES: • If your TV has a HDMI input, connect the DVD player with the HDMI cable for best results, otherwise use the Component, S-Video or Video OUT jack on the DVD player. • Set the TV’s TV/VIDEO button or switch to the VIDEO setting.
CONNECTION (CONTINUED) CONNECTING THE DVD TO A TV USING THE Y/PB/PR JACKS To Component Video In Y PB PR Component Cable (Not Included) From Component Video Out NOTES FOR CONNECTING TO A TV: • If your TV has a HDMI input, connect the DVD player with the HDMI cable for best results, otherwise use the Component, S-Video or Video OUT jack on the DVD player. • TV must have Y, PB and PR input jacks. • Set the TV’s TV/VIDEO button or switch to the VIDEO setting.
CONNECTION (CONTINUED) CONNECTING THE DVD TO A TV USING THE HDMI OUTPUT JACK To HDMI IN HDMI Cable (Not Included) From HDMI OUT NOTES: • If your TV has a HDMI input, connect the DVD player with the HDMI cable for best results, otherwise use the Component, S-Video or Video OUT jack on the DVD player. • Set the TV’s TV/VIDEO button or switch to the VIDEO setting. • When connecting the DVD, refer to the owner’s manual of the TV, as well as this manual.
CONNECTION (CONTINUED) CONNECTING AN EXTERNAL UNIT You can connect an external unit to this unit so its audio is output through this unit’s speakers. Simply connect an audio cable from the Left and Right Audio Out of the external unit to the Left and Right AUX IN jacks on this unit. To select the external unit, press the AUX Mode button on the remote. CONNECTING THE FM ANTENNA FM hm 75 o FM ANTENNA (Included) While listening to FM, reposition the antenna for best reception.
ABOUT DISCS The region code for this DVD player is listed on the back of the player. PLAYABLE DISCS: The following discs can be played back on this DVD player: MP3 When playing an MP3, the total number of files will appear in the display, and the TV screen will list the folders/tracks. MP3 is the abbreviation of “MPEG1 Audio Layer 3”. MPEG Audio is a format that compresses the audio portion only. IMPORTANT NOTES: Due to many variables, including recording condition, type of disc, writing software, etc.
ABOUT DISCS (CONTINUED) Notes on Copyright: It is forbidden by law to copy, broadcast, show, broadcast on cable, play in public and rent copyrighted material without permission. DVD video discs are copy protected, and any recordings made from these discs will be distorted. This product incorporates copyright protection technology that is protected by method claims of certain U.S. patents and other intellectual property rights owned by Macrovision Corporation and other rights owners.
SETUP MENU The setup menu lets you customize the DVD player by allowing you to select various language preferences, set up a parental level, turn captions and screen saver on and off, adjust what type of television screen you have, and more. Below, find the menu, and then find the corresponding page that describes the features of the selected menu option. 2 3 5 1 4 6 1. Press the SETUP button 1 to enter the Setup menu. 2.
SETUP MENU (CONTINUED) SYSTEM SETUP MENU: Select system and then select the desired option using the Navigation (√,®,π,†) buttons to navigate through the menus/screens and press the ENTER button to select (see page 17 for details). TV SYSTEM 1 SCREEN SAVER 1 SYSTEM SETUP NTSC: Select when using an NTSC/ATSC TV. PAL: Select when using a PAL TV. AUTO: Select when using a multi-system TV. IMPORTANT: In the USA, the standard is NTSC/ATSC. NOTE: If your TV has an ATSC signal, you can select NTSC also.
SETUP MENU (CONTINUED) PASSWORD DEFAULT 1 1 SYSTEM SETUP TV SYSTEM SCREEN SAVER HD OUTPUT VIDEO TV TYPE PASSWORD DEFAULT To change the password, press the Navigation ®/Searchl/Tune + button to enter the password input section. Enter the default password (“1234”) using the Number buttons if this is the first time entering the password, then press the ENTER button to confirm. When the correct password is entered, the Lock icon will be opened.
SUBTITLE LANGUAGE SETUP MENU (CONTINUED) MENU LANGUAGE 1 1 Select the language the DISC MENU will be in (ENGLISH, FRENCH, SPANISH). The DVD’s DISC MENU must be written in the selected language, otherwise the default language of the DVD will be shown. Select the language the Subtitle (OSD) will be in (ENGLISH, FRENCH, SPANISH, OFF). The DVD must be recorded in the selected language, otherwise the default language of the DVD will be shown.
SETUP MENU (CONTINUED) SPEAKER SETUP MENU: Select Speaker and then select the desired option using the Navigation (√,®,π,†) buttons to navigate through the menus/screens and press the ENTER button to select (see page 17 for details).
SETUP MENU (CONTINUED) TVG (TV GUARDIAN) TVGuardian® Feature This product supports TVGuardian® Foul Language Filtering Technology, offering your family the very best control of T objectionable language in your home. If you are interested in this service, please visit www.TVGuardian.com or call 866884-3458 for additional details (service subject to activation fee). HOW IT WORKS TVGuardian® (TVG®) filters out objectionable language. When objectionable words or phrases are detected, TVG® mutes the audio.
SETUP MENU (CONTINUED) TVGuardian® Setup Menu Word Subset Filtering In addition to the main TVG® modes listed above, you can turn certain word subsets on or off according to your preferences. Damn and Hell..................................Filters out variations of “Damn”/“Hell” Religious..............................Filters out references to deities (To watch religious programming, turn this word subset off.) Sexual .........................Filters out sexually-explicit language TVG® Modes Off ..........
SETUP MENU (CONTINUED) SETTING THE CLOCK 1 2 3 1 2 Press and hold the CLOCK button until “24 HOUR” or “12 HOUR” appears in the display. Select 12 HOUR or 24 HOUR using the Navigation π/Preset + 1 or †/Preset - 2 button, then press the CLOCK button 3; the hours will blink. 3 4 3 3 1 2 1 2 Select the current hour using the Navigation π/Preset + 1 or †/Preset - 2 button, making sure to set the correct AM or PM setting if in 12 hour mode. Then press the CLOCK button 3; the minutes will blink.
BASIC OPERATION VOLUME IMPORTANT: When “INVALID KEY” appears while pressing a button, this means that the corresponding function cannot be performed either on the disc inserted or in the selected mode. MUTE 1 1 Adjust the VOLUME Up/Down buttons as desired. Press the MUTE button once to mute the sound; “MUTE” will appear on the TV screen briefly. Press the MUTE button again to restore the sound.
ECONOMY MODE BASIC OPERATION (CONTINUED) SOURCE 1 1 While in the Standby mode, press and hold the Standby/Power button for more than 2 seconds and the system will enter ECONOMY mode. The display will be off. Press again to turn the unit ON. Note: When the Economy mode is on, the Sleep Timer function will be cancelled. This manual gives instructions on selecting the source via the remote. However, you can also press the SOURCE button repeatedly on the main unit to select the desired source.
DVD BASIC OPERATION IMPORTANT NOTES: • After plugging in, the unit will be in the Standby mode (the Standby indicator will be lit). Press the Standby/Power button on the main unit or the remote to turn on the unit. • “INVALID KEY will appear on the TV screen during operation if you try to access a function that is not available on the disc. • Some discs may take a few seconds to load.
DVD BASIC OPERATION (CONTINUED) SKIP SEARCH 1 1 2 3 1 2 Press the Skip (n) button 1 to advance the DVD to the beginning of the next chapter. During playback, press either the Navigation ®/Search l/Tune + button 1 or m/Tune - button 2 to move the DVD forward or backward at double (x2) speed to locate a specific section. Repeatedly press these buttons and the speed will increase to x4, x8, x20 and resume normal playback.
TITLE/CHAPTER SEARCH DVD BASIC OPERATION (CONTINUED) Use this feature to directly go to a specific title and/or chapter. 1 3 2 4 1 Press the GOTO/TRACK button 1 once. Press the Navigation (√,®) buttons 2 to select TITLE (TT), then use the Number (0-9) buttons 3 to select the desired title number. Then press the ENTER button 4; playback will start immediately. OR Press the Navigation (√,®) buttons 2 to select CHAPTER (CH), then use the Number (0-9) buttons 3 to select the desired chapter number (i.
DVD BASIC OPERATION (CONTINUED) AUDIO MENU SUBTITLE MENU 1 1 Press the AUDIO button repeatedly to change the audio language. This feature is not available on all discs. DVD MENU 1 Press the SUBTITLE button repeatedly to select a subtitle language and to turn the subtitle menu on/off. This feature is not available on all discs. TITLE MENU 1 2 2 3 1 1 Press the MENU button 1; the Main Menu of the disc will appear.
DVD BASIC OPERATION (CONTINUED) PROGRAMMED PLAYBACK The DVD player in this unit has a 16 chapter programmable memory that allows you to program up to 16 chapters on any disc for playback in any desired order. You may program 16 different chapters or you may also program certain chapters to play more than once. To perform Programmed Playback, proceed as follows: 1 2 1 2 During playback of a DVD disc, press the PROGRAM button; the Program menu will appear on the TV screen.
MP3 BASIC OPERATION PLAYBACK OF AN MP3 CD 1 2 2 1 Press the Open/Close button to open the disc tray; “OPEN” will appear on the screen and in the display. Insert a disc with the label side facing up on the disc tray. Close the disc tray. Press the Standby/Power button 1 to turn on the unit; the STANDBY indicator will go out. With NO USB attached, press the DVD/USB Mode button 2 to select the DVD mode. 3 3 2 1 After loading, playback of the first track of the first folder will begin automatically.
MP3 BASIC OPERATION (CONTINUED) SELECTING FOLDERS/TRACKS USING THE SKIP (n) OR (o) BUTTON SELECTING FOLDERS/TRACKS USING THE NUMBER BUTTONS 1 2 1 1 Press the Skip n button 1 to advance to the beginning of the next file. Press the Skip o button 2 to move to the beginning of the previous file. During playback, press the Number buttons corresponding to the track numbers to select your desired track; the unit will playback the desired track automatically.
MP3 BASIC OPERATION (CONTINUED) PROGRAMMED PLAYBACK The DVD player in this unit has a 16 chapter programmable memory that allows you to program up to 16 chapters on any CD for playback in any desired order. You may program 16 different files or you may also program certain files to play more than once. To perform Programmed Playback, proceed as follows: 1 2 1 2 During playback of an MP3 disc, press the PROGRAM button; the Program menu will appear on the TV screen.
PLAYBACK OF A CD CD BASIC OPERATION 1 1 2 2 Press the Open/Close button to open the disc tray; “OPEN” will appear on the screen and in the display. Insert a disc with the label side facing up on the disc tray. Press the Standby/Power button 1 to turn on the unit; the STANDBY indicator will go out. With NO USB attached, press the DVD/USB button 2 to select the DVD mode. 3 4 2 1 Press the OPEN/CLOSE button to close the disc tray. “CLOSE” will appear on the screen.
CD BASIC OPERATION (CONTINUED) FORWARD®®/REVERSE √√ SEARCH 1 REPEAT ONE/ALL PLAY 1 1 3 2 1 2 During playback, press either the Navigation ®/Searchl/Tune + button 1 or Navigation√/Search m/Tune - button 2 to move the file forward or backward at double (x2) speed to locate a specific section. Repeatedly press these buttons and the speed will increase to x4, x8, x20 and resume normal playback.
CD BASIC OPERATION (CONTINUED) PROGRAMMED PLAYBACK The DVD player in this unit has a 16 track programmable memory that allows you to program up to 16 tracks on any CD for playback in any desired order. You may program 16 different tracks or you may also program certain tracks to play more than once. To perform Programmed Playback, proceed as follows: 1 2 1 2 During playback of a CD, press the PROGRAM button; the Program menu will appear on the TV screen.
PICTURE CD BASIC OPERATION 1 2 2 1 Press the Open/Close button to open the disc tray; “OPEN” will appear on the screen and in the display. Insert a disc with the label side facing up on the disc tray. Press the Standby/Power button 1 to turn on the unit; the STANDBY indicator will go out. With NO USB attached, press the DVD/USB button 2 to select the DVD mode. 4 3 4 1 2 3 2 5 1 Press the Skip n 1 or o 2 button to select the next or previous picture.
LISTENING TO THE FM RADIO TUNER OPERATION 1 2 Press the Standby/Power button to turn on the unit; the STANDBY indicator will go out. Press the TUNER Mode button on the remote to select the Tuner mode. 3 4 2 2 1 MANUAL TUNING: Repeatedly press the Navigation ®/Search l/Tune + 1 or m/Tune - button 2 to manually advance the frequency in the display up or down until the desired frequency appears.
TUNER OPERATION (CONTINUED) SETTING FM RADIO PRESETS (UP TO 10) 1 2 Press the Standby/Power button to turn on the unit; the STANDBY indicator will go out. Press the TUNER Mode button on the remote to select the Tuner mode and tune an FM station as described on the previous page. 3 4 1 3 2 Press the PROGRAM button again and the station will be stored in the selected preset. Repeat steps 2 and 3 to program additional presets.
iPod CONNECTION You must insert the universal dock supplied with your iPod onto the docking station before docking your iPod. iPod AUDIO ONLY iPod AUDIO AND VIDEO If you have docked a Video iPod, the video output is available from the Video Out jack on the back of the dock. Connect a single video cable from this jack to the composite video (CVBS) input of your TV/monitor to watch the video.
iPod OPERATION LISTENING TO THE iPod 1 2 Press the Standby/Power button to turn on the unit; the STANDBY indicator will go out. Press the iPod Mode button on the remote to select the iPod mode. You can now control the iPod functions from this unit. 3 4 1 3 4 2 To start playback, press the Play/Pause (®p) button; the selected track will play. To pause playback, press the Play/Pause (®p) button. Press it again to resume playback.
USB OPERATION PLAYING THE FILES ON THE CONNECTED USB DEVICE 1 2 Press the Standby/Power button to turn on the unit; the STANDBY indicator will go out. Connect a USB Flash or other USB storage device to the USB jack. Device must be 2GB or less. 3 4 1 2 4 3 5 Press the DVD/USB Mode button 1 on the remote; a menu will appear. Select a desired folder using the Navigation (√,®,π,†) 2 buttons. Select USB using the Navigation/Preset † 3/π 4 buttons, then press the ENTER button 5 to select the USB.
TIMER SETTING THE TIMER This unit can be set to turn on to the TUNER or iPod automatically at a preset time as follows: 1 2 3 1 2 Press and hold the TIMER button for a second; “TUNER” will blink in the display. Select the desired source (TUNER OR iPod) to wake up to using the Navigation/Preset π 1 or † 2 button, then press the TIMER button 3; the hours will blink.
SLEEP TIMER SLEEP TIMER 1 2 With the unit on and playing the selected source, press the SLEEP button repeatedly to set the sleep time from 10 minutes to 120 minutes in 10 minute increments. Press the SLEEP button at any time to view the sleeping time left. 3 Press the SLEEP button repeatedly until OFF appears to turn the Sleep option off.
TROUBLESHOOTING GUIDE Check the following before requesting service: SYMPTOM GENERAL No power. Power on, but unit not functioning properly. POSSIBLE CAUSE AC cord unplugged. Condensation has formed. Wrong type of CD inserted. Unit needs to be reset. No picture. The disc is dirty or inserted incorrectly. Some features and functions are not available on all discs. The equipment is not connected properly. The INPUT of the TV is not set to receive the DVD signal output.
SYMPTOM TROUBLESHOOTING GUIDE (CONTINUED) DVD The unit does not start playback. POSSIBLE CAUSE Rating level set to block the DVD. DVD not inserted or inserted upside-down. A non-playback disc is inserted. The disc is not placed in the guide. Some functions do not operate as stated. Selected language is not being shown or spoken in the subtitles. Subtitles are not working properly. Angle cannot be changed. The Rating Level password has been forgotten. The disc is dirty.
CARE AND MAINTENANCE Caring for Discs • Treat the disc carefully. Handle the disc only by its edges. Never allow your fingers to come in contact with the shiny, unprinted side of the disc. • • • • Do not attach adhesive tape, stickers, etc. to the disc label. Clean the disc periodically with a soft, lint-free, dry cloth. Never use detergents or abrasive cleaners to clean the disc. If necessary, use a CD cleaning kit.
SPECIFICATIONS Power Requirements..........................................................................................................AC120V, 60Hz Power Consumption ..............................................200W Max/15W in Standby mode/1W in ECO mode. Weight........................................................................................................................................22.27 Lbs Dimensions ...............................................................................16.
CONTENIDOS Contenidos ......................................................................1 Medidas importantes de seguridad.............................. 2 Precauciones ..................................................................5 Fuente de Alimentación .................................................6 Ubicación de los Controles............................................6 • Frente .........................................................................6 • Parte trasera .........................
MEDIDAS IMPORTANTES DE SEGURIDAD El símbolo de la flecha con forma de rayo adentro de un triángulo está hecho para alertar al usuario de la presencia de cables sin aislar de “voltaje peligroso” en el interior del gabinete, el cual puede ser de magnitud suficiente para constituir un riesgo de descarga eléctrica para las personas. PRECAUCIÓN RIESGO DE DESCARGA ELÉCTRICA. NO ABRIR. PRECAUCIÓN: PARA REDUCIR EL RIESGO DE DESCARGA ELÉCTRICA, NO QUITE LA CUBIERTA (O TAPA POSTERIOR).
MEDIDAS IMPORTANTES DE SEGURIDAD Antes de usar este aparato asegúrese de leer bien todos los puntos de este manual de operaciones. Una vez leído, consérvelo a la mano para usarlo como referencia en el futuro. Tenga especial cuidado al seguir las advertencias indicadas en la unidad, así como las que aparecen en el manual de instrucciones. 1. Lea el instructivo. Usted deberá leer todo el instructivo de seguridad y funcionamiento antes de operar su equipo. 2.
MEDIDAS IMPORTANTES DE SEGURIDAD presencia de cortinas o mobiliario obstruya las aberturas de ventilación. 17.Conexión a tierra de la antena exterior Si se conecta una antena al receptor, asegúrese de que el sistema de antena tenga una conexión a tierra a fin de proveer cierta protección contra sobrecargas de electricidad y acumulación de estática. La Sección 810 del Código Eléctrico Nacional, ANSI/NFPA No.
NOTAS SOBRE EL MANEJO: • • • • • PRECAUCIONES PARA OBTENER UNA IMAGEN CLARA: El reproductor de DVD es un aparato de alta tecnología y precisión. Si los lentes de captación óptica y las piezas de accionamiento del disco están sucios o desgastados, la calidad de la imagen se volverá mala. Para obtener una imagen clara, recomendamos la inspección y el mantenimiento regular (limpieza o reemplazo de piezas) cada 1,000 horas de uso, dependiendo del entorno donde opera la unidad.
GUÍA DE RESOLUCIÓN DE PROBLEMAS Inserte la clavija (de 2 cuchillas) en un contacto eléctrico de 120VCA de 60Hz, ubicado en un lugar conveniente. NOTA: El enchufe de CA incluido con la unidad está polarizado para ayudar a minimizar la posibilidad de una descarga eléctrica. Si el enchufe de CA no entra en el contacto eléctrico no polarizado, no lime ni corte el lado ancho. Es responsabilidad del usuario pedir a un electricista que cambie el contacto eléctrico obsoleto.
UBICACIÓN DE LOS CONTROLES (CONTINUACIÓN) PARTE TRASERA 1 2 3 4 5 1. Cable de Alimentación de CA 2. Terminales de salida del altavoz 3. Controlador izquierdo y derecho de la ENTRADA AUX 4. ENTRADA DE AUDIO POR BASE DOCK 5. SALIDA de HDMI 6 7 8 9 6. Conectores de SALIDA (Y, PB, PR) de video componente 7. Conector de SALIDA DE VIDEO 8. Conector de SALIDA de S-VIDEO 9. Conector de Antena FM Los siguientes elementos no se muestran pero están a la venta. Para comprarlos, consulte la página 47.
UBICACIÓN DE LOS CONTROLES (CONTINUACIÓN) CONTROL REMOTO 1 3 2 22 21 23 4 5 7 9 12 11 14 17 16 19 24 26 25 27 6 28 8 29 10 30 13 32 15 34 18 36 31 CONTROL REMOTO PIEZA NO. 0861-001200-00000* 33 35 *Pieza reemplazable por el consumidor (Vea la página 47 para ordenar) 20 1. 2. 3. 4. 5. 6. 7. 8. 9. 10. 11. 12. 13. 14. 15. 16. 17. 18. 19. 20.
CONTROL REMOTO INSTALACIÓN DE LAS PILAS 1. Quite el compartimiento de la batería presionando la solapa y deslizando el compartimiento hacia afuera. Introduzca una pila CR2025, poniendo atención al diagrama de polaridad en el compartimiento de pila (el lado positivo hacia arriba). 3. Coloque nuevamente el compartimiento. PRECAUCIONES CON LA PILA Siga estas precauciones al usar baterías con este aparato: 1. Advertencia: Existe riesgo de explosión si la pila se reemplaza de modo incorrecto.
CONEXIÓN CONEXIÓN DE LOS ALTAVOCES INCLUIDOS La unidad incluye un altavoz central, dos altavoces frontales, dos altavoces traseros y un parlante auxiliar de graves. Si desea conectar los altavoces a la unidad, siga los pasos mencionados a continuación: 1 2 El altavoz frontal izquierdo tiene cables de color blanco y negro. El altavoz frontal derecho tiene cables de color rojo y negro.
CONEXIÓN CONEXIÓN DEL DVD A UN TELEVISOR USANDO EL CONECTOR DE SALIDA DE VIDEO Entrada de Video Cable de Video (Incluido) Salida de Video CONECTAR LA UNIDAD A UN TELEVISOR USANDO LOS CONECTORES DE SALIDA DE S-VIDEO (SÓLO PARA DVD) Entrada de S-Video Cable S-Video (no incluido) Salida de S-Video NOTAS: • Si la TV tiene una entrada de HDMI, conecte el reproductor de DVD al cable HDMI para mejores resultados.
CONEXIÓN (CONTINUACIÓN) CONEXIÓN DE LA UNIDAD A UN TELEVISOR USANDO LOS CONECTORES Y, Pb/Cb, Pr/Cr Entrada de Video Componente Y PB PR Cable de componente (no incluido) Salida de Video Componente NOTAS PARA LA CONEXIÓN A UN TV: • Si la TV tiene una entrada de HDMI, conecte el reproductor de DVD al cable HDMI para mejores resultados. De lo contrario, use el conector de componente, de S-Video o de SALIDA de video en el reproductor de DVD. • La TV debe tener entradas para Y, PB y PR.
CONEXIÓN (CONTINUACIÓN) CONEXIÓN DEL DVD A UN TELEVISOR USANDO EL CONECTOR DE SALIDA HDMI Entrada de HDMI Cable HDMI (no incluido) Salida de HDMI NOTAS: • Si la TV tiene una entrada de HDMI, conecte el reproductor de DVD al cable HDMI para mejores resultados. De lo contrario, use el conector de componente, de S-Video o de SALIDA de video en el reproductor de DVD. • Ubique el botón o interruptor de TV/VIDEO de la TV en la configuración VIDEO.
CONEXIÓN (CONTINUACIÓN) CONEXIÓN CON UNA UNIDAD EXTERNA UNIDAD EXTERNA Salida AUXILIAR (AUX) Cable de audio (No Incluido) Entrada AUXILIAR (AUX) Puede conectar una unidad externa a ésta para que el audio salga a través de los altavoces de esta unidad. Simplemente, deberá conectar un cable de audio desde la salida de audio izquierda y derecha de la unidad externa a los conectores de SALIDA AUX izquierda y derecha de esta unidad.
ACERCA DE LOS DISCOS El número de región para este reproductor es listado en la parte trasera del jugador. DISCOS REPRODUCIBLES: Los siguientes discos pueden reproducirse en este reproductor: MP3 Cuando se reproduce un disco MP3, el archivo seleccionado aparecerá en el display y enumerará las carpetas y pistas. MP3 es la abreviatura para “MPEG1 Audio Layer 3”. El audio MPEG es un formato que comprime solamente la porción del audio.
ACERCA DE LOS DISCOS (CONTINÚA) Notas sobre los derechos de propiedad literaria: Queda prohibido por ley copiar, transmitir, mostrar, transmitir por cable, reproducir en público y rentar sin premiso los materiales con derechos de propiedad literaria. Los discos DVD están protegidos por esta ley y cualquier grabación que se haga de estos discos se distorsionará.
MENÚ DE CONFIGURACIÓN El menú de configuración permite personalizar el reproductor de DVD ya que podrá seleccionar diversas opciones de idioma, configurar el nivel de control para padres, activar o desactivar el protector de pantalla, ajustar al tipo de pantalla según el televisor que usted posea y otras opciones. A continuación encontrará el menú y luego la página correspondiente que describe la opción seleccionada del menú. 4. 4 3 5 3.
VIDEO TV TYPE PASSWORD SYSTEM SETUP DEFAULT TV SYSTEM SCREEN SAVER HD OUTPUT VIDEO TV TYPE PASSWORD DEFAULT TV TV TYPE TYPE PASSWORD PASSWORD DEFAULT DEFAULT MENÚ DE CONFIGURACIÓN (CONTINÚA) ON OFF MENÚ DE CONFIGURACIÓN DEL SISTEMA: Seleccione Sistema y luego la opción deseada con los botones de Navegación (√,®,π,†) para navegar por los menús y las pantallas. Presione ACEPTAR (ENTER) para confirmar (consulte la página 17 para obtener detalles).
MENÚ DE CONFIGURACIÓN (CONTINÚA) CONTRASEÑA PREDETERMINADO 1 1 SYSTEM SETUP TV SYSTEM SCREEN SAVER HD OUTPUT VIDEO TV TYPE PASSWORD DEFAULT SYSTEM SETUP TV SYSTEM SCREEN SAVER HD OUTPUT VIDEO TV TYPE PASSWORD DEFAULT Para modificar la contraseña oprima el botón de Navegación ®/Búsqueda (Search)l/Sintonización (Tune) + y entrará en la sección para escribir la contraseña.
MENÚ DE CONFIGURACIÓN (CONTINÚA) MENÚ SUBTÍTULO 1 1 Seleccione el idioma en que se verán los subtítulos (ENGLISH, FRENCH, SPANISH, OFF). El DVD debe estar grabado en el idioma seleccionado; de lo contrario, se verá el idioma predeterminado del DVD. Seleccione el idioma en que estará el MENÚ DEL DISCO (ENGLISH, FRENCH, SPANISH). El MENÚ DEL DISCO del DVD debe estar hecho en el idioma seleccionado; de lo contrario, se mostrará el idioma predeterminado del DVD.
SPEAKER SETUP MENÚ DE CONFIGURACIÓN (CONTINÚA) LT/RT STEREO VSS OFF DOWNMIX SUBWOOFER CENTER DELAY REAR DELAY MENÚ DE CONFIGURACIÓN DEL ALTAVOZ (SPEAKER SETUP MENU): SPEAKER SETUP Seleccione Altavoz y luego la opción deseada con los botones de Navegación (√,®,π,†) para navegar por los STEREO SUBWOOFER VSS detalles).
MENÚ DE CONFIGURACIÓN (CONTINÚA) TVG (TV GUARDIAN) TVGuardian® Feature Este producto cuenta con la Tecnología de filtrado de lenguaje obsceno TVGuardian®, que le brinda a su familia la mejor T manera de controlar el lenguaje ofensivo en su hogar. Si está interesado en este servicio, ingrese en www.TVGuardian.com o comuníquese al 866-884-3458 para información adicional (el servicio está sujeto a la tarifa de activación). CÓMO FUNCIONA TVGuardian® (TVG®) filtra el lenguaje inapropiado.
MENÚ DE CONFIGURACIÓN (CONTINÚA) Menú de configuración de TVGuardian® Filtrado de subgrupo de palabras Además de los modos principales de TVG® indicados anteriormente, usted puede activar o desactivar ciertos subgrupos de palabras según sus preferencias. Modos de TVG® Desactivado....................................................No hay filtrado Tolerante........Sólo filtra el lenguaje obsceno más insultante Moderado.........Aumenta el estándar de filtrado de lenguaje Estricto.............
AJUSTE DEL RELOJ MENÚ DE CONFIGURACIÓN (CONTINÚA) 1 2 3 1 2 Oprima y mantenga presionado el botón RELOJ (CLOCK) hasta que aparezca “HORA 24” (“24 HOUR”) u “HORA 12” (“12 HOUR”) en la pantalla. Seleccione HORA 12 u HORA 24 con los botones de Navegaciónπ/Preprogramado (Preset) + 1 o †/Preprogramado (Preset) - 2, luego oprima RELOJ (CLOCK) 3; las horas parpadearán.
FUNCIONAMIENTO BÁSICO IMPORTANTE: Si aparece el mensaje “Tecla no válida” (“Invalid Key”) mientras oprime un botón, esto significa que la función correspondiente no puede realizarse ya sea en el disco introducido o en el modo seleccionado. VOLUMEN MUDO Ajuste el VOLUMEN (VOLUME) con los botones de Arriba/Abajo (Up/Down) según lo desee. Oprima el botón MUDO (MUTE) una vez para quitar el sonido, “MUDO” (“MUTE”) aparecerá en la pantalla de la TV.
FUNCIONAMIENTO BÁSICO (CONTINUACIÓN) MODO DE AHORRO DE ENERGÍA (ECONOMY MODE) FUENTE (SOURCE) Mientras se encuentra en el modo en Espera (Standby), oprima y mantenga presionado modo en Espera/Encendido (Standby/Power) por más de 2 segundos y el sistema ingresará al modo de AHORRO DE ENERGÍA (ECONOMY mode). La pantalla se apagará. Oprima nuevamente para encender la unidad. Nota: Cuando el modo económico se encuentre encendido, la function del temporizador de apagado automático se cancelará.
OPERACIÓN BÁSICA DEL DVD NOTAS IMPORTANTES: • Lurgo de enchufar la unidad, ésta se encontrará en Modo en espera (Standby) (el indicador de Modo en espera -Standby- se iluminará). Oprima modo en Espera/Encendido (Standby/Power) en la unidad principal o en el control remoto para encender la unidad. • “TECLA NO VÁLIDA” (“INVALID KEY”) aparecerá en la pantalla del televisor durante el funcionamiento si intenta acceder a una función no disponible en el disco.
FUNCIONAMIENTO DEL DVD (CONTINUACIÓN) SALTO BÚSQUEDA 1 1 2 3 1 Oprima el botón Salto (Skip) (n) 1 para adelantar el DVD hasta el principio del siguiente capítulo. Durante la reproducción, oprima Navegación ®/Búsqueda l 1 o Navegación √/Búsqueda m 2 para adelantar o retroceder el DVD a una velocidad doble (x2) para ubicar una sección específica. Presione repetidas veces estos botones; la velocidad aumentará x4, x8, x20 y se reanudará la reproducción normal.
FUNCIONAMIENTO DEL DVD (CONTINUACIÓN) BÚSQUEDA POR TÍTULO/CAPÍTULO/HORA Utilice esta función para ir directamente a un título, capítulo y/u hora específicos. 1 3 2 4 1 Oprima el botón IR A/TRACK (GO TO) 1 una vez. Oprima los botones deNavegación (√,®) 2 para seleccionar TÍTULO (TT), luego utilice las teclas numéricas (0-9) 3 para seleccionar el número de título deseado. Luego oprima ENTRAR 4; la reproducción comenzará de inmediato.
FUNCIONAMIENTO DEL DVD (CONTINUACIÓN) MENÚ DE AUDIO (AUDIO MENU) MENÚ DE SUBTÍTULOS Oprima el botón de AUDIO repetidamente para cambiar el idioma del audio. Esta función no está disponible en todos los discos. Oprima MENÚ DE SUBTÍTULOS (SUBTITLE MENU) varias veces para seleccionar un idioma de subtítulo y para apagar o encender el menú de subtítulos. Esta función no está disponible en todos los discos.
FUNCIONAMIENTO DEL DVD (CONTINUACIÓN) REPRODUCCIÓN PROGRAMADA El reproductor de DVD de esta unidad tiene una memoria programable de 16 capítulos que le permite programar hasta 16 capítulos en cualquier disco y reproducirlos en cualquier orden que desee. Puede programar 16 capítulos diferentes o QUE determinados capítulos se reproduzcan más de una vez.
FUNCIONAMIENTO BÁSICO DEL MP3 REPRODUCCIÓN DE UN CD MP3 1 2 3 3 1 2 1 Oprima modo en Espera/Encendido (Standby/Power) 1 para encender la unidad. El indicador de MODO EN ESPERA (STANDBY) se apagará. Si NO hay un cable USB conectado, oprima Modo DVD/USB 2 para seleccionar el modo DVD. Oprima el botón Abrir/Cerrar (Open/Close) para abrir la bandeja del disco, aparecerá “ABRIR” (OPEN) en la pantalla. Colocar un disco con la etiqueta mirando hacia arriba, sobre la bandeja del disco.
FUNCIONAMIENTO BÁSICO DEL MP3 (CONTINUACIÓN) SELECCIONAR CARPETAS/PISTAS (FOLDERS/TRACKS) CON EL BOTÓN DE SALTO (SKIP) (n) O (o). SELECCIONAR CARPETAS/PISTAS (FOLDERS/TRACKS) CON LAS TECLAS NUMÉRICAS 1 2 1 1 Oprima el botón Salto (Skip) n 1 para adelantar el DVD hasta el principio del siguiente archivo. Oprima el botón Salto (Skip) o 2 para llevar el DVD hasta el principio del archivo anterior.
FUNCIONAMIENTO BÁSICO DEL MP3 (CONTINUACIÓN) REPRODUCCIÓN PROGRAMADA El reproductor de DVD de esta unidad tiene una memoria programable de 16 capítulos que le permite programar hasta 16 capítulos en cualquier disco para su reproducción en cualquier orden que se desee. Puede programar 16 capítulos diferentes o también puede programar que determinados capítulos se reproduzcan más de una vez.
REPRODUCCIÓN DE UN CD FUNCIONAMIENTO DEL CD 1 2 2 3 Oprima modo en Espera/Encendido (Standby/Power) 1 para encender la unidad. El indicador de MODO EN ESPERA (STANDBY) se apagará. Si NO hay un cable USB conectado, oprima DVD/USB 2 para seleccionar el modo DVD. 3 2 3 3 Oprima el botón Abrir/Cerrar (Open/Close) para abrir la bandeja del disco, aparecerá “ABRIR” (OPEN) en la pantalla. Colocar un disco con la etiqueta mirando hacia arriba, sobre la bandeja del disco.
FUNCIONAMIENTO BÁSICO (CONTINUACIÓN) BÚSQUEDA HACIA ADELANTE/ATRÁS 1 REPETIR UNA/TODAS 1 1 3 2 1 2 Durante la reproducción, oprima Navegación ®/Búsqueda l 1 o Navegación√/Búsqueda m 2 para adelantar o retroceder el disco a doble velocidad (x2) y así ubicar una sección específica. Presione repetidas veces estos botones; la velocidad aumentará x2, x4, x8, x20 y se reanudará la reproducción normal.
FUNCIONAMIENTO BÁSICO (CONTINUACIÓN) REPRODUCCIÓN PROGRAMADA El reproductor de DVD de esta unidad tiene una memoria programable de 16 capítulos que le permite programar hasta 16 capítulos en cualquier disco para su reproducción en cualquier orden que se desee. Puede programar 16 pistas diferentes o también puede programar que determinadas pistas se reproduzcan más de una vez.
FUNCIONAMIENTO DEL CD DE IMÁGENES 1 2 2 3 3 1 2 1 Oprima modo en Espera/Encendido (Standby/Power) 1 para encender la unidad. El indicador de MODO EN ESPERA (STANDBY) se apagará. Si NO hay un cable USB conectado, oprima DVD/USB 2 para seleccionar el modo DVD. Oprima el botón Abrir/Cerrar (Open/Close) para abrir la bandeja del disco, aparecerá “ABRIR” (OPEN) en la pantalla. Colocar un disco con la etiqueta mirando hacia arriba, sobre la bandeja del disco.
FUNCIONAMIENTO DEL SINTONIZADOR Para escuchar la radio FM 1 2 Oprima modo en Espera/Encendido (Standby/Power) 1 para encender la unidad. El indicador de MODO EN ESPERA (STANDBY) se apagará. Oprima SINTONÍA/BANDA (TUNER/BAND) en el control remoto para seleccionar el modo de Radio.
FUNCIONAMIENTO (CONTINUACIÓN) CONFIGURACIÓN DE MEMORIAS DE ESTACIONES DE FM (HASTA 10) 1 2 Oprima modo en Espera/Encendido (Standby/Power) 1 para encender la unidad. El indicador de MODO EN ESPERA (STANDBY) se apagará. Oprima Modo SINTONIZADOR (TUNER Mode) en el control remoto para seleccionar el modo para sintonizar una estación FM como se describe en la página anterior. 3 4 1 3 2 3 2 1 3 2 1 la Oprima PROGRAMA (PROGRAM) nuevamente para que 2 estación se almacene en la memoria seleccionada.
CONEXIÓN con iPod Debe colocar la base dock universal suministrada con su iPod en la estación de la base dock antes de colocar su iPod en la base. AUDIO DE iPod ÚNICAMENTE AUDIO Y VIDEO DE iPod Si ha conectado un iPod de video, la salida de video está disponible en el conector de salida de video en la parte de atrás de la base dock. Conecte un solo cable de video desde este conector a la entrada de video compuesta (CVBS) de su televisor o monitor para mirar el video.
PARA ESCUCHAR LA RADIO FUNCIONAMIENTO DEL iPod 1 2 Oprima modo en Espera/Encendido (Standby/Power) 1 para encender la unidad. El indicador de MODO EN ESPERA (STANDBY) se apagará. Oprima SINTONÍA/BANDA (TUNER/BAND) en el control remoto para seleccionar el modo de Radio. Ahora puede controlar las funciones del iPod desde esta unidad. 3 4 1 2 1 1 3 3 4 2 3 Para comenzar la reproducción, oprima Reproducir/Pausa (Play/Pause) (®p); se reproducirá la pista seleccionada.
FUNCIONAMIENTO DE USB REPRODUCCIÓN DE LOS ARCHIVOS EN EL DISPOSITIVO USB CONECTADO 1 2 Oprima modo en Espera/Encendido (Standby/Power) para encender la unidad. El indicador de MODO EN ESPERA (STANDBY) se apagará. Conecte una unidad Flash USB u otro dispositivo de almacenamiento USB al conector USB. El dispositivo debe ser de 2GB o menos. 3 4 1 2 4 3 5 2 1 Si el dispositivo USB tiene una mezcla de tipos de archivos, seleccionará primero los archivos MP3 y comenzará la reproducción.
TEMPORIZADOR CONFIGURACIÓN DEL TEMPORIZADOR Esta unidad puede configurarse para que se encienda en SINTONIZADOR o iPod automáticamente en el momento fijado, de la siguiente manera: 1 2 3 1 2 Oprima y mantenga presionado TEMPORIZADOR (TIMER) durante un segundo, en la pantalla destellará “SINTONIZADOR” (TUNER). Seleccione la fuente deseada (SINTONIZADOR o iPod) para que lo despierte con el botón de navegación/Memoria (Preset) π 1 o † 2, luego oprima TEMPORIZADOR (TIMER) 3; las horas titilarán.
TEMPORIZADOR DE APAGADO AUTOMÁTICO TEMPORIZADOR DE APAGADO AUTOMÁTICO 1 2 Con la unidad encendida y reproduciendo la fuente seleccionada, oprima APAGADO AUTOMÁTICO (SLEEP) varias veces para configurar el tiempo para el apagado automático, desde 10 a 120 minutos, aumentando de a 10 minutos. Oprima APAGADO AUTOMÁTICO (SLEEP) en cualquier momento para ver el tiempo restante antes del apagado automático.
GUÍA DE RESOLUCIÓN DE PROBLEMAS (DVD) Lea el siguiente cuadro antes de pedir ayuda al servicio técnico: PROBLEMA: GENERAL No hay energía. La unidad está encendida pero no funciona debidamente. CAUSA POSIBLE Cable eléctrico desconectado. Se formó condensación. Tipo de CD equivocado. SOLUCIÓN POSIBLE Conecte el cable al contacto eléctrico. Desconecte la unidad y espere 1 ó 2 horas para seque el dejar que reproductor.
GUÍA DE RESOLUCIÓN DE PROBLEMAS (DVD) (CONTINÚA) DVD CAUSA POSIBLE PROBLEMA La unidad no inicia la reproducción. Nivel de clasificación configurado para Introduzca su contraseña o cambie el nivel El DVD no está colocado, o está colocado al revés. Coloque el DVD correctamente. bloquear el DVD. Ha colocado un disco que no reproduce. El disco no se encuentra en la guía. Algunas funciones no funcionan como deberían. El idioma seleccionado no aparece en los subtítulos, o no se oye.
CUIDADO Y MANTENIMIENTO Cuidado de los discos • Trate el disco con cuidado. Maneje el disco sólo por sus orillas. Nunca permita que sus dedos toquen el lado brilloso y sin impresión del disco. • No pegue cinta adhesiva, calcomanías u otra cosa en la etiqueta del disco. • Limpie el disco periódicamente con un trapo suave, seco y sin pelusa. Nunca use detergentes ni limpiadores abrasivos para limpiar el disco. Si es necesario, use un juego de limpieza para CD.
ESPECIFICACIONES Requisitos de energía........................................................................................................120VCA, 60Hz Consumo de energía ...............200 vatios máximo/15 vatios en modo en espera/1 vatio en modo ECO Peso ........................................................................................................................................22.27 libras Dimensiones .........................................................16.73 (ancho) x 16.
Job # MiHTS5005 manual cover Colors: 1-color print FO LD Pantone 533c User Guide Guía del usario DVD home theater system for iPod® Sistema de cine en casa DVD para iPod www.memorexelectronics.com Imation Electronics Products, A Division of Imation Enterprises Corp. Weston, FL MiHT5005 Printed in China / Imprimé dans Chine / Impreso en China Memorex, the Memorex logo, and "Is it live or is it Memorex?" are trademarks of the affiliates of Memorex Products, Inc.