K09-00450-01
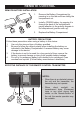
SAFETY PRECAUTIONS CAUTION RISK OF ELECTRIC SHOCK DO NOT OPEN CAUTION: TO REDUCE THE RISK OF ELECTRIC SHOCK, DO NOT REMOVE COVER (OR BACK). NO USERSERVICEABLE PARTS INSIDE. REFER SERVICING TO QUALIFIED SERVICE PERSONNEL.
SAFETY PRECAUTIONS INFORMATION: This equipment complies with Class B digital device regulations. This equipment generates, uses and can radiate radio frequency energy and, if not installed and used in accordance with the instructions, may cause harmful interference to radio communications. However, there is no guarantee that interference will not occur in a particular installation.
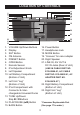
LOCATION OF CONTROLS 13 14 15 16 17 18 1 2 3 4 5 6 7 19 8 9 20 21 10 11 12 1. 2. 3. 4. 5. 6. 7. 8. 9. 10. 11. 12. 13. 14. 15. 22 23 VOLUME Up/Down Buttons Display SET Button FM Antenna PRESET Button OPEN Button Remote Sensor iPod Adjustment Knob Left Speaker Left Battery Compartment (Bottom of Unit) Left Unit “Leg” (Bottom of Unit) iPod Compartment with Connector & Interchangeable Universal Docks TUNE Up/Down/ Skip n / o Buttons PLAY/PAUSE (®p) Button BASS Button 16. 17. 18. 19. 20. 21.
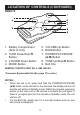
LOCATION OF CONTROLS (CONTINUED) REMOTE 1. Battery Compartment (Side of Unit) 2. TUNE Down/Skip o Button 3. VOLUME Down Button 4. MODE Button 5. VOLUME Up Button 6. BASS Button 7. POWER/PLAY/PAUSE (®p) Button 8. TUNE Up/Skip n Button 9. Belt Clip REMOTE CONTROL PART NO. A -0MI 3000-02* *Consumer Replaceable Part (See page 17 to order.
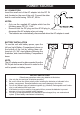
REMOTE CONTROL REMOTE BATTERY INSTALLATION 1. 2. 3. Remove the Battery Compartment by pressing in on the tab and then sliding the compartment out. Install a CR2025 battery, by popping it in through the back of the compartment, paying attention to the polarity diagram in the compartment (positive side up). Replace the Battery Compartment. BATTERY PRECAUTIONS Follow these precautions when using a battery in this device: 1. Use only the size and type of battery specified. 2.
POWER SOURCE AC CONNECTION Insert the small end of the AC adapter into the DC IN jack (located on the rear of the unit). Connect the other end to a wall outlet having 120V AC, 60 Hz. NOTES: • Only use the supplied AC adapter which has the following specs: DC 9V Z • Remove both the DC plug and the AC-IN plug to disconnect the AC adapter when not using. • The batteries are automatically disconnected when the AC adapter is used.
OPTIONAL CONNECTIONS A/V (Audio/Video) OUT JACK (REAR OF UNIT) If you are using an iPod with video (5th generation) or iPod photo, you can connect this unit to an external TV with the included audio/video cable. You will then be able to view the photos (in Slideshow mode)/videos, and hear the audio, from the iPod on your external TV. NOTES: • Set the TV’s TV/VIDEO button or switch to the VIDEO setting. • When connecting this unit, refer to the owner’s manual of the TV, as well as this manual.
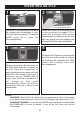
INSERTING AN iPod 1 2 2 1 make sure two tabs are facing front and slip dock into place Locate the correct iPod universal dock to use as shown on pages 13-14. Insert the universal dock into the compartment by making sure the two tabs are facing front and slipping the universal dock into place (as shown). Rotate the iPod Adjustment Knob 1 to the number that corresponds to your iPod (see chart on page 15). Press the OPEN button 2 to open the iPod compartment.
OPERATION USING AN iPod WITH THIS UNIT 1 2 Operate the iPod as per its owner’s manual and the sound will be1 heard through this unit’s speakers, or you can use this unit’s controls to play, pause, skip or search on the iPod (see Steps 3 and 4 below). With an iPod connected (see previous page), turn this unit on by pressing the Power button (if it is not on already); "iPod" will appear in the display. NOTE: If the unit is in a mode other than iPod mode, press the MODE button to select iPod mode.
OPERATION (CONTINUED) ADJUSTING THE VOLUME CONTROLS 1 2 To adjust the main volume: Press the VOLUME Up and/or Down button to increase and/or decrease the volume. To adjust the bass: Press the BASS button to enhance the bass; “bass” will appear briefly in the display. Press again to resume normal bass.
OPERATION (CONTINUED) USING THE RADIO 1 2 Turn this unit on by pressing the Power button. 3 2 1 Repeatedly press the Tune Up/Skip n 1 or Down/Skip o 2 button to manually advance the frequency in the display up or down until the desired frequency appears. For auto tuning, press and hold the Tune Up/Skip n 1 or Down/Skip o 2 button until the frequency in the display starts to scan and then release; the tuner will search and then stop on the next strong station it finds.
OPERATION (CONTINUED) SETTING THE RADIO PRESETS (20 for FM) 1 2 Follow Steps 1-3 on the previous page to tune a station. Press the SET button; “MEMO” will appear and “1” (if no presets have ever been set), will blink in the display. 2 1 1 Press the TUNE Up/Down/Skip n / o buttons 1 to select a desired Preset (1-20). Press the SET button 2 again to confirm, the station will be saved into memory. Repeat to program up to 20 Presets, as desired.
OPERATION (CONTINUED) iPod Universal Dock Locate your iPod in the chart on the next two pages and select the respective universal dock to match with your iPod. Insert the corresponding universal dock and your iPod into the unit as described on page 8. iPod Type Memory Univ. Dock No. Fourth Generation iPod 20GB/ U2 Special Edition 20GB No. 4 20GB, 30GB, U2 Special Edition No. 6 4 to 6GB iPod mini 40GB iPod Photo/ iPod with color display 40 to 60GB No. 3 No. 5 No.
iPod OPERATION (CONTINUED) Type First Generation iPod nano Fifth Generation iPod (w/video) Second Generation iPod nano Memory 1 to 4GB Univ. Dock No. No. 8 (Part No. P0500536-01*) 30GB No. 9 60GB/ 80GB No. 10 2 to 8GB No. 11 (Part No. P0500537-01*) (Part No. P0500538-01*) (Part No. P0500539-01*) *Consumer Replaceable Part (See page 17 to order.) NOTE: The 4 holders (No. 8–No. 11) provided with this unit are Universal Docks. IMPORTANT! The universal dock no.
OPERATION (CONTINUED) iPod ADJUSTMENT KNOB Before inserting your iPod into this unit (see page 8 for detailed instructions), you must first rotate the point of the iPod Adjustment Knob (Part No. P09-00126-01*) to the number that corresponds to your iPod (see below). 3 . . . . . . . . . . . . . . . . . . . . . . . . . . . . . . . . . . . . . . . . . . iPod mini (4-6GB) 4 . . . . . . . . . . . . . . . . . . . . . . . . . . . . . . . . . . 4th Generation iPod (20GB) 5 . . . . . . . . . . . . . . . . . . . .
TROUBLESHOOTING GUIDE If you experience a problem with this unit, check the chart below before calling for service. SYMPTOM CAUSE FM, no sound. Power is not on. No sound. SOLUTION Volume is set to minimum. set to minimum. Station is not tuned iPod mode, not charging battery. then the MODE button to Increase volume. Retune the FM properly. broadcast station. FM: Telescopic Reorient FM telescopic antenna is not antenna. Incorrectly connected. Check the connection. properly adjusted.
SPECIFICATIONS GENERAL: Power Source .............DC 9V (6 x 1.5V ‘AA’ size batteries) ...............................Alkaline is recommended for longer life .....................................DC IN 9V Adapter (Center Positive) Speaker...............................................................4 x 4 ohms Output Power ..................................2 x 4W (using adapter) RADIO SECTION: Frequency Range (FM) ................................87.
MEDIDAS DE SEGURIDAD CUIDADO RIESGO DE DESCARGA ELÉCTRICA. NO ABRIR ADVERTENCIA: Para reducir el riesgo de descargas eléctricas no abra la cubierta o tapa posterior. Allí no hay partes que el usuario pueda reparar. Lleve su unidad a un Centro de Servicio Autorizado.
MEDIDAS DE SEGURIDAD INFORMACIÓN: Este equipo cumple con los reglamentos de un aparato digital de Clase B. Este equipo genera, usa y puede irradiar energía de radiofrecuencia y, si no se instala y usa conforme a las instrucciones, puede generar interferencia dañina con las radiocomunicaciones. Sin embargo, no hay garantía de que no habrá interferencia en una instalación particular.
UBICACIÓN DE LOS CONTROLES 13 14 15 16 17 18 1 2 3 4 5 6 7 19 8 9 20 21 22 23 10 11 12 1. Botones de Subir/Bajar VOLUMEN 2. Display 3. Botón de AJUSTE 4. Antena FM 5. Botón de PREDEFINIR 6. Botón de ABRIR 7. Sensor del remoto 8. Perilla de ajuste del iPod 9. Bocina izquierda 10. Compartimiento de batería izquierdo (parte inferior de la unidad) 11. “Pata” izquierda de la unidad (parte inferior de la unidad) 12. Compartimiento de iPod con conector y puertos universales intercambiables 13.
UBICACIÓN DE LOS CONTROLES (CONTINÚA) CONTROL REMOTO 1. Compartimiento de baterías (costado de unidad) 2. Botón de Sintonizar Abajo/ Brincar o 3. Botón de Bajar volumen 4. Botón de Modo 5. Botón de Subir volumen 6. Botón de GRAVES 7. Botón de Encendido/ Reproducir/Pausa (®p) 8. Botón de Sintonizar Arriba/ Brincar n 9. Clip para cinturón CONTROL REMOTO, NO. DE PIEZA: A-0MI3000-02* *Pieza reemplazable por el consumidor (Ver página 17 para realizar un pedido.
CONTROL REMOTO INSTALACIÓN DE LAS BATERÍAS EN EL CONTROL REMOTO 1. 2. 3. Quite la puerta del compartimiento ejerciendo presión en la pestaña y deslizándola. Instale una batería CR2025, metiéndola por la parte posterior del compartimiento, prestando atención al diagrama de polaridad en el compartimiento (lado positivo hacia arriba). Coloque nuevamente el compartimiento de baterías. CUIDADO DE LAS BATERÍAS Cuando use baterías, tome las siguientes precauciones: 1.
FUENTE DE ENERGÍA CONEXIÓN A CORRIENTE ELÉCTRICA Inserte el extremo pequeño del cable para adaptador de corriente alterna en el enchufe de entrada de DC (ubicado en la parte posterior de la unidad). Conecte el otro extremo en el contacto eléctrico de 120VCA, 60 Hz.
CONEXIONES OPCIONALES Conector de salida de A/V (Audio/Video) (ATRÁS EN LA UNIDAD) Si está usando un iPod con video (5a generación) o un iPod photo, puede conectar esta unidad a un televisor externo con el cable de audio/video incluido. Entonces podrá ver las fotos (en modo de Presentación) y los videos, y escuchar el audio, del iPod en su televisor externo. NOTAS: • Ponga el botón o interruptor de TV/VIDEO del televisor en VIDEO.
1 CÓMO INSERTAR UN iPod 2 2 1 Gire la Perilla de ajuste del iPod número que corresponde con su (vea la tabla en la página Presione el botón de ABRIR 2 abrir el compartimiento del iPod. Asegúrese de que las dos pestañas miren hacia adelante y deslice el puerto a su lugar 1 al iPod 15). para Ubique el puerto universal correcto para el iPod a ser usado como se muestra en las páginas 13 y 14.
OPERACIÓN CÓMO USAR UN iPod CON ESTA UNIDAD 1 2 Opere el iPod como indica el manual del propietario y escuchará el sonido a través 1 de las bocinas de esta unidad, o puede usar los controles de esta unidad para reproducir, pausar, brincar o buscar en el iPod (vea los pasos 3 y 4 a continuación). Con el iPod conectado (ver página previa), encienda la unidad presionando el botón de encendido (si no lo ha hecho); “iPod” aparecerá en el display.
OPERACIÓN (CONTINÚA) CÓMO AJUSTAR LOS CONTROLES DE VOLUMEN 1 2 Para ajustar el volumen principal: Presione el botón de Subir/Bajar VOLUMEN para subir o bajar el volumen. Para ajustar los bajos: Presione el botón de GRAVES para mejorar el sonido de los graves; "bass" [graves] aparecerá brevemente en el display. Presiónelo de nuevo para reanudar los graves normales.
OPERACIÓN (CONTINÚA) CÓMO USAR LA RADIO 1 2 Encienda esta unidad presionando el botón de Encendido. 3 2 1 Presione repetidamente el botón de Sintonizar Arriba/Brincar n 1 o Abajo/ Brincar o 2 para avanzar manualmente la frecuencia en el display hacia arriba o abajo, hasta que aparezca la frecuencia deseada.
OPERACIÓN (CONTINÚA) CONFIGURAR PREDEFINIDOS DE LA RADIO (20 para FM) 1 2 Siga los pasos 1 a 3 en la página anterior para sintonizar una estación. Presione el botón de AJUSTE; “MEMO” aparecerá y “1” (si nunca ha configurado los predefinidos) parpadeará en el display. 2 1 1 Presione los botones de SINTONIZAR Arriba/Abajo/Brincar n / o 1 para seleccionar el Predefinido deseado (1-20). Presione nuevamente el botón de AJUSTE 2 para confirmar; la estación quedará guardada en la memoria.
OPERACIÓN (CONTINÚA) PUERTOS UNIVERSALES DE iPod Ubique su iPod en la tabla en las siguientes dos páginas y seleccione el puerto universal respectivo que corresponde con su iPod. Inserte el puerto universal correspondiente así como su iPod en la unidad como se describe en la página 8. iPod Tipo Memoria N° puerto univ. 4a 6GB No. 3 Fourth Generation iPod 20GB/ U2 Special Edition 20GB No. 4 20GB, 30 GB, U2 Special Edition No.
iPod OPERACIÓN (CONTINÚA) Tipo First Generation iPod nano Fifth Generation iPod (c/video) Second Generation iPod nano Memoria N° puerto univ. 1a 4GB No. 8 30GB No. 9 60GB / 80GB No. 10 2a 8GB No. 11 (No. de pieza P0500536-01*) (No. de pieza P0500537-01*) (No. de pieza P0500538-01*) (No. de pieza P0500539-01*) *Pieza reemplazable por el consumidor (Ver página 17 para realizar un pedido.) NOTA: Los 4 portadores (no. 8 a no. 11) suministrados con esta unidad son puertos universales.
OPERACIÓN (CONTINÚA) Perilla de ajuste del iPod Antes de insertar su iPod en esta unidad (vea la página 8 en cuanto a instrucciones detalladas), primero debe girar la punta de la Perilla de ajuste del iPod (No. de pieza P09-00126-01*) al número que corresponde con su iPod (vea a continuación). 3 . . . . . . . . . . . . . . . . . . . . . . . . . . . . . . . . . . . . . . . . . . iPod mini (4-6GB) 4 . . . . . . . . . . . . . . . . . . . . . . . . . . . . . . . . . . 4th Generation iPod (20GB) 5 . . . . . .
GUÍA DE DIAGNÓSTICO Si tiene problemas con esta unidad, revise la tabla a continuación antes de llamar a servicio. SÍNTOMA CAUSA FM, sin sonido. Energía apagada. Sin sonido. El volumen está al mínimo. luego el botón de MODO El volumen está al Sonido deficiente en FM. mínimo. Estación no sintonizada Modo de iPod: no carga la batería. Presione el botón de Encendido, para seleccionar Sintonizador. Suba el volumen. Resintonice la estación de FM.
ESPECIFICACIONES GENERAL: Fuente de energía ....9V CD (6 baterías 1.5V tamaño “AA”) ............Se recomiendan las alcalinas por su larga duración ...................Enchufe de entrada de 9V CD (centro positivo) Bocina. .............................................................4 x 4 ohmios Potencia de salida ...............2 x 4W (usando el adaptador) SECCIÓN DE RADIO: Rango de frecuencia (FM) ...........................87.5–108 MHz Las especificaciones están sujetas a cambios sin previo aviso.
K09-00450-01