MC1009 User’s Guide Splash-Resistant AM/FM radio with Compact Disc Player Before operating this product, please read these instructions completely.
SAFETY PRECAUTIONS Thank you for purchasing the Memorex audio system. The serial number of your unit can be found on a label on the rear of the cabinet. We suggest that you record the serial number in the space provided below in case this information is ever needed at a future date. PLEASE KEEP ALL PACKAGING MATERIAL FOR AT LEAST 90 DAYS IN CASE YOU NEED TO RETURN THIS PRODUCT TO YOUR PLACE OF PURCHASE OR MEMOREX.
SAFETY PRECAUTIONS (CONTINUED) FCC WARNING: This equipment may generate or use radio frequency energy. Changes or modifications to this equipment may cause harmful interference unless the modifications are expressly approved in the instruction manual. The user could lose the authority to operate this equipment if an unauthorized change or modification is made. LASER SAFETY: This unit employs a laser. Only qualified service personnel should attempt to service this device due to possible eye injury.
SAFETY PRECAUTIONS (CONTINUED) • • • • • Do not open the CD compartment while the CD is rotating. Always keep the CD compartment closed when not in use. Keep all foreign objects out of the CD compartment. Place the unit on a stable surface. Avoid installing the unit in locations described below: • Places exposed to direct sunlight or close to heat radiating appliances such as electric heaters. • On top of other stereo equipment that radiates too much heat. • Placed lacking ventilation or dusty places.
Dear Customer: Selecting fine audio equipment such as the unit you’ve just purchased is only the start of your musical enjoyment. Now it’s time to consider how you can maximize the fun and excitement your equipment offers. This manufacturer and the Electronic Industries Association’s Consumer Electronics Group want you to get the most out of your equipment by playing it at a safe level.
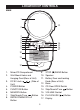
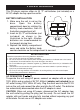
LOCATION OF CONTROLS MAIN 1 13 2 3 4 5 6 7 8 9 14 15 16 17 10 11 12 1. 2. Mirror/CD Compartment Wall Mount Holes and Hanging Cord (Rear of Unit) 3. + (Side of DC 9V Jack – Unit) POWER Button FUNCTION Button MEMORY Button Skip/Search/Tune Button REPEAT/MEMORY UP Button 4. 5. 6. 7. 8. 9. STOP (■)/BAND Button 10. Speaker 11. Battery Door and Locking Knob (Rear of Unit) 12. Base 13. CD Door OPEN Switch 14. Skip/Search/Tune Button 15. VOLUME Control 16. PLAY/PAUSE ( 17.
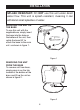
INSTALLATION SPLASH RESISTANT: DO NOT use this unit under direct water flow. This unit is splash resistant, meaning it can withstand small splashes of water. MOUNTING THE UNIT ON THE BASE To use this unit with the supplied base, simply insert the base into the hole on the bottom of the unit, then rotate the base 90° to attach the base to the main unit as shown in figure 1.
INSTALLATION (CONTINUED) INSTALLING ON A WALL 1 2 Put the Wall Adapter with suction cups on the wall. Pull the suction cup lever down and it will stick to the wall. 3 4 Connect the main unit to the Wall Adapter by inserting the holes on the base unit into the hooks on the Wall Adapter. USING THE HANGING CORD Use the Hanging Cord to hang the unit on an already installed hook, nail, etc. When using the Hanging cord, also use the Wall Adapter for extra support.
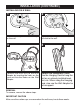
POWER SOURCES This CD player requires either six (6) “C” cell batteries (not included) or a 9V AC adapter having a positive center. BATTERY INSTALLATION 1. Make sure the unit is not on the – + base. Open the battery compartment door by rotating the + – Battery knob clockwise, then lift – + the battery compartment off. 2. Insert six (6) “C” cell batteries (not included) as shown in the illustration to the right. Alkaline batteries are recommended for the longest playing time. 3.
OPERATION FOGLESS MIRROR Before using, remove the thin film over the fogless mirror and discard. CLEANING THE MIRROR If the mirror, which is made of polycarbonate (plastic), becomes dirty or smudged with fingerprints, it may be cleaned with a wet soft cloth. Never use abrasive cloths or polishes as these will mar the finish of the mirror. TO PLAY THE RADIO 1 2 1 2 Press the POWER button ❶ to turn the unit on. Press the Function button ❷ to select Radio.
OPERATION (CONTINUED) SETTING/RECALLING RADIO PRESETS (UP TO 10 PRESETS EACH BAND) 1 2 1 2 Press the POWER button ❶ to turn the unit on. Press the Function button ❷ to select Radio. Press the STOP (■)/BAND button to select the AM or FM band. Tune a station as described on the previous page. 3 3 1 2 Press the MEMORY button ❶ once; “P1” will appear in the display. Press the REPEAT/MEMORY UP button ❷ repeatedly until the desired memory number appears on the display.
OPERATION (CONTINUED) TO PLAY A CD 1 2 1 2 Insert a CD as described on the previous page and press the PLAY/PAUSE ( ) button to start playback. TO PAUSE PLAYBACK, press the PLAY/PAUSE ( ) button again; the Play indicator will blink in the display. Press the PLAY/PAUSE ( ) button again to resume playback. Press the POWER button ❶ to turn the unit on. Press the Function button ❷ to select Radio. 3 4 2 3 1 Adjust the VOLUME control ❶ as desired.
OPERATION (CONTINUED) TO REPEATEDLY PLAY BACK ONE TRACK 2 1 2 3 1 2 4 Turn the unit on and press the Function button ❶ to select CD. Press the REPEAT/MEMORY UP button ❷ once; “REPEAT” will blink in the display. Select a track using the Skip/Search/Tune ❸ or ❹ buttons. 1 3 Press the PLAY/PAUSE ( ) button ❶. The unit will then play the same track over and over until the STOP (■)/BAND button ❷ is pressed. Adjust the VOLUME control ❸ as desired.
OPERATION (CONTINUED) TO PROGRAM THE MEMORY (UP TO 20 TRACKS) 1 1 2 2 2 1 3 Press the POWER button ❶ to turn the unit on. Press the Function button ❷ to select CD. Press the MEMORY button ❶, “MEMORY” and “00” will blink in the display. Press the Skip/Search/Tune ❷ or ❸ button repeatedly to select the first MEMORY button ❶ to memorize the track. 3 4 1 2 2 3 Press the Skip/Search/Tune ❶ or ❷ button repeatedly to select the second desired track to program.
OPERATION (CONTINUED) TO SET OR RESET THE ACTUAL TIME 1 3 2 1 3 With the power off, press the MEMORY button ❶; “12H” will blink in the display. Repeatedly press the Skip/Search/Tune ❷ or ❸ button to select 12H (12 hour) or 24H (24 hour) mode, then press the MEMORY button ❶ to confirm; the hours will blink in the display.
TROUBLESHOOTING GUIDE If you experience a problem with this unit, check the chart below before calling for service. SYMPTOM Unit will not turn on. Disc will not play. Erratic CD playback. No sound. Noise or sound distorted on radio. CAUSE Weak or dead batteries. Wrong adapter being used AC adapter not connected. CD compartment not closed. Disc inserted incorrectly. Dirty or defective disc. Moisture condensation on disc. Dirty or defective disc. Headphone plug inserted into headphone jack.
CARE AND MAINTENANCE Caring for Compact Discs • Treat the compact disc carefully. Handle the compact compact disc only by its edges. Never allow your fingers to come in contact with the shiny, unprinted side of the compact compact disc. • Do not attach adhesive tape, stickers, etc. to the compact disc label. • Clean the compact disc periodically with a soft, lint-free, dry cloth. Never use detergents or abrasive cleaners to clean the compact disc. If necessary, use a CD cleaning kit.
SPECIFICATIONS Frequency Range (FM) .......................................................87.5–108MHz Frequency Range (AM) .......................................................530–1720kHz Disc Diameter ....................................................................4.72” (120mm) ............................................................................3.15” (80mm) Single CD Optical Source .........................................................Semiconductor Laser D/A Conversion ...................
Memcorp, Inc. Weston, FL Printed in Hong Kong Visit our website at www.memorexelectronics.