MCD4300BT.2002.O/M.QXD 4/19/02 9:57 AM Page 37 AZURE BLUETOOTH CAPABLE MULTI-HANDSET SYSTEM MODEL: MCD4300BT BEFORE OPERATING THIS PRODUCT, PLEASE READ THESE INSTRUCTIONS COMPLETELY.
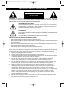
MCD4300BT.2002.O/M.QXD 4/19/02 9:57 AM Page 1 IMPORTANT SAFETY PRECAUTIONS CAUTION RISK OF ELECTRIC SHOCK DO NOT OPEN CAUTION: TO REDUCE THE RISK OF ELECTRIC SHOCK, DO NOT REMOVE COVER (OR BACK). NO USER-SERVICEABLE PARTS INSIDE. REFER SERVICING TO QUALIFIED SERVICE PERSONNEL. DANGEROUS VOLTAGE Uninsulated Dangerous Voltage, that may be of sufficient magnitude to constitute a risk of electric shock to persons is present within this product’s enclosure.
MCD4300BT.2002.O/M.QXD 4/19/02 9:57 AM Page 2 IMPORTANT SAFETY PRECAUTIONS (CONTINUED) 8. 9. 10. 11. 12. 13. Do not overload wall outlets and extension cords as this can result in the risk of fire or electric shock. Never push objects of any kind into this product through openings as they may touch dangerous voltage points or short out parts that could result in fire or electric shock. Never spill or spray any type of liquid on the product.
MCD4300BT.2002.O/M.QXD 4/19/02 9:57 AM Page 3 IMPORTANT SAFETY PRECAUTIONS (CONTINUED) 8. Do not store this product, or the battery provided with or identified for use with this product, in a high-temperature area. Batteries that are stored in a freezer or refrigerator for the purpose of extending shelf life should be stabilized at room temperature prior to use after cold storage. 9. Disconnect telephone lines before installing batteries.
MCD4300BT.2002.O/M.QXD 4/19/02 9:57 AM Page 4 CONTENTS Important Safety Instructions ..........1 Entering a Name Using the Key Buttons ...........................................20 Character Map Chart......................20 Dialing a Number From the Directory.........................................21 Editing a Directory Entry ................22 Deleting a Single Entry From the Directory...................................22 Contents.............................................4 Location of Controls .
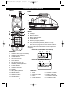
MCD4300BT.2002.O/M.QXD 4/19/02 9:57 AM Page 5 LOCATION OF CONTROLS FRONT BASE 9 1 2 15 16 17 18 19 3 4 5 10 20 11 BASE: 15. Charger 16. Base Antenna 17. Base LED Indicator 18. PAGE Button 19. PROG (Program) Button 20. T/P (Tone/Pulse) Switch (bottom of unit) * See the next page for the T/P switch location. 12 6 7 8 13 14 All logo marks are trademarks of their respective company. DISPLAY (CHECKING CALLER ID) HANDSET: 1. Headset Jack (top of handset) 2. Handset LED Indicator 3.
MCD4300BT.2002.O/M.QXD 4/19/02 9:57 AM Page 6 INSTALLATION INSTRUCTIONS 1. Carefully unpack and remove your unit from the box. 2. Make sure all the items have been included: • • • • • Base Unit Handset Unit Rechargeable Ni-MH battery pack AC Adapter Two Telephone Cords (Long and • • • Short) Wall Mount Adapter Belt Clip Software CD 3. Make sure the Rechargeable Battery is installed or install the Rechargeable Battery as described on the next page.
MCD4300BT.2002.O/M.QXD 4/19/02 9:57 AM Page 7 INSTALLATION INSTRUCTIONS (CONTINUED) Installation of the Rechargeable Battery 1 2 Remove the battery cover located on the rear of the handset by sliding it downward. If replacing an old battery pack, unplug the battery connector and remove it by carefully using a small flat head screwdriver to pry it out from the battery compartment.
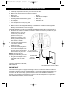
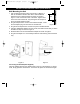
MCD4300BT.2002.O/M.QXD 4/19/02 9:57 AM Page 8 INSTALLATION INSTRUCTIONS (CONTINUED) Wall Mounting the Unit 1. Use an existing wall mount, like ones found in a kitchen or drill one as follows: Drill two holes with a vertical distance 83mm between the two marked positions of 83mm as shown in Figure 1. Drive a screw into each of the holes. Tighten them to the end of the screw lines, only leaving the smooth part of the screw head outside the wall. 2. Plug the telephone line cord into the modular wall jack.
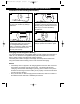
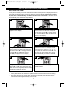
MCD4300BT.2002.O/M.QXD 4/19/02 9:57 AM Page 9 SET-UP INSTRUCTIONS (CONTINUED) SETTING THE TIME It may be necessary to set the internal clock time of the phone to display the time in the Caller ID display when incoming calls are received. If you subscribe to Caller ID, the time is automatically set when the first call is received. If the time is not automatically set, follow the steps below: 1 2 12/14 10:25AM 17 17 1.MEMORY 2.SET UP 3.RINGER 4.VOLUME 12/14 10:25AM 17 17 1.MEMORY 2.SET UP 3.
MCD4300BT.2002.O/M.QXD 4/19/02 9:57 AM Page 10 SET-UP INSTRUCTIONS (CONTINUED) SETTING THE AREA CODES To conveniently call back a number from the caller ID, it is necessary to store your local area code when your telephone is installed, as follows: 1 2 12/14 10:25AM 17 17 1.MEMORY 2.SET UP 3.RINGER 4.VOLUME 2 3 1 12/14 10:25AM 17 17 1.AREA CODE 2.EXTENSION 3.CONTRAST 4.TIME 5.ALARM 1 2 Press the MENU button❶; the Menu will appear in the display.
MCD4300BT.2002.O/M.QXD 4/19/02 9:57 AM Page 11 SET-UP INSTRUCTIONS (CONTINUED) CHANGING THE HANDSET’S VOLUME Change the handset’s volume as follows: 1 2 12/14 10:25AM 17 17 1.MEMORY 2.SET UP 3.RINGER 4.VOLUME 12/14 10:25AM 17 17 1.MEMORY 2.SET UP 3.RINGER 4.VOLUME 1 2 Press the MENU button; the Menu will appear in the display. Using the CID JOG control ❶, scroll down to select “4. VOLUME” and press the CID JOG control ❶, or simply press the “4” button ❷. 3 4 12/14 10:25AM 17 17 1.
MCD4300BT.2002.O/M.QXD 4/19/02 9:57 AM Page 12 SET-UP INSTRUCTIONS (CONTINUED) CHANGING THE RINGER VOLUME Change the handset’s ringer volume as follows: 1 2 12/14 10:25AM 17 17 1.MEMORY 2.SET UP 3.RINGER 4.VOLUME 12/14 10:25AM 17 17 1.MEMORY 2.SET UP 3.RINGER 4.VOLUME 1 2 Press the MENU button; the Menu will appear in the display. Using the CID JOG control ❶, scroll down to select “4. VOLUME” and press the CID JOG control ❶, or simply press the “4” button ❷. 3 4 12/14 10:25AM 17 17 1.
MCD4300BT.2002.O/M.QXD 4/19/02 9:57 AM Page 13 SET-UP INSTRUCTIONS (CONTINUED) CHANGING THE RINGER MELODY Change the ringer melody to choose from two tones or three songs as follows: 1 2 12/14 10:25AM 17 17 1.MEMORY 2.SET UP 3.RINGER 4.VOLUME 12/14 10:25AM 17 17 1.MEMORY 2.SET UP 3.RINGER 4.VOLUME 1 2 Press the MENU button; the Menu will appear in the display. Using the CID JOG control ❶, scroll down to select “3. RINGER” and press the CID JOG control ❶, or simply press the “3” button ❷.
MCD4300BT.2002.O/M.QXD 4/19/02 9:57 AM Page 14 BASIC OPERATION PLACING A CALL 1 2 1 2 After the battery has been fully charged, press the Key buttons (0-9) ❶ for the phone number you wish to call. NOTE: Press the REDIAL button ❷ to insert a pause. A pause is a two second interval between numbers. Press the TALK button to dial the number you entered. You can also press the TALK button first and then dial the number. The display will show the amount of time you have been on the phone.
MCD4300BT.2002.O/M.QXD 4/19/02 9:57 AM Page 15 BASIC OPERATION (CONTINUED) RECEIVING A CALL The last 30 incoming calls are saved in the Caller ID log. 1 2 12/14 10:25AM 17 JOHN SMITH 8001234567 Make sure that the Caller ID service is turned on by your phone company. When you receive a call, the display will show the name of the caller, number, time and date of the call. To answer the call, press the TALK button. The display will show the amount of time you have been on the phone.
MCD4300BT.2002.O/M.QXD 4/19/02 9:57 AM Page 16 BASIC OPERATION (CONTINUED) USING THE BASE PAGE BUTTON USING THE FLASH BUTTON 1 1 Press the PAGE button on the base to locate all handsets when not in use; all handsets will ring. Press again to end the paging feature. Press any button on the handset to end paging. If none of the handsets pick up in two minutes, the paging will stop. Press the FLASH button to momentarily hang up.
MCD4300BT.2002.O/M.QXD 4/19/02 9:57 AM Page 17 BASIC OPERATION (CONTINUED) CHECKING THE CALLER ID LOG DELETING NAME(S)/NUMBER(S) FROM THE CALLER ID LOG 1 1 12/14 10:25AM 17 JOHN SMITH 800-123-4567 12/14 10:25AM 17 JOHN SMITH 800-123-4567 1.CAL 2.SAV 2 3.DEL 1 Using the CID JOG control, scroll to see the Caller ID log. Scroll up for newer calls, down for older calls. Using the CID JOG control ❶, scroll to the desired number to delete. Press the CID JOG control ❶ again.
MCD4300BT.2002.O/M.QXD 4/19/02 9:57 AM Page 18 BASIC OPERATION (CONTINUED) AUTOMATICALLY DIALING A NUMBER IN THE CALLER ID DISPLAY When the local area code and/or extra codes have been stored as described on page 13, you can automatically call a number from the caller ID log as follows: 1 2 12/14 10:25AM 17 JOHN SMITH 800-123-4567 Using the CID JOG control, scroll to see the Caller ID log. Scroll up for newer calls, down for older calls.
MCD4300BT.2002.O/M.QXD 4/19/02 9:57 AM Page 19 BASIC OPERATION (CONTINUED) ADDING A DIRECTORY ENTRY The directory can store up to 100 name/telephone numbers which you may enter either through the phone as described below or via your computer using a USB cable (not included) and the included CD software (see page 30 for instructions). 1 2 12/14 10:25AM 17 17 1.MEMORY 2.SET UP 3.RINGER 4.VOLUME 1.MEMORY 2.SET UP 3.RINGER 4.VOLUME 1 2 Press the MENU button; the Menu will appear in the display.
MCD4300BT.2002.O/M.QXD 4/19/02 9:57 AM Page 20 BASIC OPERATION (CONTINUED) ENTERING A NAME USING THE KEY BUTTONS When entering names into the directory, you must use the Key buttons (0-9,*,#). To use the buttons to add names, perform the following steps: 1 2 12/14 10:25AM 17 17 1.MEMORY 2.SET UP 3.RINGER 4.VOLUME 2 1 1 2 Follow steps one through five on the previous page to program the telephone number. See the chart below and using the Key buttons (0-9,*,#) ❶, enter the name.
MCD4300BT.2002.O/M.QXD 4/19/02 9:57 AM Page 21 BASIC OPERATION (CONTINUED) DIALING A NUMBER FROM THE DIRECTORY To select and dial a number from the directory, follow the steps below: 1 2 12/14 10:25AM 17 17 1.MEMORY 2.SET UP 3.RINGER 4.VOLUME 12/14 10:25AM 17 17 1.MEMORY 2.SET UP 3.RINGER 4.VOLUME 1 2 Press the MENU button; the Menu will appear in the display. Using the CID JOG control ❶, scroll down to select “1. MEMORY” and press the CID JOG control ❶, or simply press the “1” button ❷.
MCD4300BT.2002.O/M.QXD 4/19/02 9:57 AM Page 22 BASIC OPERATION (CONTINUED) EDITING A DIRECTORY ENTRY To select and edit a name/number from the directory, follow the steps below: 1 2 12/14 10:25AM 17 17 1.MEMORY 2.SET UP 3.RINGER 4.VOLUME 1 2 1 2 Follow steps one through four on the previous page to select a name/ number to edit. Press the CID JOG control to select the entry. Using the CID JOG control ❶, scroll to select “2. EDT” and press the CID JOG control ❶, or simply press the “2” button ❷.
MCD4300BT.2002.O/M.QXD 4/19/02 9:57 AM Page 23 ADVANCED FEATURES SETTING THE ALARM THE TIME MUST BE SET BEFORE SETTING THE ALARM. (For time setting, refer to page 9.) 1 2 12/14 10:25AM 17 17 1.MEMORY 2.SET UP 3.RINGER 4.VOLUME 1.MEMORY 2.SET UP 3.RINGER 4.VOLUME 1 2 Press the MENU button; the Menu will appear in the display. Using the CID JOG control ❶, scroll down to select “2. SET UP” and press the CID JOG control ❶, or simply press the “2” button ❷; the SET UP Menu will appear in the display.
MCD4300BT.2002.O/M.QXD 4/19/02 9:57 AM Page 24 ADVANCED FEATURES (CONTINUED) TURNING THE ALARM ON/OFF After the alarm has been set, it automatically will turn on at a set time, one time only. If you would like to turn the alarm off or back on, follow the instructions below: 1 2 12/14 10:25AM 17 17 1.MEMORY 2.SET UP 3.RINGER 4.VOLUME 12/14 10:25AM 17 17 1.MEMORY 2.SET UP 3.RINGER 4.VOLUME 1 2 Press the MENU button; the Menu will appear in the display.
MCD4300BT.2002.O/M.QXD 4/19/02 9:57 AM Page 25 ADVANCED FEATURES (CONTINUED) SETTING THE ALARM MELODY Choose one of the alarm melodies as follows: 1 2 12/14 10:25AM 17 17 1.MEMORY 2.SET UP 3.RINGER 4.VOLUME 2 3 12/14 10:25AM 17 17 1.INCOMING CALL 2. ALARM 1 1 2 Press the MENU button ❶; the Menu will appear in the display.Using the CID JOG control ❷, scroll down to select “3. RINGER” and press the CID JOG control ❷, or simply press the “3” button ❸.
MCD4300BT.2002.O/M.QXD 4/19/02 9:57 AM Page 26 ADVANCED FEATURES (CONTINUED) REGISTERING THE HANDSETS (FOR MULTIPLE HANDSET USAGE) You can purchase additional handsets for use with many of this telephone’s features. Make sure the battery is connected and the base is plugged in and on for at least five seconds before starting the operation. Make sure the extra headset purchased is fully charged for normal operations.
MCD4300BT.2002.O/M.QXD 4/19/02 9:57 AM Page 27 ADVANCED FEATURES (CONTINUED) ASSIGNING/CHANGING A HANDSET’S INTERNAL/INTERCOM (EXTENSION) NUMBER The handset that comes with the unit is assigned number 1 at the factory. To assign or change the number of the additional handsets (if purchased), in order to take advantage of the additional features, simply follow the instructions below: 1 1.MEMORY 2.SET UP 3.RINGER 4.VOLUME 2 1 2 Press the MENU button; the Menu will appear in the display.
MCD4300BT.2002.O/M.QXD 4/19/02 9:57 AM Page 28 ADVANCED FEATURES (CONTINUED) MAKING INTERCOM CALLS (PAGING) Intercom calls are calls to the additional handsets (if purchased) and do not tie up the phone line. For example, if used in your home, you can have a conversation with your wife by the pool without going outside. Each additional handset must be registered, see page 26.
MCD4300BT.2002.O/M.QXD 4/19/02 9:57 AM Page 29 ADVANCED FEATURES (CONTINUED) TRANSFERRING A CALL Transfer a call to another handset (this example shows Handset 1 transferring to Handset 2) as follows: 1 2 2 1 Using the Key buttons (1-7) ❶, enter the desired handset number, Handset 1 (HS1) display will show “TRANSFERRED 2”. Press the TALK ❷ button on HS2 to pick up the transfer.
MCD4300BT.2002.O/M.QXD 4/19/02 9:57 AM Page 30 USING THE SOFTWARE INSTALLING THE SOFTWARE: Included with your telephone is software that can be used to synchronize your phone directory with Microsoft Outlook. It can also be used to download ringer melodies (MIDI Files). Additionally, there will be other software applications and upgrades available through the Bluetooth page on our website, www.memcorpinc.com (see “Downloading MIDI Files” for instructions).
MCD4300BT.2002.O/M.QXD 4/19/02 9:57 AM Page 31 USING THE SOFTWARE (CONTINUED) 2. CONFIGURING OUTLOOK XP: a. Outlook XP synchronization will not work with a Microsoft Exchange server. If you do not get your mail via Microsoft Exchange, you can ignore the following steps. However if you do connect to a Microsoft Exchange server you will need to add a POP3 account, by following these steps: 1. Click on “Start” – “Settings” – “Control Panel” then double click on the “Mail” icon. 2.
MCD4300BT.2002.O/M.QXD 4/19/02 9:57 AM Page 32 USING THE SOFTWARE (CONTINUED) DOWNLOADING RINGER MELODIES (MIDI “INSTRUMENTAL MUSIC FORMAT”): Before uploading MIDI files to your phone, you must first download them from the Bluetooth page on our website, www.memcorpinc.com as follows: 1. Go to the Memorex website at www.memcorpinc.com. 2. From the “Products” tab select the “Communication” drop down menu and then select “2.4 Ghz Bluetooth Phones”. 3. Click on the “Download Music Files” tab. 4.
MCD4300BT.2002.O/M.QXD 4/19/02 9:57 AM Page 33 USING THE SOFTWARE (CONTINUED) 5. On the right-hand side of your window you will see the following: “MIDI FILES [HANDSET]”, and below that you will see three sets of numbers. For example: 321 421 214 These numbers are the three “MIDI FILES” that are currently on your phone. You can only change these three MIDI files. The Bluetooth phone comes with five MIDI files. However you CANNOT change tone number one, and tone number two on your Bluetooth phone. 6.
MCD4300BT.2002.O/M.QXD 4/19/02 9:57 AM Page 34 TROUBLESHOOTING GUIDE SYMPTOM No dial tone. No power on the handset. Handset does not charge. • • • • • Range is limited. Call received flutters or fades. Handset not working. Cannot hear ringer. Caller ID information does not appear. Time does not automatically set. Alarm does not turn on. Unit will not memory dial. • • • SOLUTION Make sure the telephone line cord is connected properly to the modular wall jack.
MCD4300BT.2002.O/M.QXD 4/19/02 9:57 AM Page 35 RESETTING THE UNIT If the handset starts to operate abnormally, or the Caller ID stops working, please unplug the unit from the power source for five seconds, and then plug it back in. CARE AND MAINTENANCE 1. Clean your phone with a damp (never wet) cloth. Solvent or detergent should never be used. 2. Avoid operating your unit under direct sunlight or in hot, humid or dusty places. 3. Keep your unit away from heating appliances. 4.
MCD4300BT.2002.O/M.QXD 4/19/02 9:57 AM Page 36 Memcorp, Inc. Weston, FL Printed in China Visit our website at www.memcorpinc.