MKS2422 User’s Guide CD/CD+G Karaoke System with Cassette Recorder Before operating this product, please read these instructions completely.
Dear Customer, Please read this manual thoroughly before operating the unit to become more familiar with it and obtain the performance that will bring you continued enjoyment for many years. Keep these instructions handy for future reference. PLEASE KEEP ALL PACKAGING MATERIAL FOR AT LEAST 90 DAYS IN CASE YOU NEED TO RETURN THIS PRODUCT TO YOUR PLACE OF PURCHASE OR MEMOREX. For future reference, record the serial number of the unit printed on the rear of the cabinet.
Dear Customer Selecting fine audio equipment such as the unit you’ve just purchased is only the start of your musical enjoyment. Now it’s time to consider how you can maximize the fun and excitement your equipment offers. This manufacturer and the Electronic Industries Association’s Consumer Electronics Group want you to get the most out of your equipment by playing it at a safe level.
SAFETY INSTRUCTIONS Before using the unit, be sure to read all operating instructions carefully. Please note that these are general precautions and may not pertain to your unit. For example, this unit may not have the capability to be connected to an outdoor antenna. 1. READ INSTRUCTIONS All the safety and operating instructions should be read before the product is operated. 2. RETAIN INSTRUCTIONS The safety and operating instructions should be retained for future reference. 3.
LOCATION OF CONTROLS 1 2 19 3 4 5 6 7 8 9 10 11 12 13 14 15 20 21 22 23 24 25 26 27 28 29 30 31 32 16 33 17 18 1. 2. 3. 4. 5. 6. 7. 8. 9. 10. 11. 12. 13. 14. 15. 16. 17.
POWER SOURCE AC: Use the AC polarized line cord included with the unit for operation on AC power. Insert into a conveniently located AC outlet having 120V, 60Hz. NOTE: The AC plug supplied with the unit is polarized to help minimize the possibility of electric shock. If the AC plug does not fit into a nonpolarized AC outlet, do not file or cut the wide blade. It is the user’s responsibility to have an electrician replace the obsolete outlet.
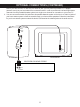
OPTIONAL CONNECTIONS (CONTINUED) Note: If you have a mono TV with only one Audio In jack, you may have to purchase a “Y” adapter (stereo to mono) at your local electronics accessories store in order to combine the Left and Right stereo channels from this portable Karaoke system to a single mono channel for connection to your mono TV. 3.
ECHO CONTROL 1 OPERATION AUTO VOICE CONTROL 1 Rotate the ECHO control clockwise to increase the echo or counterclockwise to decrease the echo. When the AUTO VOICE CONTROL feature is activated, the vocals on a multiplex recording are muted as soon as the singer begins singing into the microphone. When the singer stops singing, the vocals are automatically unmuted. Adjust the AUTO VOICE control for the best balance between playback and microphone levels.
OPERATION (CONTINUED) PLAYING COMPACT DISCS NORMAL PLAYBACK (For karaoke playback, please refer to page 12) 1 2 3 Press the POWER button to turn the unit on; the POWER indicator will light. Slide the FUNCTION switch to the CDG position. Press the CD Door OPEN/CLOSE area to open the CD compartment door. Place a CD on the center spindle, with the printed label side facing up. Close the CD compartment door.
CD PAUSE CONTROL OPERATION (CONTINUED) 1 2 During CD playback, if you wish to pause the disc momentarily, press the Play/Pause (® ) button. Playback stops but the disc continues to spin and the PLAY/PAUSE indicator will blink. Press the Play/Pause (® ) button again to release pause and resume normal CD playback; the PLAY/ PAUSE indicator will remain on.
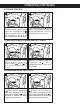
REPEAT PLAYBACK 1 OPERATION (CONTINUED) 4 3 2 3 2 2 1 1 To repeat a single track, press the REPEAT button ❶ once; the REPEAT indicator will blink. Press the SKIP ( ) ❷ or ( ) button ❸ to select the specific track that you wish to repeat. When the desired track number appears in the display, press the PLAY/PAUSE (® ) button ❹ to begin playback. The specific track you selected will be repeated continuously.
OPERATION (CONTINUED) 5 6 4 2 2 1 3 Press the SKIP ( ) ❶ or ( ) button ❷ to select the first track that you wish to program. When the desired track number appears in the display, press the PROGRAM button ❸ again. 7 2 1 3 1 3 Press either the SKIP ( ) ❶ or ( ) button ❷ to select the next track you wish to program. When the desired track number appears in the display, press the PROGRAM button ❸ again. Repeat step 5 until you have programmed up to 30 track numbers into the CD Program Memory.
OPERATION (CONTINUED) PLAYING A CD+G (COMPACT DISC + GRAPHICS) KARAOKE DISC You can listen to a CD+G Karaoke disc. CD+G discs combine the recorded music with an additional video track that displays the song lyrics on a television screen. As the song plays, the words to be sung are highlighted in a different color on most CD+Gs. 1 2 3 Insert a CD+G disc. Insert the microphone into the MIC jack(s) and slide the FUNCTION switch to the CDG position.
OPERATION (CONTINUED) PLAYING CASSETTE TAPES OR KARAOKE 1 1 2 3 Press the STOP/EJECT ( ) button to open the Cassette Door and insert a cassette with the open end facing down. Press the PLAY (®) button to begin playback. 5 6 2 Press the POWER button ❶ to turn the unit on; the POWER indicator will light. Slide the FUNCTION switch ❷ to the TAPE position. 4 3 1 2 1 2 Adjust the MASTER VOLUME ❶ and TONE ❷ controls as desired.
OPERATION (CONTINUED) KARAOKE RECORDING FROM A CD OR CD+G (COMPACT DISC + GRAPHICS) DISC You can record onto a cassette tape from a CD+G Karaoke disc or standard CD. CD+G discs combine the recorded music with an additional video track that displays the song lyrics on an external television screen. As the song plays, the words to be sung are highlighted in a different color. 1 2 3 2 Press the STOP/EJECT ( ) button to open the Cassette Door and insert a cassette with the open end facing down.
CARE AND MAINTENANCE SAFEGUARD AGAINST ACCIDENTAL ERASURE 1 NOTE: When a tab is broken out, the record button cannot be depressed. SIDE When a new recording is made, any program material previously recorded is automatically erased and only the new recording remains. To safeguard valuable recordings from being erased accidentally, the cassette and the deck are equipped with a special device. On the back of the cassette there is an erase Tab for side 2 prevention tab on each side.
CARE AND MAINTENANCE (CONTINUED) Caring for Compact Discs • Treat the compact disc carefully. Handle the compact disc only by its edges. Never allow your fingers to come in contact with the shiny, unprinted side of the compact disc. • Do not attach adhesive tape, stickers, etc. to the compact disc label. • Clean the compact disc periodically with a soft, lint-free, dry cloth. Never use detergents or abrasive cleaners to clean the compact disc. If necessary, use a CD cleaning kit.
TROUBLESHOOTING GUIDE Should this unit exhibit a problem, check the following before seeking service: Symptom Possible Cause Solution No sound. FUNCTION switch not set to TAPE. Slide to the TAPE position. Sound distorted. Dirty head. Cassette Player Speed varies. Volume at minimum. Increase volume. Tape old. Replace the tape. Clean the head. Cassette tape worn out. Replace the tape. Erase prevention tab removed. Cover hole with adhesive tape. CD Player will not play.
SPECIFICATIONS GENERAL: Power source .............................................................................................120 V, 60Hz AC Speaker ...............................................................................................Impedance 4 Ohms Dimensions .......................................................................10 (W) x 16 (H) x 10 (D) Inches Weight. .....................................................................................................................8.
Memcorp, Inc. Weston, FL Printed in Hong Kong Visit our website at www.memorexelectronics.
MKS2422 Guía del Usuario Sistema Karaoke para CD/CD+G con Grabadora de Casete Antes de operar este producto, sírvase leer este instructivo en su totalidad.
Estimado Cliente: Sírvase leer este manual detenidamente antes de operar la unidad para familiarizarse más con la misma y obtener el desempeño que le permitirá disfrutarla por muchos años. Mantenga estas instrucciones a la mano para futura referencia. SÍRVASE GUARDAR EL EMPAQUE DE CARTÓN AL MENOS POR 90 DÍAS POR SI ACASO NECESITARA REGRESAR EL PRODUCTO A SU DISTRIBUIDOR O A MEMOREX. Para futura referencia, registre el número de serie de la unidad impresa en la parte trasera del gabinete.
Estimado cliente: El haber seleccionado un equipo de tan alta tecnología, como el que usted acaba de comprar, es sólo el comienzo de su entretenimiento musical. Ahora es tiempo de tomar en consideración como optimizar el entretenimiento que su equipo le ofrece.
MEDIDAS DE SEGURIDAD Antes de usar este aparato asegúrese de leer bien todos los puntos de este manual de operaciones. Una vez leído guárdelo a la mano para usarlo como referencia en el futuro. Tenga especial cuidado al seguir las advertencias indicadas en la unidad, así como las que aparecen en el manual de instrucciones. 1. Lea las instrucciones Usted deberá leer todas las instrucciones sobre seguridad y funcionamiento antes de operar su equipo. 2.
UBICACIÓN DE LOS CONTROLES 1 2 19 3 4 5 6 7 8 9 10 11 12 13 14 15 20 21 22 23 24 25 26 27 28 29 30 31 32 16 33 17 18 1. 2. 3. 4. 5. 6. 7. 8. 9. 10. 11. 12. 13. 14. 15. 16. 17.
FUENTE DE ENERGÍA AC: Use el cable AC polarizado incluido con la unidad para operar con energía AC. Inserte el cable AC en cualquier toma de corriente casera de 120V 60Hz. NOTA: La clavija AC incluida con la unidad está polarizada para ayudar a minimizar la posibilidad de un choque eléctrico. Si la clavija AC no cabe en un tomacorriente AC no polarizado, no lime ni corte la cuchilla ancha. Es responsabilidad del usuario hacer que un electricista cambie la toma de corriente obsoleta.
CONEXIONES OPCIONALES y el sonido del disco se escuchará en las bocinas de su televisor. Nota: Si usted tiene un televisor mono con un único enchufe de Entrada a audio, es posible que tenga que comprar un adaptador "Y" (estéreo a mono) en su tienda local para accesorios electrónicos para poder combinar los canales de estéreo izquierdo y derecho de este sistema de Karaoke portátil a un solo canal mono para conectarse a su televisor mono. 3.
CONTROL DE ECO 1 Gire el control de ECO a la derecha para aumentar el eco o la izquierda para disminuir el eco. INTERRUPTOR DEL MICRÓFONO 1 Para encender los micrófonos, deslice los interruptores de ENCENDIDO/ APAGADO, ubicados en un lado en los micrófonos, a la posición de ON. Para apagar los micrófonos, deslice los interruptores de ENCENDIDO/ APAGADO a la posición de OFF. CONTROL DE TONO Gire el control de TONO a la derecha para subir el tono o a la izquierda para bajarlo.
OPERACIÓN (CONTINÚA) REPRODUCIR DISCOS COMPACTOS REPRODUCCIÓN NORMAL (Para el karaoke, consulte la página 12.) 1 2 3 Oprima el botón de encendido para encender la unidad; el indicador de ENERGÍA se iluminará. Deslice el interruptor de FUNCIÓN a la posición de CDG. 4 5 Oprima el área para Abrir/Cerrar la puerta del CD para abrir la puerta del compartimiento de CD. Coloque un CD en el centro del eje, con el lado de la etiqueta hacia arriba. Cierre la puerta del compartimiento del CD.
OPERACIÓN (CONTINÚA) CONTROL DE PAUSA PARA CD 1 2 Durante la reproducción del CD, si desea poner en pausa el disco momentáneamente, oprima el botón de Tocar/Pausa (®p). Se detiene la reproducción pero el disco continúa girando y parpadeará el indicador de TOCAR/PAUSA. Oprima de nuevo el botón de Tocar/Pausa (® ) para soltar la pausa y reanudar la reproducción normal del CD; el indicador de TOCAR/ PAUSA permanecerá encendido.
REPRODUCCIÓN REPETIDA 1 4 3 OPERACIÓN (CONTINÚA) 2 3 2 2 1 1 1 Para repetir una sola pista, oprima el botón de Repetir 1 una vez; el indicador de REPETIR parpadeará. Oprima el botón de Brincar ( )2 o ( ) 3 tpara escoger una pista específica que usted desee repetir. Cuando aparezca el número deseado de pista en la pantalla, oprima el botón de Tocar/Pausa (® ) 4 para tocar el inicio de la pista seleccionada. La pista específica que usted escogió se repetirá continuamente.
OPERACIÓN (CONTINÚA) 4 5 2 2 1 3 Oprima el botón de BRINCAR ( ) 1 o ( ) 2 para escoger la primera pista que desee programar. Cuando aparezca el número de pista deseado en la pantalla, oprima de nuevo el botón de PROGRAMA 3. 7 6 2 1 3 1 3 Oprima el botón de BRINCAR ( ) 1o( ) 2 para escoger la próxima pista que desee programar. Cuando aparezca el número de pista deseado en la pantalla, oprima de nuevo el botón de PROGRAMA 3.
OPERACIÓN (CONTINÚA) REPRODUCIR UN DISCO KARAOKE CD+G (DISCO COMPACTO + GRÁFICOS) Usted puede oír un disco karaoke CD+G. Los discos CD+G combinan la música grabada con un video adicional que muestra las letras de las canciones en la pantalla de un televisor. Mientras escucha la canción, las palabras a cantar se marcarán en un color diferente en la mayoría de los CD+G. 1 Introduzca un disco CD+G. Inserte el micrófono en el enchufe del MIC y deslice el interruptor de FUNCIÓN a la posición de CDG.
OPERACIÓN (CONTINÚA) TOCAR CINTAS DE CASETE O KARAOKE 1 1 2 3 Oprima el botón de PARO/ EXPULSAR ( ) para abrir la puerta del Casete e introduzca un casete con el lado abierto hacia abajo. Oprima el botón de Tocar (®) para iniciar la reproducción. 2 Oprima el botón de ENCENDIDO ❶ para encender la unidad; el indicador de ENERGÍA se iluminará. Deslice el interruptor de FUNCIÓN ❷ a la posición de CINTA. 4 5 3 6 1 2 1 2 Ajuste los controles de VOLUMEN MAESTRO ❶ y TONO ❷ según desee.
OPERACIÓN (CONTINÚA) GRABACIONES DE KARAOKE DE UN DISCO CD O CD+G (DISCO COMPACTO + GRÁFICOS) Usted puede grabar en un casete a partir de un CD+G karaoke o un CD estándar. Los discos CD+G combinan la música grabada con una pista adicional de video que muestra las letras de las canciones en la pantalla de un televisor externo. A medida que toca la canción, las palabras a cantarse se marcan en un color diferente.
CUIDADO Y MANTENIMIENTO PROTECCIÓN CONTRA BORRADO ACCIDENTAL 1 NOTA: Cuando una pestaña esté rota, no se podrá oprimir el botón de grabar. SIDE Cuando realiza una grabación nueva, se borra automáticamente cualquier material grabado anteriormente y sólo permanece la grabación nueva. Para proteger grabaciones valiosas y evitar borrarlas accidentalmente, el casete y el modular están equipados con un dispositivo Pestaña Tab forpara side 2 especial.
CUIDADO Y MANTENIMIENTO (CONTINÚA) Cuidado a los discos compactos • Trate el disco compacto con cuidado. Agarre el disco compacto sólo por sus orillas. Nunca permita que sus dedos toquen el lado brilloso y sin etiqueta del disco compacto. • No pegue cinta adhesiva, calcomanías, etc. sobre la etiqueta del disco compacto. • Limpie el disco compacto periódicamente con una tela suave, seca y sin pelusas. Nunca use detergentes o limpiadores abrasivos para limpiar un disco compacto.
GUÍA DE DIAGNÓSTICO En caso de tener algún problema con la unidad, verifique lo siguiente antes de buscar servicio: Síntoma Posible causa Sin sonido. Interruptor de FUNCIÓN no en CINTA. Deslice a posición de CINTA. Sonido distorsionado. Cabeza sucia. Reproductor de casete Velocidad varía. Grabadora de casete No graba. Sonido distorsionado en reproducción. Solución Volumen al mínimo. Suba el volumen. Cinta vieja. Cambie la cinta. No tiene la pestaña para evitar borrado.
ESPECIFICACIONES GENERAL: Fuente de energía ......................................................................................120V, 60Hz AC Bocina ...............................................................................................Impedancia 4 ohmios Dimensiones .................................................10 (ancho) x 16 (alto) x 10 (fondo) pulgadas Peso .........................................................................................................................8.
Memcorp, Inc. Weston, FL Impreso en Hong Kong Visite nuestro sitio web en www.memorexelectronics.