MKS8506 User’s Guide CD/CD+G Karaoke System with B&W Monitor 27 Before operating this product, please read these instructions completely.
Dear Customer, Please read this manual thoroughly before operating the unit to become more familiar with it and obtain the performance that will bring you continued enjoyment for many years. Keep these instructions handy for future reference. PLEASE KEEP ALL PACKAGING MATERIAL FOR AT LEAST 90 DAYS IN CASE YOU NEED TO RETURN THIS PRODUCT TO YOUR PLACE OF PURCHASE OR MEMOREX. For future reference, record the serial number of the unit printed on the rear of the cabinet.
Dear Customer Selecting fine audio equipment such as the unit you’ve just purchased is only the start of your musical enjoyment. Now it’s time to consider how you can maximize the fun and excitement your equipment offers. This manufacturer and the Electronic Industries Association’s Consumer Electronics Group want you to get the most out of your equipment by playing it at a safe level.
SAFETY INSTRUCTIONS Before using the unit, be sure to read all operating instructions carefully. Please note that these are general precautions and may not pertain to your unit. For example, this unit may not have the capability to be connected to an outdoor antenna. 1. READ INSTRUCTIONS All the safety and operating instructions should be read before the product is operated. 2. RETAIN INSTRUCTIONS The safety and operating instructions should be retained for future reference. 3.
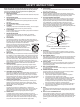
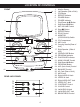
LOCATION OF CONTROLS FRONT 16 1 2 17 3 4 5 6 18 19 20 7 8 9 10 11 21 22 13 25 23 12 24 14 26 27 15 REAR JACK PANEL 28 29 34 30 31 32 33 35 36 4 1. 2. 3. 4. 5. 6. 7. 8. 9. 10. 11. 12. 13. 14. 15. 16. 17. 18. 19. 20. 21. 22. 23. 24. 25. 26. 27. 28. 29. 30. 31. 32. 33. 34. 35. 36.
POWER SOURCE AC: Use the AC polarized line cord included with the unit for operation on AC power. Insert into a conveniently located AC outlet having 120V, 60Hz. NOTE: The AC plug supplied with the unit is polarized to help minimize the possibility of electric shock. If the AC plug does not fit into a nonpolarized AC outlet, do not file or cut the wide blade. It is the user’s responsibility to have an electrician replace the obsolete outlet.
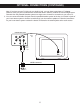
OPTIONAL CONNECTIONS (CONTINUED) Note: If you have a mono TV with only one Audio In jack, you may have to purchase a “Y” adapter (stereo to mono) at your local electronics accessories store in order to combine the Left and Right stereo channels from this portable Karaoke system to a single mono channel for connection to your mono TV. 3.
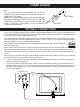
CONNECTIONS (CONTINUED) CONNECTING AN EXTERNAL AUDIO UNIT KARAOKE UNIT Rotate the MONITOR switch to the AUX position when connecting the unit as per this step. To Audio In From Audio Out EXTERNAL AUDIO SOURCE NOTES: • Connecting the unit to an external audio source will allow you to broadcast the external unit’s sound through the unit’s speakers. • When connecting the external unit, refer to the owner’s manual of the external unit, as well as this manual.
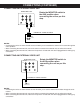
CONNECTING THE MICROPHONE OPERATION This unit has two microphone jacks which will allow you to sing along with your favorite songs. Before connecting, make sure the MIC VOLUME control is set to minimum. MIC ON/OFF SWITCH ECHO CONTROL 1 1 27 Rotate the ECHO control clockwise to increase the echo or counterclockwise to decrease the echo. BALANCE CONTROL 1 To turn the microphone on, slide the ON/OFF switch, located on the side of the microphone, to the ON position.
OPERATION (CONTINUED) PLAYING COMPACT DISCS NORMAL PLAYBACK (For karaoke, please refer to page 13.) 1 2 3 27 27 Press the POWER button to turn the unit on; the POWER indicator will light. Rotate the MONITOR switch to the CD position. Press the OPEN/CLOSE button to open the CD compartment door. Place a CD on the center spindle, with the printed label side facing up. Close the CD compartment door.
CD PAUSE CONTROL OPERATION (CONTINUED) 1 2 27 27 During CD playback, if you wish to pause the disc momentarily, press the Play/Pause (® ) button. Playback stops but the disc continues to spin and the PLAY/PAUSE indicator will blink. Press the Play/Pause (® ) button again to release pause and resume normal CD playback; the PLAY/ PAUSE indicator will light.
REPEAT PLAYBACK OPERATION (CONTINUED) 1 4 3 1 2 3 2 2 27 1 To repeat a single track, press the REPEAT button ❶ once; the REPEAT indicator will blink. Press the Skip/Search ( ) ❷ or ( ) button ❸ to select the specific track that you wish to repeat. When the desired track number blinks in the display, within five seconds, press the PLAY/PAUSE (® ) button ❹ to begin playback. The specific track you selected will be repeated continuously.
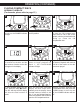
OPERATION (CONTINUED) 4 5 2 2 1 3 Press the Skip/Search ( ) ❶ or ( ) button ❷ to select the first track that you wish to program. When the desired track number appears in the display, press the PROGRAM button ❸ again. 7 1 27 2 1 3 27 2 6 1 3 27 Press either the Skip/Search ( ) ❶ or ( ) button ❷ to select the next track you wish to program. When the desired track number appears in the display, press the PROGRAM button ❸ again.
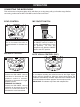
OPERATION (CONTINUED) PLAYING A CD+G (COMPACT DISC + GRAPHICS) KARAOKE DISC You can listen to a CD+G karaoke disc. CD+G discs combine the recorded music with an additional video track that displays the song lyrics on this monitor (and an external TV, if connected). As the song plays, the words to be sung are highlighted in a different color on most CD+Gs. 1 2 3 27 27 27 Insert a CD+G disc. Insert the microphone(s) into the MIC jack(s) and rotate the MONITOR switch to the CDG position.
OPERATION (CONTINUED) When watching a CD+G on the monitor screen, adjust the brightness, v-hold and contrast as follows: V-HOLD BRIGHTNESS CONTRAST If the picture moves up and down or rolls, rotate to adjust the vertical hold. If the picture is too light or too dark, rotate to adjust the brightness. If the picture is too strong or too weak, rotate to adjust the contrast and clearly define the shades of blacks, grays and whites.
TROUBLESHOOTING GUIDE Should this unit exhibit a problem, check the following before seeking service: Symptom Possible Cause Solution CD Player will not play. CD is not installed or installed upside-down. Insert CD with label side up. Compact Disc Player CD skips while playing. Disc is dirty or scratched. Wipe disc with cloth or use another disc. No sound. Power cord disconnected. Connect power cord. Some vocals are still present when AUTO VOCAL is off. Using non-CD+G disc.
SPECIFICATIONS GENERAL: Power Source .............................................................................................120V, 60Hz AC Speaker ...............................................................................................Impedance 8 Ohms Dimensions.......................................................................8 (W) x 11.5 (H) x 10 (D) Inches Weight ......................................................................................................................8.
Memcorp, Inc. Weston, FL Printed in Hong Kong Visit our website at www.memorexelectronics.