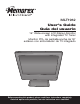
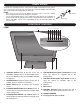
MLT1912 User’s Guide Guía del usuario 19” Wide-screen LCD Stereo Monitor with Integrated TV Tuner Monitor PCL de pantalla ancha de 19” estéreo con sintonizador de TV integrado Before operating this product, please read these instructions completely. Antes de operar este producto, lea este instructivo en su totalidad.
CONTENTS Contents ................................................................................................................................................................................1 Important Safety Instructions..............................................................................................................................................2 Power Source..................................................................................................................................
IMPORTANT SAFETY INSTRUCTIONS FCC NOTICE: This device complies with Part 15 of the FCC Rules. Operation is subject to the following two conditions: (1) this device may not cause harmful interference, and (2) this device must accept any interference received, including interference that may cause undesired operation. WARNING: TO REDUCE THE RISK OF FIRE OR ELECTRIC SHOCK, DO NOT EXPOSE THIS PRODUCT TO RAIN OR MOISTURE.
IMPORTANT SAFETY INSTRUCTIONS (CONTINUED) CAUTION RISK OF ELECTRIC SHOCK DO NOT OPEN CAUTION: TO REDUCE THE RISK OF ELECTRIC SHOCK, DO NOT REMOVE COVER (OR BACK). NO USER-SERVICEABLE PARTS INSIDE. REFER SERVICING TO QUALIFIED SERVICE PERSONNEL. (This Caution Marking and Rating Label are located at the rear enclosure of the unit.
IMPORTANT SAFETY INSTRUCTIONS (CONTINUED) 13. LIGHTNING To protect your product from a lightning storm, or when it is left unattended and unused for long periods of time, unplug it from the wall outlet and disconnect the antenna or cable system. This will prevent damage to the product due to lightning and power-line surges. 14.
POWER SOURCE To operate the unit using AC power, connect the AC adapter (included) to the DC 12V IN jack (z) on the rear of the unit. Connect the AC cord to the adapter and connect the other end to a wall outlet having 120V AC, 60Hz only. NOTES: • When you turn on the unit, the AC adapter will become warm or hot. This is normal and it is suggested to put the AC adapter in a cool place. • The AC plug supplied with the unit is polarized to help minimize the possibility of electric shock.
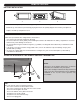
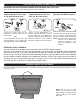
SIDE PANEL LOCATION OF CONTROLS (CONTINUED) 1 2 3 4 5 6 7 The side panel is accessible by pressing in on the side cover tabs, then lifting the side cover. After connections have been made, slide the wires through the bottom opening of the side cover and replace the side cover. 1. 2. 3. 4. 5. 6. 7. 8. 9. REMOTE (DETACHABLE POWER CORD PART NO. 023-25040-120*, AC ADAPTER PART NO.
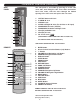
REMOTE CONTROL BATTERY INSTALLATION 1 AA AAA 1 AA 2 3 AAA 1. Remove the Battery Compartment cover by pushing in on the tab and lifting the cover off. 2. Install two (2) “AA” batteries (not included), paying attention to the polarity diagram in the Battery Compartment. 3. Replace the Battery Compartment cover. BATTERY PRECAUTIONS Follow these precautions when using batteries in this device: 1. Use only the size and type of batteries specified. 2.
CABLE (CATV)/SATELLITE CONNECTIONS This TV has an extended tuning range and can tune most cable channels without using a Cable TV converter box. Some Cable TV companies offer “premium pay channels” in which the signal is scrambled. Descrambling these signals for normal viewing requires the use of a descrambler device which is generally provided by the cable company.
OUTDOOR ANTENNA CONNECTIONS OUTDOOR VHF/UHF ANTENNA CONNECTION (ANTENNA NOT SUPPLIED) Follow the instructions for the type of antenna system you intend to use. Combination VHF/UHF Antenna (Single 75 ohm cable or 300 ohm twin-lead wire) Combination VHF/UHF Antenna (Separate VHF and UHF 300 ohm twin-leads) Connect the 75 ohm cable from the combination VHF/UHF antenna to the antenna jack. OR If your combination antenna has a 300 ohm twin-lead wire, use a 300-75 ohm matching transformer (NOT SUPPLIED).
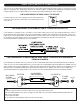
VCR CONNECTIONS CONNECTION USING COAXIAL CABLE: Follow the instructions below to connect a VCR to your television using a 75 ohm coaxial cable. (CABLES NOT INCLUDED.) VCR INCOMING CATV CABLE Side panel is accessible by pressing in on the tabs, then lift the side cover off. After connections have been made, slide the wires through the bottom opening of the cover and replace cover. From VCR OUT jack 1. Connect the cable, satellite or incoming antenna to the VHF/UHF IN jack on the rear of the VCR. 2.
VCR CONNECTIONS (CONTINUED) CONNECTION USING S-VIDEO CABLE: Follow the instructions below to connect an S-VIDEO VCR to your television using an S-video cable. (CABLES NOT INCLUDED.) 1. Connect the cable, satellite or incoming antenna to the ANT jack on the rear of the VCR. 2. Connect the left and right audio cable from the VCR’s AUDIO OUT jacks to the TV’s left and right AUDIO IN jacks. 3. Connect the VCR’s S-VIDEO OUT jack to the TV’s S-VIDEO IN jack. 4.
DVD CONNECTIONS (CONTINUED) CONNECTION USING S-VIDEO CABLE: Follow the instructions below to connect a DVD player to your television using the S-Video cable. (CABLES NOT INCLUDED.) 1. Connect the left and right audio cable from the DVD’s AUDIO OUT jacks to the TV’s left and right AUDIO IN jacks. 2. Connect the DVD’s S-VIDEO OUT jack to the TV’s S-VIDEO IN jack. 3. Press the SOURCE button until S-VIDEO appears on the TV screen and press PLAY on the DVD to watch the DVD.
COMPUTER CONNECTION Follow the instructions below to connect a computer to your television/monitor. (CABLES NOT INCLUDED.) 1. Turn off the TV and your computer (PC). 2. Connect the audio cable (not included) from the computer’s AUDIO OUT jack to the TV’s VGA AUDIO IN jack. 3. Connect a VGA cable from the computer’s VGA OUT jack to the TV’s VGA IN jack. 4. Turn on the TV and press the SOURCE button until PC appears on the TV screen. 5. Turn on your computer and the computer screen will appear.
SETTING THE PICTURE 1 SETTING THE MENU 2 1 1 2 2 3 Press the STANDBY button 1 to turn on the TV; the STANDBY indicator will turn off. Press the MENU button 2; the Main Menu screen will appear. Select Picture using the CHANNEL/Navigation UP 1 or DOWN 2 button, then press the VOLUME UP/Navigation Right button 3 to select it. 3 4 4 1 2 3 Select the desired picture setting to adjust (Brightness, Contrast, Hue, Saturation, Sharpness) using the CHANNEL/Navigation UP 1 or DOWN 2 button.
SETTING THE MENU (CONTINUED) SETTING THE ADVANCED OPTIONS (PC MODE ONLY) 1 2 1 2 4 3 While in the PC mode and connected to a PC via the VGA connector, follow Steps 1 and 2 on the previous page to enter the menu as shown. Select Advanced using the CHANNEL/Navigation UP 1 or DOWN 2 button and then press the VOLUME UP/Navigation Right button 3. 3 NOTE: When finished, press the MENU button repeatedly to exit the menus.
SETTING THE MENU (CONTINUED) SELECTING THE RECEPTION (TV/CATV) 1 2 1 1 2 2 3 3 Press the STANDBY button 1 to turn on the TV; the STANDBY indicator will turn off. Press the SOURCE button 2 to select TV (NTSC) or ATSC. Press the MENU button 3; the Main Menu screen will appear. NOTE: To receive an ATSC signal, press the SOURCE button 2 repeatedly to select ATSC mode or select TV mode for NTSC signal.
SETTING THE MENU (CONTINUED) SETTING CHANNELS INTO MEMORY 1 2 1 2 2 3 Press the STANDBY button 1 to turn on the TV; the STANDBY indicator will turn off. Press the SOURCE button 2 to select the desired mode, TV (NTSC) or ATSC. Set the desired reception mode (TV/CATV) as described on the previous page. Press the MENU button 3; the Main Menu screen will appear.
SETTING THE MENU (CONTINUED) ADDING/DELETING CHANNELS 1 2 Press the STANDBY button to turn on the TV; the STANDBY indicator will turn off. Press the SOURCE button 1 to select TV (NTSC or ATSC). Select a channel to add or delete using the Number buttons 2. Press the MENU button 3; the Main Menu screen will appear. 3 4 1 2 3 1 2 Select Setup using the CHANNEL/Navigation UP 1 or DOWN 2 button, then press the VOLUME UP/Navigation Right button 3 to select it.
SETTING THE MENU (CONTINUED) SETTING THE FAVORITE CHANNEL (ATSC MODE ONLY) 1 2 1 1 2 2 3 Press the STANDBY button 1 to turn on the TV; the STANDBY indicator will turn off. While in the ATSC mode, and with the desired channel selected, press the MENU button 2; the Main Menu screen will appear. Select Setup using the CHANNEL/Navigation UP 1 or DOWN 2 button, then press the VOLUME UP/Navigation Right button 3 to select it.
SETTING THE LANGUAGE 1 SETTING THE MENU (CONTINUED) 2 1 2 2 Press the STANDBY button 1 to turn on the TV; the STANDBY indicator will turn off. Press the MENU button 2; the Main Menu screen will appear. 3 1 2 1 3 Select Setup using the CHANNEL/Navigation UP 1 or DOWN 2 button, then press the VOLUME UP/Navigation Right button 3 to select it. Select Language using the CHANNEL/Navigation UP 1 or DOWN 2 button, then press the VOLUME UP/Navigation Right button 3 to select it.
SETTING THE MENU (CONTINUED) SETTING THE TIME ZONE AND THE (DST) DAYLIGHT SAVING TIME (For ATSC mode only) 1 2 1 2 2 Press the STANDBY button 1 to turn on the TV; the STANDBY indicator will turn off. Press the MENU button 2; the Main Menu screen will appear. 4 2 4 3 Select Setup using the CHANNEL/Navigation UP 1 or DOWN 2 button, then press the VOLUME UP/Navigation Right button 3 to select it.
TV OPERATION 1 2 1 2 2 Press the STANDBY button 1 to turn on the TV; the STANDBY indicator will turn off. Press the SOURCE button 2 to select the desired mode, TV(NTSC) or ATSC. 3 3 4 2 1 1 Adjust the volume level by pressing the VOLUME UP/Navigation Right 1 or VOLUME DOWN/Navigation Left 2 button. The volume level will be indicated on the bottom of the screen. For proper operation, before selecting channels, they must be set into the TV’s program memory, see page 17.
MUTE 1 TV OPERATION (CONTINUED) SOURCE 1 Press the MUTE button to turn off the sound. The TV’s sound will be silenced and the Mute indicator will appear at the bottom left of the screen. The sound can be turned back on by pressing this button again; the Mute indicator will disappear from the screen. Repeatedly press this button to cycle through the device(s) connected to the INPUT jacks: ATSC, TV (CATV), AV, SVIDEO, YUV and PC).
PICTURE 1 TV OPERATION (CONTINUED) SLEEP 1 Repeatedly press the PICTURE button to select the desired Picture setting (USER, DYNAMIC, MILD or STANDARD). Select USER to use the presets made on page 14, Setting the Picture. Set the unit to remain on for a preset time as follows: Press the SLEEP button once and “0 Min” will appear on the screen. repeatedly press to increase the Sleep time by 15 minute increments, up to 240 minutes. Select “0 Min” to deactivate the Sleep timer.
GUIDE 1 TV OPERATION (CONTINUED) INFO 1 While viewing a digital program (ATSC), press the GUIDE button to view the guide. The guide allows you to select the channels from a channel list and also provides information about the current channel. NOTE: Channel information must be available from the channel. While viewing a digital program (ATSC), press the INFO button to display the current program info (Audio Format, Aspect Ratio, Channel number, etc) on the screen.
CLOSED CAPTIONS (for TV [NTSC], AV or S-Video Input) WHAT IS CLOSED CAPTIONING? TEXT 1, TEXT 2, TEXT 3 OR TEXT 4: The Text Closed Caption modes will usually fill the screen with a programming schedule or other information. Select between TEXT 1, TEXT 2, TEXT 3 OR TEXT 4. After selecting a Closed Caption mode, press the CCD button on the remote to activate it. Press again to deactivate.
ATSC CLOSED CAPTIONS 1 CLOSED CAPTIONS (for ATSC) 2 1 2 2 Press the STANDBY button 1 to turn on the TV; the STANDBY indicator will turn off. While in the ATSC mode, press the MENU button 2; the Main Menu screen will appear. 3 4 1 2 3 CC MODE: Select Broadcast (captions will be in broadcast font) or Customer (captions will be in customer’s font–see next step) option using the CHANNEL/ Navigation UP 1 or DOWN 2 button, then press the VOLUME UP/Navigation Right button 3 to select it.
USING THE PARENTAL MENU Parental (V-chip) enables parents to prevent their children from watching inappropriate material on TV. Parental reads the ratings for programming (except for news, sports, unedited movies on premium cable and Emergency System signals), then denies access to programming if the program’s rating meets the limitations you select. In this case, the program will be blocked.
SETTING PARENTAL CONTROL (CONTINUED) MOVIE RATING SET-UP 1 2 1 2 3 Enter the PARENTAL menu screen as described in Steps 1 and 2 on the previous page. Once in the PARENTAL MENU, press the CHANNEL/ Navigation UP 1 or DOWN 2 button until MOVIE RATING is selected, then press the VOLUME UP/Navigation Right button 3 to select it . 3 4 1 2 3 Press the MENU button four times to exit the menus.
TV RATING SET-UP SETTING PARENTAL CONTROL (CONTINUED) 1 2 1 3 2 Enter the PARENTAL menu screen as described in Steps 1 and 2 on page 28. Once in the PARENTAL MENU, press the CHANNEL/ Navigation UP 1 or DOWN 2 button until TV RATING is selected, then press the VOLUME UP/Navigation Right button 3 to select it . 3 4 1 2 3 1 4 Press the CHANNEL/Navigation UP 1 or DOWN 2 button to select a rating (see below), then press the VOLUME UP/Navigation Right button 3 once to select it.
SETTING PARENTAL CONTROL (CONTINUED) CANADIAN ENGLISH SET-UP 1 2 1 2 3 Enter the PARENTAL menu screen as described in Steps 1 and 2 on page 28. Once in the PARENTAL MENU, press the CHANNEL/ Navigation UP 1 or DOWN 2 button until CA ENG (Canadian English) RATING is selected, then press the VOLUME UP/Navigation Right button 3 to select it .
SETTING PARENTAL CONTROL (CONTINUED) CANADIAN FRENCH SET-UP 1 2 1 2 3 Enter the PARENTAL menu screen as described in Steps 1 and 2 on page 28. Once in the PARENTAL MENU, press the CHANNEL/ Navigation UP 1 or DOWN 2 button until CA FR (Canadian French) RATING is selected, then press the VOLUME UP/Navigation Right button 3 to select it .
SETTING PARENTAL CONTROL (CONTINUED) CHANGING THE PASSWORD 1 2 1 2 Enter the PARENTAL menu screen as described in Steps 1 and 2 on page 28. 3 3 Once in the PARENTAL MENU, press the CHANNEL/ Navigation UP 1 or DOWN 2 button until CHANGE PIN is selected, then press the VOLUME UP/Navigation Right button 3 to select it . 4 1 2 Use the Number (0-9) buttons 1 to enter the new password, press the VOLUME UP/Navigation Right button 2.
SETTING PARENTAL CONTROL (CONTINUED) TURNING PARENTAL LOCK ON OR OFF 1 2 1 2 Enter the PARENTAL menu screen as described in Steps 1 and 2 on page 28. After setting the parental settings, turn Parental Lock ON or OFF as shown on this page. 3 1 2 3 Once in the PARENTAL MENU, press the CHANNEL/ Navigation UP 1 or DOWN 2 button until PARENTAL LOCK is selected, then press the VOLUME UP/Navigation Right button 3 to select it .
SETTING PARENTAL CONTROL (CONTINUED) DOWNLOADING THE VCHIP (ATSC ONLY) The function of Download Vchip is same as the other parental control rating settings (i.e. such as TV Rating, CANADIAN FRENCH rating set up,etc.). However, these rating levels are downloaded from the corresponding program and some of the program may not have this function. 1 2 1 2 Enter the PARENTAL menu screen as described in Steps 1 and 2 on page 28.
SETTING PARENTAL CONTROL (CONTINUED) RESETTING ALL 1 2 1 2 This function will reset the all of the v-chip/parental settings, except the password. Enter the PARENTAL menu screen as described in Steps 1 and 2 on page 28. 3 1 2 3 Once in the PARENTAL MENU, press the CHANNEL/ Navigation UP 1 or DOWN 2 button until CLEAR ALL is selected, then press the VOLUME UP/Navigation Right button 3 to select it .
TROUBLESHOOTING GUIDE Check the following before requesting service: SYMPTOM POSSIBLE CAUSE No power. The AC adapter/cord is not connected. POWER POSSIBLE SOLUTION TV BROADCAST RECEPTION Poor or no picture. Picture wobbles or drifts. (TV–NTSC only) Connect the AC adapter/cord properly. TV station experiencing problems. Try another channel. Possible local interference. Check for source of reception disturbance. Picture control is not adjusted. Check picture control adjustments.
RECEPTION DISTURBANCES For TV mode (NTSC mode), most types of television interference can be remedied by adjusting the height and position of the VHF/UHF antenna. Outdoor antennas are recommended for best results if not using cable or a satellite. The most common types of television interference are shown below. If one of these symptoms appear when the TV is connected to a Cable TV system, the disturbance may be caused by the local cable company broadcast.
SPECIFICATIONS Power Source ......................................................................................................DC IN 12V z LCD Monitor .............................................................................................................19" LCD Panel Viewing Angle..........................................................................................................H: 150° V: 140° Screen Ratio ......................................................................................
CARE AND MAINTENANCE To prevent fire or shock hazard, disconnect your unit from the AC power source when cleaning. The finish on the unit may be cleaned with a dust cloth and cared for as other furniture. Use caution when cleaning and wiping the plastic parts. Mild soap and a soft, damp cloth may be used. FOR ADDITIONAL SET-UP OR OPERATING ASSISTANCE, PLEASE VISIT OUR WEBSITE AT WWW.MEMOREXELECTRONICS.COM OR CONTACT CUSTOMER SERVICE AT (954) 660-7100.
CONTENIDO Contenido ..............................................................................................................................................................................1 Importantes medidas de seguridad....................................................................................................................................2 Fuente de energía....................................................................................................................................
IMPORTANTES MEDIDAS DE SEGURIDAD NOTIFICACIÓN DE FCC: Este aparato cumple con la Parte 15 de las normas de la FCC. El funcionamiento está sujeto a las siguientes dos condiciones: (1) Este aparato no debe causar interferencia dañina y (2) este aparato debe aceptar cualquier interferencia que reciba, incluso aquella interferencia que pueda causar una operación indeseada. ADVERTENCIA: PARA REDUCIR EL RIESGO DE INCENDIO O DESCARGA ELÉCTRICA, NO EXPONGA ESTE PRODUCTO A LA LLUVIA NI A LA HUMEDAD.
IMPORTANTES MEDIDAS DE SEGURIDAD PRECAUCIÓN RIESGO DE DESCARGA ELÉCTRICA. NO ABRIR. PRECAUCIÓN: PARA REDUCIR EL RIESGO DE DESCARGA ELÉCTRICA, NO QUITE LA CUBIERTA (O TAPA POSTERIOR). NO HAY PIEZAS EN EL INTERIOR QUE EL USUARIO PUEDA REPARAR. REMITA LAS REPARACIONES AL PERSONAL DE SERVICIO CALIFICADO. (Esta etiqueta con marca de alerta y clasificación se encuentra en el gabinete inferior de la unidad.
IMPORTANTES MEDIDAS DE SEGURIDAD 14. Líneas aéreas de energía eléctrica. Como medida de precaución, cuando instale una antena exterior, hágalo lo más lejos posible de las líneas aéreas de energía eléctrica, ya que la antena podría caer sobre dichas líneas y causar un cortocircuito. Asimismo, nunca deberá tocarlas ya que podría ser fatal. 15. Sobrecarga Nunca sobrecargue los enchufes ni extensiones, ya que podría resultar en un incendio o cortocircuito. 16.
FUENTE DE ENERGÍA Para operar la unidad con corriente alterna, conecte el adaptador de CA (incluido) al contacto eléctrico de 12VCD (z) que se encuentra en la parte posterior de la unidad. Conecte el cable eléctrico a un adaptador y conecte el otro extremo a un contacto eléctrico 120VCA, 60 Hz. NOTAS: • Cuado encienda la unidad, el adaptador de CA se calentará. Eso es normal y sugerimos que coloque el adaptador de CA en un lugar fresco.
PANEL LATERAL UBICACIÓN DE LOS CONTROLES 1 2 3 4 5 6 Puede obtener acceso al panel lateral presionando las pestañas en la tapa lateral para luego levantarla. Después de realizar las conexiones, deslice los cables a través de la abertura inferior en la tapa lateral y coloque nuevamente la tapa en su lugar. 1. 2. 3. 4. 5. 6. 7. 8. 9.
INSTALACIÓN DE LAS BATERÍAS CONTROL REMOTO 1 AA AAA AAA AA 1 2 3 1. Abra el compartimiento de la batería ejerciendo presión sobre la pestaña y levantándola. 2. Instale dos (2) baterías “AA” (no incluidas), respetando el diagrama de polaridades en el compartimiento de baterías. 3. Coloque nuevamente la tapa del compartimiento de baterías. PRECAUCIONES CON LA BATERÍA Siga estas precauciones al usar baterías con este aparato: 1. Use sólo baterías del tamaño y tipo especificado. 2.
CONEXIONES DE CABLE (CATV)/SATÉLITE Este televisor tiene un alcance extendido de sintonización y puede sintonizar la mayoría de los canales de cable sin usar una caja convertidora de TV por cable. Algunas compañías de TV por Cable ofrecen “canales premium de paga” donde la señal está codificada. Descodificar estas señales para verlas de manera normal requiere el uso de un dispositivo descodificador que, generalmente, es suministrado por la compañía de cable.
CONEXIONES DE LA ANTENA CONEXIÓN DE LA ANTENA VHF/UHF EXTERIOR (ANTENA NO INCLUIDA) Siga las instrucciones para el tipo de antena que pretende usar. Antena de combinación VHF/ UHF (un solo cable de 75 ohmios o un cable bifilar de plomo de 300 ohmios) Antena de combinación VHF/UHF (cables bifilares de plomo separados para VHF y UHF de 300 ohmios) Conecte el cable de 75 ohmios de la antena de combinación VHF/UHF al conector de la antena.
CONEXIONES DE LA VIDEOCASETERA CONEXIÓN CON UN CABLE COAXIAL: Siga las instrucciones a continuación para conectar una videocasetera al televisor usando un cable coaxial de 75 ohmios. (LOS CABLES NO SE INCLUYEN.) Videocasetera Cable entrante de CATV Del conector de salida Puede obtener acceso al panel lateral presionando las en la tapa lateral para luego levantarla..
CONEXIONES DE LA VIDEOCASETERA CONEXIÓN CON EL CABLE DE S-VIDEO Siga las instrucciones a continuación para conectar una videocasetera con S-VIDEO al televisor usando un cable de S-video. (LOS CABLES NO SE INCLUYEN.) Cable entrante de CATV 1. Conecte el cable, satélite o antena entrante al conector de ANT en la parte posterior de la videocasetera. Videocasetera Cable de S-video (no incluido) El panel de conectores se muestra en un costado. La parte superior del panel es este lado.
CONEXIONES DEL DVD (CONTINÚA) CONEXIÓN CON EL CABLE DE S-VIDEO Siga las instrucciones a continuación para conectar un reproductor de DVD al televisor usando el cable de S-Video. (LOS CABLES NO SE INCLUYEN.) Reproductor de DVD Cable de S-video (no incluido) El panel de conectores se muestra en un costado. La parte superior del panel es este lado. De los conectores de salida del DVD Cable de audio A los conectores de entrada del televisor 1.
CONEXIÓN A LA COMPUTADORA Siga las instrucciones a continuación para conectar una computadora al televisor o monitor. (LOS CABLES NO SE INCLUYEN.) El panel de conectores se muestra en un costado. La parte superior del panel es este lado. Computadora Del conector de Delsalconector de salo ida deDelVGconector de ida de audi salida de VGA Al conector de entrada de VGA 1. 2. Apague el televisor y su computadora (PC).
CONFIGURAR LA IMAGEN 1 CONFIGURACIÓN DE LOS MENÚS 2 1 1 2 2 3 Presione el botón de ESPERA 1 para encender el televisor; el indicador de STANDBY [espera] se apagará. Presione el botón de MENÚ 2; aparecerá la pantalla de Menú principal. Seleccione Picture [imagen] usando el botón de CANAL/ Navegación Arriba 1 o Abajo 2, luego presione el botón de Subir VOLUMEN/Navegación Derecha 3 para seleccionar la opción.
CONFIGURACIÓN DE LOS MENÚS (CONTINÚA) CONFIGURAR LAS OPCIONES AVANZADAS (SÓLO EN MODO DE PC) 1 2 1 2 4 3 Mientras está en modo de PC y está conectado a la computadora mediante el conector de VGA, siga los Pasos 1 y 2 en la página anterior para entrar al menú como se indica. Seleccione Advanced [avanzado] usando el botón de CANAL/ Navegación Arriba 1 o Abajo 2 y luego presione el botón de Subir VOLUMEN/Navegación Derecha 3.
CONFIGURACIÓN DE LOS MENÚS (CONTINÚA) SELECCIONAR LA RECEPCIÓN (TV/CATV) 1 2 1 1 2 2 3 3 Presione el botón de ESPERA 1 para encender el televisor; el indicador de STANDBY [espera] se apagará. Presione el botón de FUENTE 2 para seleccionar TV (NTSC) o ATSC. Presione el botón de MENÚ 3; aparecerá la pantalla de Menú principal. NOTA: Para recibir la señal de ATSC, presione repetidamente el botón de FUENTE 2 para seleccionar el modo de ATSC o seleccione el modo de TV para la señal de NTSC.
CONFIGURACIÓN DE LOS MENÚS (CONTINÚA) CONFIGURAR LOS CANALES EN LA MEMORIA 1 1 2 2 2 3 1 2 4 3 Seleccione Setup [ajuste] usando el botón de CANAL/ Navegación Arriba 1 o Abajo 2, luego presione el botón de Subir VOLUMEN/Navegación Derecha 3 para seleccionar la opción. Seleccione Preset [predefinido] usando el botón de CANAL/ Navegación Arriba 1 o Abajo 2, luego presione el botón de Subir VOLUMEN/Navegación Derecha 3 para seleccionar la opción.
CONFIGURACIÓN DE LOS MENÚS (CONTINÚA) AÑADIR Y BORRAR CANALES 1 2 Presione el botón de ESPERA para encender el televisor; el indicador de STANDBY [espera] se apagará. Presione el botón de FUENTE 1 para seleccionar TV (NTSC o ATSC). Seleccione el canal que desee borrar o añadir usando los botones de Número 2. Presione el botón de MENÚ 3; aparecerá la pantalla de Menú principal.
CONFIGURACIÓN DE LOS MENÚS (CONTINÚA) CONFIGURAR EL CANAL FAVORITO (SÓLO EN MODO DE ATSC) 1 2 1 1 2 2 3 Presione el botón de ESPERA 1 para encender el televisor; el indicador de STANDBY [espera] se apagará. Cuando esté en modo de ATSC, y con el canal deseado seleccionado, presione el botón de MENÚ 2; aparecerá la pantalla del Menú principal.
CONFIGURACIÓN DE LOS MENÚS (CONTINÚA) CONFIGURAR EL IDIOMA 1 2 1 2 2 1 2 3 Seleccione Setup [ajuste] usando el botón de CANAL/ Navegación Arriba 1 o Abajo 2, luego presione el botón de Subir VOLUMEN/Navegación Derecha 3 para seleccionar la opción. Seleccione Language [idioma] usando el botón de CANAL/ Navegación Arriba 1 o Abajo 2, luego presione el botón de Subir VOLUMEN/Navegación Derecha 3 para seleccionar la opción.
CONFIGURACIÓN DE LOS MENÚS (CONTINÚA) CONFIGURAR LA ZONA HORARIA Y EL HORARIO DE VERANO (SÓLO EN MODO DE ATSC) 1 2 1 2 2 Presione el botón de ESPERA 1 para encender el televisor; el indicador de STANDBY [espera] se apagará. Presione el botón de MENÚ 2; aparecerá la pantalla de Menú principal. 4 2 4 3 Seleccione Setup [ajuste] usando el botón de CANAL/ Navegación Arriba 1 o Abajo 2, luego presione el botón de Subir VOLUMEN/Navegación Derecha 3 para seleccionar la opción.
OPERACIÓN DEL TELEVISOR 1 2 1 2 2 Presione el botón de ESPERA 1 para encender el televisor; el indicador de STANDBY [espera] se apagará. Presione el botón de FUENTE 2 para seleccionar el modo deseado: TV (NTSC) o ATSC. 3 3 4 2 1 1 Ajuste el nivel de volumen presionando el botón de Subir VOLUMEN/Navegación derecha 1 o Bajar VOLUMEN/ Navegación Izquierda 2. El nivel del volumen se indicará en la parte inferior de la pantalla.
SILENCIO 1 OPERACIÓN DEL TELEVISOR (CONTINÚA) FUENTE 1 Presione el botón de SILENCIO para apagar el sonido. El sonido del televisor será silenciado y el indicador de Mute [silencio] aparecerá en la parte inferior izquierda de la pantalla. Puede activar nuevamente el sonido presionando de nuevo este botón; el indicador de Mute [silencio] desaparecerá de la pantalla.
IMAGEN 1 OPERACIÓN DEL TELEVISOR (CONTINÚA) DORMIR 1 Presione repetidamente el botón de IMAGEN para seleccionar la configuración de imagen deseada (USUARIO, DINÁMICA, SUAVE o NORMAL). Seleccione USUARIO para usar los predefinidos realizados en la página 14: Configurar la imagen. Configure la unidad para que permanezca encendida durante un tiempo predefinido, de la siguiente manera: Presione una vez el botón de DORMIR y “0 min” aparecerá en la pantalla.
GUÍA 1 OPERACIÓN DEL TELEVISOR (CONTINÚA) INFORMACIÓN 1 Mientras ve un programa digital (ATSC), presione el botón de GUÍA para ver la guía. La guía le permite seleccionar los canales a partir de una lista de canales y también le brinda información acerca del canal actual. NOTA: La información del canal debe estar disponible en el canal.
SUBTÍTULOS (para TV [NTSC], AV o S-Video) ¿QUÉ SON LOS SUBTÍTULOS OPCIONALES? Este televisor puede descodificar y mostrar los programas de televisión o una unidad conectada con los conectores de entrada de AV o S-video con subtítulos. Los subtítulos mostrarán un texto en la pantalla para videntes con problemas auditivos o traducirá y mostrará el texto en otro idioma. Generalmente, los subtítulos en inglés se transmiten en Subtítulos 1 y los subtítulos en otros idiomas se transmiten en Subtítulos 2, 3 y 4.
SUBTÍTULOS DE ATSC 1 SUBTÍTULOS (para ATSC) 2 1 2 2 Presione el botón de ESPERA 1 para encender el televisor; el indicador de STANDBY [espera] se apagará. Mientras está en modo de ATSC, presione el botón de MENÚ 2; aparecerá la pantalla del menú principal.
USAR EL MENÚ DE CONTROL INFANTIL El control infantil (V-Chip) permite que los padres eviten que los niños vean programas inadecuados en el televisor. El control infantil lee las clasificaciones para la programación (excepto para noticieros, deportes, películas no editadas en el canal premium de cable y las señales del Sistema de emergencias), y luego niega el acceso a la programación si la clasificación del programa cumple con las limitantes que usted escogió. En este caso, el programa se bloqueará.
CONFIGURAR EL CONTROL INFANTIL (CONTINÚA) CONFIGURACIÓN DE CLASIFICACIÓN PARA PELÍCULAS 1 2 1 2 3 Entre a la pantalla del menú de PARENTAL como se describe en los pasos 1 y 2 en la página anterior. Una vez en el menú de CONTROL INFANTIL, presione el botón de CANAL/Navegación Arriba 1 o Abajo 2 hasta que seleccione MOVIE RATING [clasificación de películas], luego presione el botón de Subir VOLUMEN/Navegación Derecha 3 para seleccionar la opción.
CONFIGURAR EL CONTROL INFANTIL (CONTINÚA) CONFIGURACIÓN DE CLASIFICACIÓN DE TELEVISIÓN 1 2 1 3 2 Entre a la pantalla del menú de PARENTAL como se describe en los pasos 1 y 2 en la página 28. 3 1 2 Una vez en el menú de CONTROL INFANTIL, presione el botón de CANAL/Navegación Arriba 1 o Abajo 2 hasta que seleccione TV RATING [clasificación de televisión], luego presione el botón de Subir VOLUMEN/Navegación Derecha 3 para seleccionar la opción.
CONFIGURAR EL CONTROL INFANTIL (CONTINÚA) CONFIGURACIÓN PARA INGLÉS CANADIENSE 1 2 1 2 Entre a la pantalla del menú de PARENTAL como se describe en los pasos 1 y 2 en la página 28. 3 1 2 3 Una vez en el menú de CONTROL INFANTIL, presione el botón de CANAL/Navegación Arriba 1 o Abajo 2 hasta que seleccione CA ENG RATING [clasificación de inglés canadiense], luego presione el botón de Subir VOLUMEN/Navegación Derecha 3 para seleccionar la opción.
CONFIGURAR EL CONTROL INFANTIL (CONTINÚA) CONFIGURACIÓN PARA FRANCÉS CANADIENSE 1 2 1 2 Entre a la pantalla del menú de PARENTAL como se describe en los pasos 1 y 2 en la página 28. 3 1 2 3 Una vez en el menú de CONTROL INFANTIL, presione el botón de CANAL/Navegación Arriba 1 o Abajo 2 hasta que seleccione CA FR RATING [clasificación de francés canadiense], luego presione el botón de Subir VOLUMEN/ Navegación Derecha 3 para seleccionar la opción.
CONFIGURAR EL CONTROL INFANTIL (CONTINÚA) CAMBIAR LA CONTRASEÑA 1 2 1 2 Entre a la pantalla del menú de PARENTAL como se describe en los pasos 1 y 2 en la página 28. 3 3 Una vez en el menú de CONTROL INFANTIL, presione el botón de CANAL/Navegación Arriba 1 o Abajo 2 hasta que seleccione CHANGE PIN [cambiar NIP], luego presione el botón de VOLUMEN/Navegación Derecha 3 para seleccionar la opción. 4 1 2 Cuando termine, presione el botón de MENÚ cuatro veces para salir de los menús.
CONFIGURAR EL CONTROL INFANTIL (CONTINÚA) ACTIVAR O DESACTIVAR EL CONTROL INFANTIL 1 2 1 2 Entre a la pantalla del menú de PARENTAL como se describe en los pasos 1 y 2 en la página 28. Después de ajustar la configuración del control infantil, active o desactive el Control infantil como se muestra en esta página.
CONFIGURAR EL CONTROL INFANTIL (CONTINÚA) DESCARGAR EL VCHIP (SÓLO ATSC) La función de Descargar Vchip es la misma que las configuraciones de clasificación del control infantil (es decir, como la configuración de la Clasificación de TV o la Clasificación de FRANCÉS CANADIENSE, etc.). Sin embargo, estos niveles de clasificación se descargan del programa correspondiente y es posible que algunos de los programas no tengan esta función.
CONFIGURAR EL CONTROL INFANTIL (CONTINÚA) RESTABLECER TODO 1 2 1 2 Esta función restablece todas las configuraciones de vchip/control infantil, excepto la contraseña. Entre a la pantalla del menú de PARENTAL como se describe en los pasos 1 y 2 en la página 28. 3 1 2 3 Una vez en el menú de Control infantil, presione el botón de CANAL/Navegación Arriba 1 o Abajo 2 hasta que seleccione CLEAR ALL [borrar todo], luego presione el botón de VOLUMEN/Navegación Derecha 3 para seleccionar la opción.
GUÍA DE DIAGNÓSTICO Revise primero los siguientes puntos antes de pedir ayuda a servicio: SÍNTOMA CAUSA POSIBLE No enciende. El adaptador de CA/cable eléctrico no está Conecte el adaptador de CA/cable eléctrico conectado. correctamente. ENERGÍA RECEPCIÓN DE LA TRANSMISIÓN DE TV Imagen deficiente o sin imagen. La estación de TV tiene problemas. Pruebe otro canal. Posible interferencia local. Revise si hay un disturbio en la fuente de recepción. El control de imagen no se ajusta.
INTERFERENCIAS EN LA RECEPCIÓN En el modo de TV (NTSC), la mayoría de las interferencias por televisión se pueden remediar ajustando la altura y posición de la antena VHF/UHF. Recomendamos las antenas exteriores para obtener los mejores resultados si no está usando cable o satélite. Los tipos más comunes de interferencia de televisión se muestran a continuación.
ESPECIFICACIONES Fuente de energía .................................................................................Entrada de 12VCD, z Monitor PCL..................................................................................Pantalla de cristal líquido de 19” Ángulo de perspectiva.............................................................................................H: 150° V: 140° Relación de la pantalla..............................................................................................
CUIDADO Y MANTENIMIENTO Para evitar un incendio o descarga eléctrica, desconecte su unidad de la corriente eléctrica cuando la esté limpiando. El acabado de su receptor puede limpiarse con un trapo seco como cuidaría cualquier otro mueble. Tenga cuidado al limpiar y frotar las partes de plástico. Puede usar jabón neutro y un trapo húmedo. PARA OBTENER AYUDA ADICIONAL CON RESPECTO A LOS AJUSTES O A LA OPERACIÓN, VISITE NUESTRO SITIO WEB EN WWW.MEMOREXELECTRONICS.
Memcorp, Inc. Weston, FL Printed in / Impreso en Hong Kong Visit our website at / Visite nuestro sitio web en www.memorexelectronics.