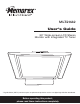
MLT2022 User’s Guide 20" Wide-screen LCD Stereo Monitor with Integrated TV Tuner * High Definition (HDTV) monitors require an optional set-top box to receive true digital high definition broadcasts. Before operating this product, please read these instructions completely.
CONTENTS Contents ................................................................................................................................................................................1 Important Safety Instructions..............................................................................................................................................2 Power Source...................................................................................................................................
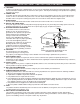
IMPORTANT SAFETY INSTRUCTIONS FCC NOTICE: This equipment has been tested and found to comply with the limits for a Class B digital device, pursuant to part 15 of the FCC Rules. These limits are designed to provide reasonable protection against harmful interference in a residential installation. This equipment generates, uses and can radiate radio frequency energy and, if not installed and used in accordance with the instructions, may cause harmful interference to radio communications.
IMPORTANT SAFETY INSTRUCTIONS (CONTINUED) CAUTION RISK OF ELECTRIC SHOCK DO NOT OPEN CAUTION: TO REDUCE THE RISK OF ELECTRIC SHOCK, DO NOT REMOVE COVER (OR BACK). NO USER-SERVICEABLE PARTS INSIDE. REFER SERVICING TO QUALIFIED SERVICE PERSONNEL.
IMPORTANT SAFETY INSTRUCTIONS (CONTINUED) 13. LIGHTNING To protect your product from a lightning storm, or when it is left unattended and unused for long periods of time, unplug it from the wall outlet and disconnect the antenna or cable system. This will prevent damage to the product due to lightning and power-line surges. 14.
POWER SOURCE When using a 3-pronged plug 3-pronged Receptacle To operate the unit using AC power, connect the AC adapter (included) to the DC 12V IN jack (z) on the rear of the unit. Connect the AC cord to the adapter and connect the other end to a wall outlet having 120V AC, 60Hz only. NOTE: When you turn on the unit, the AC adapter will become warm or hot. This is normal and it is suggested to put the AC adapter in a cool place. LOCATION OF CONTROLS FRONT 1. 2. 3. 4. 5.
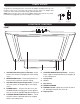
LOCATION OF CONTROLS (CONTINUED) REAR PANEL 1 1. 2. 3. 4. 5. 6. 2 3 4 5 6 Main POWER Switch z) DC 12V IN Jack (z Earphone Jack VGA (PC) AUDIO IN Jack VGA (PC) IN Jack COMPONENT IN Jacks (CR/CB/Y) 7. 8. 9. 10. 11. 11 2 3 12 4 13 14 5 6 7 8 9 10 8 9 10 11 COMPONENT IN Audio Left/Right Jacks VIDEO IN Jack S-VIDEO IN Jack AUDIO Left/Right IN Jacks UHF/VHF Antenna IN Jack 1. POWER Button 2. Direct Channel Selection/Number (0-9) Buttons 3. 1-- Button 4. TV/VIDEO Button 5. SLEEP Button 6.
BATTERY INSTALLATION REMOTE CONTROL 1 Slide to open the battery compartment cover. Install two “AAA” batteries (not included), paying attention to the polarity diagram in the battery compartment. Replace the battery compartment cover. BATTERY PRECAUTIONS Follow these precautions when using batteries in this device: 1. Use only the size and type of batteries specified. 2. Be sure to follow the correct polarity when installing the batteries as indicated in the battery compartment.
CABLE (CATV)/SATELLITE CONNECTIONS This TV has an extended tuning range and can tune most cable channels without using a Cable TV converter box. Some Cable TV companies offer “premium pay channels” in which the signal is scrambled. Descrambling these signals for normal viewing requires the use of a descrambler device which is generally provided by the cable company.
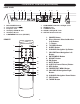
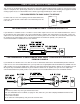
OUTDOOR ANTENNA CONNECTIONS OUTDOOR VHF/UHF ANTENNA CONNECTION (ANTENNA NOT SUPPLIED) Follow the instructions for the type of antenna system you intend to use. Combination VHF/UHF Antenna (Single 75 ohm cable or 300 ohm twin-lead wire) Combination VHF/UHF Antenna (Separate VHF and UHF 300 ohm twin-leads) Separate VHF/UHF Antennas UHF 300 Ohm UHF 300 Ohm VHF/UHF Combiner 75 Ohm Connect the 75 ohm cable from the combination VHF/UHF antenna to the antenna jack.
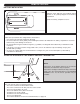
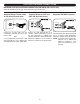
VCR CONNECTIONS CONNECTION USING COAXIAL CABLE: Follow the instructions below to connect a VCR to your television using a 75 ohm coaxial cable. (CABLES NOT INCLUDED.) REAR OF TV VCR INCOMING CATV CABLE From VCR OUT jack 1. Connect the cable, satellite or incoming antenna to the VHF/UHF IN jack on the rear of the VCR. 2. Connect a 75 ohm coaxial cable from the VCR’s 75 Ohm OUT jack to the ANT jack on the rear of the TV. 3.
VCR CONNECTIONS (CONTINUED) CONNECTION USING S-VIDEO CABLE: Follow the instructions below to connect an S-VIDEO VCR to your television using an S-video cable. (CABLES NOT INCLUDED.) 1. Connect the cable, satellite or incoming antenna to the ANT jack on the rear of the VCR. 2. Connect the left and right audio cable from the VCR’s Audio OUT jacks to the TV’s audio left and right IN jacks. 3. Connect the VCR’s S-VIDEO OUT jack to the TV’s S-VIDEO IN jack. 4.
DVD CONNECTIONS CONNECTION USING AUDIO/VIDEO CABLES: Follow the instructions below to connect a DVD player to your television using Audio/Video cables. (CABLES NOT INCLUDED.) 1. Connect the left and right audio cable from the DVD’s Audio OUT jacks to the TV’s audio left and right AUDIO IN jacks. Connect the DVD’s video OUT jack to the TV’s VIDEO IN jack. 2. Press the TV/VIDEO button until AV appears on the TV screen and press PLAY on the DVD to watch a DVD.
DVD CONNECTIONS (CONTINUED) CONNECTION USING COMPONENT CABLES: Follow the instructions below to connect a DVD player to your television using the Cr, Cb, Y jacks. (CABLES NOT INCLUDED.) 1. Connect the left and right audio cable from the DVD’s Audio OUT jacks to the TV’s audio left and right COMPONENT IN jacks. 2. Connect the component cables (not included) from the DVD's Pr/Cr, Pb/Cb, Y OUT jacks to the TVs Component IN (Pr/Cr, Pb/Cb, Y) jacks. 3.
SETTING THE MENU TURNING THE MAIN POWER ON 1 2 Press the Main POWER switch to the On (I) position to turn the power on and enter the Standby mode; the POWER indicator will light red. Press the POWER button to turn on the TV; the POWER indicator will light green. SETTING THE VIDEO 1 2 1 2 Make sure the main power switch is on as shown above, then press the POWER button 1 to turn on the TV; the POWER indicator will light green. Press the ENTER/MENU button 2; the Video Menu screen will appear.
SETTING THE MENU (CONTINUED) PICTURE IN PICTURE (You must have a VGA and another source connected) 1 2 3 Set the Video to PC as shown on previous page. NOTE: You must select the Video mode to PC, otherwise, the picture in picture function will not be able to operate. Press the ENTER/MENU button; the Video Menu screen will appear. 2 1 2 Press the CHANNEL/Navigation UP 1 or DOWN 2 button to select PICTURE IN PICTURE, then press the ENTER/MENU button 3 to select it.
SETTING THE MENU (CONTINUED) IMAGE SETUP 1 2 1 1 3 2 Smart Theme 2 Smart Theme Standard Standard Make sure the main power switch is on as shown on page 14, then press the POWER button 1 to turn on the TV; the POWER indicator will light green. Press the ENTER/MENU button 2; the Video Menu screen will appear. Press the CHANNEL/Navigation UP 1 or DOWN 2 button to select IMAGE SETUP, then press the ENTER button 3 to select it.
SETTING THE MENU (CONTINUED) IMAGE SETUP (CONTINUED) 7 4 2 8 1 3 5 9 4 5 2 1 3 1 2 3 Smart Theme H-Position V-Position Phase Clock Auto Adjust Multimedia Press the CHANNEL/Navigation UP 1 or DOWN 2 button until H-Position is selected. Adjust the window's horizontal position using the VOLUME UP/Navigation Right 3 or VOLUME DOWN/Navigation Left 4 button. When done, press the ENTER/MENU button 5. NOTE: The H-Position setting is for PC(VGA) mode only.
User EQ SETTING THE MENU (CONTINUED) AUDIO SETUP 1 Mono 2 1 3 2 1 2 User EQ Mono Make sure the main power switch is on as shown on page 14, then press the POWER button 1 to turn on the TV; the POWER indicator will light green. Press the ENTER/MENU button 2; the Video Menu screen will appear. Press the CHANNEL/Navigation UPUser 1EQor DOWN 2 button Mono 3 to to select AUDIO, then press the ENTER/MENU button select it.
User EQ User EQ SETTING THE MENU (CONTINUED) Mono Mono User EQ AUDIO SETUP (CONTINUED) Mono 7 4 2 1 3 8 4 User EQ Mono User EQ 2 1 3 User EQ Mono Mono Press the CHANNEL/Navigation UP 1 or DOWN 2 button until SOURCE is selected. Set the desired audio source using the VOLUME UP/NavigationUserRight 3 or VOLUME EQ DOWN/Navigation Left 4 button. NOTE: You can only set the SOURCE during theMono Picture in User EQ Picture is activating.
FEATURE SETUP 1 SETTING THE MENU (CONTINUED) 2 1 2 4 3 4 5 2 1 3 Make sure the main power switch is on as shown on page 14, then press the POWER button 1 to turn on the TV; the POWER indicator will light green. Press the ENTER/MENU button 2; the Video Menu screen will appear. Press the CHANNEL UP 3 or DOWN 4 button to select FEATURE, then press the ENTER/MENU button 2 to select it.
SETTING THE MENU (CONTINUED) FEATURE SETUP (CONTINUED) 7 4 2 1 8 3 3 Press the CHANNEL/Navigation UP 1 or DOWN 2 button until LANGUAGE is selected. Set the desired on-screen language (ENGLISH, SPANISH, FRENCH) using the VOLUME UP/Navigation Right 3 or VOLUME DOWN/Navigation Left 4 button. 1 2 Press the CHANNEL/Navigation UP 1 or DOWN 2 button until RECALL is selected. To reset the options to the default settings, press the ENTER/MENU button 3.
1 SETTING THE SYSTEM AND SETTING THE CHANNELS INTO MEMORY 2 3 1 2 Make sure the main power switch is on as shown on page 14, then press the POWER button 1 to turn on the TV; the POWER indicator will light green. Press the TV/VIDEO button 2 repeatedly to select the TV mode. Press the ENTER/MENU button 3; the Video Menu screen will appear. Press the CHANNEL/Navigation UP 1 or DOWN 2 button to select TV SETUP, then press the ENTER/MENU button 3 to select it.
ADDING AND SKIPPING CHANNELS After setting channels into memory, you can add or delete channels as follows: 1 2 1 Make sure the main power switch is on as shown on page 14, then press the POWER button 1 to turn on the TV; the POWER indicator will light green. Press the TV/VIDEO button 2 repeatedly to select the TV mode. Select a channel to delete using the Direct Channel Selection/Number (0-9) buttons 3. 2 3 Press the ENTER/MENU button 1; the Video Menu screen will appear.
1 TV OPERATION 2 Make sure the main power switch is on as shown on page 14, then press the POWER button 1 to turn on the TV; the POWER indicator will light green. Press the TV/VIDEO button 2 repeatedly to select the TV mode. OPTIONS AIR: If using a VHF/UHF antenna. CATV: If using Cable TV. Set the AIR/CABLE (SYSTEM) option as described on page 22. 3 4 3 4 1 2 Adjust the volume level by pressing the VOLUME UP/Navigation Right 1 or VOLUME DOWN/Navigation Left 2 button.
MUTE TV OPERATION (CONTINUED) CHANNEL RETURN 1 1 Press the MUTE button to turn off the sound. The TV’s sound will be silenced and “MUTE” will appear on the screen. The sound can be turned back on by pressing this button again; “MUTE” will disappear from the screen. Press the CHRTN button to go back to the previous channel selected. Press the CHRTN button again to return to the channel you were watching.
INFO TV OPERATION (CONTINUED) THEME 1 1 Press the INFO button once to show the mode (channel number if in TV/CATV mode). Press a second time to clear the screen or wait three seconds and the screen will clear automatically. Repeatedly press the THEME button to select the desired Smart Theme setting (STANDARD, RICH, MULTIMEDIA, NATURE, SOFT). Wait 10 seconds and the text will disappear. NOTE: Smart Theme setting is not available for PC mode.
WHAT IS CLOSED CAPTIONING? CLOSED CAPTIONS Captions 2 through 4. This television has the capability to decode and display Closed Captioned television programs. Closed Captioning will display text on the screen for hearing-impaired viewers or it will translate and display text in another language. TEXT: The Text Closed Caption Mode will usually fill the screen with a programming schedule or other information. Select between Text 1 through 4. OFF: Turns Closed Captions off.
SETTING V-CHIP V-Chip enables parents to prevent their children from watching inappropriate material on TV. V-Chip reads the ratings for programming (except for news, sports, unedited movies on premium cable and Emergency System signals), then denies access to programming if the program’s rating meets the limitations you select. In this case, the program will be blocked.
SETTING PARENTAL CONTROL (CONTINUED) MPAA RATING SET-UP 1 2 1 2 Change password V chip TV Rating MPAA Rating Return Enter the V-CHIP menu screen as described on page 28. Press the CHANNEL/Navigation UP 1 or DOWN 2 button until MPAA RATING is selected. 3 4 Press the VOLUME DOWN/Navigation Left 1 or UP/Navigation Right 2 button to select a rating (see below).
TV RATING SET-UP SETTING PARENTAL CONTROL (CONTINUED) 1 2 Change password V chip TV Rating MPAA Rating Return Enter the V-CHIP menu screen as described on page 28. Press the CHANNEL/Navigation UP 1 or DOWN 2 button until TV-RATING is selected, then press the VOLUME UP button 3 to select it. 3 4 To Block or Unblock a rating, use the CHANNEL/Navigation UP 1 or DOWN 2 button to select the desired rating in the ALL column (see menu above).
SETTING PARENTAL CONTROL (CONTINUED) CHANGING THE PASSWORD 1 2 Change password V chip TV Rating MPAA Rating Return Enter the V-CHIP menu screen as described on page 28. Press the CHANNEL/Navigation UP 1 or DOWN 2 button until PASSWORD SETTING is selected, then press the VOLUME UP button 3 to select it. 3 4 Use the Number (0-9) buttons to enter the new password and re-enter the new password again to confirm, “Change Password OK” will temporarily appear to indicate the password has been changed.
TROUBLESHOOTING GUIDE Check the following before requesting service: SYMPTOM POSSIBLE CAUSE No power. The AC adapter/cord is not connected. Main Power switch not in On (I) position. Connect the AC adapter/cord properly. Press Main Power switch to On (I) position. TV station experiencing problems. Try another channel. Possible local interference. Check for source of reception disturbance. POWER POSSIBLE SOLUTION TV BROADCAST RECEPTION Poor or no picture. Picture wobbles or drifts.
RECEPTION DISTURBANCES Most types of television interference can be remedied by adjusting the height and position of the VHF/UHF antenna. Outdoor antennas are recommended for best results if not using cable or a satellite. The most common types of television interference are shown below. If one of these symptoms appear when the TV is connected to a Cable TV system, the disturbance may be caused by the local cable company broadcast.
SPECIFICATIONS Power Source ......................................................................................................... AC 120V, 60Hz Max. Power Consumption.........................................................................................................60W LCD Monitor .............................................................................................................20" LCD Panel Viewing Angle....................................................................................
CARE AND MAINTENANCE To prevent fire or shock hazard, disconnect your unit from the AC power source when cleaning. The finish on the receiver may be cleaned with a dust cloth and cared for as other furniture. Use caution when cleaning and wiping the plastic parts. Mild soap and a soft, damp cloth may be used. FOR ADDITIONAL SET-UP OR OPERATING ASSISTANCE, PLEASE VISIT OUR WEBSITE AT WWW.MEMOREXELECTRONICS.COM OR CONTACT CUSTOMER SERVICE AT (954) 660-7100.
Memcorp, Inc. Weston, FL Printed in Taiwan Visit our website at www.memorexelectronics.