002-L00-BF4213MEMOH
WEEE This product contains electrical or electronic materials. The presence of these materials may, if not disposed of properly, have potential adverse effects on the environment and human health. Presence of this label on the product means it should not be disposed of as unsorted waste and must be collected separately. As a consumer, you are responsible for ensuring that this product is disposed of properly. This TV incorporates High-Definition Multimedia Interface (HDMITM) technology.
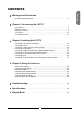
CONTENTS Important Safety Instructions........................................................................................ 2 Chapter 1 Introducing the LCD TV Key Features................................................................................................................ 5 Package Contents........................................................................................................ 6 Setting Your LCD TV...............................................................................
Chapter 1 Introducing the LCD TV
Chapter 1 Introducing the LCD TV ENGLISH
Chapter 1 Introducing the LCD TV
Chapter 1 Introducing the LCD TV Chapter 1 Introducing the LCD TV ENGLISH Key Features Various Audio/Video terminals for external equipment connection ▪ ▪ ▪ ▪ ▪ ▪ ▪ ▪ 2 sets of composite A/V input terminals 1 set of S-VIDEO terminals 2 sets of component Video input terminals 1 VGA/ Audio input terminals 2 HDMI/Audio input terminals 1 set of Audio(L/R) output terminals 2 SPDIF output terminals (Optical x 1 /Coaxial x 1) 1 Headphone terminal The built-in TV tuner to receive HD ATSC ▪ This function allows
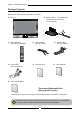
Chapter 1 Introducing the LCD TV Package Contents Make sure all of the following contents are included. Bottom Stand 154-700-BF32H / Screw Driver and Screws 6 101-025-5013H LCD TV Remote Control 845-042-GF1XAB-MEH S.MODE MTS P. MODE CAPTION SLEEP P.SIZE VIDEO Cable 621-181-2000H AUDIO Cable 621-181-60002H MUTE VOL. INPUT GUIDE CH. EXIT INFO MENU LIST FAV.
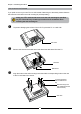
Chapter 1 Introducing the LCD TV Setting Up Your LCD TV ENGLISH How to install the TV Stand Read all instructions before continuing with the stand installation. Attach the Stand the TV with the bottom foam packaging material still attached. a. b. Lift foam packaging material from the top of the LCD out of the box. Lift LCD out of the box, with the bottom foam packaging material still attached, and place onto a stable surface. a b Stand c.
Chapter 1 Introducing the LCD TV How to remove the TV Stand If you prefer to mount your new TV on a wall instead of attaching it to the stand, please reference the instructions included in the wall mounting kit (sold separately). Verify your TV’s model and be sure to use the wall mounting kit specified for your TV model only. Contract your technician for assistance when installing the wall mounting kit. To prevent damaging the surface of the LCD TV, place the TV on a soft cloth.
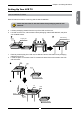
Chapter 1 Introducing the LCD TV How to setup the TV Use an antenna cable to connect the VHF/UHF signal to the LCD TV’s ANT. terminal (refer to page14-18). Connect the AC power cord at the back of the TV and connect the power cord to wall outlet. Insert the two batteries in remote control(battery not included). Step1 Slide the back cover up to open the battery compartment of the remote control. Step2 Insert two AAA size batteries.
Chapter 1 Introducing the LCD TV Your LCD TV Front/Right Side View and Controls LED The LED light is red when the LCD TV is in standby and the LED light is blue when powered up. VIDEO L AUDIO R IR Infrared Receiver VOLUME▲▼ Adjusts the volume up and down. Selects the main-menu item and change values for items when in the OSD mode. VIDEO1 IN VIDEO Connects to the composite Video and Audio output jacks on external video equipment. L AUDIO CHANNEL▲▼ Scans up and down through channels.
Chapter 1 Introducing the LCD TV Rear View and Jacks ENGLISH VIDEO2 IN Connects to the composite VIDEO and AUDIO(L/R) output jacks on external video equipment. HDMI1 IN/HDMI2 IN Connects the all digital AV equipment with HDMI connector.HDMI supports enhanced, high-definition video and two-channel digital audio. The AUDIO(L/R) of HDMI IN is for DVI connection. S-VIDEO IN Connects to the S-VIDEO and AUDIO(L/R) output jacks on external video equipment.
Chapter 1 Introducing the LCD TV Your Remote Control 1 POWER 2 MTS S.MODE MTS P. MODE CAPTION SLEEP P.SIZE 5 3 S.MODE Selects sound effect options: Surround/ Live/Dance/Techno/Classic/Soft/Rock/ Pop/Off. 4 4 P.
Chapter 1 Introducing the LCD TV Displays the Program Guide on the screen. Pressing again to turn GUIDE off. 15 EXIT Exits the OSD menu. 16 ▲▼►◄ Cycles through OSD options and selects individual menu items. OK confirms option settings. 17 INFO Displays information on the LCD TV screen such as input source, channel, program title. 18 MENU Displays the OSD menu on the screen. 19 GREEN In Program Guide, press to select first program of next day. OK S.MODE MTS P. MODE CAPTION SLEEP P.
Chapter 2 Installing the LCD TV Chapter 2 Installing the LCD TV Refer to the owner’s manual of any external equipment to be connected. When connecting any external equipment, do not connect any AC power cords to wall outlets until all other connections are completed. Connecting a TV Cable or an Antenna Antenna Connection The antenna requirements for good color TV reception are more important than those for a black & white TV reception.
Chapter 2 Installing the LCD TV Use one of the following two diagrams when connecting an outdoor antenna. A: Shows how to use a VHF/UHF combination outdoor antenna. B: Shows how to use a separate VHF and/or UHF outdoor antenna. ENGLISH A. Combination VHF/UHF antenna VHF/UHF Antenna 300/75-ohm adapter (not included) 300-ohm twinlead cable VHF/UHF Antenna 75-ohm coaxial cable B.
Chapter 2 Installing the LCD TV Cable TV (CATV) Connection This reminder is provided to call the CATV system installer’s attention to Article 820-40 of the National Electrical Code (NEC) that provides guidelines for proper grounding and, in particular, specifies that the cable ground shall be connected to the grounding system of the building accurately, or as close to the point of cable entry as possible.
Chapter 2 Installing the LCD TV Use an antenna cable to connect the TV signal to the LCD TV’s TV CABLE terminal. ENGLISH HDTV/TV AIR/CABLE VHF/UHF IN Connect the AC power cord at the back of the TV and connect the power cord to wall outlet. HDTV/TV AIR/CABLE VHF/UHF IN This TV is equipped with a safety fuse. In the event of an electrical storm or power outage the safety fuse is designed to protect your TV.
Chapter 2 Installing the LCD TV Press the INPUT button on the remote to display the Input List. Use the ▲▼ buttons to select TV and press the OK button. Input Source TV(CABLE/AIR) VIDEO1 (SIDE) VIDEO2 (REAR) VIDEO3 (S-VIDEO) VIDEO4 (YPbPr1) VIDEO5 (YPbPr2) VIDEO6 (HDMI1) VIDEO7 (HDMI2) COMPUTER(VGA) Press the MENU button on the remote control to display the Main menu, and use the ◄► buttons to select the TV.
Chapter 2 Installing the LCD TV Connecting a VCR HDMI1 IN HDMI2 IN ENGLISH Rear of TV PC/VGA IN AUDIO OUT YPbPr1 IN AUDIO AUDIO L R L Y Pb Pr R STEREO AUDIO L Y Pb DIGITAL OPTICAL R HDTV/TV AIR/CABLE L COAXIAL Pr VHF/UHF IN VIDEO L AUDIO VIDEO2 IN R L R S-VIDEO AUDIO S-VIDEO IN L YPbPr2 IN R R AUDIO AUDIO Cable S-VIDEO Cable AV Cable A B METHOD A: Use a composite cable to connect the VCR’s composite video/audio jacks to the LCD TV’s VIDEO2 IN jacks.
Chapter 2 Installing the LCD TV Connecting a Video Camera or Game console Rear of TV Right Side HDMI1 IN HDMI2 IN PC/VGA IN AUDIO OUT VIDEO YPbPr1 IN AUDIO AUDIO Y Pb Pr STEREO AUDIO DIGITAL OPTICAL L L R L R L R L Y R Pb R HDTV/TV AIR/CABLE L COAXIAL Pr VHF/UHF IN VIDEO IN VIDEO AUDIO VIDEO2 IN L R S-VIDEO AUDIO S-VIDEO IN L YPbPr2 IN R R AUDIO AUDIO Cable or S-VIDEO Cable B GAME CONSOLE AV Cable A METHOD A: Use a composite cable to connect the video camera’s
Chapter 2 Installing the LCD TV Connecting a DVD Player HDMI1 IN HDMI2 IN ENGLISH Rear of TV PC/VGA IN AUDIO OUT YPbPr1 IN AUDIO AUDIO L R L Y Pb Pr AUDIO R L Y Pb STEREO DIGITAL OPTICAL R HDTV/TV AIR/CABLE L COAXIAL Pr VHF/UHF IN VIDEO L AUDIO VIDEO2 IN R L R S-VIDEO AUDIO S-VIDEO IN L YPbPr2 IN R R AUDIO or Pb Pr COMPONENT/AUDIO Cable AUDIO Cable S-VIDEO Cable AV Cable A HDMI Cable B C Pb Pr D DVD PLAYER METHOD A: Use a composite cable to connect the DVD player
Chapter 2 Installing the LCD TV Connect all AC power sources, before turning on the power switch of the LCD TV or other connected equipment. Press the button on the remote to turn on the LCD TV. To watch a DVD, press the INPUT button on the remote, then using the ▲ or ▼ button to select VIDEO2( METHOD A), or VIDEO3 ( METHOD B), or VIDEO4/VIDEO5 (METHOD C), or VIDEO6/VIDEO7 (METHOD D),and press OK button.
Chapter 2 Installing the LCD TV Connecting a Digital TV Cable Box or Digital Satellite Receiver HDMI1 IN ENGLISH Rear of TV PC/VGA IN HDMI2 IN AUDIO OUT YPbPr1 IN AUDIO AUDIO L L R Y Pb Pr R AUDIO L Y Pb STEREO DIGITAL OPTICAL R HDTV/TV AIR/CABLE L COAXIAL Pr VHF/UHF IN VIDEO L AUDIO VIDEO2 IN R L R S-VIDEO AUDIO S-VIDEO IN L YPbPr2 IN Pb R R AUDIO Pr COMPONENT/AUDIO Cable A Pb HDMI Cable Pr B METHOD A: Use a component cable to connect the satellite receiver’s/TV
Chapter 2 Installing the LCD TV Connecting an AV Equipment with HDMI Connector Rear of TV HDMI1 IN HDMI2 IN PC/VGA IN AUDIO OUT YPbPr1 IN AUDIO AUDIO L R L Y Pb Pr R L Y Pb STEREO AUDIO DIGITAL OPTICAL R HDTV/TV AIR/CABLE L COAXIAL Pr VHF/UHF IN VIDEO L AUDIO VIDEO2 IN R L R S-VIDEO AUDIO S-VIDEO IN L YPbPr2 IN R R AUDIO HDMI Cable AV EQUIPMENT Use a HDMI cable to connect the AV equipment’s HDMI output jack to the LCD TV’s HDMI IN jacks.
Chapter 2 Installing the LCD TV Connecting an AV Equipment with DVI Connector HDMI1 IN HDMI2 IN ENGLISH Rear of TV PC/VGA IN AUDIO OUT YPbPr1 IN AUDIO AUDIO L R L Y Pb Pr R L Y Pb STEREO AUDIO DIGITAL OPTICAL R HDTV/TV AIR/CABLE L COAXIAL Pr VHF/UHF IN VIDEO L AUDIO VIDEO2 IN R L R S-VIDEO AUDIO S-VIDEO IN L YPbPr2 IN R R AUDIO AUDIO Cable AUDIO L HDMI-to-DVI Cable R DVI IN AV EQUIPMENT Use a HDMI-to-DVI cable to connect the AV equipment’s DVI output jack to the LCD
Chapter 2 Installing the LCD TV Connecting a PC Rear of TV HDMI1 IN HDMI2 IN PC/VGA IN AUDIO OUT YPbPr1 IN AUDIO AUDIO L R L Y Pb Pr R L Y Pb STEREO AUDIO DIGITAL OPTICAL R HDTV/TV AIR/CABLE L COAXIAL Pr VHF/UHF IN VIDEO L AUDIO VIDEO2 IN R L R S-VIDEO AUDIO S-VIDEO IN L YPbPr2 IN R R AUDIO AUDIO Cable VGA Cable PC Use a D-SUB cable to connect the PC’s D-SUB output jack to the LCD TV’s VGA input jack.
Chapter 2 Installing the LCD TV Connecting an Audio Receiver or a Dolby Digital 5.
Chapter 3 Using the LCD TV Chapter 3 USING THE FEATURES Wide Screen Viewing Wide Screen function allows viewing of 4:3/16:9 images in wide screen mode, cycling through the following wide screen settings. Press the P.SIZE button repeatedly to select the screen format you want. NORMAL Displays at 4:3 aspect ratio NORMAL is not available when you are watching 720p, 1080i, or 1080p source.
Chapter 3 Using the LCD TV Using the Program Guide With the LCD TV connected to a television programming source, press the INPUT button on the remote control and use the ▲▼ button to select TV and press the OK button.
Chapter 3 Using the LCD TV Operating the Menu Press the button to turn the LCD TV on. Press the MENU button on the remote control, the on-screen menu will appear on the screen. Use the ◄► buttons to select your main menu option. VIDEO MENU: Allows you to make adjustments to your picture settings.
Chapter 3 Using the LCD TV TV MENU: Allows you to edit and label channels. TV ENGLISH Channel Scan Tuner Mode Channel Skip Favorite List Time Zone Cable Eastern Time Select Exit SETUP MENU: Allows you to set up a variety of features: Language, Closed Caption, factory reset, Parental Control, sleep timer.
Chapter 3 Using the LCD TV Customizing the VIDEO Settings Press the button to turn the LCD TV on. Press the MENU button on the remote control to display the Main menu, and use the ◄► buttons to select the VIDEO. Use the ▲▼buttons to highlight an individual VIDEO option, use the ◄► buttons to change the setting, and press the MENU to exit the menu.
Chapter 3 Using the LCD TV Color temperature Color Temperature R Gain G Gain B Gain User 120 120 120 Color Temperature Select Back Noise Reduction Select to reduce the noise level of connected equipment: Off/Low/ Medium/Strong. VGA Press the OK button to enter the VGA Setting: Auto Adjust H.Position 72 V. Position 31 Clock 127 Phase 31 VGA Select Exit ▪ Auto Adjust Press the OK button to automatically adjust the display settings to optimize performance based on the VGA mode ▪ H.
Chapter 3 Using the LCD TV Customizing the AUDIO Settings Press the button to turn the LCD TV on. Press the MENU button on the remote control to display the Main menu, and use the ◄► buttons to select the AUDIO.
Chapter 3 Using the LCD TV Allows to selection of the digital sound format: PCM/OFF/Dolby Digital ▪ PCM: The external audio system is connected to the AUDIO OUT (L/R) of the LCD TV ▪ Dolby Digital: The external audio system is connected to the AUDIO OUT DIGITAL (OPTICAL or COAXIAL) ot the LCD TV ▪ OFF: Select OFF to turn off the external audio system SPDIF Type Spea
Chapter 3 Using the LCD TV Customizing the TV Settings Press the button to turn the LCD TV on. Press the MENU button on the remote control to display the Main menu, and use the ◄► buttons to select the TV. Use the ▲▼buttons to highlight an individual TV option, use the ◄► buttons changes the setting, and press the MENU exits the menu.
Chapter 3 Using the LCD TV Press the ▼ button to select the desired channel, andpress the OK button repeatedly to select show () or hide() Allows to set your favorite channels. Select Favorite Edit from the TV option and press the OK button.
Chapter 3 Using the LCD TV Customizing the SETUP Settings Press the button to turn the LCD TV on. Press the MENU button on the remote control to display the Main menu, and use the ◄► buttons to select the SETUP. Use the ▲▼buttons to highlight an individual SETUP option, use the ◄► buttons to change the setting, and press the MENU to exit the menu.
Chapter 3 Using the LCD TV Closed Caption Allows to select from analog or digital closed caption modes and press the OK button.
Chapter 3 Using the LCD TV Parental The Parental Control can be set up to the TV to block Channel, Video Source and to change password. Use the ▼ button to select the Parental, and press the OK to display the Parental menu Use the Program Block function, must enter a four-digit password.
Chapter 3 Using the LCD TV Selects to block a Input source signal Input Block TV(CABLE/AIR) 2 VIDEO1 (SIDE) 3 VIDEO2 (REAR) 4 VIDEO3 (S-VIDEO) 5 VIDEO4 (YPbPr1) 6 VIDEO5 (YPbPr2) 7 VIDEO6 (HDMI1) 8 VIDEO7(HDMI2) 9 COMPUTER(VGA) Input Block Select Back Press the ▲▼ buttons to select the input source. Press the OK button repeatedly to select BLOCK UNBLOCK . or Selects to block program based on downloadable ratings are blocked from viewing.
Chapter 3 Using the LCD TV The Parental block menu includes the following options: U.S. TV Ratings Selects to activate the TV Rating programs. U.S. Movie Ratings Selects to activate the MPAA Rating programs Canadian English Ratings Selects to activate the English Rating programs of Canada. Canadian French Ratings Selects to activate the French Rating programs of Canada Block MPAA Unrated ▪ ▪ YES: Block all movies that are broadcast without a MPAA rating.
Chapter 3 Using the LCD TV U.S. TV Ratings A D L S V FV TV-Y TV-Y7 TV-G TV-PG TV-14 TV-MA Allowed Rating U.S.
Chapter 3 Using the LCD TV Canadian English Ratings The Canadian Englsh Ratings includes the following options: C C8+ G PG 14+ 18+ Allowed Rating Blocked Rating Canadian English Ratings Select Back RATING DESCRIPTION G All children C8+ Children 8 years and older G General programming PG Parental guidance 14+ Viewers 14 and older 18+ Adult programming Use the ◄►▲▼ buttons to select the rating you want and press the OK button repeatedly to select BLOCK or UNBLOCK .
Chapter 3 Using the LCD TV U.S. Movie Ratings G PG PG-13 R NC-17 X Allowed Rating U.S. Movie Ratings Blocked Rating Select Back RATING DESCRIPTION G General Audiences. Movie is appropriate for all ages PG Parental Guidance Suggested. May contain material not suited for younger viewers PG-13 Contains content that may not be appropriate for viewers under the age of 13 R Restricted.
Chapter 3 Using the LCD TV TROUBLESHOOTING Before consulting service personnel, check the following chart for a possible cause of the trouble and for a possible solution. TV will not turn on Make sure the power cord is plugged in, then press the button on the remote. The batteries in the remote control may be exhausted. Replace the batteries. No picture, no sound Check the interface cable between TV and antenna/cable TV. Press the button on the remote.
Specifications SPECIFICATIONS LCD Panel 42” TFT LCD (measured diagonally) Brightness 500 cd/m2 Contrast Ratio Max. Resolution Input Connector MLT4221P Panel Size 1500:1 1920x1080 VIDEO/AUDIO(L/R) 2 S-VIDEO/AUDIO(L/R) 1 YPbPr/AUDIO(L/R) 2 VGA/AUDIO(L/R) 1 HDMI/AUDIO(L/R) 2 AUDIO OUT(L/R) 1 OPTICAL/COAXIAL 1 HEADPHONE 1 Power Source AC100~240V, 50/60HZ, 4.0A Power Consumption 300 W, standby < 3 W Dimension 41.4 w x 31.1 h x 9.7 d inch WEIGHT 62.
Specifications DISPLAY MODE The screen resolution has been optimized during manufacture for the display modes listed below. If the signal from the system equals the standard signal mode, the screen is adjusted automatically. If the signal from the system does not equal the standard signal mode, adjusting the screen resolution by referring to your video card user guide otherwise there may be no video, Video signal: (VGA Standard) Vertical Frequency(Hz) Horizontal Frequency(kHz) 640 x 350 85 37.
Specifications CARE AND MAINTENANCE FOR ADDITIONAL SET-UP OR OPERATING ASSISTANCE, PLEASE VISIT OUR WEBSITE AT WWW.MEMOREXELECTRONICS.COM OR CONTACT CUSTOMER SERVICE: For customers calling within US, call 1-888-636-5238. For customers calling within Mexico, call 001-866-580-9454. PLEASE KEEP ALL PACKAGING MATERIAL FOR AT LEAST 90 DAYS IN CASE YOU NEED TO RETURN THIS PRODUCT TO YOUR PLACE OF PURCHASE OR TO IMATION ELECTRONICS PRODUCTS.
WEEE •Este producto contiene materiales eléctrico o electrónico. La presencia de dichos materiales puede resultar nociva para el medioambiente y la salud si no se desechan adecuadamente. La presencia de esta etiqueta en el producto implica que no se debe tirar con el resto de la basura, sino que es necesario desecharlo por separado. Como consumidor, es usted responsable de asegurar que este producto se deseche adecuadamente. Para saber cómo desechar adecuadamente este producto, visite www.visionquestce.
CONTENIDO Advertencias y Precauciones Medidas de Seguridad Importantes.................................................................................... 2 Capítulo 1 Presentación del TV de LCD Capítulo 2 Instalación del TV de LCD Conectando un Cable de TV o una Antena................................................................ 15 Conectando un VCR................................................................................................... 20 Conectando una Cámara de Video o Consola de Juegos..
Advertencias y Precauciones INSTRUCCIONES DE SEGURIDAD IMPORTANTES AVISO FCC: Este dispositivo cumple con la Sección 15 de las Normativas FCC. Su uso está sujeto a las dos condiciones siguientes: (1) este dispositivo no puede causar interferencias dañinas, y (2) este dispositivo debe aceptar cualquier interferencia recibida, incluyendo interferencias que puedan causar un funcionamiento no deseado.
Advertencias y Precauciones INSTRUCCIONES DE SEGURIDAD IMPORTANTES (CONTINUACIÓN) PRECAUCIÓN RIESGO DE DESCARGA ELÉCTRICA NO ABRIR El punto de exclamación dentro de un triángulo equilátero tiene como función alertar al usuario de la presencia de instrucciones de uso y mantenimiento (reparación) importantes en la documentación que acompaña al dispositivo. ADVERTENCIA: PARA REDUCIR EL RIESGO DE FUEGO O DESCARGA ELÉCTRICA, NO EXPONGA ESTE APARATO A LA LLUVIA O LA HUMEDAD.
Advertencias y Precauciones INSTRUCCIONES DE SEGURIDAD IMPORTANTES (CONTINUACIÓN) 10.FUENTES DE ENERGÍA Este producto debería ser usado sólo con el tipo de fuente de alimentación indicada en la etiqueta de referencia. Si no está seguro del tipo de fuente de alimentación de su hogar, consulte con el vendedor de su aparato o con la compañía energética local. En cuanto a productos que estén pensados para funcionar con energía de baterías o de otras fuentes, consulte con las instrucciones de uso. 11.
Advertencias y Precauciones INSTRUCCIONES DE SEGURIDAD IMPORTANTES (CONTINUACIÓN) ESPAÑOL 18.REPARACIONES No intente reparar el producto usted mismo, ya que abrir o extraer las tapas podría dejarle expuesto a voltajes peligrosos u otros peligros. Deje cualquier reparación en manos de personal de servicio cualificado. 19.
Capítulo 1 Presentación de la TV LCD Capítulo 1 Presentación del TV de LCD Características Principales Diversos terminales de Audio/Video para conexión del equipo externo ▪ ▪ ▪ ▪ ▪ ▪ ▪ ▪ 2 juegos de terminales de entrada A/V compuestos 1 juego de terminales de S-VIDEO 2 juegos de terminales de entrada de Video componente 1 terminal de entrada VGA/Audio 2 terminal de entrada HDMI/Audio 1 juego de terminales de salida Audio/L/R) 2 terminales de salida SPDIF (Óptico x 1 / Coaxial x 1) 1 terminal para audífon
Capítulo 1 Presentación de la TV LCD Contenido del Paquete S’assurer que tous les contenu suivants sont inclus. LCD TV Parante inferior (154-700-BF32H) / Destornillador y 6 Tornillos 101-025-5013H ESPAÑOL Control Remoto (845-042-GF1XABH) Cable de Alimentación 600-181-3200-LIH Cable VÍDEO 621-181-2000H Carta de Garantía Cable de AUDIO 621-181-60002H Manual del Usuario Warranty Card Guía de Inicio Veloz *Consumer Replaceable Part (See page 49 to order.
Capítulo 1 Presentación de la TV LCD Instalación de su TV de LCD Cómo Instalar el Parante del TV Si prefiere instalar su nuevo TV en la pared en vez de fijarlo al parante, por favor lea las instrucciones incluidas en el juego de montaje a la pared (no incluido). Fije el Parante del TV con el material de embalaje de espuma de la parte inferior aún sujeto. Lea todas las instrucciones antes de continuar con la instalación del parante. a. b.
Capítulo 1 Presentación de la TV LCD Cómo retirar el Soporte del Televisor Si prefiere montar su nuevo televisor Polaroid en una pared en lugar de fijarlo en el soporte o base, consulte las instrucciones que se incluyen en el kit de montaje en pared (se vende por separado). Verifi que su modelo de televisor y asegúrese de usar el kit de montaje especificado sólo para su modelo de televisor. Póngase en contacto con su técnico para recibir asistencia al instalar el kit de montaje en pared.
Capítulo 1 Presentación de la TV LCD Cómo Instalar el TV Use un cable de antena incluido para conectar la señal VHF/UHF al terminal de la antena del TV de LCD (ver páginas 15-19). Conecte el cable de alimentación de CA en la parte posterior del TV y conecte el cable de corriente a la salida de la pared. Inserte 2 baterías suministradas en el control remoto(de baterías no incluido). Paso1 Deslice la tapa posterior para abrir el compartimento de baterías del control remoto.
Capítulo 1 Presentación de la TV LCD Su TV de LCD Vista Lateral de Frente/Lado Derecho y Controles ESPAÑOL VIDEO L AUDIO R IR Receptor de Infrarrojos LED La luz LED es roja cuando el TV LCD está en standby y la luz LED es azul cuando está encendido. VOLUMEN+Ajusta el volumen. Selecciona el primer elemento del menú principal y cambia los valores de los elementso en el modo OSD. ENTRADA DE VÍDEO1 VIDEO CANAL▲▼ Explora los canales. Selecciona un submenú en el modo OSD.
Capítulo 1 Presentación de la TV LCD Rear View and Jacks VIDEO2 IN Connects to the composite VIDEO and AUDIO(L/R) output jacks on external video equipment. HDMI1/HDMI2 IN Connects the all digital AV equipment with HDMI connector.HDMI supports enhanced, high-definition video and two-channel digital audio. The AUDIO(L/R) of HDMI IN is for DVI connection. S-VIDEO IN Connects to the S-VIDEO and AUDIO(L/R) output jacks on external video equipment.
Capítulo 1 Presentación de la TV LCD Su Control Remoto 1 2 4 6 5 POWER Enciende y apaga el TV de LCD 2 MTS Ciclos a través de las opciones de sonido de TV de canales múltiples (MTS): SPA/MONO/STEREO 3 S.MODE 4 P.MODE 5 P.
Capítulo 1 Presentación de la TV LCD 14 GUIDE 15 EXIT Sale del menu OSD 16 ▲▼►◄ Ciclos a través de las opciones OSD y selecciona ítems i individuales del menú 17 INFO Presionándolo una vez muestra una variedad de información como el canal actual y la fuente de entrada 18 MENU Muestra el menú OSD en pantalla OK 14 19 GREEM En la Guía, púlselo para seleccionar el 20 RED 21 YELLOW En la Guía, púlselo para ver la página 22 BLUE primer programa del día siguiente.
Capítulo 2 Instalación de su TV LCD Capítulo 2 Instalación del TV de LCD Vea el manual de usuario de cualquier equipo externo que vaya a ser conectado. Cuando conecte cualquier equipo externo, no conecte ningún cable de alimentación de CA a salidas de la pared hasta que todas las demás conexiones se hayan completado. Conectando un Cable de TV o una Antena Los requerimientos de la antena para una buena recepción de la TV a colores son más importantes que para una recepción de TV en blanco y negro.
Capítulo 2 Instalación de su TV LCD Use uno de los siguientes diagramas cuando conecte una antena externa. A: Muestra cómo usar una antena externa de combinación VHF/UHF. B: Muestra cómo usar una antena externa con VHF y/o UHF separados. A. Combinación de antena VHF/UHF Antena VHF/UHF Adaptador 300/75 ohmios (no suministrado) Par de cable de 300 ohmios Antena VHF/UHF Cable coaxial de 75 ohmios B.
Capítulo 2 Instalación de su TV LCD Conexión de TV por Cable (CATV) Este recordatorio es proporcionado para llamar la atención al instalador sobre el sistema de CATV en relación al Artículo 820-40 de la Norma de Electricidad Nacional (NEC) que brinda las pautas para la correcta puesta a tierra y, en particular, especifica que el cable a tierra debe conectarse al sistema de puesta a tierra del edificio con precisión, o tan cerca como sea posible al punto de la entrada de cable.
Capítulo 2 Instalación de su TV LCD Use un cable de antena incluido para conectar la señal de TV al terminal de TV por CABLE del TV de LCD. HDTV/TV Air/Cable VHF/UHF IN Conecte el cable de alimentación de CA en la parte posterior del TV y conecte el cable de alimentación a la salida de la pared. HDTV/TV Air/Cable VHF/UHF IN Este televisor está equipado con un fusible de seguridad.
Capítulo 2 Instalación de su TV LCD Input Source TV(CABLE/AIR) VIDEO1 (SIDE) VIDEO2 (REAR) VIDEO3 (S-VIDEO) VIDEO4 (YPbPr1) VIDEO5 (YPbPr2) VIDEO6 (HDMI 1) VIDEO7 (HDMI 2) COMPUTER(VGA) Presione el botón MENÚ en el control remoto para mostrar el Menú Principal, y use los botones ◄► para seleccionar el TV. Channel Scan Tuner Mode Channel Skip Favorite List Time Zone Cable Eastern Time Enter Select Exit Presione el botón ▼ para seleccionar Channel Scan, y presione el botón OK.
Capítulo 2 Instalación de su TV LCD Conectando un VCR Parte Posterior del TV HDMI 1 IN HDMI 2 IN VGA IN AUDIO OUT YPbPr1 IN AUDIO AUDIO Y Pb Pr STEREO AUDIO DIGITAL OPTICAL HDTV/TV Air/Cable L L R R L Y Pb Pr R L COAXIAL AUDIO VHF/UHF IN VIDEO L AUDIO VIDEO2 IN R L R S-VIDEO AUDIO S-VIDEO IN YPbPr2 IN L R R AUDIO Cable S-VIDEO Cable AV Cable A B MÉTODO A: Use un cable compuesto para conectar las clavijas de video/audio compuestas del VCR a las clavijas de VIDEO IN2 del
Capítulo 2 Instalación de su TV LCD Conectando una Cámara de Video o Consola de Juegos Parte Posterior del TV Lado Derecho HDMI 1 IN HDMI 2 IN VGA IN AUDIO OUT VIDEO YPbPr1 IN AUDIO AUDIO Y Pb Pr STEREO AUDIO DIGITAL OPTICAL L HDTV/TV Air/Cable L R L R L R L Y R Pb Pr R L COAXIAL AUDIO VHF/UHF IN VIDEO IN VIDEO L R S-VIDEO AUDIO S-VIDEO IN YPbPr2 IN L R R ESPAÑOL AUDIO VIDEO2 IN AUDIO Cable or S-VIDEO Cable B ConsoladeJuegos GAME CONSOLE AV Cable A MÉTODO A:
Capítulo 2 Instalación de su TV LCD Conectando un Reproductor de DVD Parte Posterior del TV HDMI 1 IN HDMI 2 IN VGA IN AUDIO OUT YPbPr1 IN AUDIO AUDIO Y Pb Pr STEREO AUDIO DIGITAL OPTICAL HDTV/TV Air/Cable L R L R L Y Pb Pr R L COAXIAL AUDIO VHF/UHF IN VIDEO L AUDIO VIDEO2 IN R L R S-VIDEO AUDIO S-VIDEO IN L YPbPr2 IN R R or Pb Pr COMPONENT/AUDIO Cable AUDIO Cable S-VIDEO Cable AV Cable HDMI Cable A B C Pb Pr D DVD PLAYER Reproductor de DVD MÉTODO A: Use un cabl
Capítulo 2 Instalación de su TV LCD Conecte todas las fuentes de alimentación de CA, antes de encender el interruptor del TV de LCD u otro equipo conectado. Presione el botón en el control remoto para encender el TV de LCD. Para ver un DVD, pulse el botón INPUT (Entrada) en el mando a distancia, luego use el botón ▲ o ▼ del mando a distancia para seleccionar VÍDEO2( MÉTODO A), o VÍDEO3 ( MÉTODO B), o VÍDEO4/VÍDEO5 (MÉTODO C). Luego pulse el botón OK (Aceptar).
Capítulo 2 Instalación de su TV LCD Conectando un decodificador digital para TV por Cable o un Receptor Digital Satelital.
Capítulo 2 Instalación de su TV LCD Conectando un equipo AV con conector HDMI Parte Posterior del TV HDMI 1 IN HDMI 2 IN VGA IN AUDIO OUT YPbPr1 IN AUDIO AUDIO Y Pb Pr STEREO AUDIO DIGITAL OPTICAL HDTV/TV Air/Cable L R L R L Y Pb Pr R L COAXIAL AUDIO VHF/UHF IN L AUDIO VIDEO2 IN R L R S-VIDEO AUDIO S-VIDEO IN YPbPr2 IN L R R ESPAÑOL VIDEO Cable HDMI AV EQUIPMENT AV EQUIPMENT Use un cable HDMI para conectar la clavija de salida HDMI del equipo AV a las clavijas de
Capítulo 2 Instalación de su TV LCD Conectando un Equipo AV con Conector DVI Parte Posterior del TV HDMI 1 IN HDMI 2 IN VGA IN AUDIO OUT YPbPr1 IN AUDIO AUDIO Y Pb Pr STEREO AUDIO DIGITAL OPTICAL HDTV/TV Air/Cable L R L R L Y Pb Pr R L COAXIAL AUDIO VHF/UHF IN VIDEO L AUDIO VIDEO2 IN R L R S-VIDEO AUDIO S-VIDEO IN YPbPr2 IN L R R Cable de AUDIO AUDIO L R DVI IN Cable HDMI a DVI Equipo de AV AV EQUIPMENT Use un cable de HDMI a DVI para conectar la clavija de sali
Capítulo 2 Instalación de su TV LCD Conectando una PC Parte Posterior del TV HDMI 1 IN HDMI 2 IN VGA IN AUDIO OUT YPbPr1 IN AUDIO AUDIO Y Pb Pr STEREO AUDIO DIGITAL OPTICAL HDTV/TV Air/Cable L R L R L Y Pb Pr R L COAXIAL AUDIO VHF/UHF IN L AUDIO VIDEO2 IN R L R S-VIDEO AUDIO S-VIDEO IN YPbPr2 IN L R R ESPAÑOL VIDEO Cable de AUDIO Cable VGA PC Use un cable D-SUB para conectar la clavija de salida D-SUB de la PC a la entrada VGA de la TV DE LCD.
Capítulo 2 Instalación de su TV LCD Conectando un Receptor de Audio o un Sistema de Sonido Dolby Digital 5.1 Para una mejor calidad de sonido, puede conectar el audio de la TV de LCD a su sistema estéreo.
Capítulo 3 Uso de las Funciones Capítulo 3 USO DE LAS CARACTERÍSTICAS Vista de pantalla panorámica Wide Screen La función Wide Screen le permite ver 4:3/16:9 imágenes en modo pantalla panorámica, pasando por las siguientes configuraciones de pantalla panorámica. Presione el botón P.SIZE repetidamente para seleccionar el formato de pantalla que desee. NORMAL Se muestra con relación de aspecto 4:3 ESPAÑOL El modo NORMAL no está disponible cuando está viendo desde, una fuente 720p, 1080i.
Capítulo 3 Uso de las Funciones Usando la Guía de Programación La característica Program Guide o Guía de Programación trae todo tipo de información a su pantalla, como el título del programa, su duración, el tiempo que queda, información, subtitulado, disponibilidad etc. Oprima ENTRADA (INPUT) en el control remoto para seleccionar TV (CABLE/AIRE), con el televisor LCD conectado a una fuente de programación televisiva.
Capítulo 3 Uso de las Funciones Operación del Menú Presione para encender su TV de LCD. Presione el botón MENU del control remoto, el menú de pantalla aparecerá. Use los botones ◄► para seleccionar la opción deseada en el menú principal. MENÚ DE VIDEO: Le permite hacer ajustes a su configuración de pantalla.
Capítulo 3 Uso de las Funciones MENÚ TV: Le permite editar y poner nombre a los canales. Channel Scan Tuner Mode Channel Skip Favorite List Time Zone Cable Eastern Time Enter Exit Select MENÚ SETUP o DE CONFIGURACIÓN: Le permite configurar una serie de características: Idioma, Subtitulado, reset, Control Parental, time Setup.
Capítulo 3 Uso de las Funciones Personalizando las configuraciones de VIDEO Presione para encender su TV de LCD. Presione el botón MENU del control remoto para mostrar el menú principal, y use los botones ◄► para seleccionar video.
Capítulo 3 Uso de las Funciones Color temperature Ajusta los componentes de color independientemente para lograr un efecto cálido o frío: Cool(Frío)/Natural/Warm (Cálido) /User (Usuario). ▪ Warm (Cálido): Aumenta el tono rojo ▪ Natural : Aumenta el tono natural ▪ Cool (Frío) :Aumenta el tono azul ▪ User (Usuario) :Permite al usuario ajustar los niveles de los componentes de color rojo, verde y azul independientemente.
Capítulo 3 Uso de las Funciones Personalizando las Configuraciones de AUDIO Presione para encender su TV de LCD. Presione el botón MENU para mostrar el menú principal y use los botones ◄► para seleccionar el AUDIO.
Capítulo 3 Uso de las Funciones SPDIF Type Permite seleccionar el formato de audio digital: PCM/OFF (Apagado)/ Dolby Digital. ▪ PCM: El sistema externo de audio está conectado a la salida de AUDIO (L/R) de su TV de LCD. ▪ Dolby Digital: El sistema externo de audio está conectado a la salida digital de AUDIO(ÓPTICA o COAXIAL) de su TV de LCD. ▪ OFF: Seleccione OFF para apagar el sistema externo de audio. Audio Language Permite seleccionar el idioma del audio:Inglés/Español/Francés.
Capítulo 3 Uso de las Funciones Personalizando las Configuraciones de TV Presione para encender su TV de LCD. Presione el botón MENU del control remoto para mostrar el menú principal, y use los botones ◄► para seleccionar TV. Use los botones ▲▼para resaltar una opción de TV individual, use los botones ◄► para cambiar la configuración y presione MENU para salir del menú.
Capítulo 3 Uso de las Funciones Presione el botón ▼ para seleccionar el canal deseado, y presione repetidamente el botón OK para seleccionar show () (mostrar) o hide() (esconder) Favorite List Seleccione Favorite List (Lista de Favoritos) de la opción TV y presione el botón OK .
Capítulo 3 Uso de las Funciones Personalizando las Configuraciones SETUP Presione para encender su TV de LCD. Presione el botón MENU del control remoto para mostrar el menú principal, y use los botones ◄► para seleccionar el SETUP. Use los botones ▲▼para resaltar una opción individual de configuración SETUP, use los botones ◄► para cambiar la configuración, y presione MENU para salir del menú.
Capítulo 3 Uso de las Funciones Closed Caption Permite seleccionar modos de subtitulado análogos o digitales. Presione el botón OK.
Capítulo 3 Uso de las Funciones Parental El Control Parental se puede configurar para que su TV bloquee canales, fuentes de video y para cambiar claves. Use el botón ▼ para seleccionar Parental, y presione OK para mostrar el menú de control parental Para usar la función Program Block (bloqueo de programa), deberá ingresar una clave de 4 dígitos. La clave de fábrica es 0000.
Capítulo 3 Uso de las Funciones . Input Block (Bloqueo de Entrada): Seleccione para bloquear fuente de entrada de señal. 1 TV(CABLE/AIR) 2 VIDEO1 (SIDE) 3 VIDEO2 (REAR) 4 VIDEO3 (S-VIDEO) 5 VIDEO4 (YPbPr1) 6 VIDEO5 (YPbPr2) 7 VIDEO6 (HDMI1) 8 VIDEO7(HDMI2) 9 COMPUTER(VGA) Set Select Back Presione los botones ▲▼ para seleccionar la fuente de entrada. Presione OK varias veces, seleccione BLOCK UNBLOCK (Desbloquear).
Capítulo 3 Uso de las Funciones El menú Parental block (de bloqueo parental) incluye las siguientes opciones: U.S. TV Ratings Seleccione para activar la clasificación de los programas de TV. U.S. Movie Ratings Seleccione para activar la clasificación MPAA de los programas. Canadian English Ratings Seleccione para activar la clasificación de los programas de Canadá. Canadian French Ratings Seleccione para activar la clasificación francocanadiense de los programas en Canadá.
Capítulo 3 Uso de las Funciones Clasificación de TV en los Estados Unidos El sistema de clasificación de TV en los Estados Unidos tiene dos métodos: Clasificación por Contenido y clasificación por edad. La clasificación de TV de los Estados Unidos incluye las siguientes opciones: A D L S V FV TV-Y TV-Y7 TV-G TV-PG TV-14 TV-MA Allowed Rating Blocked Rating Set Select Back POR EDAD CLASIF.
Capítulo 3 Uso de las Funciones Clasificación en Canadá (Inglés) Las clasificaciones en Canadá de habla inglesa incluyen las siguientes opciones: G C8+ G PG 14+ 18+ Allowed Rating Blocked Rating CLASIF. Select ESPAÑOL Set Back DESCRIPCION G Todos los niños. C8+ Niños de 8 años y mayores. G Programación General. PG Guía Parental. 14+ Público de 14 y mayores. 18+ Programación para adultos.
Capítulo 3 Uso de las Funciones Clasificación de Películas en los Estados Unidos La clasificación de Películas en los Estados Unidos se usa para películas originales clasificadas por la Motion Picture Association of America (MPAA) (Asociación Estadounidense de Cinematografía) transmitidas en TV por cable y no editadas para televisión. La clasificación de películas en los Estados Unidos incluye las siguientes opciones: G PG PG-13 R NC-17 X Allowed Rating Blocked Rating Set CLASIF.
Capítulo 3 Uso de las Funciones LOCALIZACIÓN DE AVERÍAS Antes consultar personal de servicio, compruebe la lista siguiente para una causa posible del apuro y para saber si hay una solución posible. La TV no enciende remoto en el control Las baterías en el control remoto pueden ser agotados Substituya las baterías Sin imagen, sin sonido Cheque el cable de interfaz entre la TV y la televisión por la antena/cable.
Especificaciones ESPECIFICACIONES MODELO Panel LCD MLT4221P Tamaño del panel 42” TFT LCD (medido en diagonal) Brillo 500 cd/m2 Relación de Contraste 1500:1 Resolución Máxima Conector entrada 1920x1080 VIDEO/AUDIO(L/R) 2 S-VIDEO/AUDIO(L/R) 1 YPbPr/AUDIO(L/R) 2 VGA/AUDIO(L/R) 1 HDMI/AUDIO(L/R) 2 SORTIE AUDIO (L/R) 1 OPTIQUE/COAXIAL 1 AUDÍFONO 1 FUENTE DE ENERGÍA AC100~240V, 50/60HZ, 4.0A CONSUMO DE ENERGÍA 300 W, espera < 3 W Dimensiones 41.4 w x 31.1 h x 9.7 d pulgadas PESO 62.
Especificaciones MODO VISUALIZACIÓN En la fabricación, se ha optimizado la resolución de pantalla para los modos de visualización listados a continuación. Si la señal del sistema es igual al modo de señal estándar, la pantalla se ajusta automáticamente. Si la señal del sistema no iguala el modo de señal estándar, ajuste la resolución de pantalla consultando con el manual de usuario de la tarjeta de video, de otra manera puede que no haya video.
Especificaciones CUIDADO Y MANTENIMIENTO Para prevenir cualquier peligro de fuego o descargas, desconecte su unidad de la fuente de alimentación CA mientras la esté limpiando. El acabado de la unidad puede limpiarse con un paño y requiere los mismos cuidados que otros muebles. Tenga cuidado al limpiar y pasar un paño por las piezas de plástico. Puede usarse un jabón suave y un paño húmedo. PARA ASISTENCIA ADICIONAL SOBRE LA CONFIGURACIÓN O ELFUNCIONAMIENTO, INGRESE EN WWW.MEMOREXELECTRONICS.
002-L00-BF4213MEMOH