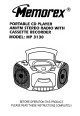
@ PORTABLE CD PLAYER AM.
Dear Customer, Please read this manual thoroughly before operating the unit so that you wit be informed of all the features and control operations. Also keep these instructions handy for future reference. WARNING: TO REDUCE THE RISK OF FIRE OR ELECTRIC SHOCK.
Before using the unit, be sure to read all operating Instructions carefully Please note that these are general precautions and may not pertain to your unit For example, this unit may not have the capability to be connected to an outdoor antenna 15 16 1 READ INSTRUCTIDNS All"'" ..
LOCATION POWER CD LISTENING RECORDING LISTENING SKIP To Operating When Cassette improve SOURCES / SEARCHto OF TO TO WITH replace FROM Operation.. CONTROLS the theTHE THE A reception TAPE HEADPHONES player player CD RADIO CD RADIO the batteries. on on batteries AC power (NOT .2 INCLUDED) .3 .3 .3 .3 .4 .5 .6 .7 .9 10 11 GENERAL Care Cassette Cleaning Compact and INFORMATION the Tapes Maintenance Discs.
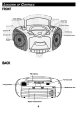
FRONT BACK 4
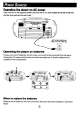
-(' ~ Operating the player on AC power Insert one end of the supplied power cord into the AC IN Jack located at the rear of the unit, and the other end into the wall outlet. /f AC 120V 160Hz Operating the player on batteries To play your unit on batteries, the AC power cord must be disconnected from the player. Unplug the AC power cord from the unit and insert eight size C alkaline batteries (not supplied) in the compartment.
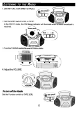
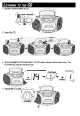
1. Set the FUNCTION switch to RADIO. cr=D::J mD~~ j , Set the BAND switch to AM, or FM ST. In the FM ST. mode, the FM Stereo indicator will illuminate when a stereo broadcast is received. / ~~:~:~:::~\\~) fM_-" 3. Turn the TUNING control to tune in a radio station. [ ~ "" Adjust the VOLUME. ~(Ll) ~, "'.~. ",~~~,/ To turn off the Radio Set the Function switch to TAPE (Off). \.cr=~::J] ~~ 6 ~ 1@ ~i~~~~~~ (2. 4.
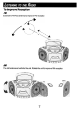
To Improve Reception FM Extend the FM Rod antenna 10 improve FM reception. ~ ~. ~ Ir==4 AM The AM antenna is built into the unit. Rotate the unit to improve AM reception.
1. Set the Function switch to CD. ~ j 2. Insert the CD. Press the ~ I PLAY/PAUSE Button. The CD player will play all the tracks once. The PLAY/PAUSE indicator will illuminate. / Play/Pause ...Q 4. Adjust the VOLUME. ~ 3. ::==~ ;::;::::~:;~:::~, ~~~ ..
PRESS... Stop play .STOP Stop . PLAY/PAUSE Pause Play/Pau~e ~ I PLAY/PAUSE The Play/Pause indicator will flash Resume play after pause ~ I PLAY/PAUSE ..- PlAY/PAUSE Press Skip/Search forward""'" TO... or backward ~ 9 to select a particular track.
Press and hold Skip/Search forward"" music. or backward ~ Press To Find the beginning of the current track Display [SJ .. [5] ~once Find the beginning of previous tracks ~ repeatedly Find the beginning of the next track ~ I repeatedly Go forward quickly [5J .. [SJ ~ ~ once Find the beginning of a succeeding track ~ I ~ hold down To turn off the power Set the Function selector to TAPE (Off). [jJ /~ W~AADIO ... TAP~ \.
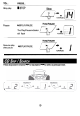
Use Type 1 (normal) tape only. 1. Set the FUNCTION selector to Tape (OFF). (~-;~:;;;;;", ~~!¥?:DJ.' 2. Insert a prerecorded tape. 6'1 3. Press ~ PLAY to start playing. The unit will automatically turn off when the end of the tape is reached. ~ 4. Adjust the VOLUME control to the desired listening level. I~::~~::~" ~f!\\. ~ .~~=:~:) .
TO... PRESS... -Ploy -F.PM) --./~ STOP/EJECT \d ~ Play ~ Fast forward the tape Ploy -"FWD F.F. k:::f Rewind the tape -4-4 REW F.FWD -Pause tape II PAUSE ~ Resume play after pause II PAUSE -'Remove the cassette -F_-"'- .
1. Set the FUNCTION switch to RADIO. 2. Set the BAND switch toAM or FM ST. In the FM ST. mode, the FM Stereo indicator will illuminate when a stereo broadcast is received. ~ Turn the TUNING control to tune in a radio station ' Insert a blank tape. 5. Press. REG. bf 1 ..PLAY will depress automatically, and recording starts. ~ ~~~: ~'\~~~~~ ~. 3 4.
3. 6. Press .~ STOP/EJ. to stop recording. Insert a blank tape. \dl 4. Press. REG. ...PLAY will depress automatically and recording starts.
5. Press the ~ I PLAY/PAUSE Button. The CD player will play all the tracks once. The PLAY/PAUSE indicator will illuminate. -0 Play/Pause "Ci7+ 6. Press .~ -., "* PlAY/PAUSE \ / STOP/EJ. to stop recording. This unit is equipped with Automatic Level Control (ALC) circuitry. Adjusting the VOLUME will not affect the recording level. However these controls will change the sound levels you hear through the speakers, or headphones. "'\ / Setthe VOLUME"" to a lowlevelbeforeusingheadphones.
Care and Maintenance Handle your compact discs, cassette tapes, and cassette deck carefully, and they will last a long time. .Use a soft, clean cloth moistened with plain lukewarm water to clean the exterior of the unit. .Never use solvents such as benzene or other strong chemical cleaners since these could damage the unit's finish. .It is important that no liquid reach the inside of the unit CompactDiscs t ~ ~/ ~~~~~ .
CASSETTE TAPES .If the tape is loose in its cassette, take up the slack by inserting a pencil in one of the reels and rotating .If the tape is loose it may get stretched, cut, or caught in the cassette player. .Do not touch the tape surface. To prevent recordings from being erased accidentally, remove the tab(s) A and B. TAB 'B"~~~~~!~~~ ~TAB 'A": \ To record after the tabs have been broken off, reseal the A and B with a piece of adhesive tape.
SPECIFICATION POWERSOURCE: AC: 120V -60Hz BATTERIES: 8 X C CELLS (LR14 OR EOUIVALENT) RADIO FM: FREQUENCY COVERAGE AM: 88 -108MHz 530-1710kHz RECORDING SYSTEM RECORDING SYSTEM: DC BIAS ERASING SYSTEM: MAGNETIC ERASE GENERAL SPEAKER POWER OUTPUT HEADPHONES: 32 OHMS 1.8 WATT AT 10% T.H.D. PER CHANNEL 3.5MM STEREO JACK PLUG.
TROUBLESHOOTING GUIDE BEFORE REQUESTING SERVICE, PLEASE REFER TO THE FOLLOWING CHART FOR THE SYMPTOM AND POSSIBLE SOLUTION. POSSIBLE SOLUTIONS POSSIBLE CAUSES SYMPTOMS CD PLAYER CD PLAYER WILL NOT OPERATE CD SKIP WHILE PLAYING. FUNCTION SELECTOR SWITCH SET FUNCTION SELECTOR SWITCH TO NOT SET TO CD POSITION CD POSTION. CD NOT INSTALLED OR INSERT CD WITH LABEL INSTALLED UPSIDE DOWN. SIDE UP. DISC IS DIRTY OR SCRATCHED. WIPE DISC WITH A SOFT CLOTH OR TRY ANOTHER DISC.
@ WARRANTY AUDIO We at Memorex believe you will. be pleased with your new product. Please read this Warranty qar~fully. Memorex warrants this product to be 1ree from manufacturing defects including original parts and workmanship for a period of ninety (90) days from the date of original purchase in, and if used in, the United States.
Memcorp, Inc. Weston, FL33331 @ 2000 Memorex is a registered trademark of Memorex Telex N.V. Prnited in Hong Kong Visit our website at www.memorex.