MD6459 User’s Guide PERSONAL COMPACT DISC PLAYER WITH 60 SECOND DIGITAL MOTION PROOF ANTI-SHOCK PROTECTION Before operating this product, please read these instructions completely.
SAFETY PRECAUTIONS CAUTION RISK OF ELECTRIC SHOCK DO NOT OPEN CAUTION: TO REDUCE THE RISK OF ELECTRIC SHOCK, DO NOT REMOVE COVER (OR BACK). NO USER-SERVICEABLE PARTS INSIDE. REFER SERVICING TO QUALIFIED SERVICE PERSONNEL. DANGEROUS VOLTAGE: The lightning flash with arrowhead symbol, within an equilateral triangle is intended to alert the user to the presence of uninsulated dangerous voltage within the product’s enclosure that may be of sufficient magnitude to constitute a risk of electric shock to persons.
SAFETY PRECAUTIONS (CONTINUED) INFORMATION: This equipment has been tested and found to comply with the limits for a Class B digital device, pursuant to Part 15 of the FCC Rules. These limits are designed to provide reasonable protection against harmful interference in a residential installation. This equipment generates, uses and can radiate radio frequency energy and, if not installed and used in accordance with the instructions, may cause harmful interference to radio communications.
Dear Customer: Selecting fine audio equipment such as the unit you’ve just purchased is only the start of your musical enjoyment. Now it’s time to consider how you can maximize the fun and excitement your equipment offers. This manufacturer and the Electronic Industries Association’s Consumer Electronics Group want you to get the most out of your equipment by playing it at a safe level.
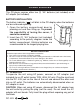
LOCATION OF CONTROLS 1 9 2 10 11 3 4 56 7 12 13 1. LINE OUT Jack 2. Display 3. PLAY/PAUSE (®p)/POWER ON Button 4. SKIP/SEARCH (o) Button 5. DC 4.5V Jack (Rear of Unit) – 9. 10. 11. 12. 13. 14. 8 14 15 16 PHONES Jack (Side of Unit) VOLUME Control DBBS (Bass Boost) Switch CD Compartment CD Door OPEN Switch STOP (■)/POWER OFF Button 15. PROG (Program) Button 16. ESP Button + 6. SKIP/SEARCH (n) Button 7. MODE Button 8.
POWER SOURCES This CD player requires either two (2) “AA” batteries (not included) or an AC adapter (not included). BATTERY INSTALLATION The battery indicator ( ) will blink in the CD display when the batteries are low and need replacing. 1. Open the battery compartment door by – –+ pressing out and then lifting up. To prevent the possibility of losing the cover, it cannot be removed. 2. Insert two (2) “AA” batteries (not included) according to the polarity diagram inside the – + + battery compartment.
OPERATION BASS BOOST TURNING POWER ON/OFF 1 1 1 2 To turn the unit on, press the PLAY/PAUSE ( )/POWER ON button ❶. To turn the unit off, press the STOP (■)/POWER OFF button1 ❷. To emphasize the bass, slide the DBBS switch to the ON 1position. For normal bass, slide the DBBS switch to 1 the OFF position. 1 AUTO POWER OFF When the unit is stopped (Standby mode) for approximately one minute, the power will automatically turn off.
CD OPERATION TO PLAY A CD (Standard, CD-R and CD-RW) 1 2 Open the CD compartment lid by sliding the CD OPEN switch to the right. Gently press a disc, label side up, 1 in place. onto the spindle until it locks Close the CD compartment lid. Insert 1 2 jack. headphones into the PHONES While the unit is off, press the PLAY/PAUSE ( )/POWER ON button to start playback. To pause PLAYBACK, press the PLAY/PAUSE ( )/POWER ON button again, the display will blink. Press once again to resume playback.
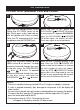
CD OPERATION (CONTINUED) 60 SECOND MOTION PROOF ELECTRONIC ANTI-SHOCK SYSTEM This CD player has a built-in Anti-Shock System that cuts down on CD skipping, which is useful when using the CD player in the car or while jogging/walking. Follow the steps below to activate and understand the Anti-Shock System: 1 2 Open the CD compartment lid by sliding the CD OPEN switch to the right. Gently press a disc, label side 1 it locks in up, onto the spindle until place. Close the CD lid.
CD OPERATION (CONTINUED) 5 6 If the CD player is subject to vibration during playback, the bars will disappear one by one. During the vibration, the music should continue to play the signals stored in the memory until the CD player can read the music data properly from the disc. At this time, the indicator will probably show fewer bars indicating the music signals stored in memory are low. If all the bars disappear and the CD player is subject to immediate vibration, the unit may skip.
CD OPERATION (CONTINUED) TO REPEATEDLY PLAY BACK ONE TRACK 2 1 1 3 2 4 1 2 3 The unit will then play the same track over and over until the STOP (■)/POWER OFF button ❶ is pressed. Adjust the VOLUME control ❷ and DBBS switch ❸ as 4 desired. 3 3 2 With a CD inserted, press the PLAY/PAUSE ( )/POWER ON button ❶ to turn the unit on, then select a track using the SKIP/SEARCH ❷ or ❸ button. Press the MODE button ❹ once; the Repeat 1 indicator 1 willALL appear in the display.
CD OPERATION (CONTINUED) INTRO PLAY 2 1 1 1 4 3 2 2 3 With a CD inserted, press the PLAY/PAUSE ( )/POWER ON button ❶ to turn the unit on and press the STOP (■)/POWER OFF button ❷ to stop auto playback. Press the MODE button ❸ three times; the INTRO indicator will appear in the display. Press the PLAY/PAUSE ( )/POWER ON button ❶ to begin playback. The unit will play the first 10 seconds of each track. Adjust the VOLUME control ❷ and DBBS switch ❸ as desired.
CD OPERATION (CONTINUED) TO PROGRAM THE MEMORY (UP TO 24 TRACKS) 2 1 1 1 3 2 2 3 With a CD inserted, press the PLAY/PAUSE ( )/POWER ON button ❶ to turn the unit on and press the STOP (■)/POWER OFF button ❷ to stop auto playback. Press the PROG button ❸; the PROG indicator will blink in the CD display. Select the first track to be played back ❶ or using the SKIP/SEARCH ❷ button, then press the PROG button ❸ again. Repeat this step to program additional tracks up to a maximum of 24 tracks.
CARE AND MAINTENANCE Caring for Compact Discs • Treat the compact disc carefully. Handle the compact disc only by its edges. Never allow your fingers to come in contact with the shiny, unprinted side of the compact disc. • Do not attach adhesive tape, stickers, etc. to the compact disc label. • Clean the compact disc periodically with a soft, lint-free, dry cloth. Never use detergents or abrasive cleaners to clean the compact disc. If necessary, use a CD cleaning kit.
TROUBLESHOOTING GUIDE If you experience a problem with this unit, check the chart below before calling for service. SYMPTOM Unit will not turn on. Disc will not play. Erratic CD playback. No sound from headphones. ESP not working. CAUSE Weak or dead batteries or inserted incorrectly. Weak or dead Rechargeable batteries. AC adapter not connected. CD compartment not closed. Disc inserted incorrectly. Dirty or defective disc. Moisture condensation on disc. Dirty or defective disc.
SPECIFICATIONS Power requirements......................................2 x LR6 "AA" alkaline battery DC In 4.5V adapter (center positive) D/A conversion ...................................1-bit DAC eight times oversampling Frequency response ............................................20~20,000Hz (+1,-3 dB) Anti-shock. .......................................................................60 second buffer Output level. ..........................................Line output: 0.
Memcorp, Inc. Weston, FL Printed in Hong Kong Visit our website at www.memorexelectronics.