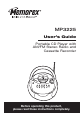
MP3225 User’s Guide Portable CD Player with AM/FM Stereo Radio and Cassette Recorder Before operating this product, please read these instructions completely.
Dear Customer, Please read this manual thoroughly before operating the unit to become more familiar with it and obtain the performance that will bring you continued enjoyment for many years. Keep these instructions handy for future reference. PLEASE KEEP ALL PACKAGING MATERIAL FOR AT LEAST 90 DAYS IN CASE YOU NEED TO RETURN THIS PRODUCT TO YOUR PLACE OF PURCHASE OR MEMOREX. For future reference, record the serial number of the unit printed on the rear of the cabinet.
INFORMATION: This equipment has been tested and found to comply with the limits for a Class B digital device, pursuant to Part 15 of the FCC Rules. These limits are designed to provide reasonable protection against harmful interference in a residential installation. This equipment generates, uses and can radiate radio frequency energy and, if not installed and used in accordance with the instructions, may cause harmful interference to radio communications.
Dear Customer: Selecting fine audio equipment such as the unit you’ve just purchased is only the start of your musical enjoyment. Now it’s time to consider how you can maximize the fun and excitement your equipment offers. This manufacturer and the Electronic Industries Association’s Consumer Electronics Group want you to get the most out of your equipment by playing it at a safe level.
SAFETY INSTRUCTIONS Before using the unit, be sure to read all operating instructions carefully. Please note that these are general precautions and may not pertain to your unit. For example, this unit may not have the capability to be connected to an outdoor antenna. 1. READ INSTRUCTIONS All the safety and operating instructions should be read before the product is operated. 2. RETAIN INSTRUCTIONS The safety and operating instructions should be retained for future reference. 3.
SAFETY INSTRUCTIONS (CONTINUED) 15. OVERLOADING Do not overload wall outlets and extension cords as this can result in a risk of fire or electric shock. 16. OBJECT AND LIQUID ENTRY Never push objects of any kind into this product through openings as they may touch dangerous voltage points or short out parts that could result in fire or electric shock. Never spill or spray any type of liquid on the product. 17.
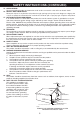
LOCATION OF CONTROLS 15 1 2 3 4 16 17 18 5 6 19 7 8 9 10 11 20 21 22 23 12 24 13 14 1. 2. 3. Carrying Handle AC Power Jack (Rear of Unit) PHONES (Headphones) Jack (Rear of Unit) 4. Display 5. Tune/Skip/Search o Button 6. STOP (■) Button 7. POWER Button 8. BAND Button 9. BACKLIGHT Button 10. FUNCTION Button 11. PRESET/MEM(Memory)/CLOCK SET Button 12. Cassette Buttons (left to right): PAUSE (p) STOP/EJECT (■) F.FWD (ÃÃ) 13. 14. 15. 16. 17. 18. 19. 20. 21. 22. 23. 24.
POWER SOURCES This unit is designed to operate on AC household current or DC (batteries). AC Use the AC polarized line cord included with the unit for operation on AC power. Insert one end of the AC line cord into the AC power jack on the rear of the unit and the other end (with the 2 blades) into a conveniently located AC outlet having 120V, 60Hz. When the AC cord is plugged in, the batteries will AC Outlet be disconnected.
OPERATION SETTING THE CLOCK 1 2 1 2 With the power off, press the PRESET/MEM/CLOCK SET button; “12 H” will blink. Press the Tune/Skip/Search o 1 or n 2 button to set the unit to the 24 hour (24 HOUR) mode (also known as military time), or 12 hour (12 HOUR) mode. 3 4 1 3 Press the Tune/Skip/Search o 1 or n 2 button to set the current hour, then press the PRESET/MEM/CLOCK SET button 3 again; the minute digits will blink.
OPERATION (CONTINUED) LISTENING TO THE RADIO 1 2 1 2 Press the POWER button 1 to turn the unit on. Press the FUNCTION button 2 repeatedly to select the Radio band; AM or FM will appear in the display. Press the BAND button to select AM or FM. 3 4 1 1 2 2 MANUAL TUNING: Repeatedly press the Tune/Skip/Search o 1 or n 2 button to manually advance the frequency in the display up or down until the desired frequency appears.
OPERATION (CONTINUED) SETTING AND RECALLING RADIO PRESETS This unit can preset 10 AM and 10 FM radio stations for convenient recall. 1 2 1 2 Press the POWER button 1 to turn the unit on. Press the FUNCTION button 2 repeatedly to select the Radio band; AM or FM will appear in the display. Press the BAND button to select AM or FM. 3 4 1 2 1 2 Select a station using the Tune/Skip/ Search o 1 or n 2 button. (See the previous page for manual or auto tuning.
OPERATION (CONTINUED) TO PLAY A CD 1 2 2 1 Press the POWER button 1 to turn the unit on. Open the CD compartment door by pressing the OPEN/CLOSE area 2. Place a CD on the center spindle, with the printed label side facing up. Close the CD compartment door. Press the FUNCTION button repeatedly to select CD, "--" will blink in the display for a few seconds, then the total tracks of the CD will appear in the display. If there is no disc, "--" will appear in the display.
OPERATION (CONTINUED) TO PLAY A CD (CONTINUED) 7 8 When the disc is through playing, it will stop rotating. Press the STOP (■) button to stop the disc before it is finished. To turn the radio off, press the POWER button again. NOTES: • If a disc is inserted incorrectly, dirty or damaged, it will not play. • As each track is played, the track number is shown in the display. • To prevent damage to the disc, never open the CD door while the disc is rotating.
OPERATION (CONTINUED) TO PROGRAM THE MEMORY (UP TO 20 TRACKS) 1 2 1 2 Press the POWER button 1 to turn the unit on. Press the FUNCTION button 2 repeatedly to select CD. Press the PRESET/MEM/CLOCK SET button; “MEM” will blink in the display. 3 4 1 2 Use the Tune/Skip/Search o 1 or n 2 button to select the first track to be programmed. Press the PRESET/MEM/CLOCK SET button again; the selected track has now been programmed and counted as program 1.
OPERATION (CONTINUED) NOTES ON PROGRAMMED PLAY: • Programming is the ability to preselect the order in which a series of tracks will be played. • Each track may be stored in the program memory as many times as desired. • As each track is played, its track number will be displayed. You can move forward or backward through the programmed tracks with the Tune/Skip/Search o or n button. • The CD player will stop after all programmed tracks have been played or the STOP (■) button is pressed.
OPERATION (CONTINUED) TO RANDOMLY PLAY A CD 1 2 2 1 Press the MODE/MEMORY UP button 1 three times while in the Stop mode; “RND” will light. Press the PLAY/PAUSE (¨/p) button 2 to begin playback. The unit will randomly play the tracks on the CD and then stop. Press the STOP (■) button to stop Random playback before it is finished. TO LIGHT THE DISPLAY 1 Press the Power button to turn on the unit, the backlight will light on for 10 seconds then off.
OPERATION (CONTINUED) PLAYING CASSETTE TAPES 1 2 1 2 Press the POWER button 1 to turn the unit on. Press the FUNCTION button 2 repeatedly to select TAPE. Press the STOP/EJECT (■) button to open the cassette compartment. Insert a pre-recorded cassette into the slots in the cassette door with the open end facing up and the full reel on the right side. Close the cassette door. 3 4 1 2 Press the PLAY (Ã) button to begin playback. Adjust the VOLUME control 1 and BBS button 2 as desired.
OPERATION (CONTINUED) 7 8 To stop playback before the tape ends, press the STOP/EJECT (■) button. The PLAY ( Ã ) button is released and the tape motor shuts off. When the tape reaches the end, the auto-stop mechanism activates, the PLAY (Ã) button is released and the tape motor shuts off. Press the STOP/EJECT (■) button to open the cassette compartment and remove the cassette. 9 Press the POWER button to turn the unit off.
OPERATION (CONTINUED) MAKING A TAPE RECORDING This unit allows you to make direct recordings from the radio or CD player to a blank cassette. An automatic recording volume level control (ALC) circuit will automatically control the volume level of your recordings to prevent distortion. 1 2 Open Surface Side 1 2 Full Reel on Rightand insert a Open the cassette door good quality blank cassette tape into the slots on the door, with the open end facing up and the full reel on the right side.
CARE AND MAINTENANCE SAFEGUARD AGAINST ACCIDENTAL ERASURE Tab 1 Tab for side 2 SIDE When a new recording is made, any program material previously recorded is automatically erased and only the new recording remains. To safeguard valuable recordings from being erased accidentally, the cassette and the deck are equipped with a special device. On the back of the cassette there is an erase prevention tab on each side. To prevent accidental erasing, break out these tabs with a screwdriver.
CARE AND MAINTENANCE (CONTINUED) Caring for Compact Discs • Treat the compact disc carefully. Handle the compact disc only by its edges. Never allow your fingers to come in contact with the shiny, unprinted side of the compact disc. • Do not attach adhesive tape, stickers, etc. to the disc label. • Clean the compact disc periodically with a soft, lint-free, dry cloth. Never use detergents or abrasive cleaners to clean the compact disc. If necessary, use a CD cleaning kit.
TROUBLESHOOTING GUIDE If you experience a problem with this unit, check the chart below before calling for service. SYMPTOM Unit will not turn on. Disc will not play. CAUSE AC cord not connected. CD compartment door not closed. Disc inserted SOLUTION Check AC cord connection. Close CD compartment door. Reinsert disc correctly. incorrectly. Dirty or defective CD. Try another disc. Moisture condensation on disc. No sound. VOLUME control set to minimum. Defective disc. Erratic playback.
SPECIFICATIONS GENERAL: Power Source ..............................................................................120V, 60Hz AC Battery .........................................................12V DC (8 x 1.5V ‘C’ size batteries) Alkaline is recommended for longer life Speaker. .....................................................................................2 x 5W 8 Ohms Output Power....................................................................2 x 1.
Memcorp, Inc. Weston, FL Printed in Hong Kong Visit our website at www.memorexelectronics.