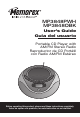
MP3848PWH MP3848OBK User’s Guide Guía del usuario Portable CD Player with AM/FM Stereo Radio Reproductor de CD Portátil con Radio AM/FM Estéreo AUX CD TUNER BOOM BASS BAND REPEAT FM PROG Before operating this product, please read these instructions completely. Antes de operar este producto, lea este instructivo en su totalidad.
Dear Customer, Please read this manual thoroughly before operating the unit to become more familiar with it and obtain the performance that will bring you continued enjoyment for many years. Keep these instructions handy for future reference. PLEASE KEEP ALL PACKAGING MATERIAL FOR AT LEAST 90 DAYS IN CASE YOU NEED TO RETURN THIS PRODUCT TO YOUR PLACE OF PURCHASE OR MEMOREX. For future reference, record the serial number of the unit printed on the rear of the cabinet.
SAFETY PRECAUTIONS INFORMATION: This equipment has been tested and found to comply with the limits for a Class B digital device, pursuant to Part 15 of the FCC Rules. These limits are designed to provide reasonable protection against harmful interference in a residential installation. This equipment generates, uses and can radiate radio frequency energy and, if not installed and used in accordance with the instructions, may cause harmful interference to radio communications.
Dear Customer: Selecting fine audio equipment such as the unit you’ve just purchased is only the start of your musical enjoyment. Now it’s time to consider how you can maximize the fun and excitement your equipment offers. This manufacturer and the Electronic Industries Association’s Consumer Electronics Group want you to get the most out of your equipment by playing it at a safe level.
SAFETY INSTRUCTIONS Before using the unit, be sure to read all operating instructions carefully. Please note that these are general precautions and may not pertain to your unit. For example, this unit may not have the capability to be connected to an outdoor antenna. 1. READ INSTRUCTIONS All the safety and operating instructions should be read before the product is operated. 2. RETAIN INSTRUCTIONS The safety and operating instructions should be retained for future reference. 3.
SAFETY INSTRUCTIONS (CONTINUED) 15. OVERLOADING Do not overload wall outlets and extension cords as this can result in a risk of fire or electric shock. 16. OBJECT AND LIQUID ENTRY Never push objects of any kind into this product through openings as they may touch dangerous voltage points or short out parts that could result in fire or electric shock. Never spill or spray any type of liquid on the product. 17.
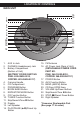
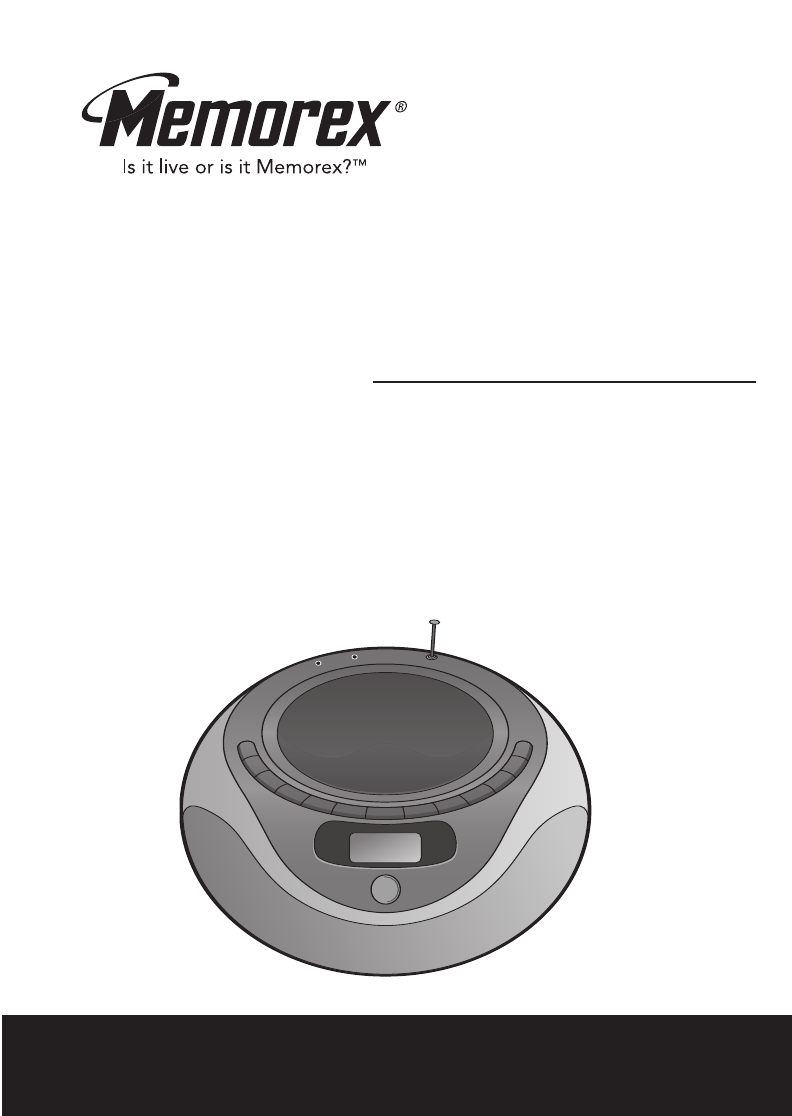
MAIN UNIT LOCATION OF CONTROLS 15 16 1 2 3 4 5 6 7 8 9 10 11 12 13 14 1. 2. 3. 4. 5. 6. 7. 8. 9. 10. 11. 12. 13. 14. 17 18 19 20 21 22 23 24 AUX In Jack PHONES (Headphones) Jack Battery Compartment (Bottom of Unit) (BATTERY COVER PART NO. PINK: 622-05638-0010, COPPER: 622-05638-0011*) Carrying Handle CD Compartment PROGRAM Button BOOM BASS Button REPEAT/FM MODE Button CD Function Button TUNER Function Button Skip/Search/Tune o Button Display Left Speaker PLAY/PAUSE (®p)/Preset Up Button 15.
POWER SOURCES This unit is designed to operate on AC household current or DC (batteries). AC Use the AC polarized line cord included with the unit for operation on AC power. Insert one end of the AC line cord into the AC power jack on the rear of the unit and the other end (with the 2 blades) into a conveniently located AC outlet having 120V, 60Hz. When the AC cord is plugged in, the batteries will AC Outlet be disconnected.
OPERATION LISTENING TO THE RADIO 1 2 1 2 Press the POWER button 1 to turn the unit on. Press the TUNER button 2 to select the Tuner mode. Press the BAND button to select AM or FM. 3 4 3 1 2 2 2 1 Press the Skip/Search/Tune o 1 or n 2 button to tune in a station. If listening to FM, press the REPEAT/FM MODE button 3 to select FM Mono or Stereo. Noise present in FM stereo broadcasts can be reduced by listening in Mono. Adjust the VOLUME Up/Down buttons 1 and BOOM BASS button 2 as desired.
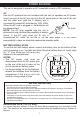
OPERATION (CONTINUED) SETTING THE PRESETS (UP TO 15 TOTAL FOR BOTH BANDS) 1 2 1 1 2 2 3 Press the POWER button 1 to turn the unit on. Press the TUNER Function button 2 to select the Tuner mode. Press the BAND button 1 to select AM or FM. Press the Skip/Search/Tune o 2 or n 3 button to tune in a station. 3 4 1 2 3 Press the PROGRAM button 1; the preset number will appear and MEMORY will blink in the display.
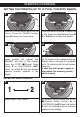
TO PLAY A CD 1 OPERATION (CONTINUED) 2 1 3 2 Press the PLAY/PAUSE (®p)/Preset Up button; playback will start automatically and the elapsed time will start counting in the display. Press the POWER button 1 to turn the unit on. Press the CD Function button 2 to select the CD mode. Open the CD compartment door by pressing the CD Door OPEN area 3. Place a CD on the center spindle, with the printed label side facing up. Close the CD compartment door.
OPERATION (CONTINUED) TO PLAY A CD (CONTINUED) 7 8 When the disc is through playing, it will stop rotating. Press the STOP (X)/Preset Down button to stop the disc before it is finished. To turn the unit off, press the POWER button again. NOTES: 1 2 • If a disc is inserted incorrectly, dirty or damaged, "disc" will appear in the display. • As each track is played, the track number is shown in the display. • To prevent damage to the disc, never open the CD door while the disc is rotating.
OPERATION (CONTINUED) TO PROGRAM THE MEMORY (UP TO 16 TRACKS) 1 2 1 With the power on and the unit in the Stop mode, press the PROGRAM button; "MEMORY" will blink and “Pr01” will appear in the display. 2 Use the Skip/Search/Tune o 1 or n 2 button to select the first track to be programmed. 3 4 1 Press the PROGRAM button again; the selected track has now been programmed and counted as program 1. 2 Repeat steps 2 and 3 to program the other desired tracks in sequence, up to 16 tracks.
OPERATION (CONTINUED) NOTES ON PROGRAMMED PLAY: • Programming is the ability to preselect the order in which a series of tracks will be played. • Each track may be stored in the program memory as many times as desired. • As each track is played, its track number will be displayed. You can move forward or backward through the programmed tracks with the Skip/Search/ Tune o or n button. • The CD player will stop after all programmed tracks have been played or the STOP (X)/Preset Down button is pressed.
OPERATION (CONTINUED) USING AN EXTERNAL UNIT You can connect an external unit to this unit, such as a cassette player, MP3 player, etc. Simply connect an audio cable (not included) from the AUX IN jack on this unit to the external unit's AUX OUT jack. This will allow you to broadcast the external unit's sound through this unit’s speakers. 1 2 Connect the external unit to the AUX IN jack. Press the POWER button to turn the unit on, and also make sure the external unit is on.
CARE AND MAINTENANCE Caring for Compact Discs • Treat the compact disc carefully. Handle the compact disc only by its edges. Never allow your fingers to come in contact with the shiny, unprinted side of the compact disc. • Do not attach adhesive tape, stickers, etc. to the disc label. • Clean the compact disc periodically with a soft, lint-free, dry cloth. Never use detergents or abrasive cleaners to clean the compact disc. If necessary, use a CD cleaning kit.
TROUBLESHOOTING GUIDE If you experience a problem with this unit, check the chart below before calling for service. SYMPTOM Unit will not turn on. Disc will not play. No sound. CAUSE AC cord not connected. CD compartment door not closed. Disc inserted incorrectly. Dirty or defective CD. Moisture condensation on disc. Volume is set to minimum. Defective disc. Dirty or defective disc. AM or FM, no sound. Power is not on. Volume is set to minimum. AM/FM, poor sound. Station is not tuned properly.
SPECIFICATIONS GENERAL: Power Source .........................................................120V, 60Hz AC Battery.....................................12V DC (8 x 1.5V ‘C’ size batteries) Alkaline is recommended for longer life Speaker....................................................................2 x 3W, 8 Ohm Output Power ....................................................................2 x 1.8W RADIO SECTION: Frequency Range (FM) ...........................................87.
Estimado Cliente: Lea este manual detenidamente antes de operar la unidad para familiarizarse más con la misma y obtener el desempeño que le permitirá disfrutarla por muchos años. Conserve estas instrucciones a la mano para futura referencia. CONSERVE EL EMPAQUE AL MENOS DURANTE 90 DÍAS POR SI ACASO NECESITARA REGRESAR EL PRODUCTO A SU DISTRIBUIDOR O A MEMOREX. Para futura referencia, registre el número de serie de la unidad, impreso en la parte trasera del gabinete.
MEDIDAS DE SEGURIDAD INFORMACIÓN: Este equipo fue probado y se encontró que cumple con las limitantes para aparatos digitales de Clase B, de conformidad con el apartado 15 de las Normas de la FCC. Estas limitantes están diseñadas para ofrecer una protección razonable contra interferencia dañina en una instalación residencial.
Estimado Cliente: En el momento en que seleccionó un equipo de tan alta tecnología como el que usted acaba de comprar, su entretenimiento musical recién comenzó. Ahora es tiempo de pensar en cómo puede optimizar el entretenimiento que su equipo le ofrece.
MEDIDAS DE SEGURIDAD Antes de usar este aparato asegúrese de leer bien todos los puntos de este manual de operaciones. Una vez leído, consérvelo a la mano para usarlo como referencia en el futuro. Tenga especial cuidado al seguir las advertencias indicadas en la unidad, así como las que aparecen en el manual de instrucciones. 1. Lea el instructivo. Usted deberá leer todo el instructivo de seguridad y funcionamiento antes de operar su equipo. 2.
MEDIDAS DE SEGURIDAD 16. No permita la entrada de objetos o líquidos dentro de la unidad. Nunca introduzca un objeto metálico en la unidad, ni ponga nada que contenga líquidos cerca de ella. La unidad no deberá ser instalada en un mueble empotrado, como una repisa para libros, un estante o donde la presencia de cortinas o mobiliario obstruya las aberturas de ventilación. 17. Conexión a tierra de la antena exterior.
UBICACIÓN DE LOS CONTROLES UNIDAD PRINCIPAL 15 16 1 2 3 4 5 6 7 8 9 10 11 12 13 14 17 18 19 20 21 22 23 24 1. 2. 3. Conector de entrada de AUX Enchufe de AUDÍFONOS Compartimiento de baterías (parte inferior de la unidad) 15. Antena FM 16. Conector de enchufe de CA (atrás en la unidad) 4. 5. 6. 7. 8. 9. 10.
FUENTE DE ENERGÍA Esta unidad fue diseñada para operar con corriente eléctrica o con baterías. OPERACIÓN CON CORRIENTE ELÉCTRICA Use el cable eléctrico polarizado incluido con la unidad para operar con energía CA. Inserte un extremo del cable eléctrico en el enchufe atrás en la unidad y el otro extremo (con las dos clavijas) en el contacto eléctrico convenientemente ubicado y de 120V, 60 Hz. Cuando conecte el cable eléctrico, las baterías se desconectarán automáticamente.
ESCUCHAR LA RADIO OPERACIÓN 1 2 1 2 Presione el botón de BANDA para seleccionar AM o FM. Presione el botón de ENCENDIDO 1 para encender la unidad. Presione el botón de SINTONIZADOR 2 para seleccionar el modo de Sintonizador. 3 4 3 1 2 2 2 1 Presione el botón de Brincar/Buscar/ Sintonizar o 1 o n 2 para sintonizar una estación. Si escucha una estación de FM, presione el botón de REPETIR/ MODO FM 3 para seleccionar FM Mono o Estéreo.
OPERACIÓN (CONTINÚA) CÓMO AJUSTAR LOS PREDEFINIDOS DE LA RADIO (HASTA 15 EN TOTAL PARA AMBAS BANDAS) 1 2 1 1 2 2 Presione el botón de ENCENDIDO 1 para encender la unidad. Presione el botón de Función de SINTONIZADOR 2 para seleccionar el modo de Sintonizador. 3 3 Presione el botón de BANDA 1 para seleccionar AM o FM. Presione el botón de Brincar/ Buscar/Sintonizar o 2 o n 3 para sintonizar una estación.
OPERACIÓN (CONTINÚA) PARA REPRODUCIR UN CD 1 2 1 3 2 Presione el botón de REPRODUCIR /PAUSA (®p)/Predefinido Arriba; la reproducción comenzará automáticamente y el tiempo transcurrido empezará a contar en el display. Presione el botón de ENCENDIDO 1 para encender la unidad. Presione el botón de Función de CD 2 para seleccionar el modo de CD. Abra el compartimiento del CD presionando el Área de Abrir puerta del CD 3. Coloque un CD en el eje central, con el lado de la etiqueta hacia arriba.
OPERACIÓN (CONTINÚA) PARA REPRODUCIR UN CD (CONTINÚA) 7 8 Cuando el disco termine de reproducir, dejará de girar. Presione el botón de DETENER (X)/Predefinido Abajo para detener el disco antes de terminar. Para apagar la unidad, presione nuevamente el botón de ENCENDIDO. NOTAS: 1 disco incorrectamente, 2 • Si introdujo el si está sucio o dañado o si no hay un disco, “disc” [disco] aparecerá en el display. • A medida que se reproduce cada pista, se muestra el número de pista en el display.
OPERACIÓN (CONTINÚA) PARA PROGRAMAR LA MEMORIA (HASTA 16 PISTAS) 1 2 1 Utilice el botón de Brincar/Buscar/ Sintonizar o 1 o n 2 para seleccionar la primera pista a programar. Con la unidad encendida y en modo de Paro, presione el botón de PROGRAMA; “MEMORY” [memoria] parpadeará y “01” aparecerá en el display. 3 4 1 Presione nuevamente el botón de PROGRAMA; así programa la pista seleccionada y cuenta como el programa 1.
OPERACIÓN (CONTINÚA) NOTAS SOBRE LA REPRODUCCIÓN PROGRAMADA: • Programar es la habilidad de seleccionar previamente el orden en el cual se reproducirá una serie de pistas. • Cada pista puede guardarse en la memoria del programa tantas veces como desee. • A medida que se van reproduciendo las pistas, se mostrará el número de pista. Usted puede moverse hacia adelante o atrás por las pistas programadas usando el botón de Brincar/Buscar/Sintonizar o o n.
OPERACIÓN (CONTINÚA) USAR UNA UNIDAD EXTERNA Usted puede conectar una unidad externa a esta unidad, como por ejemplo un reproductor de casete, un reproductor de MP3, etc. Simplemente conecte un cable de audio (no incluido) por un lado al conector de entrada de AUX en esta unidad y, por otro lado, al conector de SALIDA DE AUXILIAR en la unidad externa. Eso le permitirá transmitir el sonido de una unidad externa a través de las bocinas de esta unidad.
CUIDADO Y MANTENIMIENTO Cuidado de los discos compactos • Trate el disco con cuidado. Maneje el disco sólo por sus orillas. Nunca permita que sus dedos toquen el lado brilloso y sin impresión del disco. • No pegue cinta adhesiva, calcomanías u otra cosa en la etiqueta del disco compacto. • Limpie el disco compacto periódicamente con una tela suave, seca y sin pelusas. Nunca use detergentes ni limpiadores abrasivos para limpiar el disco. Si es necesario, use un juego de limpieza para CD.
GUÍA DE DIAGNÓSTICO Si tiene problemas con esta unidad, revise la tabla a continuación antes de llamar a servicio. SÍNTOMA La unidad no enciende. Disco no toca. Sin sonido. Reproducción errática. CAUSA El cable no está conectado. Puerta del compartimiento del CD abierta. Disco introducido incorrectamente. CD sucio o defectuoso. Condensación en el disco. El volumen está al mínimo. SOLUCIÓN Revise la conexión del cable. Cierre el compartimiento del CD. Introduzca el disco correctamente.
ESPECIFICACIONES GENERAL: Fuente de energía ........................................................................120VCA, 60Hz Batería .......................................................12VCD (8 baterías 1.5V tamaño “C”) Se recomiendan las alcalinas por su larga duración Bocina.......................................................................................2 x 3W, 8 ohmios Potencia de salida..................................................................................2 x 1.
Memcorp, Inc. Weston, FL Printed in / Impreso en Hong Kong Visit our website at / Visite nuestro sitio web en www.memorexelectronics.