MPD8807.O/M.QXD 5/19/03 7:54 AM Page 23 MPD8807CP User’s Guide PERSONAL COMPACT DISC MP3 PLAYER Before operating this product, please read these instructions completely.
MPD8807.O/M.QXD 5/19/03 7:54 AM Page 1 SAFETY PRECAUTIONS CAUTION RISK OF ELECTRIC SHOCK DO NOT OPEN CAUTION: TO REDUCE THE RISK OF ELECTRIC SHOCK, DO NOT REMOVE COVER (OR BACK). NO USER-SERVICEABLE PARTS INSIDE. REFER SERVICING TO QUALIFIED SERVICE PERSONNEL.
MPD8807.O/M.QXD 5/19/03 7:54 AM Page 2 SAFETY PRECAUTIONS (CONTINUED) INFORMATION: This equipment has been tested and found to comply with the limits for a Class B digital device, pursuant to Part 15 of the FCC Rules. These limits are designed to provide reasonable protection against harmful interference in a residential installation.
MPD8807.O/M.QXD 5/19/03 7:54 AM Page 3 Dear Customer: Selecting fine audio equipment such as the unit you’ve just purchased is only the start of your musical enjoyment. Now it’s time to consider how you can maximize the fun and excitement your equipment offers. This manufacturer and the Electronic Industries Association’s Consumer Electronics Group want you to get the most out of your equipment by playing it at a safe level.
MPD8807.O/M.QXD 5/19/03 7:54 AM Page 4 LOCATION OF CONTROLS 1 10 2 3 11 6 7 8 9 12 1. Display 2. DC 4.5V Jack (Side of Unit) – 4 5 8. Skip ( 13 14 15 )/ Button 9. PLAY/PAUSE ( )/UP/Power On Button 10. Battery Compartment (Inside of CD Compartment) 11. CD Door OPEN Switch 12. CD Compartment 13. VOLUME Up/Down Buttons 14. PHONES (Headphones) Jack 15. LINE OUT Jack (Side of Unit) + 3. P.MODE (Play Mode)/CLEAR Button 4. ESP/MENU Button 5. PROG/EQ/ENTER Button 6. Skip ( )/¥ Button 7.
MPD8807.O/M.QXD 5/19/03 7:54 AM Page 5 POWER SOURCES This CD player requires either two (2) “AA” cell standard batteries (not included) or the AC adapter (not included). BATTERY INSTALLATION “Low Battery” will light in the display when batteries are low (when using battery power). – –+ 1. Open the CD Compartment, then open the battery compartment door by pressing in the tab and lifting it. To prevent the possibility of losing the cover, it cannot be removed. – 2.
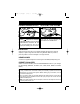
MPD8807.O/M.QXD 5/19/03 7:54 AM Page 6 CD OPERATION TURNING POWER ON /OFF ADJUSTING THE VOLUME 1 1 2 1 To turn the unit on, press the PLAY/ PAUSE ( )/UP/Power On button ❶. To turn the unit off, press the STOP (■)/DOWN/Power Off button ❷. The unit will automatically shut off if stopped (CD Standby) for one minute. You can adjust the digital volume level from “00” to “32” by pressing the VOLUME UP or DOWN button.
MPD8807.O/M.QXD 5/19/03 7:54 AM Page 7 CD OPERATION (CONTINUED) TO INSERT AND PLAY A CD This CD player is designed to play all kinds of Audio Discs and MP3 CD ROMS, such as CD recordables and rewritables. Do not try to play CDI, CDV, DVD or computer CDs in this unit. 1 2 Press the PLAY/PAUSE ( )/UP/ Power On button to turn the unit on. If a CD is inserted, it will automatically start playing. Slide the CD Door OPEN switch to the right to open the CD compartment.
MPD8807.O/M.QXD 5/19/03 7:54 AM Page 8 CD OPERATION (CONTINUED) CD PLAYBACK NOTES: • See page 15 for more information on MP3’s. • When recording (“burning”) CDs, make sure the session is “finalized”, or simply record (“burn”) only one session. You can find more information in your recorder’s manual. • This unit is capable of playing standard CDs or 3” singles; no adapter is required. • If a disc is inserted incorrectly, dirty, damaged or not present at all, “no disc” will appear in the display.
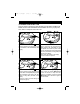
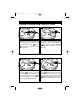
MPD8807.O/M.QXD 5/19/03 7:54 AM Page 9 CD OPERATION (CONTINUED) TO BEGIN PLAYBACK FROM A SPECIFIC TRACK 2 1 1 2 After you insert the disc into the CD player and the total number of tracks and time appear on the display, you may press either the Skip /¥ ❶ or / ❷ button to select a specific track for playback. When the desired track number (and file number if using MP3) appears in the display, press the PLAY/PAUSE ( )/UP/Power On button. Playback will begin with the track (or file) you selected.
MPD8807.O/M.QXD 5/19/03 7:54 AM Page 10 CD OPERATION (CONTINUED) HIGH-SPEED MUSIC SEARCH 1 1 During playback, depress and hold either the Skip /¥ ❶ or / ❷ button to move the player forward or backward within a track to locate a specific musical passage. The player will move forward or backward at high speed as long as the buttons are depressed. When you release the Skip /¥ ❶ or / ❷ button, normal playback will resume.
MPD8807.O/M.QXD 5/19/03 7:54 AM Page 11 CD OPERATION (CONTINUED) REPEAT PLAYBACK OF ALL TRACKS 2 1 1 2 To repeat all the tracks on the CD, while in the Stop mode, press the P.MODE/CLEAR button twice; “Repeat ALL” will appear in the display. Press the PLAY/PAUSE ( )/UP/ Power On button ❶ to begin playback. All tracks on the disc will be repeated continuously. To stop Repeat playback, press the P.MODE/CLEAR button ❷ repeatedly until the mode indicator disappears.
MPD8807.O/M.QXD 5/19/03 7:54 AM Page 12 CD OPERATION (CONTINUED) INTRO PLAYBACK (Will play the first 10 seconds of each track) 1 2 2 While in the Stop mode, press the P.MODE/CLEAR button three times (four times if an MP3 CD with multiple directories is inserted); “INTRO” will appear in the display. 1 Press the PLAY/PAUSE ( )/ UP/Power On button ❶ to begin Intro playback. The first 10 seconds of all tracks on the disc will be played in sequence.
MPD8807.O/M.QXD 5/19/03 7:54 AM Page 13 CD OPERATION (CONTINUED) TO PROGRAM THE MEMORY (UP TO 64 TRACKS) Programming is the ability to preselect the order in which a series of tracks will be played. 2 1 1 2 While in the Stop mode, press the PROG/EQ/ENTER button. The track number will blink and “P-01” will appear in the display. Select a track to be programmed using the Skip /¥ ❶ or / ❷ button. If using a MP3 disc, see note below. 3 4 2 Press the PROG/EQ/ENTER button to memorize the track.
MPD8807.O/M.QXD 5/19/03 7:54 AM Page 14 CD OPERATION (CONTINUED) NOTES ON PROGRAMMED PLAYBACK: • You can review the program by pressing the PROG/EQ/ENTER button repeatedly while in the Stop mode. • To add a track to the program memory, simply press the PROG/EQ/ ENTER button repeatedly until the track (Directory for MP3) appears and “00” blinks in the display, then follow steps 2 and 3 on the previous page.
MPD8807.O/M.QXD 5/19/03 7:54 AM Page 15 CD OPERATION (CONTINUED) MP3 FAQs - Frequently Asked Questions Please read before playing an MP3 CD. Does the unit support packet write CD-RW? Yes it can. You can add or delete MP3 files without reformatting. It appears like a PC hard drive. Can the unit read regular music CDs? Yes it can. However you can not mix MP3s and WAV files on the same CD. If you do this your Portable MP3 CD Player will play only the MP3 files.
MPD8807.O/M.QXD 5/19/03 7:54 AM Page 16 CD OPERATION (CONTINUED) SELECTING SONGS BY MP3 TITLE 2 1 4 1 3 You can search for a song by title as follows: 2 While in the Stop mode (and with an MP3 CD inserted), press the ESP/MENU button; the alphabet will appear in the display. Select the first letter of a file you would like to listen to using the Skip /¥ ❶ and/or Skip / ❷ buttons.
MPD8807.O/M.QXD 5/19/03 7:54 AM Page 17 CD OPERATION (CONTINUED) SEARCHING THROUGH MP3 DIRECTORIES You can search the contents of the directories (if burned on CD) as follows: 2 1 1 2 Press the ESP/MENU button twice; the first directory will appear in the display, as well as its contents. To select a file from the directory, use the Skip /¥ ❶ and/or / ❷ buttons.
MPD8807.O/M.QXD 5/19/03 7:54 AM Page 18 CD OPERATION (CONTINUED) SINGLE SESSION The following chart is an example of a Windows Explorer display that will appear on your computer monitor for a single session MP3 CD ROM with directories/albums. Check the added notes to help you understand the MP3 CD unit display and the playback sequence of directories/ albums and tracks on a single session MP3 CD. MULTI SESSION The computer user does not need to finalize the CDR disc as music is burned on the CD.
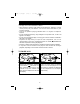
MPD8807.O/M.QXD 5/19/03 7:54 AM Page 19 CARE AND MAINTENANCE Caring for Compact Discs • Treat the compact disc carefully. Handle the compact compact disc only by its edges. Never allow your fingers to come in contact with the shiny, unprinted side of the compact compact disc. • Do not attach adhesive tape, stickers, etc. to the compact disc label. • Clean the compact disc periodically with a soft, lint-free, dry cloth. Never use detergents or abrasive cleaners to clean the compact disc.
MPD8807.O/M.QXD 5/19/03 7:54 AM Page 20 TROUBLESHOOTING GUIDE If you experience a problem with this unit, check the chart below before calling for service. SYMPTOM Unit will not turn on. Disc will not play. Erratic CD playback. No sound from headphones. ESP not working. CAUSE Dead batteries, or not installed properly. Weak or dead Rechargeable batteries. AC adapter not connected. CD compartment not closed. Disc inserted incorrectly. Dirty or defective disc. Moisture condensation on disc.
MPD8807.O/M.QXD 5/19/03 7:54 AM Page 21 SPECIFICATIONS Power Requirement DC ............................2 x AA (LR6) Alkaline batteries Power Requirement AC...................DC IN 4.5V Adapter (center positive) MPEG Rate ............................................................................32-384Kbps Sampling Frequency ..................................8/11.025/12KHz for MPEG2.5 16/22.05/24KHz for MPEG2 32/44.1/48KHz for MPEG1 MP3 Playback ................................................
MPD8807.O/M.QXD 5/19/03 7:54 AM Page 22 Memcorp, Inc. Weston, FL Printed in Hong Kong Visit our website at www.memorexelectronics.