
Owner`s manual


19
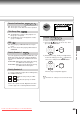
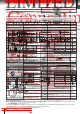
Connections
Notes
• Refer to the owner’s manual of the connected equipment as well.
• When you connect the DVD player to other equipment, be sure to turn off the power and unplug all of the equipment from the
wall outlet before making any connections.
• If you place the DVD player near a tuner or radio, the radio broadcast sound might be distorted. In this case, place the DVD
player away from the tuner and radio.
• The output sound of the DVD player has a wide dynamic range. Be sure to adjust the receiver’s volume to a moderate
listening level. Otherwise, the speakers may be damaged by a sudden high volume sound.
• Turn off the amplifier before you connect or disconnect the DVD player’s power cord. If you leave the amplifier power on, the
speakers may be damaged.
• The S VIDEO OUT jack and the VIDEO OUT jack cannot output video signals simultaneously, if you select progressive
signal when the SELECT (I/P) switch is set to “P.”
Connecting to an audio system and TV equipped with component video inputs
Signal flow
To wall outlet
To audio inputs of the amplifier
(red) (white)
(red)
(white)
To Y
VIDEO
OUT
To PR
VIDEO
OUT
To PB
VIDEO
OUT
To PB video input
To PR video input
To Y video input
TV or monitor equipped
with component video
(INTERLACED) inputs
or
TV or monitor equipped
with component video
(PROGRESSIVE) inputs
Audio system
INTERLACED outputs/inputs (ColorStream
®
)
Some TVs or monitors are equipped with component video
inputs. Connecting to these inputs allows you to enjoy
higher quality picture playback.
Actual labels for component video inputs may vary
depending on the TV manufacturer. (ex. Y, R-Y, B-Y or Y,
CB, CR)
In some TVs or monitors, the color levels of the playback
picture may be reduced slightly or the tint may change. In
such a case, adjust the TV or monitor for optimum
performance.
• Make the following setting.
On-screen display
Select:
Page
“Analog Output”
To 2CH AUDIO OUT
Set to “I.”
Set to “P.”
Switching the output signal (interlaced/
progressive) using the remote control
(only when the SELECT (I/P) switch is set to “P”)
You can temporarily switch the output signal for better
picture quality.
Press PROGRESSIVE on the remote control.
While the DVD player is outputting progressive signals,
the indicator on the right side on the front panel
illuminates.
PROGRESSIVE outputs/inputs (ColorStream
®
Pro)
Some TVs or monitors are equipped with component video
inputs that are capable of reproducing a progressively
scanned video signal. Connecting to these inputs allows
you to view the highest quality pictures with less flicker.
ΒΙΤΣΤΡΕΑΜ
/ΠΧΜ
5.1ΧΗ
ΣΥΡΡΟΥΝ∆
ΑΝΑΛΟΓ
Λ
ΧΟΑΞΙΑΛ ΟΠΤΙΧΑΛ
2ΧΗ
∆ΙΓΙΤΑΛ
Ρ
Χ
Λσ
Λ
ΣΥΒ
Ρσ
Ρ
ςΙ∆ΕΟ
Ψ
Π
Β
ΠΡ
Σ
ΑΥ∆ΙΟ ΟΥΤ
ςΙ∆ΕΟ ΟΥΤ
ΣΕΛΕΧΤ
Π
Ι
ΣΕΛΕΧΤ
Π
Ι
ΣΕΛΕΧΤ
Π
Ι
“Stereo”
* After setting this switch (I/P), be sure to
power off the DVD player then turn it on
to activate the setting.
Downloaded From Disc-Player.com Toshiba Manuals
21
Connections
Dolby Surround Pro Logic
You can enjoy the dynamic realistic sound of Dolby Surround Pro Logic by
connecting an amplifier and speaker system (right and left front speakers, a
center speaker, and one or two rear speakers).
With an amplifier equipped with Dolby Digital
Connect the equipment the same way as described in “Connecting to an
amplifier equipped with a Dolby Digital decoder.” Refer to that amplifier’s
owner’s manual and set the amplifier so you can enjoy Dolby Surround Pro
Logic sound.
With an amplifier not equipped with Dolby Digital
Connect the equipment as follows.
Manufactured under license from Dolby
Laboratories. “Dolby”, “Pro Logic” and
the double-D symbol are trademarks of
Dolby Laboratories. Confidential
unpublished works. Copyright 1992-1997
Dolby Laboratories. All rights reserved.
• Use DVD video discs encoded via
the Dolby Digital recording
system.
• Make the following setting.
Be sure to set “Analog Output”
to “Stereo” when you enjoy
sounds of Dolby Surround Pro
Logic using this connection.
* Connect one or two rear speakers.
The output sound from the rear speakers
will be monaural even if you connect two
rear speakers.
• Make the following setting.
On-screen display
Select:
“Analog Output”
Amplifier equipped with
Dolby Surround Pro Logic
To audio input
Audio cable
Connect either.
To OPTICAL
type digital
audio input
*
To 2CH AUDIO OUT
Amplifier equipped with a
Dolby Digital decoder
Optical digital cable
75 Ω coaxial cable
To COAXIAL
type digital
audio input
Connecting to an amplifier equipped with a Dolby Digital decoder
Dolby Digital
Dolby Digital is the surround sound technology used in theaters showing the
latest movies, and is now available to reproduce this realistic effect in the home.
You can enjoy motion picture and live concert DVD video discs with this dynamic
realistic sound by connecting the DVD player to a 6 channel amplifier equipped
with a Dolby Digital decoder or Dolby Digital processor. If you have a Dolby
Surround Pro Logic decoder, you will obtain the full benefit of Pro Logic from the
same DVD movies that provide full 5.1-channel Dolby Digital soundtracks, as well
as from titles with the Dolby Surround mark.
Connecting to an amplifier equipped with Dolby Surround Pro Logic
Page
“Stereo”
• Even if “Analog Output” is set to
“Multi,” sound will be output in
bitstream format.
On-screen display
Select:
Page
“Bitstream”“Digital Output”
Recording system
D
“Stereo”
“Analog Output”
Downloaded From Disc-Player.com Toshiba Manuals
23
Connections
Connecting to an amplifier equipped with a digital audio input
2 channel digital stereo
You can enjoy the dynamic sound of 2 channel digital stereo by connecting an
amplifier equipped with a digital audio input and speaker system (right and left
front speakers).
• Make the following setting.
Amplifier equipped with
a digital audio input
Connect either.
To OPTICAL
type digital
audio input
Optical digital cable
75 Ω coaxial cable
To COAXIAL
type digital
audio input
Connecting to an amplifier equipped with 5.1ch audio inputs
5.1ch surround sound
The Dolby Digital decoder equipped with this DVD player enables you to obtain
the full benefit of 5.1 channel sound tracks when you connect the DVD player to
an amplifier equipped with 5.1 channel audio inputs.
• Use DVD video discs encoded via
the Dolby Digital recording
system.
• Make the following setting.
On-screen display
Select:
Page
“Multi”
“Analog Output”
Recording system
Audio cable
Amplifier equipped with
5.1ch audio inputs
To 5.1ch audio
inputs
To 5.1CH
SURROUND
AUDIO OUT
When “ Pro Logic” is set to “On,” 2 channel
sound is output in the Dolby Surround Pro
Logic format. To obtain the original 2 channel
sound, set “
Pro Logic” to “Off”.
D/MPEG
On-screen display Select:
Page
“PCM”
“Digital Output”
“Stereo”
“Analog Output”
Downloaded From Disc-Player.com Toshiba Manuals
27
Basic playback
To pause playback (still mode)
Press PAUSE/STEP during playback.
To resume normal playback, press
the PLAY button.
• Sound is muted during still mode.
To stop playback
Press STOP.
To remove the disc
Press OPEN/CLOSE.
Remove the disc after the disc tray
opens completely.
Be sure to press the OPEN/CLOSE button to close
the disc tray after you remove the disc.
To obtain a higher quality picture
Occasionally, some picture noise not usually visible during a normal broadcast may
appear on the TV screen while playing a DVD video disc because the high
resolution pictures on these discs include a lot of information. While the amount of
noise depends on the TV you use with this DVD player, you should generally reduce
the sharpness adjustment on your TV when viewing DVD video discs.
About
The icons on the heading bar show the playable discs for the
function described under that heading.
: DVD video discs.
: VIDEO CDs.
About the screen saver
If you pause a picture of a DVD video disc and leave it
still for a long while, the screen saver of the DVD player
automatically appears (when “Screen Saver” is set to
“On”
). To turn off the screen saver, press the PLAY
button.
Automatic Power Off function
If the DVD player is stopped, or the screen saver is
engaged for approximately 20 minutes, the DVD player
will automatically turn itself off.
Still pictures included on DVD audio discs
DVD audio discs may include still pictures, which are
classified into two large groups.
• Slideshow: Still pictures appear one after another
automatically consistent with the disc
program. They cannot be operated.
• Browsable pictures:
You can display your favorite still picture
selected with the buttons on the remote
control. Some of those may change
automatically.
: To select a picture. (The order of pictures
vary depending on the disc)
: To return to a specific one programmed on
the disc.
Notes
• Do not move the DVD player during playback. Doing so may damage the disc.
• Use the OPEN/CLOSE button to open and close the disc tray. Do not push the disc tray while it is moving. Doing so may
cause the DVD player to malfunction.
• Do not push up on the disc tray or put any objects other than discs on the disc tray. Doing so may cause the DVD player to
malfunction.
• In many instances, a menu screen will appear after playback of a movie is completed. Prolonged display of an on-screen
menu may damage your television set, permanently etching that image onto its screen. To avoid this, be sure to press the
STOP button twice on your remote control once the movie is completed.
: DVD audio discs.
: Audio CD.
Downloaded From Disc-Player.com Toshiba Manuals
29
Basic playback
Playing in slow-motion
Press SLOW during playback.
Each time you press the SLOW
button, the slow-motion speed
changes.
If you press the SLOW
button
during playback, you can view the
picture in reverse slow-motion. (Only
when using a DVD video disc.)
Each time you press the SLOW
button, the slow-motion speed
changes.
To resume normal playback
Press PLAY.
Notes
• The sound is muted during slow-motion playback.
• The playback speed may differ depending on the disc.
• When using a DVD audio disc that includes pictures, this
operation may be permitted in some picture segments.
Resuming playback from the same location
Press STOP at the location where you
want to interrupt playback.
The DVD player memorizes the
location where playback is stopped.
Press PLAY.
The DVD player resumes playback
from the location where you stopped
playback.
To start playback from the beginning regardless
of the location where you stopped playback
1 Press STOP twice.
The DVD player erases the previous
location from its memory.
1
2
2 Press PLAY.
Playback starts from the
beginning of the current title.
Playback starts from the
beginning of the current group.
Playback starts from the
beginning of the disc.
• If you want to return to the beginning of a DVD video/
audio disc, open and close the disc tray once with
the OPEN/CLOSE button before pressing the PLAY
button.
Notes
• Resuming cannot function when:
– you change the parental lock setting or select a disc
menu language .
– you play a PBC-featured VIDEO CD while “PBC” is
set to “On.”
– you open the disc tray.
• There may be a difference in the location where playback
resumes depending on the disc. Especially when using a
DVD audio disc, playback may resume from the beginning of
the current track.
• Settings you changed using the on-screen displays while the
DVD player keeps a location in the memory may function
only after the memory is cleared.
Downloaded From Disc-Player.com Toshiba Manuals
31
Basic playback
Locating a specific chapter or track
Press SKIP or repeatedly to display
the chapter or track number you want.
Playback starts from the selected chapter or track.
To locate succeeding chapters or
tracks.
Playback starts from the beginning
of the current chapter or track.
When you press twice, playback
starts from the beginning of the
preceding chapter or track.
Notes
• Some titles may not display chapter numbers.
• When you set “Title/Group Stop” to “Off” , you can
access chapters in another title. If you go back to the
preceding title by pressing the SKIP button, the DVD
player locates the first chapter of the title. When “Title/Group
Stop” is set to “On,” you can access chapters only within the
current title.
• If you press and hold the SKIP or button on the front
panel during playback, the DVD player performs fast reverse
or fast forward playback. You can vary the speed by
pressing the button further.
To locate chapters or tracks during fast reverse or fast
forward playback, first press the PLAY button to resume
normal playback, then use the SKIP or button.
Number buttons
Press T.
If you are using a VIDEO CD/audio CD, skip steps 1
and 2. Then at step 3, enter the number for the track
you want using the number buttons.
e.g.
Press / to select a section you want
to locate.
e.g. When you want to locate a
chapter.
Press / to enter a number of the
section.
Also the number buttons are
available.
e.g. To enter 25
or
1
2
Repeat steps 2 and 3 if necessary.
Press PLAY or ENTER.
Playback starts from the
selected location.
3
5
Notes
• Pressing the CLEAR button resets the numbers. To clear the
display, press the T button several times.
• This method of locating a title/group is available only on a
disc that contains title/group numbers.
Playing bonus groups of DVD audio discs
Some DVD audio discs may include an extra content
called “Bonus group”.
If you select it to play, a display appears to enter a key
number. Press the number buttons to enter the key
number, then press ENTER.
When the number is entered correctly, playback of the
bonus group starts.
To get key numbers, refer to instruction notes of discs.
Notes
• A key number may be cleared in some cases such as when
removing the disc. Enter the key number again if necessary.
• When you use a bonus group in a programmed play such as
memory playback, enter the key number beforehand.
Locating a desired section by entering its corresponding number
4
Downloaded From Disc-Player.com Toshiba Manuals
69
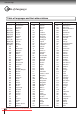
Others
TOSHIBA 0001 0071 0211 0571
BELL & HOWELL 0471 0651 0071 0281 0441
CARVER 0201 0251 0281 0411 0501
CITIZEN 0201 0251
CURTIS MATHES 0471 0651 0071 0281 0441
0311 0431 0521 0571
EMERSON 0201 0231 0471 0481 0571
0581 0651
FISHER 0041 0121 0181 0201 0281
0471 0571 0651
GE 0941 0951 0961 0971 0981
0991 1041
GOLDSTAR 0201 0251 0281 0411 0501
HALLMARK 0001 0511 0201 0231 0471
0481 0571 0581 0651
HITACHI 0021 0221 0251 0351 0371
0381 0431 0571 0641 0751
INFINITY 0501
JBL 0501
JVC 0311 0431 0521 0571
LXI 0001 0511 0851
MAGNAVOX 0501 0071 0191 0221 0461
0471 0591 0611 0651
MARANTZ 0201 0501
MEMOREX 0411
MGA 0201
MITSUBISHI 0201 0321 0331 0451 0501
0511 0571 0651 0771
MTC 0201 0251
NAD 0001 0511
OPTONICA 0511 0851 0571 0201 0501
PANASONIC 0371 0501 0511 0531 0761
0841 0911 1061
PHILCO 0071 0111 0181 0201 0271
0301 0461 0501 0651
PHILIPS 0071 0191 0221 0461 0471
0501 0591 0611 0651
PROTON 0201
PULSAR 0931 0071 0091 0281 0291
0341 0471 0651
QUASAR 0371 0501 0511 0531 0761
0841 0911
RADIO SHACK 0631 1001 1011 1021 1031
0851 0201 0501 0481 0321
0331 0501 0651 0771
RCA 0971 1071 1081 1091 0201
1041 0501
REALISTIC 0631 1001 1011 1021 1031
0851 0201 0501 0481 0321
0331 0501 0651 0771
RUNCO 0071 0091 0281 0291 0341
0471 0651
SAMSUNG 0171 0181 0251 0281 0411
0491 0501 0631 0661 0791
SANYO 0021 0041 0081 0121 0171
0181 0201 0231 0241 0451
0571 0651 0671 0701 0711
0721
SEARS 0001 0191 0491 0201 0501
0071 0211 0571 0041 0121
0181 0201 0281 0471 0651
SHARP 0851 0511 0571 0201 0501
SONY 0441 0451 0571 0681
SOUNDESIGN 0201 0481
SYLVANIA 0501 0071 0191 0221 0461
0471 0591 0611 0651 0371
0511 0531 0841
TANDY 0171 0511 0851 0571 0201
0501
TECHNICS 0371 0501 0511 0531 0761
0841 0911
TEKNIKA 0201 0251 0481 0501
TMK 0201 0251
VIDTECH 0201 0501 0401 0411 0851
0511
WARDS 0201 0501 0001 0191 0481
0491 0851 0511 0571 0071
0281 0441
ZENITH 0931
Brand code table
Brand name Brand code Brand name Brand code
Downloaded From Disc-Player.com Toshiba Manuals
71
Others
Specifications
DVD player / outputs / supplied accessories
DVD player
Power supply 120 V AC, 60 Hz
Power consumption 16 W
Mass 2.5 kg
External dimensions 430 × 69 × 219 mm (W/H/D)
Signal system Standard NTSC
Laser Semiconductor laser, wavelength 650 nm / 780 nm
Frequency range DVD linear sound : 48 kHz sampling 4 Hz to 22 kHz
96 kHz sampling 4 Hz to 44 kHz
192 kHz sampling 4 Hz to 88 kHz
Signal-to-noise ratio More than 112 dB
Audio dynamic range More than 108 dB
Harmonic distortion Less than 0.002 %
Wow and flutter Below measurable level (less than ±0.001 % (W.PEAK))
Operating conditions Temperature: 5 °C to 35 °C, Operation status: Horizontal
Outputs
Video output 1.0 V (p-p), 75 Ω, negative sync., pin jack × 1
S video output (Y) 1.0 V (p-p), 75 Ω, negative sync., Mini DIN 4-pin × 1
(C) 0.286 V (p-p), 75 Ω
Component video output (Y) 1.0 V (p-p), 75 Ω, negative sync., pin jack × 1
(P
B)/(PR) 0.7 V (p-p), 75 Ω, pin jack × 2
Audio output (BITSTREAM/PCM Optical connector × 1
OPTICAL)
Audio output (BITSTREAM/PCM 0.5 V (p-p), 75 Ω, pin jack × 1
COAXIAL)
Audio output (2CH AUDIO) 2.0 V (rms), 680 Ω, pin jacks (L, R) × 1
Audio output (5.1CH SURROUND) 2.0 V (rms), 680 Ω, pin jacks × 6
Supplied Accessories
Audio/video cable ................................................. 1
Remote control (SE-R0071) ................................. 1
Batteries (AAA) ..................................................... 2
• Designs and specifications are subject to change without notice.
Downloaded From Disc-Player.com Toshiba Manuals
73
Others
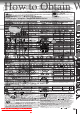
How to Obtain Warranty Service
(1) Refer to the troubleshooting guide in your owner’s manual. This check list may solve your problem.
(2) In the U.S.A., only call the TACP toll free number 800-631-3811, or if in Hawaii or Canada see listing below within (30)
days after you find a defective product or part.
(3) Arrange for the delivery of the product to the TACP/THI/TCL Authorized Service Station or TACP Return Center.
Products shipped to the Service Station must be insured and safely and securely packed, preferably in the original
shipping carton, and a letter explaining the defect and also a copy of the bill of sale or other proof of purchase must be
enclosed.
In Hawaii contact:
Toshiba Hawaii Inc.
327 Kamakee Street
Honolulu, HA 96814
(808)-521-5377
In Canada contact:
Consumer Electronics Group
191 McNabb Street
Markham, Ontario L3R 8H2
(905)-470-5400
Consumer Electronics Group
22171 Fraserwood Way
Richmond, B.C. V6W 1J5
(604)-303-2500
Consumer Electronics Group
1643 North Service Road
Droval, QC H9P 1J1
(514)-856-4100
All warranties implied by state law, including the implied warranties of merchantability and fitness for a particular purpose, are
expressly limited to the duration of the limited warranties set forth above. With the exception of any warranties implied by state
law as hereby limited, the foregoing warranty is exclusive and in lieu of all other warranties, guarantees, agreements and
similar obligations of manufacturer or seller with respect to the repair or replacement of any parts. In no event shall TACP/THI
be liable for consequential or incidental damages.
No person, agent, distributor, dealer or company is authorized to change, modify or extend the terms of these warranties in
any manner whatsoever. The time within which an action must be commenced to enforce any obligation of TACP/THI arising
under the warranty or under any statute, or law of the United States or any state thereof, is hereby limited to ninety (90) days
from the date you discover or should have discovered, the defect. This limitation does not apply to implied warranties arising
under state law.
This warranty gives you specific legal rights and you may also have other rights which may vary from state to state. Some
states do not allow limitation on how long an implied warranty lasts, when an action may be brought, or the exclusion or
limitation of incidental or consequential damages, so the above provisions may not apply to you.
ATTENTION CANADIAN CONSUMERS:
Canadian consumers are requested to complete the special Canadian “Warranty Registration Form” enclosed, and forward
this completed form with a copy of bill of sale to TOSHIBA OF CANADA to “Register and Validate” their warranty. Product
must be purchased from an Authorized Canadian Dealer. Products purchased in the U.S.A. and used in Canada are not
covered by these warranties.
IMPORTANT: PACKING AND SHIPPING INSTRUCTION
When you send the product to a Service Station, you must use the original carton box and packing material, then insert the
original carton box containing the unit into another carton using more packing material.
In the Continental United States contact:
Downloaded From Disc-Player.com Toshiba Manuals