MT2024 User’s Guide 20" COLOR TV WITH REMOTE CONTROL Before operating this product, please read these instructions completely.
CONTENTS Contents......................................................................1 • Volume Buttons ....................................................30 Power Source .............................................................5 • MTS/SAP ..............................................................30 Important Safety Instructions ...................................2 • Location of Controls ..................................................5 • Front .......................................
IMPORTANT SAFETY INSTRUCTIONS ATTENTION: POUR ÉVITER LES CHOC ÉLECTRIQUES, INTRODUIRE LA LAME LA PLUS LARGE DE LA FICHE DANS LA BORNE CORRESPONDANTE DE LA PRISES ET POUSSER JUSQU’AU FOND.
IMPORTANT SAFETY INSTRUCTIONS (CONTINUED) CAUTION RISK OF ELECTRIC SHOCK DO NOT OPEN CAUTION: TO REDUCE THE RISK OF ELECTRIC SHOCK, DO NOT REMOVE COVER (OR BACK). NO USER-SERVICEABLE PARTS INSIDE. REFER SERVICING TO QUALIFIED SERVICE PERSONNEL. (This Caution Marking is located at the rear enclosure of the unit.
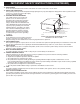
IMPORTANT SAFETY INSTRUCTIONS (CONTINUED) 15. OVERLOADING Do not overload wall outlets and extension cords as this can result in a risk of fire or electric shock. 16. OBJECT AND LIQUID ENTRY Never push objects of any kind into this product through openings as they may touch dangerous voltage points or short out parts that could result in fire or electric shock. Never spill or spray any type of liquid on the product. 17.
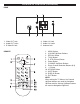
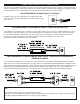
POWER SOURCE Insert the AC plug (with the 2 blades) into a conveniently located AC outlet having 120V, 60Hz. NOTE: The AC plug supplied with the unit is polarized to help minimize the possibility of electric shock. If the AC plug does not fit into a nonpolarized AC outlet, do not file or cut the wide blade. It is the user’s responsibility to have an electrician replace the obsolete outlet. FRONT AC Outlet AC Plug LOCATION OF CONTROLS 1. Audio 1 IN/Video 1 IN/Headphone Jacks 7. CHANNEL Up Button 2.
REAR LOCATION OF CONTROLS (CONTINUED) 1 3 2 4 5 1. Video OUT Jack 2. Audio OUT Jacks 3. S-Video IN Jack 6 4. Video 2 IN Jack 5. Audio 2 IN Jacks 6. Antenna Jack REMOTE 1. 2. 3. 4. 5. 6. 7. 8. 9. 10. 11. 12. 13. MENU Button VOLUME Up/Down Buttons RECALL Button TV/AV Button P.
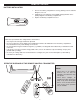
BATTERY INSTALLATION REMOTE CONTROL 1. Remove the Battery Compartment cover by pushing in on the tab and lifting the cover off. 2. Install two (2) “AA” batteries (not included), paying attention to the polarity diagram in the Battery Compartment. 3. Replace the Battery Compartment cover. BATTERY PRECAUTIONS Follow these precautions when using batteries in this device: 1. Use only the size and type of batteries specified. 2.
ANTENNA CONNECTIONS OUTDOOR VHF/UHF ANTENNA CONNECTION (ANTENNA NOT INCLUDED) Follow the instructions for the type of antenna system you intend to use. If using Cable or satellite, see the next page. Combination VHF/UHF Antenna (Single 75 ohm cable or 300 ohm twin-lead wire) Combination VHF/UHF Antenna (Separate VHF and UHF 300 ohm twin-leads) Connect the 75 ohm cable from combination VHF/UHF antenna to the antenna jack.
CABLE (CATV)/SATELLITE CONNECTIONS This TV has an extended tuning range and can tune most cable channels without using a Cable TV converter box. Some Cable TV companies offer “premium pay channels” in which the signal is scrambled. Descrambling these signals for normal viewing requires the use of a descrambler device which is generally provided by the cable company.
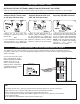
CONNECTION FROM AN EXTERNAL UNIT CONNECTION USING COAXIAL CABLE: Follow the instructions below to connect an external unit, such as a VCR, to your unit using a 75 ohm coaxial cable. (CABLES NOT INCLUDED.) VCR VCR INCOMING CATV CABLE From VCR OUT jack 1. Connect the cable, satellite or incoming antenna to the VHF/UHF IN jack on the rear of the VCR. 2. Connect a 75 ohm coaxial cable from the VCR’s 75 ohm OUT jack to the ANT jack on the rear of the TV. 3.
CONNECTION FROM AN EXTERNAL UNIT (CONTINUED) CONNECTION USING S-VIDEO CABLE: Follow the instructions below to connect an S-VIDEO VCR/DVD to your television using an S-video cable. (CABLES NOT INCLUDED.) VCR/DVD INCOMING CATV CABLE (VCR) From VCR OUT jacks AUDIO Cord To S-VIDEO IN jack 1. For VCR, connect the cable, satellite or incoming antenna to the ANT jack on the rear of the VCR. 2.
SETTING THE MENUS VIDEO SETUP MENU: SETTING THE PICTURE 1 1 2 3 2 2 1 3 Hue Hue AUDIO Press the MENU button 1 once; the Video menu will appear. TIME 19:20 VOLUME 20 ON-TIME 12:30 BALANCE 00desired 3 button until the Press the CHANNEL Up 2 or Down OFF-TIME 21:00 ALARM --:-picture setting is selected (PICTURE, BRIGHTNESS, --:-BESPOKE-TIME COLOR, SHARPNESS, HUE).
Sharpness Tint Color Temp. TIMER SETUP MENU: 80 0 Cool SETTING THE MENUS (CONTINUED) SETTING THE CLOCK 1 2 Timer 1 3 2 Clock Time-On Ch. Select Time-Off Timer Sleep Time Remind Clock Time Ch. Switch Time-On 01:13 --:-1 --:-0 -01 -:-01:13 1- - : - - 3 2 1 3 Timer English Clock 01:13 01 On Time-On --:-On Select Ch. 1 On Time-Off --:-Timer Off Time Sleep 0 CC1 Remind Time -01 -:-Clock 01:13 Ch. Switch 1 Time-On --:-Ch.
0 Tint Clock 01:13 01 Temp. Cool Color Timer Time-On --:-Select 101:13 Ch. SETTING THE Clock 13 Time-Off - -: :- -- Time-On Sleep Time 01 Ch. Select TIMER Remind Time - -- -: :- -- Time-Off Timer Ch. Switch 10 Sleep Time 0 01:13 13 --:-1 MENUS (CONTINUED) - 01:13 - : -13 0 -:-SETTING THE ON - 1- : - 1- - : - Setup 0 --:-Remind Time : Clock 01:13 Language 1 01:13 1 1 Ch. Switch 1 --:-Time-On Background 12 : - 3 2 Ch.
Ch. Select Ch. 5 0 Remind Time -5- : - Tint Select Time-Off Time-Off -Cool -:-Ch. Switch 1- - : - Color Temp. 0 Sleep 0 Sleep Timer Time Timer Time Remind Time --:-Remind Time - -THE : - - MENUS (CONTINUED) SETTING Clock Clock Ch. Switch 101:13 Ch. Switch 101:13 Time-On 12 : 30 Time-On 12 : 30 SETTING THE OFF TIMER Ch. Select 5 Ch.
SETTING THE REMIND 1 Ch. Select 5 Color Temp. Cool Time-On 12 : 30 Time-Off 12 : 45 5 Ch. Select Sleep Time 10 Time-Off 12 : 45 SETTING Remind Time - -THE :-Sleep Time 10 1 Ch. Switch Remind Time --:-TIMER Ch. Switch 1 Timer MENUS (CONTINUED) 2 01:13 Clock Time-On --:-3 2 Timer Ch. Select 1 Time-Off --:-Timer Clock 01:13 Sleep Time 0 Time-On 12 Remind Time - - :: -30 Clock 01:13 Ch. Select 5 Ch. Switch 1 Time-On 12 : 30 Time-Off 12 : 45 Ch.
VNR On Setup Fade Off C. Caption SETTINGCC1 THE MENUS (CONTINUED) Language English Demo Mode Background On SETUP MENU: Black Stretch On On VNR SETTING THE LANGUAGE Setup Fade Off C. Caption CC1 Setup Language English 2 Demo Mode 1 1 Background On Language English 4 Black Stretch On Background On 3 2 VNR On Black Stretch On 5 Fade Off VNR On Setup C. Caption CC1 Fade Off Demo Mode C.
Off Fade C. Caption CC1 Demo Mode SETTING THE Setup MENUS (CONTINUED) Language English SETTING THE VNR (VIDEO NOISE REDUCTION) 1 1 4 3 2 5 Background Setup Black Stretch VNR Language Fade Background C. Caption Black Stretch Demo Mode VNR Fade C. Caption Demo Mode Setup On On On English Off On CC1 On On Off CC1 1 1 Press the VOLUME Up 1 or Down 2 button to turn the VNR ON (this will allow the picture tube to warm up and gently turn on, thus increasing the life of the picture tube) or OFF.
SETTING 1 1 Fade Off C. Caption CC1 Setup Demo Mode Language SETTINGEnglish THE On Background Stretch On THE CLOSEDBlack CAPTIONS VNR On Setup Off Fade C.Language Caption CC1 English 4 Mode Demo On Background 3 MENUS (CONTINUED) 2 2 1 2 Black Stretch On VNR On Fade Off CC1 C. Caption Setup Demo Mode Language English Background On Onmenu will Press the MENU button 1Black once;Stretch the Video 3 button to appear.
Auto Program Current Ch. 13 Channel Fine Channel System Auto Auto Program SETTINGCATV THE MENUS (CONTINUED) Antenna Skip Off CHANNEL SETUP MENU: Current Ch. 13 Channel Fine SETTING THE CHANNEL SYSTEM Auto Program Channel System Auto Channel CATV Antenna 2 1 1 Skip Off Channel System Auto 4 13 Current Ch. CATV Antenna 3 2 Fine Skip Off 5 Auto Program Current Ch. 13 Channel Fine Channel System Auto Auto Program Antenna CATV 3 Skip Off Current Ch.
Channel Channel System Auto Antenna SETTINGCATV THE MENUS (CONTINUED) Skip Off Current Ch. 13 Channel SETTING CHANNELS INTO MEMORY Fine Auto Program Channel System Auto This unit is equipped with a channel memory feature which allows channels to skip up or down to the next channels set into Antenna CATV memory, skipping over unwanted channels. Before selecting channels, they must be programmed into the unit’s memory.
ADDING AND Channel System Auto Antenna CATV SETTING THE Skip Off Current Ch. 13 Channel Fine Auto Program System Auto DELETINGChannel CHANNELS MENUS (CONTINUED) Antenna CATV Skip Off After setting channels into memory, you can add13or delete channels as follows: Current Ch. Fine Auto Program Channel 1 2 1 4 3 2 5 Channel System Antenna Skip Current Ch. Channel Fine Auto Program Channel System Auto CATV Off 13 2 Auto CATV Antenna Skip Off Current Ch.
2005 6 1 12 13 14 15 Calendar SETTING THE MENUS (CONTINUED) s CALENDAR SETUP MENU:12 5 m 6 t 7 w t f s 1 2 3 4 8 9 10 11 16 17 18 19 20 21 22 23 24 25 26 272005 28 29 6 30 s m t 1 w t f s 1 2 3 4 8 9 10 11 13 14 15 16 17 18 19 20 21 22 23 24 25 1 2 26 27 28 29 30 Calendar 2005 6 1 3 2 1 m t 5 6 7 w t f s 1 2 3 4 8 9 2005 6 2005 6 2 s m t Calendar 10 11 5 1 6 7 1 w t f s 1 2 3 4 8 9 10 11 2005 6 1 12 13 14 15 16 17 18 19
TV PARENTAL CONTROL V-Chip enables parents to prevent their children from watching inappropriate material on TV. V-Chip reads the ratings for programming (except for news, sports, unedited movies on premium cable and Emergency System signals), then denies access to programming if the program’s rating meets the limitations you select. In this case, the program will be blocked.
TV RATING 1 TV Rating Parental Lock MPAA Rating Lock Menu Parental Lock Off TV PARENTAL Change Password TV Rating MPAA Rating Lock Menu SET-UP Change Password CONTROL (CONTINUED) 2 Parental Lock Parental Lock Parental Lock Off TV Rating MPAA Rating Lock Menu Change Password 1 Parental Lock Off TV Rating Parental Lock MPAA Rating Lock Menu Parental Lock Off Change Password TV Rating MPAA Rating Lock Menu Change Password 4 Parental Lock Off TV Rating MPAA Rating Lock Menu Change Password Enter the P
TV-G TV-PG TV-14 TV-MA MPAA RATING 1 B Rating FV D L S V B B B B B TV-Y > B B B B B B TV-Y7 B B B TVBPARENTAL B B TV-G B B B B B TV-PG B SET-UP TV-14 B B B B B TV-MA B B B B CONTROL (CONTINUED) 2 Parental Lock 1 Parental Lock Off TV Rating Parental Lock MPAA Rating Lock Menu Parental Lock Off Change Password TV Rating MPAA Rating Lock Menu Change Password 4 Enter the Parental Lock menu and turn on the V-chip option as described on page 24 (steps 1 and 2).
LOCK MENU 1 PG PG-13 R NC-17 X TV B B B PARENTAL B B CONTROL (CONTINUED) 2 Parental Lock 1 Parental Lock Off TV Rating MPAA Rating Lock Menu Change Password 2 Enter the Parental Lock menu and turn on the V-chip option as described on page Lock24 (steps 1 and 2). Press the CHANNEL Up 1 or Down 2 button until LOCK MENU is selected. 3 3 AV Lock 1 4 1 Lock 3 2 On AV Lock Program Lock On On 2 Press the VOLUME Up 1 or Down 2 to enter the Lock menu.
TV BASIC OPERATION 1 2 1 OPTIONS TV: CATV: 2 If using a VHF/UHF antenna. If using Cable TV. Press the POWER button 1 on the remote, or front of the unit, to turn on the unit; the POWER indicator will light green. Press the TV/AV button 2 repeatedly to select the TV mode. Change the Antenna option to select between TV or CATV. Select TV if using VHF/UHF antenna, and select CATV if using Cable TV (see page 21, steps 1 and 2).
TV BASIC OPERATION (CONTINUED) RECALL DISPLAY 1 1 Press the RECALL button to switch between the present channel and the last channel chosen. Press the DISPLAY button once to display the current information on the screen (Channel number or Video mode). Press again to clear. 2 FAQ: How do I watch the device connected to the side audio/video jacks? Press the TV/AV button as described in the step at the top left of the next page.
TV BASIC OPERATION (CONTINUED) TV/AV 1 VOLUME Buttons Set the sound as follows: 1 2 1 Press to select TV (CATV), VIDEO 1 (Side jacks), VIDEO 2 (Rear jacks) or SVHS (S-Video jack). Press the VOLUME Up 1/Down 2 buttons to adjust the sound level. P.STD (Picture Standard) MTS/SAP Press to select between the picture modes (Standard, Vivid, Personal, Listen {select just to listen, not to watch}, or Movie). Press to select between Auto Sap (Second Audio Program), Stereo or Mono.
WHAT IS CLOSED CAPTIONING? CLOSED CAPTIONS Captions in other languages are transmitted on these channels. This television has the capability to decode and display Closed Captioned television programs. Closed Captioning will display text on the screen for hearing-impaired viewers or it will translate and display text in another language. TEXT: The Text Closed Caption Mode will usually fill the screen with a programming schedule or other information. Select between T1, T2, T3 or T4.
TROUBLESHOOTING GUIDE Check the following before requesting service. SYMPTOM POSSIBLE CAUSE POSSIBLE SOLUTION No power. The AC power cord is not connected. Connect the AC power cord to the AC outlet. TV station experiencing problems. Try another channel. Possible local interference. Check for source of reception disturbance. POWER TV BROADCAST RECEPTION Poor or no picture. Picture wobbles or drifts. Picture control is not adjusted. Check picture control adjustments.
RECEPTION DISTURBANCES Most types of television interference can be remedied by adjusting the height and position of the VHF/UHF antenna. Outdoor antennas are recommended for best results if not using cable or a satellite. The most common types of television interference are shown below. If one of these symptoms appear when the TV is connected to a Cable TV system, the disturbance may be caused by the local cable company broadcast.
SPECIFICATIONS TELEVISION Picture Tube ...............................................................................................20” (Measured Diagonally) Antenna Input Impedance..........................................................................VHF/UHF, 75 Ohm Coaxial Input RCA Video ...........................................................................................................1Vp-p/75 Ohm Input RCA Audio ..............................................................................
Memcorp, Inc. Weston, FL Printed in Hong Kong Visit our website at www.memorexelectronics.