Contents Important safety instructions-1 Sound Control-------------------- 18 Identification of Controls-------4 Adjusting Picture-----------------19 Front ------------------------------------------------------4 Adjusting picture --------------------------------------19 Back-------------------------------------------------------5 Changing picture size -------------------------------19 Remote Controller -------------------------------------6 Installing batteries -------------------------------------7 Eff
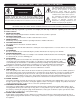
IMPORTANT SAFETY INSTRUCTIONS FCC NOTICE: This device complies with Part 15 of the FCC Rules. Operation is subject to the following two conditions: (1) this device may not cause harmful interference, and (2) this device must accept any interference received, including interference that may cause undesired operation. WARNING: TO REDUCE THE RISK OF FIRE OR ELECTRIC SHOCK, DO NOT EXPOSE THIS PRODUCT TO RAIN OR MOISTURE.
IMPORTANT SAFETY INSTRUCTIONS (CONTINUED) The lightning flash with arrowhead symbol within an equilateral triangle is intended to alert the user to the presence of uninsulated dangerous voltage within the product’s enclosure that may be of sufficient magnitude to constitute a risk of electric shock to persons. CAUTION RISK OF ELECTRIC SHOCK DO NOT OPEN CAUTION: TO REDUCE THE RISK OF ELECTRIC SHOCK, DO NOT REMOVE COVER (OR BACK). NO USER-SERVICEABLE PARTS INSIDE.
IMPORTANT SAFETY INSTRUCTIONS (CONTINUED) 13. LIGHTNING To protect your product from a lightning storm, or when it is left unattended and unused for long periods of time, unplug it from the wall outlet and disconnect the antenna or cable system. This will prevent damage to the product due to lightning and power-line surges. 14.
Identification of Controls Front 2 3 1 INPUT MENU VOL- VOL+ CH- 4 5 7 6 8 CH+ 9 1. Power button 2. Indicator 3. Remote sensor 4. INPUT button: video input select. 5. MENU button: to enter into menu operation. 6. VOL- button: volume down adjust; menu item adjust. 7. VOL+ button: volume up adjust; menu item adjust. 8. CH- button: channel down select; menu item select. 9. CH+ button: channel up select; menu item select.
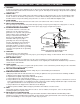
Identification of Controls (continued) Back (2) R L/MONO VIDEO 6 3 2 (1) L/MONO L/MONO L 4 1 1. S-VIDEO input 2. AV1 input (VIDEO, AUDIO L/MONO, R) 3. AV output(VIDEO, AUDIO L, R) 4. COMPONENT input (Y, CB ,CR , AUDIO L/MONO, R) 5. Antenna input 6.
Identification of Controls(continued) Remote Controller 1 2 3 5 4 6 7 8 9 11 10 12 13 14 15 16 17 1. POWER Turn the unit on or off 2.INPUT To quickly select input source 3. Direct channel selector/number buttons Use these number buttons to select channel or input password 4. Dash (-) Used to enter a program number for multiple program channels such as 2-1,2-2,etc. 5. RETURN To quickly return to the previous viewed channel 6. CH+/To select channels upward or downward 7.
Installing batteries Effective range of the Remote 1 Open the battery cover. 2 Insert two size-AAA batteries. <(Place the batteries with their terminals corresponding to the (+) and (–) indications in the battery compartment.) 3 Replace the cover. Notes: / When there is an obstacle between the TV and the transmitter, the transmitter may not operate.
Installation Antenna installation INSTALL the unit in a room where direct light will not fall upon the screen. Total darkness or a reflection on the picture screen may cause eyestrain. Soft and indirect lighting is recommended for comfortable viewing. Optimum reception of colour requires a good signal and will generally mean that an outdoor antenna must be used. The exact type and position of the antenna will depend upon your particular area.
Installation (continued) Connecting video and audio equipment This TV set provides 2 groups of AV input terminals and one group of COMPONENT input terminals for your convenient connection to VCR, DVD or other video equipment to enjoy the high quality picture. Please refer to the owner's manual of the equipment to be connected as well.
Installation (continued) Connecting COMPONENT input Connect the component video cable between Y,CB,CR input terminals on the unit and Y,CB,CR output terminals on the DVD player. Connect the Audio cable between the audio input terminals on the unit and audio output terminals on the DVD player. To view the program from the COMPONENT input terminals, please press INPUT button on the remote control repeatedly until COMPONENT appears on the screen.
Installation (continued) Connecting the AV outputs You can connect an audio system to the AV output terminals on the TV set rear to enjoy a high-quality sound from the audio system, or you can connect the AV output terminals to the VCR to record the program you like.
Basic Operation Turning on Power On/ Standby 1 Insert the AC plug into a conveniently located AC outlet. If no picture appears and the standby indicator lights up, then the TV set is in STANDBY mode. Now please follow step 2. Notes: The AC plug supplied with the unit is polarized to help minimize the possibility of electric shock. If the AC plug does not fit into a nonpolarized AC outlet, do not file or cut the wide blade.
Basic Operation (continued) Navigating the menus This unit has a simple, easy-to-use menu system that appears on the screen. This system makes it convenient and fast to use features on the unit. You can also display the status of TV features while watching a program. Main Menu Overview (TV Mode) MAIN MENU PICTURE P.LOCK CLOCK PRESET EXTRA PICTURE CONTRAST BRIGHTNESS COLOR TINT SHARPNESS PARENTAL LOCK LOCK RATINGS LOCKS P.
Basic Operation (continued) Select Input Source Watching AV program This TV set provides 2 groups of AV input terminals and one group of COMPONENT input terminals for your convenient connection to VCR, DVD or other video equipments. To watch a video program from AV inputs, press INPUT button repeatedly until you see the appropriate input indicator on the screen. AV1 AV2 COMPONENT 8-0 MONO Note: S-VIDEO input uses the same circuit as VIDEO1, and the SVIDEO terminal overrides the VIDEO1 terminal.
Tuning in MAIN MENU To enter the PRESET menu PICTURE P.LOCK CLOCK PRESET EXTRA Press MENU button. Press5or 6 button to select PRESET item. PRESET AUTO PROGRAM CH SETUP Press 3or 4 button to enter PRESET menu. Auto program When you turn on the TV for the first time, you should perform an auto program to set up stations on your TV. Below is the steps. 1 Enter the PRESET menu, highlight AUTO PROGRAM item. 2 Press 3 or 4 button to enter AUTO PROGRAM sub menu.
Tuning in (continued) PRESET AUTO PROGRAM Skipping an unnecessary channel After saving channels into memory, you can skip unnecessary channels so that only the channels you want to watch are selected with the CH+/- buttons. CH SETUP 1 Enter the PRESET menu, press 5or 6 button to select CH SETUP item. 2 Press 3 or 4 button to enter CH SETUP menu. 3 Press 5or 6button to select CH NO. item. 4 Press 3or4 button to select a channel number (for example, channel 2-2).
Channel Selection Information about USA channel numbering = ATSC PSIP channel has two part channel number: — Major channel number — Minor channel number For example: Channel: 5-1 Minor channel number Major channel number Direct select DASH button Previous channel Channel up/down =In US, in most situations the major channel number is same for both analog and digital channels (It is equal to the NTSC channel number for existing broadcasters.
Sound Control 1 Use VOL+ or VOL- button. VOLUME Press VOL+ button, the volume increases; Press VOL- button, the volume decreases. 26 2 Use MUTE button. If you want to mute the sound, press MUTE button on the remote. To resume the sound, press this button again. VOLUME 26 Notes: 4 You can also resume the sound by pressing VOL+ button. 4 If you mute the sound the color of VOLUME displayed on the screen is red, after resuming the sound the color of VOLUME displayed on the screen is green.
Adjusting Picture PICTURE CONTRAST BRIGHTNESS COLOR TINT SHARPNESS CONTRAST Adjusting picture 50 40 40 0 40 20 1 Press MENU button. Now the PICTURE item is highlighted automatically. 2 Press3or4button to enter PICTURE menu. 3 4 Press 5or 6 button to select item. Press 3or 4 button to adjust. Item Contrast Brightness Color Tint Sharpness Press 3 Press 4 weaker darker paler purplish softer stronger lighter deeper greenish sharper Press PICTURE button to select picture mode.
Timer Setting Auto search/Manual search/Channel skip/Fine tuning CLOCK ON TIMER To enter the CLOCK menu CLOCK DST --:--AM --:--AM ON AUTO CLOCK ZONE OFF PACIFIC Press MENU button. Press 5 or 6 button to select CLOCK item. Press 3 or 4 button to enter CLOCK menu. Auto Clock Setup 0-9 number button - With the Auto Clock function ON, the time is set automatically from a digital channel signal. - If the TV loses power, the clock setting you have made will be cleared.
Timer Setting (continued) Auto search/Manual search/Channel skip/Fine tuning CLOCK ON TIMER On Timer Setup CLOCK DST 7:00PM 11:00AM OFF AUTO CLOCK ZONE OFF PACIFIC - On timer function operates only if current time has been set. - The TV must be in standby mode for the on timer to work. - If the TV loses power, the timer setting will be cleared. 0-9 number button 1 In CLOCK menu, highlight ON TIMER item. 2 3 Press VOL+ button to select AM or PM. 4 Press button to switch the TV to standby mode.
System Setting EXTRA To enter the EXTRA menu CLOSED CAPTION MENU LANGUAGE ENGLISH AUDIO LANGUAGE ENGLISH Press MENU button. Press 5 or 6 button to select EXTRA item. Press 3 or 4 button to enter EXTRA menu. Selecting the OSD menu language 1 2 Enter the EXTRA menu, press 5 or 6 button to select MENU LANGUAGE item. Press 3 or 4 button to select a proper OSD MENU language.
System Setting-Closed Captions EXTRA Setting up Closed Captioning CLOSED CAPTION MENU LANGUAGE ENGLISH AUDIO LANGUAGE ENGLISH CLOSED CAPTION 1 Enter the EXTRA menu, highlight CLOSED CAPTION menu item, press the 3or 4 button to enter the menu. 2 Highlight CC DISPLAY item, press 3or 4 button to select Caption ON, CC MUTE or OFF. CC DISPLAY CC SETTING ON CC MUTE shows the captions (if available on program) when the TV sound is muted.
System Setting-Closed Captions EXTRA Customizing digital Closed Captions CLOSED CAPTION MENU LANGUAGE ENGLISH AUDIO LANGUAGE ENGLISH You can customize the digital closed captions that appear on your screen. CLOSED CAPTION 1 Navigate to the CLOSED CAPTION menu, highlight CC SETTING item, press 3or 4 button to enter the menu. 2 Press 5 or 6 button to highlight CC MODE item, press 3or 4 button to select CUSTOMER.
Parental Control PARENTAL CONTROL enables parents to prevent their children from watching inappropriate material on TV. PARENTAL CONTROL reads the ratings for programming (except for news, sports, unedited movies on premium cable and Emergency System signals ), then denies access to programming if the program's rating meets the limitations you select. In this case, the program will be blocked. P.LOCK To enter the P.LOCK menu ENTER CODE Press MENU button. Press 5or 6 button to select P.
Parental Control(continued) Enabling Parental Controls P.LOCK ENTER CODE To enable the blocking scheme you set up, you should set PARENTAL LOCK to ON. Below is the steps. P.LOCK 1 Use the password to enter the P.LOCK menu. PARENTAL LOCK CHANGE PASSWORD PARENTAL LOCK Highlight PARENTAL LOCK item, 2 press 3or 4 button to enter the LOCK ON RATINGS LOCKS menu. 0-9 number button Highlight LOCK item, press 3or 3 enable the blocking scheme.
Parental Control (continued) PARENTAL LOCK LOCK Setting up TV ratings ON RATINGS LOCKS TV ratings include two components: a general criteria (age-based) and a detailed criteria (content-based). Use the password to enter the P.LOCK menu, and then 1 navigate to RATINGS LOCKS sub menu. Press 5 or 6to select TV RATING 2 item, press 3or 4 button to enter the menu.
Parental Control (continued) RATINGS LOCKS MPAA RATING Setting up Canadian English ratings TV RATING Use the password to enter the P.LOCK menu, and then 1 navigate to RATINGS LOCKS menu. CANADA ENGLISH CANADA FRENCH Press 5 or 6to select CANADA ENGLISH item, press 3or 24 button to enter the menu. 3 0-9 number button Press 5 or 6to select the desired rating, press 3or 4 button to either block the rating or unblock (VIEW will be displayed).
Parental Control (continued) PARENTAL LOCK LOCK Setting up RRT5 criteria ratings ON RATINGS LOCKS D.L. RATINGS If the broadcasting program uses RRT5 (Rating Region TableRegion 5) criteria rating in accordance with the FCC Rules, its rating can be downloaded to this TV and can be used for parental controls. Use the password to enter the P.LOCK menu, and then 1 navigate to PARENTAL LOCK menu. Highlight the rating choice at the last line of the menu 2 screen, then press 3or 4 to enter the menu.
Troubleshooting Power Please check the following if you are having trouble with your TV. SYMPTOM POSSIBLE CAUSE POSSIBLE SOLUTION No power The AC power cord is not connected. Connect the AC power cord to the AC outlet TV station experiencing problems. Try another channel. Picture control is not adjusted. Check picture control adjustments. Possible local interference. Check for source of reception disturbance. Poor or no picture.
Troubleshooting (continued) RECEPTION DISTURBANCES Most types of television interference can be remedied by adjusting the height and position of the VHF/UHF antenna. Outdoor antennas are recommended for best results if not using cable or a satellite. The most common types of television interference are shown below. If one of these symptoms appear when the TV is connected to a Cable TV system, the disturbance may be caused by the local cable company broadcast.
Troubleshooting (continued) CARE AND MAINTENANCE To prevent fire or shock hazard, disconnect your unit from the AC power source when cleaning. The finish on the unit may be cleaned with a dust cloth and cared for as other furniture. Use caution when cleaning and wiping the plastic parts. Mild soap and a soft, damp cloth may be used. FOR ADDITIONAL SET-UP OR OPERATING ASSISTANCE, PLEASE VISIT OUR WEBSITE AT WWW.MEMOREXELECTRONICS.COM OR CONTACT CUSTOMER SERVICE AT (954) 660-7100.
Specifications Power Supply: AC 120V, 60Hz Power Consumption: 90 W Dimensions (inch): 23.7(W) X 18.0(H) X15.2(D) Weight(lbs): 48.5 CRT: 20" Audio Output: 3W x 2 TV System: NTSC-M, ATSC Channel Coverage: VHF 2-13, UHF 14-69, CATV 1-125, CADTV 1-135, DTV 2-69 Antenna Impedance: 75 ohm Accessory: Remote controller x 1 Design and specifications are subject to change without notice.
Contenido Medidas de seguridad Controles de sonido ------------18 importantes -------------------------1 Ajuste de imagen ----------------19 Identificación de controles ----4 Ajuste de imagen-------------------------------------19 Frontal ----------------------------------------------------4 Cambio del tamaño de la imagen----------------19 Posterior -------------------------------------------------5 Ajuste del temporizador-------20 Mando a distancia ------------------------------------6 Para entrar a
IMPORTANTES MEDIDAS DE SEGURIDAD NOTIFICACIÓN DE FCC: Este aparato cumple con la Parte 15 de las normas de la FCC. El funcionamiento está sujeto a las siguientes dos condiciones: (1) Este aparato no debe causar interferencia dañina y (2) este aparato debe aceptar cualquier interferencia que reciba, incluso aquella interferencia que pueda causar una operación indeseada. ADVERTENCIA: PARA REDUCIR EL RIESGO DE INCENDIO O DESCARGA ELÉCTRICA, NO EXPONGA ESTE PRODUCTO A LA LLUVIA NI A LA HUMEDAD.
IMPORTANTES MEDIDAS DE SEGURIDAD PRECAUCIÓN RIESGO DE DESCARGA ELÉCTRICA. NO ABRIR. PRECAUCIÓN: PARA REDUCIR EL RIESGO DE DESCARGA ELÉCTRICA, NO QUITE LA CUBIERTA (O TAPA POSTERIOR). NO HAY PIEZAS EN EL INTERIOR QUE EL USUARIO PUEDA REPARAR. REMITA LAS REPARACIONES AL PERSONAL DE SERVICIO CALIFICADO. (Esta etiqueta con marca de alerta y clasificación se encuentra en el gabinete inferior de la unidad.
IMPORTANTES MEDIDAS DE SEGURIDAD recomendable que desconecte la unidad de la pared, la antena o el cable. Así evitará daños producidos por descargas eléctricas. 14.Líneas aéreas de energía eléctrica. Como medida de precaución, cuando instale una antena exterior, hágalo lo más lejos posible de las líneas aéreas de energía eléctrica, ya que la antena podría caer sobre dichas líneas y causar un cortocircuito. Asimismo, nunca deberá tocarlas ya que podría ser fatal. 15.
Identificación de controles Frontal 2 3 1 INPUT MENU VOL- VOL+ CH- 4 5 7 6 8 CH+ 9 1. Interruptor de encendido. 2. Indicador. 3. Sensor remoto 4. Tecla de INPUT: Seleccione la señal de entrada de Vídeo 5. Tecla de MENU: Para entrar al menú de operaciones 6. Tecla de VOL- ajuste para bajar el volumen; ajuste de elementos del menú. 7. Tecla de VOL+ ajuste para subir el volumen; ajuste de elementos del menú. 8. Tecla de CH- ajuste para cambiar al canal anterior; selección de elementos del menú. 9.
Identificación de controles (continuación) Posterior (2) R L/MONO VIDEO 6 3 2 (1) L/MONO L/MONO L 4 1 1. S-VÍDEO input 2. Entradas de AV1 (VÍDEO, AUDIO L/MONO, R) 3. Salidas de AV (VÍDEO, AUDIO L, R) 4. COMPONENTES de entrada (Y, CB ,CR , Audio L/MONO, R) 5. Conexión de la antena 6.
Identificación de controles (continuación) Mando a distancia 1 2 3 5 4 6 7 8 9 11 10 12 13 14 15 16 17 1. POWER (Encendido) Enciende o apaga el aparato. 2.INPUT Para seleccionar rápidamente el origen de entrada 3. Selector directo de canales / teclas de números Estos botones de números sirven para seleccionar un canal o introducir una contraseña. 4. Dash (-) Sirve para introducir un número de programa para canales de múltiples programas como 2-1, 2-2, etc. 5.
Colocación de las pilas Campo de acción del mando a distancia 1 Abra la tapa del Compartimento de las pilas. 2 Introduzca dos pilas de tipo AAA. <(Coloque las pilas con los polos en la posición correcta de acuerdo a los signos (+) y (-) en el compartimento de las pilas.) 3 Coloque la tapa. Notas: / Si hay un obstáculo entre el TV y el transmisor, éste no funciona.
Instalación Instalación de la antena INSTALE la unidad en una habitación donde la luz directa no incida directamente en la pantalla. La oscuridad total o un reflejo en la imagen de la pantalla pueden producir vista cansada. Una iluminación suave e indirecta es lo ideal para una visión cómoda. La recepción óptima del color requiere una buena señal y en general implica que debe usarse una antena al aire libre. El tipo exacto y la posición de la antena dependerán de la zona de residencia.
Instalación (continuación) Conexión de los equipos de vídeo y audio Este equipo de TV incluye 2 grupos de entradas de AV y un grupo de entradas de COMPONENTES para que pueda conectarse a VCR, DVD u otros equipos de video para disfrutar de la mejor calidad de imagen. Del mismo modo, consulte el manual de instrucciones del equipo para conectarlo.
Instalación (continuación) Conexión de entradas de componentes Conecte las entradas de Y,CB,CR de la unidad a las tomas de salida deY,CB,CR del reproductor de DVD mediante el cable de video. Conecte las tomas de entrada de audio de la unidad y los conectores de salida de audio del reproductor de DVD con el cable de audio. Para ver el programa de las entradas de COMPONENTES, pulse la tecla INPUT del mando a distancia repetidas veces hasta que COMPONENTES aparezca en pantalla.
Instalación (continuación) Conexión de salidas de AV Puede conectar un sistema de audio a las salidas posteriores de AV del equipo de TV para disfrutar de un sonido de alta calidad del sistema de audio, o conectar las salidas de AV al VCR para grabar el programa que desee.
Funciones básicas Encendido Encendido /Posición de espera 1 Enchufe el aparato en una toma de corriente convenientemente ubicada. Si no hay imagen y el indicador de modo de espera está encendido, entonces el equipo de TV está en modo de espera (STANDBY). Ahora siga el paso nº 2. Notas: El enchufe de CA que viene con la unidad está polarizado para ayudar a reducir el riesgo de descarga eléctrica. Si el enchufe no encaja en una toma de corriente no polarizada, no lime ni corte la clavija ancha.
Funciones básicas (continuación) Navegación por los Menús El equipo tiene un menú de sistema sencillo y fácil de usar que aparece en la pantalla. Este sistema resulta práctico y rápido para disfrutar de las características del equipo. Puede visualizar también el estado de las características del TV mientras ve un programa. Visión del Menú Principal (Modo de TV) MAIN MENU PICTURE P.LOCK CLOCK PRESET EXTRA PICTURE CONTRAST BRIGHTNESS COLOR TINT SHARPNESS PARENTAL LOCK LOCK RATINGS LOCKS P.
Funciones básicas (continuación) Seleccione la señal de entrada Ver programas de AV Este equipo de TV incluye 2 grupos de entradas de AV y un grupo de entradas de COMPONENTES para que pueda conectarse a VCR, DVD u otros equipos de video. Para ver un programa de vídeo de entradas de AV. pulse la tecla INPUT repetidas veces hasta que vea el indicador de adecuado de entrada en la pantalla.
Sintonización MAIN MENU Para entrar al menú de PRESET PICTURE P.LOCK CLOCK PRESET EXTRA Pulse la tecla de MENU. Pulse 5o6 para seleccionar el elemento PRESELECCIÓN (PRESET). PRESET AUTO PROGRAM CH SETUP Pulse 3o4 para entrar en el menú de PRESET. Ajuste automático Cuando enciende el TV por primera vez, debe ejecutar un ajuste automático para introducir canales en la memoria del TV. Siga estos pasos. 1 Entre en el menú de PRESELECCIÓN, marque el elemento de AUTO AJUSTE.
Sintonización (continuación) PRESET AUTO PROGRAM Omitir un canal no deseado Después de haber guardado los canales en la memoria, podrá omitir canales no necesarios, de manera que solo verá los canales elegidos pulsando las teclas CH+/- CH SETUP 1 Entre en el menú de PRESELECCIÓN (PRESET) y pulse 5o6 para seleccionar el elemento de ajuste de canal (CH SETUP). 2 3 Pulse la tecla 3o4 para entrar en el submenú de ajuste de canal.
Selección de canales Información acerca de la numeración de canales en EE.UU. = El número de canal de ATSC PSIP tiene dos partes: — Número del canal principal — Número del canal secundario Por ejemplo: Channel: 5-1 Número del canal principal Número del canal secundario Seleccione directamente =En EE.UU. la mayor parte de las veces el canal analógico y el digital tienen el mismo número en el canal principal (Es igual en el caso del número de canal de NTSC en lo que respecta a las emisoras existentes).
Controles de sonido 1 Tecla de VOL+ o VOLVOLUME Al pulsar la tecla VOL+ aumenta el volumen; Al pulsar la tecla VOL- disminuye el volumen; 26 2 Uso de la tecla MUTE (Silencio) Si quiere silenciar el sonido, pulse MUTE en el mando a distancia. Para recuperar el sonido, pulse la misma tecla otra vez. VOLUME 26 Notas: 4 También puede recuperar el sonido pulsando la tecla VOL +.
Ajuste de imagen PICTURE CONTRAST BRIGHTNESS COLOR TINT SHARPNESS CONTRAST Ajuste de imagen 50 40 40 0 40 20 1 Pulse la tecla de MENU. Now the PICTURE item is highlighted automatically. 2 Pulse 3o4 para entrar en el menú de IMAGEN. 3 Pulse 5o6 para seleccionar elemento. 4 Pulse las teclas 3o4 para ajustar.
Ajuste del temporizador Auto search/Manual search/Channel skip/Fine tuning CLOCK ON TIMER Para entrar al menú de RELOJ CLOCK DST --:--AM --:--AM ON AUTO CLOCK ZONE OFF PACIFIC Pulse la tecla de MENU. Pulse 5o6 para seleccionar el elemento RELOJ. Pulse la tecla 3o4 para entrar en el menú de RELOJ. Programación automática del reloj - Con la función de AJUSTE AUTOMÁTICO DEL RELOJ activada, la hora se ajusta automáticamente con la señal de un canal digital.
Ajuste del temporizador (continuación) Auto search/Manual search/Channel skip/Fine tuning CLOCK ON TIMER Activar el temporizador CLOCK DST 7:00PM 11:00AM OFF AUTO CLOCK ZONE OFF PACIFIC -El temporizador sólo funciona si la hora se ajustado correctamente. - El TV debe en el modo de espera (STANDBY) para que funcione el temporizador. - Si el TV se queda sin luz eléctrica, la programación del temporizador se borrará.
Ajuste del sistema EXTRA Para entrar al menú EXTRA CLOSED CAPTION MENU LANGUAGE ENGLISH AUDIO LANGUAGE ENGLISH Pulse la tecla de MENU. Pulse 5o6 para seleccionar el elemento EXTRA . Pulse la tecla 3o4 para entrar en el menú de EXTRA . Seleccionar el idioma del menú de OSD 1 2 Entre en el menú de EXTRA y pulse 5o6 para seleccionar el elemento de IDIOMA DE MENÚ. Pulse 3o4 para seleccionar el idioma deseado en el MENÚ OSD (Menú en pantalla).
Programación de subtitulado para sordos EXTRA Programación de subtitulado para sordos CLOSED CAPTION MENU LANGUAGE ENGLISH AUDIO LANGUAGE ENGLISH CLOSED CAPTION 1 Entre en el menú de EXTRA, marque el menú de SUBTÍTULOS PARA SORDOS, y pulse 3o4 para entrar en el menú. 2 Marque el elemento CC DISPLAY (VISUALIZACIÓN DE SUBTÍTULOS PARA SORDOS), pulse la tecla 3o4 para seleccionar Subtitulado ON, CC SILENCIO u OFF.
Programación de subtitulado para sordos EXTRA Aprovechar las capturas digitales de subtítulos CLOSED CAPTION MENU LANGUAGE ENGLISH AUDIO LANGUAGE ENGLISH Puede manipular las capturas digitales de subtítulos que aparecen en pantalla. 1 Entre en el menú de SUBTÍTULOS PARA SORDOS, marque el menú de CC SETTING (AJUSTE DE SUBTÍTULOS PARA SORDOS), y pulse 3o4 para entrar en el menú. 2 Pulse el botón 5o6 para marcar el elemento CC MODE (MODO DE SUBTÍTULO PARA SORDOS), pulse 3o4 para elegir USUARIO.
Control paterno La función de Control Paterno permite que los adultos eviten que los niños vean programas de TV inadecuados. El CONTROL PATERNO lee las calificaciones de la programación (excepto de noticias, deportes, películas de estreno en cable premium y emisiones de sistemas de emergencia), entonces deniega el acceso al programa cuya calificación haya sido seleccionada. En ese caso, se bloqueará el programa. P.LOCK Para entrar al menú de BLOQUEO PATERNO ENTER CODE Pulse la tecla de MENU.
Control paterno (continuación) Activar los controles paternos P.LOCK ENTER CODE Para activar el esquema de bloqueo que haya elegido, debe activar el BLOQUEO PATERNO (ON). Siga estos pasos. P.LOCK 1 Escriba la contraseña en el menú de BLOQUEO PATERNO. PARENTAL LOCK CHANGE PASSWORD PARENTAL LOCK el elemento BLOQUEO 2 Marque PATERNO, pulse 3o4 para entrar LOCK ON RATINGS LOCKS en el menú. Números del 0 al 9 Marque el elemento BLOQUEO, pulse 3o4 para activar 3 (ON) el esquema de bloqueo.
Control paterno (continuación) PARENTAL LOCK LOCK Ajuste de la calificación de TV ON Las calificaciones de TV incluyen dos componentes: un criterio general (basado en la edad) y un criterio detallado (basado en los contenidos). RATINGS LOCKS Escriba la contraseña en el menú de BLOQUEO PATERNO y 1 vaya entonces al submenú de las CALIFICACIONES DE BLOQUEOS. Pulse 5o6 para seleccionar el 2 elemento CALIFICACIÓN DE TV, pulse 3o4 para entrar en el menú.
Control paterno (continuación) RATINGS LOCKS MPAA RATING Ajuste de las calificaciones de Inglés Canadiense TV RATING Escriba la contraseña en el menú de BLOQUEO PATERNO y 1 vaya entonces al submenú de las CALIFICACIONES DE CANADA ENGLISH CANADA FRENCH BLOQUEOS. Pulse 5o6 para seleccionar el elemento 2 CANADÁ, pulse 3o4 para entrar en el menú. 3 Números del 0 al 9 Pulse 5o6 para seleccionar la calificación deseada, pulse 3o4 tanto para bloquear como para desbloquear (se visualizará VISIÓN).
Control paterno (continuación) PARENTAL LOCK LOCK Ajuste de los criterios de calificación de RRT5 ON RATINGS LOCKS D.L. RATINGS Si el programa en emisión utiliza RRT5 (Calificación de la Región 5), cuyo criterio está de acuerdo con las reglas de FCC, su calificación puede descargarse a este TV y puede utilizarse en los controles paternos. la contraseña en el menú de BLOQUEO PATERNO 1 yEscriba vaya entonces al submenú de las CALIFICACIONES DE BLOQUEOS.
Resolución de problemas Si tiene problemas con el TV, pruebe lo siguiente. Encendido SINTOMAS Sin luz CAUSA PROBABLE El cable de corriente no está enchufado. Enchúfelo La emisora de TV tiene problemas. Pruebe con otro canal. El control de imagen no está ajustado. Mala imagen o ausencia de imagen Probable interferencia local Recepción de la emisión de TV SOLUCIÓN PROBABLE Compruebe los ajustes del control de imagen. Compruebe si hay interferencias en el origen de la recepción.
Resolución de problemas(continuación) INTERFERENCIAS EN LA RECEPCIÓN La mayoría de las interferencias de televisión pueden solucionarse si se ajusta la altura y la posición de la antena VHF/UHF. Se recomiendan las antenas exteriores para obtener un mejor resultado si no se recibe por cable o satélite. La mayoría de las interferencias de televisión se muestran a continuación.
Resolución de problemas(continuación) CUIDADO Y MANTENIMIENTO Para evitar un incendio o descarga eléctrica, desconecte su unidad de la corriente eléctrica cuando la esté limpiando. El acabado de su receptor puede limpiarse con un trapo seco como cuidaría cualquier otro mueble. Tenga cuidado al limpiar y frotar las partes de plástico. Puede usar jabón neutro y un trapo húmedo. PARA OBTENER AYUDA ADICIONAL CON RESPECTO A LOS AJUSTES O A LA OPERACIÓN, VISITE NUESTRO SITIO WEB EN WWW.MEMOREXELECTRONICS.
Especificaciones Fuente de alimentación AC 120V, 60Hz Consumo de energía: 90 W Dimensiones (inch): 23,7 (W) X18,0 (H) X15,2 (D) Peso (lbs): 48.5 CRT: 20" AUDIO OUTPUT 3W x 2 Sistema de TV: NTSC-M, ATSC Cobertura de Canales: VHF 2-13, UHF 14-69, CATV 1-125, CADTV 1-135, DTV 2-69 Impedancia de la antena: 75 ohmios Accesorios: Mando a distancia x 1 El diseño y las características están sujetos a cambio sin previo aviso.
604.TQ20926-02 XHM Ver.1.