DVD/VCD/MP3/PHOTO CD Player MODEL MVD2029 BEFORE OPERATING THIS PRODUCT, PLEASE READ THESE INSTRUCTIONS COMPLETELY.
CONTENTS • Selecting Folders/Tracks using the Number Buttons ................................................25 • Selecting Folders/Tracks using the SKIP Buttons..............................................................26 • Forward/Reverse ..............................................26 • Repeat Play ......................................................26 • MP3 FAQs.........................................................26 CD/VCD BASIC OPERATION ...............................
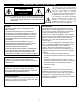
IMPORTANT SAFETY INSTRUCTIONS The lightning flash with arrowhead symbol, within an equilateral triangle is intended to alert the user to the presence of uninsulated dangerous voltage within the product’s enclosure that may be of sufficient magnitude to constitute a risk of electric shock to persons. CAUTION RISK OF ELECTRIC SHOCK DO NOT OPEN CAUTION:TO REDUCE THE RISK OF ELECTRIC SHOCK, DO NOT REMOVE COVER (OR BACK). NO USER-SERVICEABLE PARTS INSIDE. REFER SERVICING TO QUALIFIED SERVICE PERSONNEL.
IMPORTANT SAFETY INSTRUCTIONS (CONTINUED) IMPORTANT: PLEASE KEEP ALL PACKAGING MATERIAL FOR AT LEAST 90 DAYS IN CASE YOU NEED TO RETURN THIS PRODUCT TO YOUR PLACE OF PURCHASE OR MEMOREX. Before using the unit, be sure to read all operating instructions carefully. Please note that these are general precautions and may not pertain to your unit. For example, this unit may not have the capability to be connected to an outdoor antenna. 1.
IMPORTANT SAFETY INSTRUCTIONS (CONTINUED) should be taken to keep from touching such power lines or circuits as contact with them might be fatal. 15. OVERLOADING Do not overload wall outlets and extension cords as this can result in a risk of fire or electric shock. 16. OBJECT AND LIQUID ENTRY Never push objects of any kind into this product through openings as they may touch dangerous voltage points or short out parts that could result in fire or electric shock.
PRECAUTIONS NOTES ON HANDLING: TO OBTAIN A CLEAR PICTURE: • When shipping the DVD player, always use the original shipping carton and packing materials. For maximum protection, repack the unit as it was originally packed at the factory. • Do not use volatile liquids, such as insect spray, near the DVD player. Do not leave rubber or plastic products in contact with the DVD player for a long time. They will leave marks on the finish. The DVD player is a high technology, precision device.
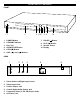
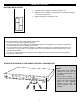
LOCATION OF CONTROLS FRONT 12 1. 2. 3. 4. 5. 3 4 5 67 8 9 POWER Button STANDBY Indicator Disc Tray OPEN/CLOSE Button STOP (■) Button 6. SKIP ( ) and ( 10 7. PAUSE ( ) Button 8. PLAY (❿) Button 9. Remote Sensor 10. Display ) Buttons REAR 1 1. 2. 3. 4. 5. 6.
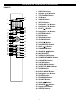
LOCATION OF CONTROLS (CONTINUED) REMOTE 1 21 22 2 3 4 5 23 24 25 26 27 6 7 8 9 10 11 28 12 13 14 15 16 17 18 19 20 31 29 30 32 33 34 35 36 1. 2. 3. 4. 5. 6. 7. 8. 9. 10. 11. 12. 13. 14. 15. 16. 17. 18. 19. 20. 21. 22. 23. 24. 25. 26. 27. 28. 29. 30. 31. 32. 33. 34. 35. 36.
REMOTE CONTROL BATTERY INSTALLATION 1. Open the battery compartment cover by sliding it out. 2. Install two (2) “AA” batteries, paying attention to the polarity diagram in the battery compartment. – –+ 3. Replace the battery compartment cover. + + –+ – BATTERY PRECAUTIONS Follow these precautions when using batteries in this device: 1. Use only the size and type of batteries specified. 2. Be sure to follow the correct polarity when installing the batteries as indicated next to the battery compartment.
CONNECTION CONNECTING THE DVD TO A TV USING THE AUDIO/VIDEO OUTPUT JACKS To Audio In To Video In Audio Cable (Included) Video Cable (Included) From Audio Out From Video Out CONNECTING THE DVD TO A TV USING THE S-VIDEO OUTPUT JACK To Audio In To S-Video In Audio Cable (Included) S-Video Cable (Not Included) From Audio Out From S-Video Out NOTES FOR CONNECTING TO A TV: • If your TV has an S-Video input, connect the DVD player with the S-Video cable for best results.
CONNECTION (CONTINUED) CONNECTING THE DVD TO A TV USING THE Y/PB/PR JACKS To Component Video In Y PB PR To Audio In Audio Cable (Included) Component Cable (Not Included) From Audio Out From Component Video Out NOTES FOR CONNECTING TO A TV: • TV must have Y, PB and PR input jacks. • Set the VIDEO OUT Option (on the GENERAL Menu Page) to YUV if using the component Video Out jacks. • When connecting the DVD, refer to the owner’s manual of the TV, as well as this manual.
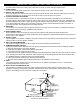
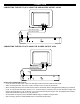
CONNECTION (CONTINUED) CONNECTING THE DVD TO A HOME THEATRE SYSTEM From Digital Out From Video Out Coaxial Cable (Not Included) Video Cable (Included) To Digital Audio Input 9 To Video Input 1 7 2 3 5 4 6 8 1. Front Left Speaker 2. Television 3. Center Speaker – can be located on top or below the Television. 4. Sub–woofer - can be located anywhere in the room. 5. Front Right Speaker Place the subwoofer, front, rear and center speakers in locations as shown/described here.
ABOUT DISCS The region number for this DVD Player is: See the following page for information regarding region numbers. 1 PLAYABLE DISCS: The following discs can be played back on this DVD player: KODAK PICTURE CD MP3: When playing an MP3, “MP3” will appear in the display, and the TV screen will list the tracks. MP3 is the abbreviation of “MPEG1 Audio Layer 3”. MPEG Audio is a format that compresses the audio portion only.
ABOUT DISCS (CONTINUED) Notes on Copyright: It is forbidden by law to copy, broadcast, show, broadcast on cable, play in public, and rent copyrighted material without permission. DVD video discs are copy protected, and any recordings made from these discs will be distorted. This product incorporates copyright protection technology that is protected by method claims of certain U.S. patents and other intellectual property rights owned by Macrovision Corporation and other rights owners.
SETUP MENU The setup menu lets you customize the DVD player by allowing you to select various language preferences, set up a parental level, turn captions and screen saver on and off, adjust what type of television screen you have and more. Below, find the menu, and then find the corresponding page that describes the features of the selected menu option. Use the Navigation (➛,❿, ,❷) buttons ❶ to navigate through the menus/screens and press the ENTER button ❷ to select the highlighted option.
SETUP MENU (CONTINUED) GENERAL SETUP MENU: Select GENERAL SETUP in the SETUP MENU and then select the desired option using the Navigation (➛,❿, ,❷) buttons to navigate through the menus/screens and press the ENTER button to select.
SETUP MENU (CONTINUED) CAPTIONS SCREEN SAVER 1 1 - - GENERAL PAGE - - T TV DISPLAY TV TYPE VIDEO OUT ANGLE MARK OSD LANG CAPTIONS SCREEN SAVER MAIN PAGE - - GENERAL PAGE - - T ON OFF CLOSED CAPTION TV DISPLAY TV TYPE VIDEO OUT ANGLE MARK OSD LANG CAPTIONS SCREEN SAVER MAIN PAGE ON OFF SCREEN SAVER When this option is set to ON, captions will appear on the screen for the hearing impaired. When this option is set to OFF, captions will NOT appear on the screen.
SETUP MENU (CONTINUED) DOLBY DIGITAL SETUP MENU: Select DOLBY DIGITAL SETUP in the SETUP MENU and then select the desired option using the Navigation (➛,❿, ,❷) buttons to navigate through the menus/screens and press the ENTER button to select. DUAL MODE 1 - - DOLBY DIGITAL SETUP - DUAL MODE MAIN PAGE STEREO L-MONO R-MONO MIX-MONO DOLBY DIGITAL RELATED STEREO: Select this to set the Dolby Digital output to Stereo mode.
SETUP MENU (CONTINUED) DISC MENU 1 - - PREFERENCES PAGE - AUDIO T SUBTITLE DISC MENU PARENTAL PASSWORD DEFAULT ENGLISH FRENCH SPANISH GERMAN JAPANESE MAIN PAGE PREFERRED MENU LANGUAGE Select the language the DISC MENU will be in (ENGLISH, FRENCH, SPANISH, GERMAN, JAPANESE). The DVD’s DISC MENU must be made in the selected language, otherwise the default language of the DVD will be shown.
SETUP MENU (CONTINUED) PASSWORD Select this option to change the password. You must know the old password in order to change it. If you have forgotten the password, call customer service at the number listed in the Warranty. 1 2 - - PREFERENCES PAGE - - 1 2 1 AUDIO T SUBTITLE DISC MENU PARENTAL PASSWORD DEFAULT PASSWORD CHANGE PAGE 2 PASSWORD NEW PASSWORD CONFIRM NEW PWD CHANGE MAIN PAGE 1 CHANGE PASSWORD At the SETUP MENU, use the Navigation ( ,❷) buttons ❶ to select PASSWORD.
BASIC OPERATION (GENERAL) IMPORTANT: When “ ” appears while pressing a button, this means that the corresponding function cannot be performed either on the disc inserted, or in the selected mode. 3D SOUND AUDIO MODE (AUDIO CD/VCD ONLY) 3D audio post-processing will give a multichannel effect when using only 2 speakers. This only works with discs encoded with Dolby Pro Logic, Dolby Digital and DTS multichannel audio tracks.
DVD BASIC OPERATION IMPORTANT NOTES: • When turning the unit on for the first time, press the POWER button on the main unit (not the remote control) to the ON (in) position. You can then use the remote control to turn the unit off and on, as long as you do not press the POWER button on the main unit to the OFF (out) position. When the unit is in the Standby mode, the STANDBY indicator will light.
DVD BASIC OPERATION (CONTINUED) SKIP SEARCH 1 1 3 2 1 2 Press the Skip ( ) button ❶ to advance the DVD to the beginning of the next chapter. 1 During playback, press either the Search ❿❿ ❶ button or Search➛➛ button ❷ to move the DVD forward or backward at double (x2) speed to locate a specific section. Repeatedly press these buttons and the speed will increase to x4, x8 and x16.
DVD BASIC OPERATION (CONTINUED) TITLE/CHAPTER SEARCH TITLE/TIME SEARCH Use this feature to directly go to a specific title and/or chapter. Use this feature to directly go to a specific title and/or time. 1 1 3 3 4 4 2 2 2 2 1 1 Press the SEARCH button ❶ once. Press the Navigation (➛,❿) buttons ❷ to select the TITLE, then use the Number buttons ❸ to select the desired title number.
DVD BASIC OPERATION (CONTINUED) AUDIO MENU SUBTITLE MENU 1 1 Press the AUDIO MENU button to change the audio language. This feature is not available on all discs. Press the SUBTITLE MENU button to select a subtitle language, and to turn the subtitle menu on/off. This feature is not available on all discs. DVD MENU TITLE MENU 1 1 1 1 2 2 3 3 Press the DVD MENU button ❶, and the Main Menu of the disc will appear.
MP3 BASIC OPERATION PLAYBACK OF AN MP3 CD 1 2 Press the POWER button to turn on the unit. If turned on with the remote control, the STANDBY indicator will go out. Press the OPEN/CLOSE button to open the disc tray, “OPEN” will appear on the screen and in the display. Insert an MP3 disc with the label side facing up on the disc tray. 3 4 1 3 3 2 4 2 Press the ENTER button ❶ to confirm, then press the NAVIGATION (❿) button ❷ to enter the track section.
MP3 BASIC OPERATION (CONTINUED) SELECTING FOLDERS/TRACKS USING THE SKIP ( ) OR ( ) BUTTON SELECTING FOLDER/TRACKS USING THE NUMBER BUTTONS 1 1 1 2 During playback, simply press the ( select a track to be played. ) or ( ) button to FORWARD❿❿/REVERSE ➛➛ 1 During playback, press the Number buttons ❶ corresponding to the track numbers to select your desired track, followed by the ENTER button ❷ . The unit will jump to the new track and playback.
CD/VCD BASIC OPERATION PLAYBACK OF A CD/VCD 1 2 Press the POWER button to turn on the unit. If turned on with the remote control, the STANDBY indicator will go out. Press the OPEN/CLOSE button to open the disc tray, “OPEN” will appear on the screen and in the display. Insert a disc will the label side facing up on the disc tray. 3 4 2 1 Press the OPEN/CLOSE button to close the disc tray. “CLOSE” will appear on the screen and in the display. After loading, playback will start automatically.
CD/VCD BASIC OPERATION (CONTINUED) FORWARD❿❿/REVERSE ➛➛ REPEAT ONE/ALL PLAY 1 1 2 2 1 1 1 To Repeat play a track, simply select the track as described on the previous page, then press the REPEAT button ❶ once; “ TRACK” will appear on the TV screen and the unit will repeat the selected track continuously until the STOP (■) button ❷ is pressed.
CD/VCD BASIC OPERATION (CONTINUED) PROGRAMMED PLAYBACK The CD player in this unit has a 20 track programmable memory that allows you to program up to 20 tracks on any disc for playback in any desired order. You may program 20 different tracks or you may also program certain tracks to play more than once. Programmed Playback only works for CDs, it does not work on DVDs or MP3 CDs.
PICTURE CD BASIC OPERATION 1 2 Press the POWER button to turn on the unit. If turned on with the remote control, the STANDBY indicator will go out. Press the OPEN/CLOSE button to open the disc tray, “OPEN” will appear on the screen and in the display. Insert a picture disc with the label side facing up on the disc tray. 3 4 1 2 2 3 1 2 2 After 12 pictures, press the STOP (■) button to show the demo pictures.
TROUBLESHOOTING GUIDE Check the following before requesting service: SYMPTOM GENERAL No power. Power on, but unit not functioning properly. POSSIBLE CAUSE AC cord unplugged. Condensation has formed. Wrong type of CD inserted. Unit needs to be reset. No picture. The disc is dirty or inserted incorrectly. Some features and functions are not available on all discs. The equipment is not connected properly. No sound. The INPUT of the TV is not set to receive the DVD signal output.
TROUBLESHOOTING GUIDE (CONTINUED) SYMPTOM DVD The unit does not start playback. POSSIBLE CAUSE Rating level set to block the DVD. DVD not inserted, or inserted upside-down. A non-playback disc is inserted. The disc is not placed in the guide. Some functions do not operate as stated. Selected language is not being shown in the subtitles, or spoken. Subtitles are not working properly. Angle cannot be changed. The Rating Level password has been forgotten. VCD (VIDEO CD) No menu playback.
CARE AND MAINTENANCE Caring for Discs • Treat the disc carefully. Handle the disc only by its edges. Never allow your fingers to come in contact with the shiny, unprinted side of the disc. • • • • Do not attach adhesive tape, stickers, etc. to the disc label. Clean the disc periodically with a soft, lint-free, dry cloth. Never use detergents or abrasive cleaners to clean the disc. If necessary, use a CD cleaning kit.
SPECIFICATIONS Power Requirements..........................................................................................................AC120V, 60Hz Power Consumption........................................20W (approx. 8W when set to Standby mode by remote) Weight ...........................................................................................................................................3.6Kg Dimensions ........................................................................................
Memcorp, Inc. Weston, FL Printed in Hong Kong Visit our website at www.memcorpinc.