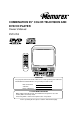
COMBINATION 25" COLOR TELEVISION AND DVD/CD PLAYER Owner’s Manual MVD2256 ATTENTION For your protection in the event of theft or loss of this product, please fill in the information listed below which is for your own personal records. Date of Purchase Serial No. Place of Purchase : : : TV/CATV MODE SELECTION When shipped from the factory, the TV/CATV menu option is set to the “CATV”(Cable Television) mode. If not using CATV, set this menu option to the “TV” position.
CAUTION RISK OF ELECTRIC SHOCK DO NOT OPEN CAUTION: TO REDUCE THE RISK OF ELECTRIC SHOCK, DO NOT REMOVE COVER (OR BACK). NO USER-SERVICEABLE PARTS INSIDE. REFER SERVICING TO QUALIFIED SERVICE PERSONNEL. The lightning flash with arrowhead symbol within an equilateral triangle is intended to alert the user to the presence of uninsulated dangerous voltage within the product's enclosure that may be of sufficient magnitude to constitute a risk of electric shock to persons.
IMPORTANT SAFEGUARDS 1. 2. 3. 4. 5. 6. 7. 8. 8A. 9. 10. 11. 12. 13. 14. READ INSTRUCTIONS All the safety and operating instructions should be read before the unit is operated. RETAIN INSTRUCTIONS The safety and operating instructions should be retained for future reference. HEED WARNINGS All warnings on the unit and in the operating instructions should be adhered to. FOLLOW INSTRUCTIONS All operating and use instructions should be followed.
IMPORTANT SAFEGUARDS (Continued) 15. OVERLOADING Do not overload wall outlets and extension cords, as this can result in a risk of fire or electric shock. 16. OBJECT AND LIQUID ENTRY Do not push objects through any openings in this unit, as they may touch dangerous voltage points or short out parts that could result in fire or electric shock. Never spill or spray any type of liquid into the unit. 17.
30. DISC Do not use a cracked, deformed, or repaired disc. These discs are easily broken and may cause serious personal injury and product malfunction. 31. NOTE TO CATV SYSTEM INSTALLER This reminder is provided to call the CATV system installer’s attention to Article 820-40 of the NEC that provides guidelines for proper grounding and, in particular, specifies that the cable ground shall be connected to the grounding system of the building, as close to the point of cable entry as practical.
Features Color TV With DVD/CD player Unique space saving design combines a 25" color TV and a DVD/CD player. The DVD disc has much more capacity, but is the same size as the audio CD disc. Picture/Audio quality of the DVD exceeds other software. Picture quality is higher than Super VHS. Audio quality is higher than audio CD. The DVD also has special options; audio language selection, subtitle language selection or multi-angle, etc. The DVD PLAYER can play back audio CDs.
Contents Before using your unit IMPORTANT SAFEGUARDS .............................................. 2 Features ............................................................................... 6 Contents ............................................................................... 7 Parts and functions .............................................................. 8 Remote control ................................................................... 10 Power source ............................................
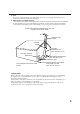
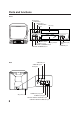
Parts and functions Front PLAY button STOP button SKIP buttons OPEN/CLOSE button Disc tray POWER button Display window Headphone Jack CHANNEL UP/DOWN buttons VOLUME UP/DOWN buttons Rear VIDEO IN jack VIDEO OUT jack RF IN jack AUDIO OUT (L/R) jacks AC power cord AUDIO IN (L/R) jacks OPTICAL DIGITAL AUDIO OUT jack COAXIAL DIGITAL AUDIO OUT jack 8 AUDIO IN (L/R) jacks VIDEO IN jack
Parts and functions Display window 2 1 3 DVD PBC 4 5 6 7 TITLE CHAPTER TRACK ALL REPEAT A B PROG VIDEO CD 1112 13 14 ANGLE 8 No. 9 10 DVD DVD disc is inserted. 2 CD Audio CD is inserted.
Remote control Page POWER Power On/Off SLEEP Sleep timer 16 MARKER Index 33 OPEN/CLOSE Tray open or close 28 ANGLE Change playback angle 36 AUDIO SELECT Switch the sound of TV 24 SUB TITLE-ON/OFF Subtitle 35 TITLE Select title 36 DVD MENU 36 RETURN SET UP/MENU 37~44 SLOW 27,37~44 14,18~25 14,27,28,30 32~44 Select option in the menu 27,28 Enter information in the menu 14,18~25 Forward/Reverse- slow motion 29 SEARCH Fast Forward/Review playback PLAY Playback SKIP Skip chapter
Remote control Inserting Batteries 1 Open the battery compartment cover. 2 Insert two AA batteries as shown. 3 Replace the cover. Operation • Aim the remote control at the remote sensor and press control buttons to operate. • Operate the remote control within 30° angle on either side of the remote sensor, up to a distance of Approx. 5 meters. Approx. 5 meters NOTE: • Do not leave the remote control unit exposed to direct sunlight or in hot or humid places.
Antenna connections If you are using an indoor or outdoor antenna, follow the instructions below that correspond to your antenna system. If you are using a cable TV service (CATV), see page 13 for Cable TV connections. Combination VHF/UHF Antenna (Single 75 ohm Cable or 300 ohm Twin-lead Wire) Connect the 75 ohm Cable from the Combination VHF/UHF Antenna to the Antenna Jack.
Cable TV connections This TV/DVD has an extended tuning range and can tune most cable channels without using a Cable TV Converter box. Some cable companies offer “premium pay channels” in which the signal is scrambled. Descrambling these signals for normal viewing requires the use of a descrambler device which is generally provided by the cable company.
Setting the language This TV can display the on screen language in English, Spanish or French. Language selection (step 4) will automatically appear on the screen when you press the MENU button initially. Select language to use the other menu options. turn on the TV/DVD, press 1 To POWER. MENU. The TV menu 2 Press screen will appear. UP or DOWN to select the 3 Press “LANGUAGE” option, then press ENTER.
TV operation turn on the TV/DVD, press 1 To POWER. the volume level by 2 Adjust pressing VOLUME UP or DOWN. The volume level will be indicated on the screen by green bars. As the volume level increases, so do the number of bars. If the volume decreases, the number of green bars also decreases. the TV/CATV menu 3 Set option to the appropriate position. (See page 18.) VOLUME 32 TV - VHF/UHF channels CATV - CABLE TV channels the Direct Channel selection 4 Press buttons to select the channel.
TV operation (Continued) MUTING Press MUTING to turn off the sound. The TV/DVD’s sound will be silenced and “MUTING” will briefly appear on the screen. The sound can be turned back on by pressing MUTING again or one of the VOLUME UP and DOWN. MUTING CHANNEL UP/DOWN Press and release CHANNEL UP or DOWN. The channel automatically stops at the next channel set into memory. Press and hold the button down to change channels more quickly.
Closed caption WHAT IS CLOSED CAPTIONING? This television has the capability to decode and display Closed Captioned television programs. Closed Captioning will display text on the screen for hearing impaired viewers or it will translate and display text in another language. Captions: This Closed Caption Mode will display text on the screen in English or another language (depend-ing on the setting of the Closed Captions CH 1/2).
To memorize channels This TV/DVD is equipped with a channel memory feature which allows channels to skip up or down to the next channel set into memory, skipping over unwanted channels. Before selecting channels, they must be programmed into the TV/DVD’s memory. In addition to normal VHF and UHF channels, this TV/DVD can receive up to 113 Cable TV channels. To use this TV/DVD with an antenna, set the TV/CATV menu option to the TV mode. When shipped from the factory, this menu option is in the CATV mode.
AUTOMATIC MEMORY TUNING 1 Press MENU. UP or DOWN to select the 2 Press “CH SET” option, then press ENTER. UP or DOWN to select the 3 Press “AUTO CH MEMORY”, then press ENTER. The TV will begin memorizing all the channels available in your area. MENU until the MENU screen 4 Press is cleared. TO ADD/DELETE CHANNELS 1 Press MENU. UP or DOWN to select the 2 Press “CH SET” option, then press ENTER. UP or DOWN to select the 3 Press “ADD/DELETE”, then press ENTER.
Setting the V-Chip An age limitation can be set to forbid children to see and hear violent scenes or pictures for adults, etc. The TV/DVD corresponds to "TV RATING" and "MOVIE RATING". To use the V-Chip function, you must register a password. TO REGISTER PASSWORD 1 Press MENU. UP or DOWN to select the 2 Press “V-CHIP SET”, then press ENTER. the password (4 digits) 3 Enter using the Direct Channel Selection buttons (0-9), then press ENTER. the same password again 4 Enter for the safety, then press ENTER.
TO SET THE V-CHIP SET menu, press 1 InUPtheor V-CHIP DOWN to select the “TV RATING”, then press ENTER. UP or DOWN to display 2 Press the desired setting, then press ENTER. OFF : TV-Y : TV-Y7 : TV-G : TV-PG: TV-14 : TV-MA: TV RATING is not set All children 7 years old and above General Audience Parental guidance 14 years old and above 17 years old and above When you select TV- Y7, TV-PG, TV-14 or TV-MA, press CALL to show the contained rating. Press UP or DOWN to select the desired item you want.
Setting the V-Chip (Continued) TO CHANGE PASSWORD 1 Press MENU. UP or DOWN to select the 2 Press “V-CHIP SET” option, then press ENTER. the Password using the 3 Enter Direct Channel Selection button (0-9), then press ENTER. UP or DOWN to select 4 Press “CHANGE PASSWORD”, then press ENTER. the new password using 5 Enter the Direct Channel Selection button (0-9), then press ENTER. the same password again 6 Enter for safety, then press ENTER. MENU repeatedly to 7 Press return to normal screen.
Picture control adjustment Picture controls are factory preset but you can adjust them individually as follows: display the picture adjustment 1 Toscreen, press MENU. UP or DOWN to select the 2 Press “PICTURE” option, then press ENTER. ENTER repeatedly to 3 Press select the item you want to adjust. BRIGHTNESS COLOR CONTRAST TINT SHARPNESS UP or DOWN to adjust the 4 Press setting.
Stereo and separate audio program (SAP) The TV/DVD is equipped with a feature known as Multi-channel TV Sound or MTS. MTS broadcasts greatly enhance TV viewing by bringing you programs with high fidelity stereo sound. MTS also provides an extra channel called the Separate Audio Program or SAP which broadcasters can use to transmit a second language for bilingual transmission or for other purposes.
Sound control adjustment Sound controls are factory preset but you can adjust them individually as follows: 1 Press MENU. UP or DOWN to select the 2 Press “AUDIO” option, then press ENTER. ENTER repeatedly to 3 Press select the item you want to adjust. BASS TREBLE BALANCE UP or DOWN to adjust the 4 Press setting. BASS: Press ENTER until "BASS" appears on the screen, then press UP or DOWN to adjust the bass sound.
Disc The unit detects whether the disc loaded is a DVD disc or Audio CD and automatically sets the mode. Compatible with DVD disc recorded in NTSC system and in PAL system • To play back disc in either NTSC or PAL system, use a Multi-system TV. • Do not use PAL TV to play back NTSC disc. • Do not use NTSC TV to play back PAL disc. Disc Notes Do not play DVD-ROM, CD-ROM, CD-R, CDV, CD-G or Photo CD to prevent accidental erasure of prerecorded material. This unit applies to DVD discs from Region 1 only.
Setting setup language The DVD set up language can be selected. Preparation: • Insert the AC cord plug into a standard 120V 60Hz polarized AC outlet. • Press POWER on the unit or on the remote control to turn on the TV/DVD. • When the unit is TV or AUX1/2 mode, press OPEN/CLOSE or PLAY to turn the DVD power to on. • When using an amplifier, switch on the amplifier. SET UP in the stop mode. 1 Press (Confirm DVD power is on.) The DVD set up menu screen will appear.
Playback procedure AUTOMATIC POWER ON: The TV/DVD will turn on automatically when OPEN/CLOSE or PLAY is pressed. OPEN/CLOSE. 1 Press The disc tray will open. OPEN a disc onto the tray. 2 Place Hold the disc, position it with the printed label side up, align it with the guides, and place it in its proper position. PLAY or OPEN/CLOSE. 3 Press The disc tray closes automatically. CLOSE On the TV-screen, “CLOSE” changes to “READING” and then playback commences.
Special playback Fast Forward Playback Press and hold SEARCH (RIGHT) during normal playback. • Normal playback is resumed when the button is released. Review Playback Press and hold SEARCH (LEFT) during normal playback. • Normal playback is resumed when the button is released. At first the speed of Fast Forward or Review Playback is slow, but speeds up after 5 seconds. Still Playback Press PAUSE/STILL during normal playback to pause playback. STILL To resume normal playback press PLAY.
Zooming / Locating desired scene Zooming In this unit you will zoom in on the frame image. You then will make selections by switching the position of the frame. The frame image is displayed at a 1:4 view. ZOOM during playback. 1 Press The center part of the image will be zoomed in. ZOOM Press UP/DOWN or LEFT/RIGHT to view a different part of the 2 frame. You may move the frame twice from the center position to UP, DOWN, LEFT or RIGHT direction. 3 In the zoom mode press ZOOM again to return to a 1:1 view.
Repeat playback Title, Chapter, Track Playback Press REPEAT MODE during playback. Each time you press the button, the on-screen display changes as below. DVD REPEAT CHAPTER Repeat Chapter REPEAT TITLE Repeat Title STANDARD PLAYBACK Standard Playback Audio CD REPEAT TRACK REPEAT ALL Repeat Track Repeat All STANDARD PLAYBACK Standard Playback To resume normal playback Press REPEAT MODE several times until “STANDARD PLAYBACK” appears.
Program playback (audio CD) You can arrange the order of tracks on the disc. PLAY MODE in the 1 Press stop mode. PROGRAM PLAYBACK SELECT TRACK 1 2 3 4 5 6 7 8 9 10 11 12 13 14 15 16 17 18 PRESS PLAY TO START UP/DOWN or LEFT/RIGHT 2 toPress select the desired track. PROGRAM PLAYBACK SELECT TRACK 1 2 3 4 5 6 7 8 9 10 11 12 13 14 15 16 17 18 PRESS PLAY TO START 3 Press SELECT. • The selected track is memorized. • To program others, repeat Step 2 and 3.
Marking desired scenes The unit stores the points which that you want to watch again. You can resume playback from that scene. Marking the Scenes 1 Press MARKER during playback. MARKER ––– PRESS SELECT TO MARK SELECT during playback at 2 Press the desired scene. MARKER 1–– • Up to 3 scenes can be selected. PRESS SELECT TO MARK Returning to the scenes 1 Press MARKER during playback. MARKER 123 SELECT TO PLAY MARK CLEAR TO ERASE LEFT or RIGHT to select 2 Press the INDEX number.
Changing soundtrack language You can select the language when you play a multilingual disc. AUDIO SELECT during 1 Press playback. AUDIO: 1 If “VOCAL OFF” appears on the screen, you can select “ON” or “OFF” with LEFT or RIGHT. (Depending on the DVD, the vocal will not be listened with digital out connection.) UP or DOWN until the de2 Press sired language is selected. AUDIO: 3 3 Press AUDIO to make display disappear.
Subtitles Turning the Subtitles On and Off When playing back a disc recorded with subtitls, you can turn the subtitle on or off. Press SUB TITLE during playback. Then press ON/OFF to select ON or OFF Subtitles appear on the screen. SUBTITLE: 1 ON Changing the subtitle language You can select the language when playing back a disc recorded with multi-lingual subtitles. SUB TITLE during 1 Press playback. UP or DOWN until the de2 Press sired language is selected.
Changing angles / Title selection / DVD menu Changing Angles When playing back a disc recorded with multi-angle facility, you can change the angle that you are viewing the scene frpm. 1 Press ANGLE during playback. ANGLE: 1 ZOOM 2 Press UP or DOWN until the desired angle is selected. 3 Press ANGLE to make display disappear. Title selection Two or more titles are recorded on some discs. If the title menu is recorded on the disc, you can select the desired title. TITLE during playback.
Rating level setting Some discs are specified not suitable for children. Such discs can be limited to play back with the unit. 1 Press SET UP in the stop mode. press UP or DOWN to select 2 Then RATING LEVEL. Press SELECT. 1) RATING LEVEL 2) AUDIO 3) SUBTITLE 4) TV SCREEN 5) OSD DISPLAY 6) MENU LANGUAGE 7) AUDIO OUTPUT 8) SETUP LANGUAGE PRESS RETURN TO EXIT UP or DOWN to select your 3 Press desired level, then press SELECT.
To unlock the rating 1 Press SET UP in the stop mode. UP or DOWN to select 2 Press RATING LEVEL, then press SELECT. 1) RATING LEVEL 2) AUDIO 3) SUBTITLE 4) TV SCREEN 5) OSD DISPLAY 6) MENU LANGUAGE 7) AUDIO OUTPUT 8) SETUP LANGUAGE PRESS RETURN TO EXIT number buttons (0-9) to 3 Press enter the passwords, then press SELECT. RATING PASSWORD IS NEEDED TO CHANGE THE LEVEL. PLESE ENTER THE 4-DIGIT PASSWORD 1234 LOCK PRESS RETURN TO EXIT 4 Press SELECT. RETURN. 5 Press Now the rating is unlocked.
Setting audio soundtrack language The same audio soundtrack language can always be selected even if you replace the disc or turn the power off. 1 Press SET UP in the stop mode. UP or DOWN to select 2 Press AUDIO, then press SELECT. 1) RATING LEVEL 2) AUDIO 3) SUBTITLE 4) TV SCREEN 5) OSD DISPLAY 6) MENU LANGUAGE 7) AUDIO OUTPUT 8) SETUP LANGUAGE PRESS RETURN TO EXIT UP or DOWN to select 3 Press your desired language, then AUDIO: 3 press SELECT.
Setting Subtitle Language The same subtitle language can always be selected even if you replace the disc or turn the power off. 1 Press SET UP in the stop mode. UP or DOWN to select 2 Press SUBTITLE, then press SELECT. 1) RATING LEVEL 2) AUDIO 3) SUBTITLE 4) TV SCREEN 5) OSD DISPLAY 6) MENU LANGUAGE 7) AUDIO OUTPUT 8) SETUP LANGUAGE PRESS RETURN TO EXIT UP or DOWN to select 3 Press your desired language, then press SELECT.
Setting the aspect ratio of TV screen You can select the aspect ratio for your TV. 1 Press SET UP in the stop mode. UP or DOWN to select TV 2 Press SCREEN, then press SELECT. 1) RATING LEVEL 2) AUDIO 3) SUBTITLE 4) TV SCREEN 5) OSD DISPLAY 6) MENU LANGUAGE 7) AUDIO OUTPUT 8) SETUP LANGUAGE PRESS RETURN TO EXIT UP or DOWN to select your 3 Press desired screen type, then press SELECT.
Setting on Screen display On screen display (conserning of deck operations, ex, PLAY, STOP, SERCH or so on) can be switched on or off when you press the buttons. 1 Press SET UP in the stop mode. UP or DOWN to select OSD 2 Press DISPLAY, then press SELECT. 1) RATING LEVEL 2) AUDIO 3) SUBTITLE 4) TV SCREEN 5) OSD DISPLAY 6) MENU LANGUAGE 7) AUDIO OUTPUT 8) SETUP LANGUAGE PRESS RETURN TO EXIT UP or DOWN to select ON 3 Press or OFF, then press SELECT.
Setting menu language You can select the language of the disc menu messages of DVDs. 1 Press SET UP in the stop mode. UP or DOWN to select 2 Press MENU LANGUAGE, then press SELECT. 1) RATING LEVEL 2) AUDIO 3) SUBTITLE 4) TV SCREEN 5) OSD DISPLAY 6) MENU LANGUAGE 7) AUDIO OUTPUT 8) SETUP LANGUAGE PRESS RETURN TO EXIT UP or DOWN to select 3 Press your desired language, then press SELECT. MENU LANGUAGE PREFERENCE FOR DISC ENGLISH OTHER – – – – PRESS RETURN TO EXIT OTHER: Other language can be selected.
Setting audio output 1 Press SET UP in the stop mode. UP or DOWN to select 2 Press AUDIO OUTPUT, then press SELECT. 1) RATING LEVEL 2) AUDIO 3) SUBTITLE 4) TV SCREEN 5) OSD DISPLAY 6) MENU LANGUAGE 7) AUDIO OUTPUT 8) SETUP LANGUAGE PRESS RETURN TO EXIT UP or DOWN to select 3 Press DIGITAL or ANALOGUE, then press SELECT. AUDIO OUTPUT DIGITAL ANALOGUE PRESS RETURN TO EXIT DIGITAL: When the unit is connected to an amplifier with any built-in decoder among Dolby Digital or MPEG or DTS.
Language code list Enter the appropriate code number for the initial settings "AUDIO", "SUBTITLE" and/or "MENU LANGUAGE" (see pages 39, 40 and 43).
Connections to other equipments The exact arrangement you use to interconnect various video and audio components to the TV/DVD is dependent on the model and features of each component. Check the Owner's Manual provided with each component for the location of video and audio inputs and outputs.
TV/DVD/AV SELECTION If you connect the TV/DVD to VCR, camcorder or TV game, you can select by pressing the TV/DVD/AV button. Press the TV/DVD/AV button repeatedly to select the desired mode. “DVD”, “AUX1” or “AUX2” will display on the screen for 4 seconds. TV DVD AUX 1 (Back) AUX 2 (Front) NOTE: When the unit is in DVD or AV mode, and with no signal input to the unit through AV jack, the TV screen shows completely dark as if the unit is powered off.
Problems and troubleshooting Use the following check list for troubleshooting when you have problems with your unit. Consult your local dealer or service outlet if problems persist. Be sure all connections are properly made when using with other units. SYMPTOMS POSSIBLE SOLUTIONS PAGE POWER • Make sure the power cord is plugged in. • Try another AC outlet. • Power is off, check fuse or circuit breaker. • Unplug unit for an hour, then plug it back in.
SYMPTOMS POSSIBLE SOLUTIONS PAGE DVD Playback doesn’t start. • No disc is inserted. • The disc may be dirty. Clean up the disc. • The unit cannot play CD-ROMs, etc. 28 26 – No picture • TV/DVD/AV selector is not set correctly. 27 No sound • Check the input selector of the amplifier is set properly. • The unit is in the Special playback mode. • Select AUDIO OUTPUT to ANALOGUE. – 29 44 Picture is distorted during CUE or REVIEW. • The picture will be distorted occasionally.
Reception disturbances Most types of television interference can be remedied by adjusting the height and position of the VHF/UHF antenna. Outdoor antennas are recommended for best results. The most common types of television interference are shown below. If one of these symptoms appear when the TV/DVD is connected to a Cable TV system, the disturbance may be caused by the local Cable TV company broadcast. IGNITION Black spots or horizontal streaks may appear, the picture may flutter or drift.
Specifications GENERAL Power supply: Power consumption: AC 120V 60Hz Operation: 130W Stand by: 8W Weight: 66.