MVD4543 Suffix A User’s Guide DVD/CD/VCD/MP3/PHOTO CD Player and Video Cassette Recorder Before operating this product, please read these instructions completely.
CONTENTS Contents..................................................................1 Important Safety Instructions ...............................2 Precautions.............................................................5 Power Source .........................................................6 Location of Controls ..............................................6 • Display ................................................................6 • Front.................................................................
IMPORTANT SAFETY INSTRUCTIONS CAUTION RISK OF ELECTRIC SHOCK DO NOT OPEN CAUTION: TO REDUCE THE RISK OF ELECTRIC SHOCK, DO NOT REMOVE COVER (OR BACK). NO USER-SERVICEABLE PARTS INSIDE. REFER SERVICING TO QUALIFIED SERVICE PERSONNEL. This Caution Marking is located at the bottom enclosure of the unit.
IMPORTANT SAFETY INSTRUCTIONS (CONTINUED) IMPORTANT: PLEASE KEEP ALL PACKAGING MATERIAL FOR AT LEAST 90 DAYS IN CASE YOU NEED TO RETURN THIS PRODUCT TO YOUR PLACE OF PURCHASE OR TO MEMOREX. Before using the unit, be sure to read all operating instructions carefully. Please note that these are general precautions and may not pertain to your unit. For example, this unit may not have the capability to be connected to an outdoor antenna. 1.
IMPORTANT SAFETY INSTRUCTIONS (CONTINUED) should be taken to keep from touching such power lines or circuits as contact with them might be fatal. 15. OVERLOADING Do not overload wall outlets and extension cords as this can result in a risk of fire or electric shock. 16. OBJECT AND LIQUID ENTRY Never push objects of any kind into this product through openings as they may touch dangerous voltage points or short out parts that could result in fire or electric shock.
NOTES ON HANDLING: • • • • • • • • • PRECAUTIONS TO OBTAIN A CLEAR PICTURE: DVD: The DVD player is a high technology, precision device. If the optical pick-up lens and disc drive parts are dirty or worn down, the picture quality becomes poor. To obtain a clear picture, we recommend regular inspection and maintenance (cleaning or parts replacement) every 1,000 hours of use depending on the operating environment. For details, contact your nearest dealer.
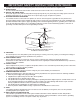
POWER SOURCE Insert the AC plug (with the 2 blades) into a conveniently located AC outlet having 120V, 60Hz. NOTE: The AC plug supplied with the unit is polarized to help minimize the possibility of electric shock. If the AC plug does not fit into a nonpolarized AC outlet, do not file or cut the wide blade. It is the user’s responsibility to have an electrician replace the obsolete outlet. AC Outlet AC Plug DISPLAY LOCATION OF CONTROLS 1.
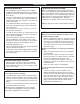
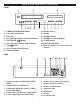
FRONT LOCATION OF CONTROLS (CONTINUED) 1. POWER (STANDBY/ON) Button 2. Cassette Compartment 3. Disc Tray 4. Disc Skip Up n/Tape Fast Forward Button ®p) Button 5. PLAY/PAUSE (® 6. Disc Skip Down o/Tape Rewind Button 7. STOP ■ Button 8. Disc Tray Open/Close Button 9. DVD/VCR Button 10. 11. 12. 13. 14. 15. 16. Remote Sensor Display RECORD Button CHANNEL Up/Down Buttons TV/VCR Button EJECT Button (VCR) Video IN, Audio L & R Input Jacks (For Video 2) 6. 7. 8. 9. 10. 11.
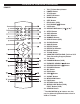
REMOTE LOCATION OF CONTROLS (CONTINUED) 1. 2. 3. 4. 5. 6. 7. 8. 9. TVG (TV Guardian®) Button POWER Button TITLE Button SUBTITLE Button ZOOM Button STEP Button REC Button (VCR) ®P) Button PLAY/PAUSE (® VCR Button 11. 12. 13. 14. 15. 16. 17. 18. 19. 20. 21. 22.
REMOTE CONTROL BATTERY INSTALLATION 1. Open the Battery Compartment cover by pushing in on the tab and lifting it out. 2. Install two (2) “AA” batteries (not included), paying attention to the polarity diagram in the Battery Compartment. 3. Replace the Battery Compartment cover. + – – + BATTERY PRECAUTIONS Follow these precautions when using batteries in this device: 1. Use only the size and type of batteries specified. 2.
CONNECTION TO OUTPUT DVD CONNECTING THE UNIT TO A TV USING THE AUDIO/VIDEO OUTPUT JACKS (FOR DVD AND VCR) CONNECTING THE UNIT TO A TV USING THE S-VIDEO OUTPUT JACK (FOR DVD ONLY) If your TV has separate AUDIO IN jacks for Composite Video and SVideo Inputs, connect to these jacks. If your TV has one set of AUDIO IN jacks for Composite Video and SVideo Inputs, connect to these jacks.
CONNECTION TO OUTPUT DVD (CONTINUED) CONNECTING THE UNIT TO A TV USING THE Y, Pb/Cb, Pr/Cr JACKS If your TV has separate AUDIO IN jacks for Composite Video and Y, Pb/Cb, Pr/Cr Inputs, connect to these jacks. If your TV has one set of AUDIO IN jacks for Composite Video and Y, Pb/Cb, Pr/Cr Inputs, connect to these jacks. NOTES FOR CONNECTING: • Set the VIDEO OUT Option (on the GENERAL Menu Page) to YUV if using the Component Video Out jack. • Your TV must have Y, Pb, Pr or Y, Cb, Cr Input jacks.
CONNECTION TO OUTPUT DVD (CONTINUED) CONNECTING THE UNIT TO A HOME THEATER SYSTEM Place the subwoofer, front, rear and center speakers in locations as shown/described here. After correctly positioning the speakers, perform the Tone Test on the AV Amplifier and adjust the volume controls until the desired sound is achieved. For best results, sit in the viewing position and have someone adjust the volumes for you; this will enable you to set the optimal levels.
CONNECTIONS CONNECTING THE UNIT TO A TV USING THE AUDIO/VIDEO OUTPUT JACKS NOTES: • Set the TV’s TV/VIDEO button or switch to the VIDEO setting when connecting using the A/V jacks. • When connecting, refer to the owner’s manual of the TV, as well as this manual. • When connecting, make sure the power is off and both units are unplugged before making any connections. • If your TV only has one audio input, the use of a “Y” connector may be necessary. Visit your local electronics supply store.
CONNECTIONS (CONTINUED) OUTDOOR VHF/UHF ANTENNA CONNECTION Follow the instructions for the type of antenna system you intend to use. If using Cable TV (CATV), see bottom of page. Combination VHF/UHF Antenna (Single 75 ohm cable or 300 ohm twin-lead wire) VHF/UHF 75 Ohm Connect the 75 ohm cable from combination VHF/UHF antenna to the antenna jack. OR If your combination antenna has a 300 ohm twin-lead wire, use a 300-75 ohm matching transformer (NOT SUPPLIED).
CONNECTIONS (CONTINUED) CONNECTING AN EXTERNAL UNIT TO THIS PLAYER (USING THE REAR A/V JACKS) CONNECTING AN EXTERNAL UNIT TO THIS PLAYER (USING THE FRONT A/V JACKS) NOTES: • When connecting, refer to the owner’s manual of the external unit, as well as this manual. • When connecting, make sure the power is off and all units are unplugged before making any connections. • If your TV only has one audio input, the use of a “Y” connector may be necessary. Visit your local electronics supply store.
ABOUT DISCS The region number for this player is: See the following page for information regarding region numbers. PLAYABLE DISCS: The following discs can be played back on this player: KODAK PICTURE CD MP3 When playing an MP3, the selected file will appear in the display and will list the folders/tracks. MP3 is the abbreviation of “MPEG1 Audio Layer 3”. MPEG Audio is a format that compresses the audio portion only.
ABOUT DISCS (CONTINUED) Notes on Copyright: It is forbidden by law to copy, broadcast, show, broadcast on cable, play in public and rent copyrighted material without permission. DVD video discs are copy protected, and any recordings made from these discs will be distorted. This product incorporates copyright protection technology that is protected by method claims of certain U.S. patents and other intellectual property rights owned by Macrovision Corporation and other rights owners.
DVD SETUP MENU The SETUP MENU lets you customize the DVD section by allowing you to select various language preferences, turn captions and screen saver on and off, adjust what type of television screen you have and more. While in the DVD mode (DVD button pressed first), enter the SETUP MENU by pressing the SETUP button 1. Use the Navigation (√,®,π,†) buttons 2 to navigate through the menus/screens and press the OK button 3 to select the highlighted option. To Exit the SETUP MENU, press the SETUP button 1.
GENERAL SETUP MENU: DVD SETUP MENU (CONTINUED) Select General and then select the desired option using the Navigation (√,®,π,†) buttons to navigate through the menus/screens and press the OK button to select. TV DISPLAY TV TYPE NORMAL/PS: Pan Scan. Select when the unit is connected to a conventional TV. Video material formatted in the Pan Scan style is played back in that style (the left and right edges are cut off). NORMAL/LB: Letter Box. Select when the unit is connected to a normal TV.
SPEAKER SETUP MENU: DVD SETUP MENU (CONTINUED) Select Audio and then select the desired option using the Navigation (√,®,π,†) buttons to navigate through the menus/screens and press the OK button to select. DOWNMIX Sets the Audio Output mode. 1 LT/RT: Select to hear the sound in theatrical downmix mode. STEREO: Select to hear the sound in Stereo downmix mode.
DVD SETUP MENU (CONTINUED) PREFERENCE MENU (this menu cannot be accessed if a disc is inserted): Select Preference and then select the desired option using the Navigation (√,®,π,†) buttons to navigate through the menus/screens and press the OK button to select. AUDIO SUBTITLE Select the language the DVD will be played back in (ENGLISH, FRENCH, SPANISH, GERMAN, JAPANESE). The DVD must be recorded in the selected language, otherwise the default language of the DVD will be played.
DVD SETUP MENU (CONTINUED) TVG (TV GUARDIAN) TVGuardian® Feature ® Thisproduct product supports TVGuardian Foul ® Language Filtering Technology, your family the very bestfamily control the of very best control of This supports TVGuardian Foul Language Filtering offering Technology, offering your objectionable language in your home. objectionable language in your home.
TVGuardian® Setup Menu DVD SETUP MENU (CONTINUED) Word Subset Filtering In addition to the main TVG® modes listed above, you can turn certain word subsets on or off according to your preferences. Damn and Hell ........Filters out variations of “Damn”/“Hell” Religious .....................Filters out references to deities (To watch religious programming, turn this word subset off.) Sexual .......................Filters sexually explicit language TVG® Modes Off............................................
VCR SETUP MENU The SETUP MENU lets you customize the VCR section by allowing you to set various options, such as clock, program, channels and more. While in the VCR mode (VCR button pressed first) enter the SETUP MENU by pressing the SETUP button 1. Use the Navigation (√,®,π,†) buttons 2 to navigate through the menus/screens and press the OK button 3 to select the highlighted option. To Exit the SETUP MENU, press the SETUP button 1.
VCR SETUP MENU (CONTINUED) TO SET THE TIMER PROGRAMMING 1 2 1 2 1 2 Enter the VCR mode and the Setup screen as described on page 24; the Setup menu will appear. Scroll to Program Set using the Navigation (†) button 1. Press the OK button 2 to select it; the Program menu will appear. NOTE: While in VCR mode, you can directly press the PROGRAM button (VCR) to enter the Program menu.
5 VCR SETUP MENU (CONTINUED) 6 2 3 1 Enter two digits for the start hour and two digits for the start minute using the Number buttons 1. As each number is pressed, the cursor will move to the right. When finished, the AM/PM setting will blink. Press the Number 1 button 2 for AM or the Number 2 button 3 for PM; the End Time hour digits will blink. NOTE: You can also use the Navigation (π,†) buttons followed 1 by the Navigation (®) button to select between AM and PM.
VCR SETUP MENU (CONTINUED) SETTING THE CHANNEL MENU 1 2 2 2 1 1 Enter the VCR mode and the Setup screen as described on page 24; the Setup menu will appear. Scroll to Channel Set using the Navigation (†) button 1. Press the OK button 2 to select it; the Channel menu will appear. Press the Navigation (†) button 1 to select the “Antenna/Cable” input option and press the OK button 2 repeatedly to select “Antenna” or “Cable”.
SETTING THE LANGUAGE VCR SETUP MENU (CONTINUED) 1 2 2 1 Enter the VCR mode and the Setup screen as described on page 24; the Setup menu will appear. Scroll to Language Select using the Navigation (†) button 1. Press the OK button 2 to select it; the Language Select menu will appear. Press the Navigation (†) button to select the desired language the On-Screen Display will be in (English, Spanish or French). 3 When finished, press the OK button and the language will be set.
VCR SETUP MENU (CONTINUED) SETTING THE GO TO ZERO SEARCH 1 2 2 2 1 1 With a prerecorded video cassette tape inserted, enter the VCR mode and the Setup screen as described on page 24; the Setup menu will appear. Scroll to Search using the Navigation (†) button 1. Press the OK button 2 to select it; the Search will appear. Press the Navigation (†) button 1 to select Go To Zero Search, then press the OK button 2; the VCR will then search until the counter reads “0:00:00”.
INDEX SEARCH + VCR SETUP MENU (CONTINUED) 1 2 2 2 1 With a prerecorded video cassette tape inserted, enter the VCR mode and the Setup screen as described on page 24; the Setup menu will appear. Scroll to Search using the Navigation (†) button 1. Press the OK button 2 to select it; the Search will appear. 1 Press the Navigation (†) button 1 to select Index Search +, then press the OK button 2; the unit will then fast forward to the next index point and then play from that point.
INDEX NUMBER SEARCH VCR SETUP MENU (CONTINUED) 1 2 2 2 1 1 With a prerecorded video cassette tape inserted, enter the VCR mode and the Setup screen as described on page 24; the Setup menu will appear. Scroll to Search using the Navigation (†) button 1. Press the OK button 2 to select it; the Search menu will appear. Press the Navigation (†) button 1 to select Index Number Search, then press the OK button 2; the Index Number Search menu will appear.
VCR SETUP MENU (CONTINUED) SETTING THE VCR OPTIONS 1 2 2 1 2 1 3 Enter the VCR mode and the Setup screen as described on page 24; the Setup menu will appear. Scroll to OPTION using the Navigation (†) button 1. Press the OK button 2 to select it; the Option menu will appear. Press the Navigation (†) button 1 to select OSD Display. Press the OK button 2 to turn the OSD On or Off.
LOADING VCR OPERATION 1 2 Push the center of the tape until it is automatically retracted into the VCR. AUTOMATIC POWER ON The VCR will turn on automatically. AUTOMATIC PLAY When loading a cassette tape without the erase prevention tab intact, playback will start immediately. An inverted video cassette cannot be inserted.
VCR OPERATION (CONTINUED) TO START PLAYBACK If the unit is in DVD mode, press the DVD/VCR button (on the main unit) or VCR Button (on the remote) to change the unit to VCR mode. 1 2 Press the POWER button to turn on the unit and load a prerecorded tape. (When loading a tape with the Erase Prevention Tab intact, playback will begin automatically.) If playback does not begin automatically, press the PLAY/PAUSE ®P button to begin playback.
VCR OPERATION (CONTINUED) TO REWIND THE TAPE RAPIDLY TO FAST FORWARD THE TAPE RAPIDLY 1 1 2 2 1 1 Press the Reverse Search √√ (Rewind) button 1 while in the Stop mode; ”REW” will appear in the display. Press the STOP ■ button 2 when done. When it reaches the beginning of the tape, it will stop Press the Forward Search ®® (Fast Forward) button 1 while in the Stop mode; ”FF” will appear in the display. Press the STOP ■ button 2 when done. When it reaches the end of the tape, it will stop.
VCR OPERATION (CONTINUED) TO VIEW ANOTHER PROGRAM WHILE RECORDING DISPLAY If this VCR/DVD Combo is connected to a TV through the antenna socket, when the unit is turned on, the combo will block the antenna signal and send the modulated signal to the TV so you can watch the VCR but cannot receive other signals from antenna. If you are3recording a TV program and wish to watch another channels, you need to switch to TV mode by pressing TV/VCR button.
VCR OPERATION (CONTINUED) RECORDING A TV PROGRAM/EXTERNAL AV INPUT If the unit is in DVD mode, press the DVD/VCR button (on the main unit) or VCR Button (on the remote) to change the unit to VCR mode. 1 2 Press the POWER button to turn on the unit and load a tape with the Erase Prevention Tab intact. Press the SP/SLP button to select the desired tape speed. See page 33 for more information on tape usage.
VCR OPERATION (CONTINUED) TO STOP RECORDING TEMPORARILY TO STOP RECORDING Press the PLAY/PAUSE ®P button to avoid recording unwanted material. Press the PLAY/PAUSE ®P button again to continue recording. The Pause mode will be released after 5 minutes to prevent damage to the tape, the unit will then be in the Stop mode. To stop recording, press the STOP X button. 1 1 ONE-TOUCH RECORDING OTR is a simple and convenient way to make a timed recording without programming the Timer.
VCR OPERATION (CONTINUED) RECORDING FROM A DVD TO A CASSETTE IMPORTANT: Many commercial DVDs have copyright protection that will not enable them to be recorded. In this case, you will not be able to copy it. 1 2 Press the POWER button to turn on the unit and load a tape with the Erase Prevention Tab intact. NOTE: Press the DVD/VCR button (on the main unit) or VCR Button (on the remote) to change the unit to VCR mode if the unit is in the DVD mode.
DVD BASIC OPERATION (GENERAL) IMPORTANT: When “ ” appears while pressing a button, this means that the corresponding function cannot be performed either on the disc inserted, or in the selected mode. MTS/AUDIO While playing a disc, you can cycle between the audio modes as follows: 1 DVD Disc: Press the MTS/Audio button to cycle through the audio modes. The audio modes vary depending on the disc inserted.
DVD BASIC OPERATION IMPORTANT NOTES: “ ” will appear on the TV screen during operation if you try to access a function that is not available on the disc. Some discs may take a few seconds to load. If a disc is inserted incorrectly, is dirty and/or damaged, or is not present at all, “NO DISC” will appear in the display. Always hold the disc without touching either of its surfaces.
DVD BASIC OPERATION (CONTINUED) SKIP SEARCH 1 1 2 1 3 2 Press the NEXT n button 1 to advance the DVD to the beginning of the next chapter. 1 During playback, press either the Forward ®® 1 or Reverse √√ 2 Search button to move the DVD forward or backward at double (x2) speed to locate a specific section. Repeatedly press these buttons and the speed will increase to x4, x8, x16 and resume normal playback. You can also resume normal playback by pressing the PLAY/PAUSE (®p) button 3.
TITLE/CHAPTER SEARCH DVD BASIC OPERATION (CONTINUED) Use this feature to directly go to a specific title and/or chapter. 1 TITLE/CHAPTER/TIME SEARCH Use this feature to directly go to a specific title and/or time. 1 1 1 2 2 3 Press the SEARCH button 1 twice. Press the Navigation (√,®) buttons 2 to select the Title (“TT”), then use the Number buttons 3 to select the desired title number (i.e. for number 5, press “0”, “5”). Playback will start immediately.
DVD BASIC OPERATION (CONTINUED) DVD MENU TITLE MENU 1 1 3 1 2 1 3 Press the DVD MENU button 1, and the Main Menu of the disc will appear. Use the Navigation (√,®,π,†) buttons 2 to select the desired option, and then press the OK button 3. This is not available on all discs. 2 Press the TITLE button 1, and the Title Menu of the disc will appear. Use the Navigation (√,®,π,†) buttons 2 to select the desired option, and then press the OK button 3. This is not available on all discs.
PLAYBACK OF AN MP3 DISC MP3 BASIC OPERATION 1 2 Press the POWER button to turn on the unit. While in the DVD mode (DVD button pressed first), press the OPEN/CLOSE button to open the disc tray, “OPEN” will appear on the screen. Insert an MP3 disc with the label side facing up on the disc tray. Press the OPEN/CLOSE button to close the disc tray. “CLOSE” will appear on the screen and the display. 3 4 3 1 1 After loading, the FOLDER/TRACK menu will appear on the TV screen.
MP3 BASIC OPERATION (CONTINUED) SELECTING FOLDERS/TRACKS USING THE (n) OR (o) BUTTON 1 2 SELECTING FOLDERS/TRACKS USING THE NUMBER BUTTONS 1 1 During playback, simply press the NEXT n 1 or PREVIOUS o 2 button to select a track to be played. 1 FORWARD®®/REVERSE √√ 1 During playback, press the Number buttons corresponding to the track numbers to select your desired track, and the unit will playback the desired track automatically. Enter a 3 digit number for the track number, i.e.
CD/VCD BASIC OPERATION PLAYBACK OF A CD/VCD 1 2 Press the POWER button to turn on the unit. While in the DVD mode (DVD button pressed first), press the OPEN/CLOSE button to open the disc tray, “OPEN” will appear on the screen. Insert a disc with the label side facing up on the disc tray. 3 4 2 1 Press the OPEN/CLOSE button to close the disc tray. “CLOSE” will appear on the screen. After loading, playback will start automatically. To stop playback, press the Stop (X) button 1.
CD/VCD BASIC OPERATION (CONTINUED) FORWARD®®/REVERSE √√ 1 2 REPEAT ONE/ALL PLAY 1 2 1 1 To Repeat play a track, simply select the track as described on the previous page, then press the REPEAT button 1 once; “ TRACK” will appear on the TV screen and the unit will repeat the selected track continuously until the STOP (X) button 2 is pressed.
CD/VCD BASIC OPERATION (CONTINUED) PBC (VCD ONLY) When playing a VCD with PBC function, you can enjoy simple interactive software on your TV. 1 The PBC Function will activate automatically if the VCD has this function. To turn off the PBC, press the PBC button 1 once. 1 Press the NEXT n button 2 to go to the Track Selection Menu. Some VCDs may not have this menu. Press the Number buttons 3 to select the desired track to play.
PICTURE CD BASIC OPERATION 1 2 Press the POWER button to turn on the unit. While in the DVD mode (DVD button pressed first), press the OPEN/CLOSE button to open the disc tray, “OPEN” will appear on the screen. Insert a picture disc with the label side facing up on the disc tray. 3 1 4 5 3 2 1 Press the OPEN/CLOSE button 1 to close the disc tray. “LOADING” will appear on the TV screen. After loading, playback will start automatically.
TROUBLESHOOTING GUIDE (DVD SIDE) Check the following before requesting service: SYMPTOM GENERAL No power. Power on, but unit not functioning properly. POSSIBLE CAUSE AC cord unplugged. Condensation has formed. Wrong type of disc inserted. Unit needs to be reset. No picture. The disc is dirty or inserted incorrectly. Some features and functions are not available on all discs. The equipment is not connected properly. No sound. The INPUT of the TV is not set to receive the DVD signal output.
TROUBLESHOOTING GUIDE (DVD SIDE) (CONTINUED) SYMPTOM DVD The unit does not start playback. POSSIBLE CAUSE DVD not inserted, or inserted upside-down. A non-playback disc is inserted. The disc is not placed in the guide. Some functions do not operate as stated. Selected language is not being shown in the subtitles, or spoken. Subtitles are not working properly. Angle cannot be changed. VCD (VIDEO CD) No menu playback. PROGRESSIVE SCAN No picture. The disc is dirty.
TROUBLESHOOTING GUIDE (VCR SIDE) Check the following before requesting service. SYMPTOM POSSIBLE CAUSE POSSIBLE SOLUTION No power. The AC power cord is not connected. Connect the AC power cord to the AC outlet. Moisture has condensed on the heads. Unplug and allow an hour or two to dry out. The video cassette's erase prevention tab is broken off. Place a piece of vinyl tape over the hole. POWER Although the power is on, the VCR does not operate. RECORDING TV recording does not work.
CARE AND MAINTENANCE Caring for Discs • Treat the disc carefully. Handle the disc only by its edges. Never allow your fingers to come in contact with the shiny, unprinted side of the disc. • • • • Do not attach adhesive tape, stickers, etc. to the disc label. Clean the disc periodically with a soft, lint-free, dry cloth. Never use detergents or abrasive cleaners to clean the disc. If necessary, use a CD cleaning kit.
VIDEO HEAD CLOGGING VIDEO HEAD CLOGGING/CLEANING The video heads are the means by which the VCR reads pictures from the tape during playback. In the unlikely event that the heads become dirty enough to be clogged, no picture will be played back. This can easily be determined if, during playback of a known good tape, there is good sound, but no picture (picture is extremely snowy). If this is the case, have the video cassette recorder checked by qualified service personnel.
SPECIFICATIONS Power Requirements ........................................................................................................................AC120V, 60Hz Power Consumption..........................................................................................................................................25W Weight............................................................................................................................................................10 Lbs Dimensions ...
Memcorp, Inc. Weston, FL Printed in Hong Kong Visit our website at www.memorexelectronics.