v@ Is it live or is it Memorex? 7" TFT TM DISPLAY PORTABLE DVD PLAYER WITH REMOTE CONTROL @@ @@J!l @@@@@_l @@@@@/ @@@ @: @@@@@J @ _ @ @ @ @ _!)
Contents .......................... Important Safety hstructions ......... Precautions ....................... Power Sources ..................... Location of Controls ................ • Blain Unit ......................... • Side ............................ • Remote ......................... Remote Control ................... • Battery Installatbn ................. • Effective Distance of the Remote Control Transmitter .......... Connection .......................
CAUTION 1 @ CAUTION: TO REDUCE THE RISK OF ELECTRIC SHOCK, DO NOT REMOVE COVER (OR BACK). NO USER-SERVICEABLE PARTS INSIDE. REFER SERVICING TO QUALIFIED SERVICE PERSONNEL. DANGEROUS VOLTAGE: The lightning flash with arrowhead symbol within an equilateral triangle is intended to alert the user to the presence of uninsulated dangerous voltage within the product's enclosure that may be of sufficient magnitude to constitute a risk of electric shock to persons.
SURGE PROTECTORS: It is recommended tousea surgeprotector forACconnection. Lightning andpowersurges ARENOTcovered underwarranty forthisproduct. LASER WARNING: Thisunitemproys a Laser onlyqualified service personal should attempt toservice thisdevice duetopossible eyeinjury'. FCC NOTICE: This equipment has been tested and found to comply with the limits for a Class B digital device, pursuant to part 15 of the FCC Rures.
Dear Customer: Selecting fine audio equipment such as the unit you've just purchased is only the start of your musical enjoyment. Now it's time to consider how you can maximize the fun and excitement your equipment offers. This manufacturer and the Electronic Industries Association's Consumer Electronics Group want you to get the most out of your equipment by playing it at a safe level.
NOTES ON HANDLING: When shipping the DVD player, always use the original shipping carton and packing materials. For maximum protection, repack the unit as it was originally packed at the factory. Do not use volatile liquids, such as insect spray, near the DVD player. Do not leave rubber or plastic products in contact with the DVD player for a long time. They will leave marks on the finish. The top and rear panels of the DVD player may become warm after a long period of use.
TO OBTAIN A CLEAR PICTURE: The DVD player is a high technology, precision device. If the optical pick-up lens and disc drive parts are dirty or worn down, the picture quality becomes poor. To obtain a clear picture, we recommend regular inspection and maintenance (cleaning or parts replacement) every 1,0O0 hours of use depending on the operating environment. For details, contact your nearest dealer. NOTES ON MOISTURE Moisture condensation carefully. CONDENSATION: damages the DVD player.
AC CONNECTION insert the small end of the AC adapter into the jack on the side of the unit. insert the other end (with the 2 blades) into a conveniently located AC outlet having 120VAC, 60Hz. DO NOT insert into the DC iN CHARGE jack. AC ADAPTER SPECiFiCATiONS: DV9V _}{_4._ NOTES: To disconnect the AC adapter, remove it from the DC iN jack on the side of the unit as well as from the AC outlet. To DC 9V iN Jack Use the enclosed AC adapter for this product only.
CHARGING THE BATTERY PACK "LOW BATTERY" will appear on the screen when the battery is low and needs recharging. The battery can be charged while attached or not attached to the unit as follows: WITH THE BATTERY ATTACHED TO THE UNIT: With the battery pack attached, insert the small end of the AC adapter into the DC IN CHARGE jack on the side of the battery pack or the DC IN jack on the side of the unit. Insert the other end (with the 2 blades) into a conveniently located AC outlet having 120V AC, 60Hz.
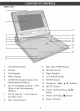
MAiNUNIT 11 3 4 5 6 12 13 14 15 16 17 18 9 10 1. Unit OPEN 2_ Switch 9. Disc Door OPEN Display 10. Remote 3_ Left Speaker 11. Right Speaker 4_ MENU Button 12. LCD MODE 5_ CHARGE Indicator (Side of the Rechargeable Battery) 13. ENTER 14. Navigation 6_ DC IN CHARGE 15. SETUP Jack 9V C_ (Side of the Rechargeable Battery) 7_ DC IN Jack 9V _"_ the Main Unit) 8_ Disc Compartment (Side of Button Sensor Button Button (4,_, _.,_') 16_ Power ON/Play/Pause Button 17.
SiDE 1 2 3 4 5 6 1. VOLUME ControE 5. S-VrDEO OUT Jack 2. Headphone Jack 3. AUDrO OUT Jack 4. VIDEO/COAXIAL OUT Jack 6. Battery Rebase Switch (Bottom of the Battery Pack) 7. Battery Pack REMOTE m 2m 3E m 16 17 m 18 m 19 20 21 22 23 24 10 11 12 25 26 27 28 10 7 1. DrSPIAY Button 2. MENU Button 3. STANDBY Button 4. 0@/10+ Number Buttons 5. PROGRAM Button 6. GOTO Button 7. TITLE Button 8. AUDIO Button 9. PLAY/ENTER Button 10. SETUP Button 11. STEP Button 12. SLOW Button 13.
BATTERY INSTALLATION 1, Remove the Battery Compartment by pressing ir_ on the tab and then sliding the compartment out. 2. _nsta_la CR2025 battery, paying attention to the polarity diagram in the battery compartment (positive side up). 3, Replace the Battery Compartment BATTERY PRECAUTIONS Fot!ow these precautions when using a battery in this dev ce: 1. Use onty the size and type of battery specified. 2.
CONNECTING THE DVD TO A TV USING THE A/V CABLE (INCLUDED) NOTES FOR CONNECTING TO A TV: if your TV has an S-Video input, connect the DVD player with the S-Video cable for best results. Set the TV's TV/VIDEO button or switch to the VIDEO setting. When connecting the DVD, refer to the owner's manual of the TV, as well as this manual. When connecting the DVD to the TV, make sure the power is off and both units are unplugged before making any connections.
CONNECTING THE DVD TO A TV USING THE S-VIDEO CABLE (iNCLUDED) l NOTES FOR CONNECTING TO A TV: If your TV has an S-Video input, connect the DVD player with the S-Video cable for best results. Set the TV's TV/VIDEO button or switch to the VIDEO setting. When connecting the DVD, refer to the owner's manual of the TV, as well as this manual. When connecting the DVD to the TV, make sure the power is off and both units are unplugged before making any connections. Connect the DVD player to your TV directly.
CONNECTING THE DVD TO A HOME THEATRE SYSTEM Frx)m Video Audio Video Place the subwoofer, front, rear and center speakers in locations as shown/described here. After correctry positioning the speakers, perform the Tone Test on the AV Amplifier and adiust the Volume contror(s) until the desired sound is achieved. For best results, sit in the viewing position and have someone adjust the volumes for you; this will enable you to set the optimar levels. 1. 2.
CONNECTING THE DVD TO A HOME THEATRE SYSTEM (COAXIAL JACK) Place the subwoofer, front, rear and center speakers in Eocations as shown/described here. After correctly positioning the speakers, pertorm the Tone Test on the AV Amplifier and adjust the Volume contror(s) untir the desired sound is achieved. For best results, sit in the viewing position and have someone adjust the volumes for you; this will enable you to set the optimar levels.
The region number for this DVD Player is: See the following page for information regarding region numbers. PLAYABLE DISCS: The following discs can be played back on this DVD player: DiSC TYPES: DVD Data on most DVDs is divkJed into sections called "titres" and then into subsections called I..... "chapters", each of which is given a title or chapter number.
Notes on Copyright: It is forbidden by law to copy, broadcast, show, broadcast on cable, play in public and rent copyrighted material without permission. DVD video discs are copy protected, and any recordings made from these discs will be distorted. This product incorporates copyright protection technology that is protected by method claims of certain U.S. patents and other intellectual property rights owned by Macrovision Corporation and other rights owners.
The Setup Menu lets you customize the DVD player by allowing you to select various language preferences, set up a parental level, turn screen saver on and off, adjust what type of television screen you have and more. Use the following instructions to navigate and change the options as described on the upcoming pages. 1. 2. 3. 4. 5. While in the Stop mode, press the SETUP button @ to enter the Setup Menu.
GENERAL SETUPMENU: Press theSETUP button toenterthemenu, select GENERAL SETUP usingtheNavigation (-4,_)buttons, thenpress thePLAY/ENTER button toselect it.SelectJchange theSetup option asdescribed onpage18. TV DISPLAY Se! TV Display ANGLE MARK Mode Set Angle NORMALiPS: Pan Scan, Select when the unit is connected to a conventional TV. Video material Mark Select ON to turn the anglemarks OFF to turn them off.
CAPTIONS Closed SCREEN SAVER Caption When this option is set to ON, Crosed Captions will appear on the screen for the hearing impaired (if originally recorded on the DVD). When this option is OFF, the Closed Captions will not appear. AUDIO SETUP When this option is set to ON, the screen saver wiEI come on when the unit stops or the image is paused for approximately 3.5 minutes. When this option is OFF, the screen saver will not come on.
DOLBYSETUPMENU: Press theSETUP button toenterthemenu, serect DOLBY SETUP usingtheNavigation (-,_,_) buttons, thenpressthePLAY/ENTER button toseEect it.SeEect/change theSetup option as described onthispageusingtheNavigation (*_,_,-, A, T) buttons and the PLAY/ENTER button. DUAL WIONO Dual Mono DYNAMIC (1 + 1) Setup STEREO: SeEect this to set the Dolby Digitar output to Stereo mode.
VtDEOSETUPMENU: Press theSETUP button toenter themenu, select VIDEO SETUP using theNavigation (4,_) buttons, thenpress thePLAY/ENTER button toselect it.Select/change thesetup option asdescribed onthisand thefollowing page using theNavigation (-,_, _,A,T)buttons andthePLAY/ENTER button. SHARPNESS COMPONENT iiComponent • I Sharpness Select the Desired Video Output mode: TV: Select for S-Video output. connect to external TV to observe using S-Video cable.
PREFERENCE SETUP MENU: Press the SETUP button to enter the menu, select PREFERENCE SETUP using the Navigation (4,1_) buttons, then press the PLAY/ENTER button to select it. Select/change the setup option as described on this and the following page using the Navigation (4,_, AUDtO button, SUBTITLE Preferred Audio Preferred Language SeEect the Eanguage the DVD KOREAN, The DVD RUSSrAN, THAt must be recorded language, otherwise or OTHERS).
PARENTAL TheParentar optionenables parents toprevent theirchiEdren fromwatching inappropriate material ona DVD.Etreadstheratings forprogramming, thendenies access toprogramming iftheprogram's ratingmeetsthelimitations youselect.Inthiscase,theuserwillhaveto enterapassword. Pressthe SETUPbutton@to enterthe PressthePLAY/ENTER button@to seJect menu,seEect PREFERENCE SETUP using the rating.
PASSWORD SeEect thisoptiontochange thepassword. Youmustknowtheoldpassword inorderto change it.Ifyouhaveforgotten thepassword, callcustomer service at the number listed on page 41. @ @@ c?_ e @ e o%_ @ @@ <_) @ @@@ @ @@@@@ At the PREFERENCE MENU, use the Navigation (&,_') buttons @ to select PASSWORD. Press the PLAY/ENTER button @ to select CHANGE. Press the PLAY/ENTER button @ to change the password.
MUTE PIN @@@0@ @@@ @ _--_ @@@@¢ @@@@@ @@@ @@@ ®@@ @ @ @@@@@ Press the MUTE button once iiiiii to mute Press the P/N button to switch back and forth between NTSC and PAL. In the USA. the standard is NTSC. the sound; "MUTE" wit! appear on the screen. Press the MUTE button again to restore the sound; "MUTE on the screen. OFF" will appear temporarily HEADPHONEJACK LOB MODE Button For private Eistening, pEug headphones into this jack.
DISPLAY BUTTON O @::} @ ® ?) @@ @ @@@O@ @@@@@ @@@ @ @ @ @ @ i} WhiEe playing a DVD, press the DISPLAY button to cycle as follows: 1st press: TitLe eEapsed time 2rid press: Title remaining time 3rd press: Chapter eEapsed time 4th press: Chapter remaining time 5th press: Display off While playing a CD, press the DISPLAY button to cycle between single elapsed time and single remaining time.
IMPORTANT After NOTES: plugging in, the unit wile be in the Power ON/PEay/Pause (_|1) Power indicator will light. "_" wi/appear is not available Some discs button on the TV screen may take a few seconds incorrectly, appear in the display. Always hord the disc without proper Press during operation and hold the Power to turn on the unit; the if you try to access a function that on the disc. If a disc is inserted position Off mode.
@@@@ @@@ @ @@@@@ ®@@ Closethedisctray.Afterbading,themenu screen of theDVDshouldappear. Usethe Navigation (4,_, A,_) buttons @toselect the desired option and press the PLAY/ENTER button @tosebctit.Adjust the VOLUME control @asdesired. NOTE: If themenuscreen doesnotappear, press theMENU button toaccess it. To stop playback, press the Stop (t) button @; "PRESS PLAY KEY TO CONTENUE" will appear on the screen.
SKiP SEARCN @@@@@ @@@ @ @@@@@ f_@@ _'_J,.,( Press @ O the Skip (_'l) button DVD to the beginning 0 @ to advance the During playback, press either the Search _ button @ or Search4_ button @ to move the of the next chapter. DVD forward or backward at double (x2) speed to locate a specific section. Repeatedly press these buttons and the speed will increase to x4, x8, x16 and resume normal playback.
TITLEICHAPTER SEARCH TITLEITIME SEARCH Usethisfeature todirectly gotoa specific title Usethisfeature todirectly gotoaspecific title and/orchapter, and/or time. iiio o ®ii @ @ @ _q@ @ C;'@@ @ @@@@@ Press the GOTO button Navigation (_,_) TITLE, use the select then the desired @ once. Press the Press the GOTO buttons @ to select Navigation Number buttons then title number. Playback @ to will (4,I_) button use the Number desired title @ twice. buttons buttons number.
REPEATPLAYBACK A-B REPEAT Whle playing back a DVD, this unit can repeatedly playback a chapter or tile. Wh/e playing back a DVD, this unit can repeatedly play back a specific section. @@@@_ @@@@@ @@@ @ @@@@@ PLAYBACK @ 0 _) @ @ '} @@ @ (_) @@ @ @ ,J _/" @ c;, 000@@ @ @ :D ¢,, o Q @ Q While in the Playback mode, press the REPEAT button once; -d" b CHAPTER" wi/ appear on the screen and the currently playing Chapter wi/repeat continuousry.
SUBTITLE AUDIO MENU MENU /) @ (3 @ @ @ @ @@ @ 0 q @ @ @ @ _@@ .._ i_; b ¢ @ 0 (%@ } Press the AUDIO button change the audio language. not available on all discs. repeatedly This feature to is Press the SUB-T button repeatedly to select a subtitle language, and to turn the subtile menu on/off. This feature is not available on all discs. TITLE MENU DVD MENU @@@@@ @@@ q q @@@@ @ @ @ !_; _._) Press the MENU button @, and the Main Menu of the disc will appear.
ANGLE ZOOM Some discs may contain scenes w,hich have been shot simultaneously from a number of different camera angles. This feature only works on discs with more than one camera iN The image on the screen can be magnified as follows: angle. The jacket will be marked with "L_J'J". 0 @@ @ @@@@@ Press the ANGLE button repeatedJy to seJect an aJternate angJe. This feature is not available on aJldiscs. Press the ZOOM button @ once during Normal, Slow or Still playback modes, and the unit wil! zoom x2.
PROGRAMMED PLAYBACK TheDVDplayerinthisunithasa20chapter programmaMe memory thatallowsyouto program upto20chapters onanydiscforplayback inanydesired order.Youmayprogram 20 different chapters oryoumayalsoprogram certain chapters toplaymorethanonce.To perform Programmed Playback, proceed asfollows: Duringplayback ofa DVDdisc,pressthe PROGRAM button;theProgram menuwill appear ontheTVscreen.
PLAYBACK OF A CD @@@@@ @} @ @ ;_,_@ @ ,_ Press the STANDBY button on the remote to turn on the unit; the POWER indicator Press will light. facing eeeee Ot3_O O q @ @ "-_';; oooc< Close will the disc start tray. After automaticaEly. Loading, To stop the Disc Door the disc tray, "OPEN" screen. Ensert a disc @ayback playback, }tess the Stop (t) button. 36 OPEN wil! with up on the disc tray.
RANDOM PLAYBACK White in the Stop mode, press the SHUFFLE button @ once, "SHUFFLE" wHE appear on the screen; press the PLAY/ENTER button @ and the unit will randomly @ayback all the tracks on the CD. To cancel Random, press the SHUFFLE button @ until "FOLDER" appears on the screen.
SELECTING TRACKS USING THE NUMBER BUTTONS PAUSE _i_iIi_iIIIIIIIIIIIIIIIIIIIIIIIIIIIIIIIIIIIIIIIIIIIIIIIIIIIIIIIIIIIIIII_B J®@ ®®®®® _.@ C @@@ @@@ @®@@@: @ ® o@? _*i;, o o ;> o Press the the PAUSE Pause screen.
6)@ i i'},_=) ...... @0@ @ B @@ @ @ @@@@@ Press the STANDBY button to turn on the unit; the POWER indicator will light. Press the Disc Door the disc tray, "OPEN" screen, rnsert a disc facing OPEN will with button to open appear on the the label side up on the disc tray. @@@@@ @@@ @ @@@@@ After loading a picture CD, the pictures wi/ automaticaly show as a slideshow on the screen. Press the Skip (_J) @ or (_) @ to select the previous or next picture. After the sideshow is done, it wi/ stop.
Check the following before requesting service: SYMPTOM POSSIBLE CAUSE POSSIBLE SOLUTION GENERAL No power, Battery Power Condensation on, but unit not functioning pack is empty, Recharge has formed, Unplug properly, battery two hours Wrong type of CD insetted, Unit needs DVD, standard Press the then disc is ditty or inserted Some features available No picture, The incorrectly, and functions are not is not connected iNPUT properly, of the TV is not set to receive DVD s
SYMPTOM POSSIBLE CAUSE level set to block the POSSIBLE SOLUTION DVD The unit does not start playback, Rating DVD, Enter i the DVD not inserted, A nomplayback or inserted disc upside-down, your rating i Insert is inserted, DVD in the guide, The disc is dirty, Some functions do not operate as stated, Some features available Selected shown language is not being in the subtitles, or spoken, to insert a DVD; will appear "DVD in the display, i Place the disc on the i inside
Caring for Discs Treat the disc carefully. Handle the disc only by its edges. Never allow your fingers to come in contact with the shiny, unprinted side d the disc. Do not attach adhesive stickers, etc. to the disc label. tape, Clean the disc periodically with a soft, lint-free, dry cloth. Never use detergents or abrasive cleaners to clean the disc. If necessary, use a ......- CD cleaning kit. -_ .......
Power Requirements ........................................................... DCIN9V(Center Positive(-)L_,_-)) Battery Packs ......................................... Li-Polymer Rechargeable Battery DC7.4V2600mAh Power Consumption .............................................................................................. 8.5W Weight ............................................................................................................. 2 Lbs Dimensions ...........................................
Memcorp, Inc. Weston, FL Printed in Hong Kong Visit our website at www.memorexelectronics.