MX4122 User’s Guide Home Audio System with MP3/WMA CD Player and AM/FM Stereo Radio Before operating this product, please read these instructions completely.
Dear Customer, Please read this manual thoroughly before operating the unit to become more familiar with it and obtain the performance that will bring you continued enjoyment for many years. Keep these instructions handy for future reference. PLEASE KEEP ALL PACKAGING MATERIAL FOR AT LEAST 90 DAYS IN CASE YOU NEED TO RETURN THIS PRODUCT TO YOUR PLACE OF PURCHASE OR MEMOREX. For future reference, record the serial number of the unit printed on the rear of the cabinet.
Dear Customer: Selecting fine audio equipment such as the unit you’ve just purchased is only the start of your musical enjoyment. Now it’s time to consider how you can maximize the fun and excitement your equipment offers. This manufacturer and the Electronic Industries Association’s Consumer Electronics Group want you to get the most out of your equipment by playing it at a safe level.
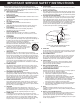
IMPORTANT SERVICE SAFETY INSTRUCTIONS Before using the unit, be sure to read all operating instructions carefully. Please note that these are general precautions and may not pertain to your unit. For example, this unit may not have the capability to be connected to an outdoor antenna. 1. READ INSTRUCTIONS All the safety and operating instructions should be read before the product is operated. 2. RETAIN INSTRUCTIONS The safety and operating instructions should be retained for future reference. 3.
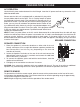
AC OPERATION PREPARATION FOR USE Unwind the AC power cord and extend it to its full length. Insert the AC power cord into any convenient 120V 60Hz household outlet. Please note that this unit is equipped with a polarized AC plug which has one blade wider than the other. This is a safety feature to reduce the likelihood of electric shock. This polarized AC plug will only fit in a polarized AC outlet.
PREPARATION FOR USE (CONTINUED) CONNECTING AN EXTERNAL UNIT TO THE AUX IN JACKS You can connect an external unit to this unit, such as a cassette player, etc. Simply connect an audio/video cable (not included) from the AUX IN jacks of this unit to the external unit’s AUX OUT jacks. This will allow you to broadcast the external unit’s sound through this unit. Make sure both units are turned on and press the FUNCTION button to select “AUX” to use the external unit.
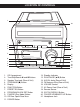
LOCATION OF CONTROLS 1 10 11 2 3 4 12 13 14 5 15 16 17 6 7 8 9 1. 2. 3. 4. 5. 6. 7. 8. 9. 10. 11. CD Compartment Tune/Skip/Search n and o Buttons Speaker Terminals (Rear of Unit) STOP/BAND (■) Button Display FUNCTION Button PRESET EQ Button PROGRAM/CLOCK SET Button P-MODE (Play Mode) Button CD Door Open/Close Area POWER Button 18 19 20 21 12. 13. 14. 15. 16. 17. 18. 19. 20. 21.
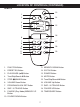
REMOTE LOCATION OF CONTROLS (CONTINUED) 13 1 2 14 3 15 4 5 16 6 7 8 17 11 12 19 9 10 18 1. FUNCTION Button 11. MEMORY DOWN Button 3. PLAY/PAUSE (®p) Button 13. POWER Button 12. ID3 TAG Button 2. PRESET EQ Button 14. MUTE Button 4. Tune/Skip/Search o Button 15. Tune/Skip/Search n Button 5. STOP (■)/BAND Button 6. VOLUME Down Button 16. VOLUME Up Button 7. PROGRAM/CLOCK SET Button 17. SKIP +10 TRACKS Button 8. SKIP -10 TRACKS Button 18. FOLDER UP Button 9.
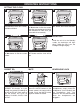
SETTING THE CLOCK OPERATING INSTRUCTIONS 1 2 3 2 With the power off, press the PROGRAM/CLOCK1 SET button; the hours will blink. 4 1 Press the Tune/Skip/Search n 1 or o 2 button to set the current hour. Be sure to observe the AM or PM indicators to make sure you have set the hour correctly. 5 2 Press the PROGRAM/CLOCK 1 SET button; the minutes will blink. BACKLIGHT While the unit is In the Standby mode, the backlight will light dimly. While the unit is on, the backlight will light brightly.
OPERATING INSTRUCTIONS (CONTINUED) LISTENING TO THE RADIO 1 2 3 Press the POWER button to turn the unit on; the Standby indicator will go out. Press the FUNCTION button to select the Tuner mode; 1 the AM or FM frequency will appear in the display. Press the STOP (■)/BAND button to select AM or FM. 1 NOTE: If you select the FM band, be sure to extend the FM Wire Antenna.
OPERATING INSTRUCTIONS (CONTINUED) SETTING RADIO PRESETS This unit can preset 10 AM and 10 FM radio stations for convenient recall. 1 2 3 2 2 1 1 Press the POWER button to turn the unit on; the Standby indicator will go out. 1 Press the FUNCTION button 1 to select the Tuner mode; the AM or FM frequency will appear in the display. Press the STOP(■)/BAND button 2 to select AM or FM. Press the Tune/Skip/Search n 1 or o 2 button to select a station.
OPERATING INSTRUCTIONS (CONTINUED) PLAYING COMPACT DISCS This CD player is designed to play all kinds of Audio Discs and MP3/WMA CD Roms, such as CD recordables and rewriteables. Do not try to play CDI, CDV, DVD or computer CDs in this unit. 1 2 3 Press the POWER button to turn the unit on; the Standby indicator 1 will go out. Press the FUNCTION button to select CD; “TOC 1READ” will appear in the display.
OPERATING INSTRUCTIONS (CONTINUED) TO BEGIN PLAYBACK FROM A SPECIFIC TRACK 1 While in the CD mode, insert a disc into the CD player. Then the unit will read the table of the contents on the disc. After the total number of tracks appear, press either the Tune/Skip/Search n 1 or o 2 button to select a specific track for playback. You can use the FOLDER/MEMORY UP button 3 (on the main unit) or FOLDER UP/Down buttons (on the remote) to select an album/folder, if using MP3/WMA with folders.
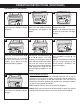
OPERATING INSTRUCTIONS (CONTINUED) FORWARD/REVERSE SKIP 10 TRACK BUTTONS 1 2 2 2 1 MP3 CD: When playing the third track of a folder, for example, press the SKIP +10 TRACKS button 1 to skip to the beginning of the 13th track. If there is no 13th track (i.e. only 8 tracks in the folder), then it will skip to the beginning track of the next folder. When playing the 13th track of a folder, press the SKIP -10 TRACKS button 2 to skip back to the beginning of the 3rd track of the same folder.
4 OPERATING INSTRUCTIONS (CONTINUED) 6 5 2 1 To repeat all files in a album/folder (MP3/WMA disc only), press the P-MODE button 1 twice; “REP FOLDER” will appear in the display. Press the FOLDER/MEMORY UP button 2 (on the main unit) or FOLDER UP/DOWN buttons (on the remote) to select the specific folder that you wish to repeat. PLAY/PAUSE (®p) button 3 to repeat play the album/folder.
OPERATING INSTRUCTIONS (CONTINUED) 4 2 5a 5b MP3/WMA: If using an MP3/WMA, you will first select the album/folder using the FOLDER UP 1 or DOWN 2 buttons, then press the PROGRAM/CLOCK SET button 3 to confirm, then select the first desired track inside the album/folder. Use the Tune/Skip/Search n 1 or o 2 button and/or the SKIP TRACKS +10 3/–10 4 buttons to select the first desired track inside the album/folder.
OPERATING INSTRUCTIONS (CONTINUED) PROGRAMMED REPEAT 1 2 3 It is also possible to use the 1 Program and Repeat functions together to repeat a specific program indefinitely. First, make a program as described above, then press the P-MODE button twice to enter the Repeat-All mode. Both the MEM and REP ALL indicators will appear in the display. Press the PLAY/PAUSE (®p) button to begin programmed repeat playback. The player will 1 play the tracks you selected in the order in which you programmed them.
OPERATING INSTRUCTIONS (CONTINUED) SETTING THE TIMER Set the timer to turn the unit on to the Tuner or CD mode at a preset time as follows: 1 2 3 With the unit off (in the Standby mode), press the TIMER/SLEEP button once, "Timer" will appear and the hours will blink in the display. Press the Tune/Skip/Search n 1 or o 2 button to set the timer on hour, then press the TIMER/SLEEP button ❸ again; the minute digits will blink.
OPERATING INSTRUCTIONS (CONTINUED) ACTIVATING THE SLEEP FUNCTION Set the sleep timer as follows: 1 2 3 2 During playback of a CD or while listening to the radio, press the TIMER/SLEEP button once, “90” will blink and “SLEEP” will appear in the display. 1 Use the Tune/Skip/Search n 1 or o 2 button to select the desired sleep (turn off) time. There are four selections: "90"–Turn off after 90 minutes. "60"–Turn off after 60 minutes. "30"–Turn off after 30 minutes. "15"–Turn off after 15 minutes.
OPERATING INSTRUCTIONS (CONTINUED) MP3/WMA FAQs–Frequently Asked Questions Please read before playing an MP3/WMA disc. Does the unit support packet write CD-RW? Yes, it can. You can add or delete MP3/WMA files without reformatting. It appears like a PC hard drive. Can the unit read regular music CDs? Yes, it can. However you can not mix MP3/WMAs and WAV files on the same CD. If you do this, the unit will play only the MP3/WMA files.
TROUBLESHOOTING GUIDE Should this unit exhibit a problem, check the following before seeking service: Symptom Possible Cause Solution Noise or sound distorted on radio broadcasts. Station not tuned properly for AM or FM. Retune the AM or FM broadcast station. Radio FM STEREO indicator does not light. FM: Antenna Wire is not extended. Extend FM Antenna Wire. Poor FM signal being received. Retune station or try another station that broadcasts in stereo. AM: Unit is not positioned correctly.
SPECIFICATIONS GENERAL Power Source..............................................................................................AV 120V, 60 Hz Battery for the Remote.........................................................2 x AAA size Alkaline batteries Left & Right Speakers........................................................................................2 x 8 ohms. Output Power ...................................................................................................... 2 x 12.
Memcorp, Inc. Weston, FL Printed in Hong Kong Visit our website at www.memorexelectronics.