SAFETY PRECAUTIONS CAUTION RISK OF ELECTRIC SHOCK DO NOT OPEN CAUTION: TO REDUCE THE RISK OF ELECTRIC SHOCK, DO NOT REMOVE COVER (OR BACK). NO USERSERVICEABLE PARTS INSIDE. REFER SERVICING TO QUALIFIED SERVICE PERSONNEL.
SAFETY PRECAUTIONS INFORMATION: This equipment complies with Class B digital device regulations. This equipment generates, uses and can radiate radio frequency energy and, if not installed and used in accordance with the instructions, may cause harmful interference to radio communications. However, there is no guarantee that interference will not occur in a particular installation.
Dear Customer: Selecting fine audio and video equipment such as the unit you’ve just purchased is only the start of your musical enjoyment. Now it’s time to consider how you can maximize the fun and excitement your equipment offers. This manufacturer and the Electronic Industries Association’s Consumer Electronics Group want you to get the most out of your equipment by playing it at a safe level.
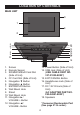
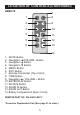
MAIN UNIT LOCATION OF CONTROLS 3 1 4 2 5 6 7 11 12 13 14 15 16 17 8 9 10 18 1. Screen 2. Remote Sensor 3. SD/MMC/MS/xD Card Slot (Side of Unit) 4. CF Card Slot (Side of Unit) 5. Navigation † Button 6. Navigation π Button 7. ENTER/PLAY Button 8. Wall Mount Hole 9. Stand 10. Wall Mount Hole 11. Navigation ®/ VOLUME + Button 12. Navigation √/ VOLUME - Button 13. Power Button (Side of Unit) 14. USB Jack (Side of Unit) (USB CABLE PART NO. 337-01000-E050*) 15. EXIT/CANCEL Button 16.
LOCATION OF CONTROLS (CONTINUED) REMOTE 7 1 8 2 9 3 10 4 11 5 12 6 13 1. MUTE Button 2. Navigation √/VOLUME - Button 3. Navigation π Button 4. Navigation † Button 5. MENU Button 6. EXIT Button 7. Remote Transmitter (Top of Unit) 8. TIME Button 9. Navigation ®/ VOLUME + Button 10. ENTER/PLAY Button 11. ROTATE Button 12. ZOOM IN Button 13. ZOOM OUT Button 14. Battery Compartment (Rear of Unit) REMOTE PART NO. 239-04421-E001* 14 *Consumer Replaceable Part (See page 21 to order.
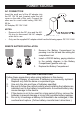
AC CONNECTION POWER SOURCE Insert the small end of the AC adapter into the DC 12V IN jack (located under the left cover on the side of this unit). Connect the other end to a wall outlet having 120V AC, 60 Hz. AC Adapter, DC 12V Z NOTES: • Remove both the DC plug and the ACIN plug to disconnect the AC adapter when not in use. To DC 5V IN Jack • Only use the supplied AC adapter which has the following specs: DC 12V Z REMOTE BATTERY INSTALLATION 1. 2. 3.
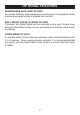
OPTIONAL FEATURES HEADPHONES JACK (SIDE OF UNIT) For private listening, plug headphones into this jack. The speakers will be disconnected when a plug is inserted into this jack. WALL MOUNT HOLES (2) (REAR OF UNIT) If desired, the digital frame can be mounted onto a wall. Simply hang using the Wall Mount holes, as you would hang an ordinary photo frame or painting. STAND (REAR OF UNIT) To use the stand, lift the stand up and then rotate counterclockwise until it is in position.
GETTING STARTED USING A MEMORY CARD You can access media files from an external memory card as described below. This unit accepts memory cards up to these sizes: SD up to 2GB, MMC up to 1GB, MS up to 1GB, xD up to 1GB and CF up to 2GB. 1 TO INSERT A MEMORY CARD: This unit can support SD (Secure Digital), MMC (MultiMedia Card), MS (Memory Stick), xD or CF (CompactFlash) memory cards.
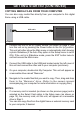
GETTING STARTED (CONTINUED) COPYING MEDIA FILES FROM YOUR COMPUTER You can also copy media files directly from your computer to this digital frame using a USB cable. USB cable USB jack Computer 1. Connect this unit to an AC power source, as shown on page 6, and turn this unit on by pressing the Power button to the On (in) position. This unit will either show the Main menu or automatically start showing a photo Slideshow (if the Auto Play option in the Setup menu is set to ON).
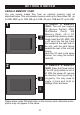
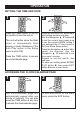
OPERATION SETTING THE TIME AND DATE 1 2 2 1 3 Press the Power button to the On (in) position to turn the unit on. Press the ENTER/PLAY button 1 to start setting the time and date. Use the Navigation π, † buttons 2 to set the current hour (make sure to set the correct AM/PM setting if you selected the 12 Hour mode in the Time Mode Setup option). Press the Navigation ® button 2 to select the minutes. Use the Navigation π, † buttons 2 to set the current minutes. Repeat to set the month, day and year.
OPERATION (Continued) BASIC PHOTO PLAYBACK (Supported format: JPEG) 1 2 1 2 3 Press the Power button to the On (in) position to turn the unit on. Select Photo using the Navigation √, ®, π, † buttons 1; then press the ENTER/PLAY button 2 to enter the Photo Thumbnail view. 1 This unit will either show 1 the Main menu or automatically start showing a photo Slideshow (if the Auto Play option in the Setup menu is set to ON).
OPERATION (Continued) ROTATE ZOOM 1 2 2 1 4 3 While viewing a photo (see the previous page), press the ZOOM IN button 1; the unit will zoom x2. Repeatedly press to zoom up to x13. Use the Navigation √,®,π,† buttons 2 to move the photo on the screen. Press the ZOOM OUT button 3 to zoom back out of the photo. To exit Zoom mode and return to normal photo playback, press the EXIT button 4. While viewing a photo (see the previous page), press the ROTATE button to rotate the photo 90 degrees clockwise.
OPERATION (Continued) PHOTO “FAVORITES” PLAYBACK 1 2 1 Press the EXIT button 1 to exit to the Main menu. Select Favorites using the Navigation √, ®, π, † buttons 2; then press the ENTER/PLAY button 3 to enter the Favorites menu. To change the favorite’s view (Single photo or Double photos) on the screen, select Play Mode using the Navigation π, † buttons 2. Then, press the Navigation √, ®, π, † buttons 2 to select between Single or Double; then press the OK button 3 again to confirm.
OPERATION (Continued) BASIC MUSIC PLAYBACK (Supported format: MP3) 1 2 1 2 3 Press the Power button to the On (in) position to turn the unit on. This unit will either show the Main 1 1 menu or automatically start showing a photo Slideshow (if the Auto Play option in the Setup menu is set to ON). If the unit is in Slideshow mode, press the EXIT button twice to exit and access the Main menu.
OPERATION (Continued) BASIC VIDEO PLAYBACK (Supported format: MOV) Video: Audio: 1 Compress type: MPEG-4 Video Dimensions: 352 x 288 CIF µ-Law 2:1 or A-Law 2:1 2 If the unit is in Slideshow mode, press the EXIT button twice to exit and access the Main menu. ADJUSTING THE VOLUME 2 2 To adjust the main volume: Press the Navigation √/VOLUME - 1 and/or Navigation ®/VOLUME + 2 button to increase and/or decrease the volume.
OPERATION (Continued) DELETING A FILE 1 2 1 2 3 Press the Power button to the On (in) position to turn the unit on. Select Folder using the Navigation √, ®, π, † buttons 1; then press the ENTER/PLAY button 2 to enter the Folder menu. 1 1 the Main This unit will either show menu or automatically start showing a photo Slideshow (if the Auto Play option in the Setup menu is set to ON). Select the desired file to delete using the Navigation π, † buttons 1.
OPERATION (Continued) COPYING A FILE 1 2 1 2 3 Press the Power button to the On (in) position to turn the unit on. Select Folder using the Navigation √, ®, π, † buttons 1; then press the ENTER/PLAY button 2 to enter the Folder menu. Select the desired file to copy using the Navigation π, † buttons 1. Then press the Navigation ® button 1; a pop-up menu will appear.
SETUP MENU OPERATION (Continued) The Setup menu lets you customize this digital frame by allowing you to select the source for your media files, set the effects between your photos, adjust the speed of the Slideshow and more! Use the following instructions to navigate and change the options which are described on the following page. 1. Press the Power button to the On (in) position to turn the unit on.
OPERATION (Continued) SETUP OPTIONS Select Card: Use this Setup option to select the source for your media files. Choose from Internal Flash, as well as any external media inserted (i.e. SD/MMC). Photo Mode: Use this Setup option to select the mode in which the photos will be displayed. Choose from Full (which will stretch the picture to fill the screen) or Normal (which will display the photo with its original proportions).
TROUBLESHOOTING GUIDE If you experience a problem with this unit, check the chart below before calling for service. SYMPTOM Main unit, no power. Remote, no power. No photos in frame. Computer does not recognize frame as a Removable Disk. CAUSE SOLUTION connected. as shown on page 6. inserted incorrectly. as shown on page 6.
SPECIFICATIONS GENERAL: Power Source ...........................AC Adapter, DC 12V Z Weight..........................................................................2 Lbs Dimensions .........................8.5" (H) x 11.9" (W) x 1.75" (D) Weight and dimensions are approximate. Resolution .............................................................800 x 480 Internal Memory ........................................................128MB Speaker ................................................................