USER’S GUIDE RF6000 Wireless Keyboard & Optical Mouse
IMPORTANT NOTICE! The information in this document is subject to change without notice and does not represent a commitment on the part of the vendor. No warranty of representation, either expressed or implied, is made with respect to the quality, accuracy or fitness for any particular purpose of this document.
TABLE OF CONTENTS PAGE 1. Introduction 1 2. System Requirements 2 3. Installing the Keyboard and Mouse Set 3 3.1 Getting the Receiver Ready 3 3.2 Getting the Keyboard Ready 4 3.3 Getting the Mouse Ready 4 4. Wireless ID Setting 6 4.1 Synchronizing the IDs of your Receiver, Keyboard and Mouse 4.2 Replacing Batteries and Resetting ID Buttons 5. Software Installation 6 7 8 5.1 Keyboard Driver Installation 8 5.2 Mouse Driver Installation 9 6. Using the Keyboard and Mouse 10 6.
1. Introduction Congratulations on your purchase of the Memorex® RF6000 Wireless Keyboard and Optical Mouse! This keyboard and mouse will finally free you from the constraints of your desktop by providing a wireless connection between your keyboard/mouse and your PC.
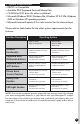
2. System Requirements • IBM PC or Compatible • Available PS/2 Keyboard Port and Mouse Port • CD-ROM or DVD drive (for driver installation) • Microsoft Windows 98 SE, Windows Me, Windows NT 4.0 SP6, Windows 2000 or Windows XP operating systems • Microsoft Internet Explorer 5.0 or later version (for the Internet keys) Please refer to table below for the other system requirements for the features: Function Description Operating System Windows 98SE / Windows NT 4.
3. Installing the Keyboard and Mouse Set This wireless keyboard and mouse combo consists of a receiver that plugs into the computer, a wireless keyboard, a wireless mouse, and a Mouseport™ charging station. 3.1 Getting the Receiver Ready Connect the receiver and select a wireless channel: 1. Make sure your PC is switched off. 2. Turn the receiver over and find the channel slide switch. Select either channel CH1 or CH2. Remember which channel you selected.
3.2 Getting the Keyboard Ready Install the two AA alkaline batteries (provided) into the keyboard and select a wireless channel: 1. Turn the keyboard over and find the battery compartment. Lift the cover. 2. Insert the include AA alkaline batteries into the compartment. Make sure the batteries are placed in the correct direction by following the polarity signs in the battery compartment. Battery AA 1.5V 2pcs (-) (+) ID Button Slide Switch Bottom View of Keyboard 3.
2. Use the slide switch, located inside the battery compartment of the mouse, to select the same channel as the one selected on the receiver and on the keyboard. Channel Slide Switch 3. Insert the included AAA rechargeable batteries into the compartment. Follow the polarity signs in the battery compartment and make sure the batteries are placed in the correct direction 4. Replace the battery compartment lid and place the mouse in the Mouseport™ charging station. 5.
4. Wireless ID Setting The mouse, keyboard and receiver each contain two channels, and each channel contains 256 IDs that are randomly selected when you press the ID button. This ID-recognition function helps protect against interference from other wireless devices in the same environment. After installing the hardware, inserting the batteries and charging the mouse batteries, you must set the IDs of the receiver, mouse and keyboard.
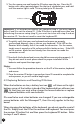
5. Turn the mouse over and locate the ID button near the top. Press the ID button with a blunt pointed object, like the tip of a ballpoint pen, and hold until the receiver light is solid. This may take up to 20 seconds. ID button of Mouse Important: If 30 seconds pass before you complete step 5, you must repeat steps 4 and 5 to set the mouse ID. If the ID button is pressed more than one time during the mouse setup (step 5), you must start over with step 4 and set the receiver ID.
5. Software Installation After finishing the hardware installation as described in this manual and starting up your PC, you should be able to immediately take advantage of the wireless benefits of the RF6000 keyboard and mouse. If the keyboard and mouse are not working properly, see section 7 "Troubleshooting" for tips on how to solve your problem. 5.
5.2 Mouse Driver Installation In order to take advantage of the special shortcut button functionality of the mouse you will need to install the mouse driver which is located on the driver CD included in the box. 1. Make sure the driver CD is in your computers CD-ROM drive. 2. Select "Installation Memorex RF6000 (for mouse driver)." 3. Follow the on-screen instructions to finish the installation procedure.
6. Using the Keyboard and Mouse 6.1 Using the Keyboard Besides the usual keyboard keys, the RF6000 keyboard also has extra dedicated keys which provide the following multimedia functionality: Important: In order to use these keys under Windows 98 SE or Windows NT 4.0 SP6, it is necessary to have the keyboard driver installed and is recommended for Windows Me, 2000 and XP as well. Please refer to section 5 for more information. Function Buttons .
Attaching the Wrist Rest At your discretion, you may choose to connect the wrist rest with the keyboard. To connect the wrist rest to the keyboard, follow the images below: 6.2 Using the Mouse After installing the mouse driver as described in section 5, you will be able to start using the Mouse Control Panel by right clicking on the Mouse icon in the Windows task bar. This icon should appear after restarting your computer. The optical mouse uses a light to sense movement.
2. Make sure the mouse plug is inserted in the mouse connector on your PC and the keyboard plug is inserted into the keyboard connector on your PC. Compare the icons on both the cable and backside of your PC if necessary. 3. Check to see if the batteries in the keyboard and mouse are installed correctly. Make sure the polarity of the batteries corresponds with the polarity signs in the battery compartment. 4.
Technical Support For more information on how to use the RF6000 Keyboard and Mouse, please visit the Memorex website at www.memorex.com/products and follow the links to the Keyboard product listings for additional product information and guides. If you need any additional help in connecting, synchronizing or installing the RF6000, please feel free to contact Memorex's technical support. Email techsupport@memorex.com with your questions, or visit us online at www.memorex.
FCC Guidelines: This equipment has been tested and found to comply with the limits for a Class B digital device, pursuant to Part 15 of the FCC Rules. These limits are designed to provide reasonable protection against harmful interference in a residential installation. This equipment generates, uses and can radiate radio frequency energy and, if not installed and used in accordance with the instructions may cause harmful interference to radio communications.
©2003 Memorex Products, Inc. • Santa Fe Springs, CA 90670 • www.memorex.com All other brand or product names are trademarks or registered trademarks of their respective owners.