USER’S GUIDE RF7000 VERSION 1.
IMPORTANT NOTICE! The information in this document is subject to change without notice and does not represent a commitment on the part of the vendor. No warranty of representation, either expressed or implied, is made with respect to the quality, accuracy or fitness for any particular purpose of this document.
TABLE OF CONTENTS 1. Introduction 1 What's in this package 1 2. System Requirements 1 3. Using the Keyboard and Mouse 2 3.1 Hardware Installation 2 3.2 Wireless ID Setting 4 3.3 Attaching the Wrist Rest 6 4. Software Installation 6 5. Uninstallation 7 6. Wireless EZ Touch Software 7 6.1 To Display the "KeyMaestro" Dialogue Box 7 6.2 To Display the "Configure Button" Dialogue Box 8 7.1 Using the Keyboard 9 7.1 Office Application Keys 9 7.2 Internet Keys 9 7.
1. Introduction Congratulations on your purchase of the Memorex® Wireless EZ Touch Keyboard and Mouse combo! This product includes a wireless, multimedia keyboard and an 800 dpi optical scroll mouse. Advanced radio frequency technology means reliable performance and optimum accuracy. Because the products operate on two channels and have 256 IDs per channel, there is virtually no interference. Additionally, the RF7000 creates a fast, efficient work environment for all your favorite functions and programs.
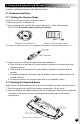
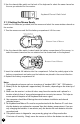
3. Using the Keyboard and Mouse This wireless keyboard and mouse combo consists of a receiver that plugs into the computer, a wireless keyboard, and a wireless mouse. 3.1 Hardware Installation 3.1.1 Getting the Receiver Ready Connect the receiver and select a wireless channel: 1. Make sure your PC is switched off. 2. Turn the receiver over and find the channel slide switch. Select either channel CH1 or CH2. Remember which channel you selected. Bottom View of Receiver Receiver Channel Slide Switch 3.
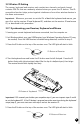
3. Use the channel slide switch on the back of the keyboard to select the same channel as the one you selected for the receiver. Keyboard Channel Slide Switch 3.1.3 Getting the Mouse Ready Install two AA batteries (provided) into the mouse and select the same wireless channel as the receiver. 1. Turn the mouse over and find the battery compartment. Lift the cover. Battery Compartment Bottom View of Mouse 2.
3.2 Wireless ID Setting The mouse, keyboard and receiver each contain two channels, and each channel contains 256 IDs that are randomly selected when you press the ID button. This IDrecognition function helps protect against interference from other wireless devices in the same environment. Important: Whenever you want to set the IDs of both the keyboard and mouse, you must first set the receiver ID and keyboard ID, and then set the receiver ID and mouse ID, as described in this procedure. 3.2.
6. Turn the mouse over and locate the ID button on the left side of the mouse near the battery compartment. Press the ID button firmly with a blunt pointed object (like the tip of a ballpoint pen), then let go. The receiver should blink rapidly then stop. ID Button Synch Button ID Button of Mouse Important: If 30 seconds pass before you complete step 6, you must repeat steps 5 and 6 to set the mouse ID.
3.3 Attaching the Wrist Rest At your discretion, you may choose to connect the wrist rest with the keyboard. To connect the wrist rest to the keyboard, follow the images below: Figure 1 Figure 2 4. Software Installation After completing the hardware installation and turning the PC power on, you will have immediate access to the alpha-numeric keys of the keyboard. In order to utilize the specialty keys you must first install the keyboard driver software using the included driver CD.
5. Uninstallation Please note when reinstalling the driver software you have to uninstall them first. To uninstall the keyboard driver software: Step 1: Right-click the driver icon Step Step Step Step Step Step 2: 3: 4: 5: 6: 7: and select "Exit" command to exit the driver program. Click "Start" menu (on the left-bottom taskbar). Move cursor to "Programs" in "Start" menu. Move cursor to "KeyMaestro". Select "Uninstallation". Click on the "Remove Program" icon.
6.1.2 Enable Display Label This command displays or hides the OSD (On Screen Display). When the OSD is enabled, each time you press any one of the multimedia buttons, its function name (button label) will show on the right-bottom corner on the screen. This function is enabled by default. 6.1.3 Enable Taskbar Icon This command displays or hides the taskbar software icon.
7. Using the Keyboard 7.1 OFFICE APPLICATION KEYS W W W Word Opens Microsoft Word Excel Opens Microsoft Excel PowerPoint Opens Microsoft PowerPoint Calendar Opens “Calendar” function of Microsoft Outlook 7.2 INTERNET KEYS W Back Returns to the last page you viewed. Forward Returns to the page you viewed before W W selecting the back button. Stop If a page you are trying to view is taking too long to open, click this button to stop.
7.3 APPLICATION KEYS W W Log Off My Computer Opens “My Computer”. Calculator Starts Microsoft Calculator. Log Off Opens log off windows dialog box. Sleep Places the computer in Sleep Mode. This function is available only on certain computers. Power Turns the computer off W Note: For Power Management functions, please see your computer's manual for assistance. Or see "Troubleshooting" on page 15 for more information. 7.4 MULTIMEDIA KEYS Mute Mutes the sound. Volume Up Adjusts volume up.
W 7.5 Enhanced Function Keys Enhanced function keys consist of 12 keys and functions. There are two ways these functions may work: 1. As a part of the main keyboard: F1 – F12. 2. As 12 embedded office keys and functions. ENHANCED FUNCTION KEYS ARE AS FOLLOWS : Office Wizard A toggle key for the Enhanced Office Keys. When the Office Wizard LED is on, the Enhanced Office function keys are activated. F1: Help Opens the Help file for the active window.
7.6 PROGRAMMABLE SCROLL WHEEL Scroll Wheel 1. Works as a mouse with scrolling functions in 2 directions - up and down. You can use the up and down functions of the Scroll Wheel to scroll the document vertically. 2. Works as a mouse button. When you push on the scroll wheel, a series dialogue functions will pop-up as shown below. Their functions are divided into 3 parts: 1.
8. Using the Mouse 8.1 Using the Mouse Driver After installing the mouse driver as described in section 4 you will be able to start up the Mouse Control Panel by left double-clicking on the KeyMaestro Mouse icon in the Windows task bar. This should appear after restarting your machine. You can also invoke the Mouse Control Panel by choosing Start?Programs?MMaestro?KeyMaestro Mouse Driver.
Window Zoom To magnify or de-magnify the view of a document in an application that supports it (this function works when the application you used is with the ctrl + wheel scrolling function, ie, Word, Excel, PowerPoint and FrontPage ...). Switch AP Switch quickly from one opened application to another application without an extra cursor move. Press the "Switch AP" button you set and scroll the wheel button to switch the applications.
Minimize All Windows Allows you to minimize all the current opened applications immediately (this function is only performed when the applications are with the minimize function). Recall the Last Active Window Recalls the last active window. Exit Exit the quick jump function panel. Clicking once more on the scroll wheel will close these icons. Note: For more detailed information please read the online help by right clicking on the KeyMaestro Mouse icon in the Windows task bar and select Help. 9.
6. Windows Media Player cannot play VCD titles or MPEG files: Make sure you have installed Windows Media Player version 7 or later properly. If not, please download the latest version of Windows Media Player (version 7 or higher required) from the Microsoft website. 7. Word, Excel, PowerPoint, or Calendar actions will not work, but the onscreen display shows up: Make sure you have installed the Microsoft Office Applications completely.
Technical Support: If the above instructions do not solve your problem, please contact Memorex technical support at 877-Is it live (toll free), or visit us online at www.memorex.com for our Frequently Asked Questions (FAQ). Memorex Products One Year Limited Warranty: Memorex Products, Inc. ("Memorex") warrants this product, excluding connected equipment, against defects in materials and workmanship for one year from the date of original purchase.
FCC Guidelines: This equipment has been tested and found to comply with the limits for a Class B digital device, pursuant to Part 15 of the FCC Rules. These limits are designed to provide reasonable protection against harmful interference in a residential installation. This equipment generates, uses and can radiate radio frequency energy and, if not installed and used in accordance with the instructions may cause harmful interference to radio communications.
©2003 Memorex Products, Inc. • Santa Fe Springs, CA 90670 • www.memorex.com All other brand or product names are trademarks or registered trademarks of their respective owners.