Rev. 2.0C Thank you for purchasing the Memorex® TravelDrive™ USB 2.0. This user's guide will help you get the maximum use and enjoyment from your new TravelDrive. I. Description The Memorex® TravelDrive™ is a portable storage device utilizing a plug-and-play USB (Universal Serial Bus) interface that allows it to function as if it were an external hard drive. Based on USB 2.0 standards, the TravelDrive™ is useable in either an available USB 1.1 or 2.0 port.
II. System Compatibility: The Memorex® TravelDrive™ can be used with any computer that has either a USB 2.0 or 1.1 port. The TravelDrive™ has the following minimum system requirements: • • • • • • + Pentium PC or Apple Macintosh Computer with USB Support PC - Windows® 98SE*(Second Edition) or later - Windows® Me / 2000 / XP Linux 2.4.x (Please see Memorex website under FAQ's for Mounting on Linux) Mac OS 8.6 or above Available USB 2.0 (for High Speed) or USB 1.
V. Getting Started: Check your Operating System (OS): • For Windows® Me, Windows® 2000 & Windows® XP There is no need to install any software or drivers! Go straight to section VII. Using Your TravelDrive™ below and follow the instructions to begin using your TravelDrive™. • For Windows® 98SE You will need to install a driver for the computer to recognize the TravelDrive™. See section VI. Windows® 98SE Driver Installation below. • For Windows® NT NT does not support USB.
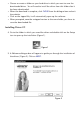
• Choose or create a folder on your hard drive in which you want to save the downloaded driver. You will need to install the driver from this folder after it has been downloaded. • When the download is complete, click CLOSE from the dialogue box and exit the website. • Click on the zipped file; it will automatically open up the software. • When prompted, save the unzipped version to the same folder you chose to save the downloaded file. Installing Driver 2C 4.
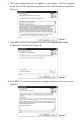
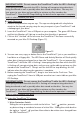
6. The License Agreement will now appear on your display. Click Yes to agree to the terms of the agreement and continue the software driver installation (Figure 3). Figure 3 7. Click NEXT to install the Software Driver in the recommended folder C:\Memorex\TravelDrive2C (Figure 4). Figure 4 8. Click NEXT to confirm and to begin installing the drivers onto your system (Figure 5).
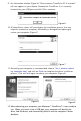
9. An information window (Figure 6) "Please remove TravelDrive 2C if inserted" will now appear on your display. Remove the TravelDrive if it is currently inserted into your USB port and click OK to continue. Figure 6 10. A Setup Status screen will now display the installation process, this may require a moment to complete, followed by a dialogue box requiring to restart your computer (Figure 7). Figure 7 11.
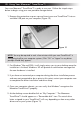
VII. Using Your Memorex ® TravelDrive™: Your new Memorex® TravelDrive™ is ready to use now. Follow the simple steps below to begin using your new portable storage device: 1. Remove the protective snap-on cap and insert your new TravelDrive™ into an available USB port on your computer (Figure 10). Figure 10 NOTE: You may be required to wait a few minutes while your new TravelDrive™ is configuring itself to your computer system. (Click “OK” or “Agree” to any driver prompts should they appear). 2.
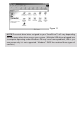
Figure 11 NOTE:The actual drive letter assigned to your TravelDrive™ will vary depending on how many other drives are on your system. (Multiple USB drives plugged into a computer operating under Windows® 98 may cause some problems, that is just one reason why it is not supported. Windows® 98 SE has resolved these types of conflicts.
VIII. Standard Operation: Write Protection Switch Protective Snap-on Cap LED Power and Activity Monitor A) Microsoft Windows® 1. Remove the protective snap-on cap. The cap was designed with a keyhole to attach to the lanyard carrying strap for easy transport of your TravelDrive™ and safekeeping of your drive. 2. Insert the TravelDrive™ into a USB port on your computer. The green LED Power and Activity Monitor will light up to confirm that the drive is powered. 3.
IMPORTANT NOTE: Do not remove the TravelDrive™ while the LED is flashing! Interrupting the data flow while the LED is flashing will corrupt existing data that is being transferred as well as possibly other data stored on the drive. You may also lose access to your drive and your ability to retrieve any files stored on the TravelDrive™. Once the LED Stops blinking, the data transfer operation is complete; and it is safe to remove your drive. B) Apple Macintosh 1. Remove the protective snap-on cap.
2. LED Power and Activity Monitor When the green LED is lighted, the TravelDrive™ is powered and recognized by your computer. When the LED is flashing, that means that data are being transferred to or from your drive. Always wait until the LED stops flashing before removing the TravelDrive™! Removing the drive while the LED is flashing risks corrupting the data files and losing access to any other files on the drive. 3.
3. My TravelDrive™ will not let me transfer files from my Mac to my PC or vice versa. The Mac is able to use storage devices formatted with the FAT (File Allocation Table) file system. This works great with Mac Operating Systems OS 8.6 through 9.21, the FAT file system is compatible with PCs. Mac OS 9.22 to 10.3 or higher treats storage devices using the FAT file system differently, this may cause re-indexing of FAT and FAT 32 files.
7. I accidentally took out the TravelDrive™ while the activity light was flashing. Now it doesn't work. Can it be repaired? Your TravelDrive™ should still function normally; however, there is a strong likelihood that the file you were transferring may have become corrupted. If that is the case, recovery software may be able to retrieve some critical files. In order to get your TravelDrive™ working again, you may have to reformat the drive.
PC a. Close all open applications including anti-virus software that may interrupt the format process and verify that your TravelDrive™ Write-Protect switch is set to the Unlock position.. b. Double-click on the "My Computer" icon on the desktop. c. Right click on the "Removable Disk" icon with the drive letter assigned to your TravelDrive™. d. Select "Format" from the drop-down menu that appears. e.
NOTE: Once you have changed the format of the TravelDrive™ from FAT or FAT32 to another format, it may not be able to be used on a PC. It will become a Mac-only device. Using the "DOS" selection (if available) will allow PC compatibility. Technical XII. Troubleshooting: Technical Support: Support: To receive technical support for your Memorex® TravelDrive™, please visit our website at www.memorex.com or call 1-877-Is It Live... Or 1-877-474-8548.