
Instructions / Assembly


4
4
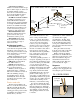
Fig. 5:
POSTHOLE
OPTIONS
4 x
4 post
Metal post
Concrete
18
"
3'
Compacted
gravel
Once the holes are dug and all
loose dirt is removed, make a drain
bed at the bottom of each hole by
shoveling in about 6 inches of
gravel. Working carefully, set the
posts, making sure that each one is
plumb and kept from moving with
braces staked to the ground (Fig. 6).
To make sure all the posts are in
alignment, reattach the twine to the
batter boards and move the tie
points so that the twine runs along
the outside of the posts.
You will also want to adjust posts
for height at this time by anchoring
a string on top of one post, drawing
Fig. 6: SET POSTS
Level
Brace
Post
String
step, a post-hole digger is often all
you need, but if there are many holes
to dig, you may want to consider
one-man or two-man power augers.
Augur-type diggers are good for
rock-free earth, but if you’re likely to
encounter large stones, a clamshell
type is better (Fig. 4). A digging
bar is also useful for prying rocks
and other hard-to-move debris from
the hole.
In most cases, your posts will be
4x4’s or 6x6’s, depending on fence
style. Posts can be set directly into
the concrete or attached with metal
post anchors. Posthole diameter
should be at least 3 times the width
of the post. Post depth should be
1/3 the above-ground height plus an
additional 6 inches for the rock or
gravel bed (Fig. 5). If you experi-
ence frost where you live, dig post-
holes down to a foot below the nor-
mal frost line to minimize damage
from ground shift due to alternate
freezing and thawing of soil.
Fig. 7: RAIL
ATTACHMENTS
it taught and anchoring it to the top
of the next. Then, running a level
along the string, move the second
post until it’s in alignment.
When pouring concrete post
footings, make the concrete thick
enough so that you can solidly pack it
into the hole. Ready-mixed concrete
is preferable for most applications;
however, if you elect to mix your
own, use a mixture of 2 parts
cement, 3 parts sand and 5 parts
gravel. Allow the concrete to set for
at least 2 days before you begin
attaching the rails.
Add rails
Once the posts are set, the
hardest part is over, and it’s time to
start giving form to your fence by
adding the rails. Start by marking
and cutting the top rails so that they
will span from one post to the next
of each 6 or 8 foot bay, then nail
them in place. Once the top of the
frame is tied together, go back and
mark and cut the bottom rails and
nail them into place.
There are a number of different
ways to join the rails to the posts
(Fig. 7). Top rails can be mitered,
butted, or notched and bolted, while
bottom rails can be toe nailed, fas-
tened with a block or metal brace,
or inset into the post by cutting a
dado or a notch.
Attach
fence boards
This is easily the most satisfying
part of the project, because it’s here
that your fence takes on its final
form. The process is also more fun
because your most exacting tasks
are done. All you need to do is to
work out your basic procedure and
repeat it until the fence is complete.
Time will fly by as you fall into a
rhythm of working.
Though there are many different
fence styles, they tend to fall into
two general categories: nail-on and
inset. Neither installation is difficult;
however, nail-on is a bit easier and
T
op
rails
Bottom
rails
Mitered Butted
Block
Toe-nail
On-edge
Notched
Metal
Dado
faster, while inset requires some-
what more attention and care in
construction and more framing
and materials.
Nail-on fencing styles
Nail-on fence styles (Fig. 8) are
easier to build because they require
fewer steps. Also, you don’t need to
precut the boards to length unless,
of course, you choose to do so. You