
Instructions / Assembly


3
3
Construction Common is
similar to Construction Heart except
that it contains sapwood, which can
be visually dramatic on large
fences. It is recommended for most
above-ground applications such as
fence boards, trellises or gates.
Deck Heart and Deck Common
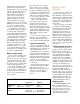
Fig. 3:
STRING LAYOUT AND TEST FOR RIGHT ANGLES
Corner
post
location
6'-8'
String
layout
marks second
fence
line
are similar in appearance to Con-
struction Heart and Construction
Common but are graded specifically
for strength. Deck Heart and Deck
String
layout marks
fence
line
6
90° 8
Common are available in 2x4 and
2x6 dimensions. In addition to use
as fence boards, these grades are
excellent for deck rails and caps.
Merchantable Heart allows
larger knots and knotholes and is
18"
Batter
board
Post
locations
6-8-10 test
for
right angle
good for fence boards, posts
and rails in low fence projects.
Merchantable allows larger
knots and knotholes and can be
cut economically for rough or
rustic fence boards.
Architectural grades
Clear All Heart has no knots
on the best face and permits small
tight knots on the reverse face of
occasional pieces. Because it resists
decay and termites, you can use it
on or near the ground.
Clear, essentially knot-free, is use-
ful for fine architectural fence panel
designs away from ground contact.
B Heart allows limited knots
and is 100% heartwood.
B Grade has limited knots,
contains sapwood and is used for
above-ground applications.
Whether you choose garden or
architectural grades, you’ll find
that a fence constructed of redwood
will resist shrinking, warping
and checking and not only age
beautifully but often look better
ten, fifteen and even twenty years
after construction.
Posts and rails
The first step in building your
fence is to locate the exact course it
will take and mark the line with
stakes and string. This is the most
exacting part of the project, because
it establishes the foundation and
framework for your fence.
To plot a straight line for your
fence, mark the location for each
end or corner post with a batter
board—-two solidly driven stakes
18 inches apart and connected by a
1x3. Use the center of the batter
board as your point of alignment
and drive a nail or cut a notch. Tie a
piece of mason’s twine or string to
the nail of one batter board, draw it
taut, and tie it to the nail on the
other. If the fence line is particularly
long, you’ll want to support the
twine with stakes whenever the
twine begins to sag.
Posts are generally spaced 6 to 8
feet apart, depending on the style of
fence. Measure and mark the center
locations of all the posts with chalk
or a pen. Corner posts will be
located directly under the crossing
stringlines at the batter boards. Take
the string of your plumb line, line
it up directly with the first chalk
mark. Mark where the point of the
plumb bob falls, using a spot of
spray paint or a stake stuck into the
ground. Paper nailed into the ground
can also serve as a marker. Once the
center marks for all the posts are
indicated, you can untie the string.
If your fence includes 90° right
angles, they can be accurately deter-
mined by using the 6-8-10 triangle
measuring technique shown in Fig. 3.
Any multiple of 3-4-5 will work,
although larger numbers are easier
to measure.
Establish the first fence line as
explained above. Then establish the
second fence line roughly
perpendicular to the first, using
another batter board. Measuring
from the stake that will form the
corner, place a chalk mark 6 feet
away along the twine that forms the
first fence line.
Next, put a mark 8 feet away
from the corner stake on the twine
forming the second fence line.
Finally, measure the distance
between the two chalk marks and
adjust the second fence line on the
batter board until the diagonal
measurement between the two
marks equals 10 feet. This gives
you an accurate 90° angle.
Set posts
Now comes the hardest part of
building a fence: digging the holes
and setting the posts. For the first
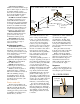
FIG. 4:
POSTHOLE DIGGER
Clamshell
type digger