
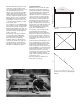
Instructions / Assembly


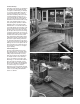


Stairs
If the deck is over a foot off the ground,
you’ll need to build stairs. Stairs require
precision carpentry and quality materials.
Decay resistance is important, so an all-
heartwood grade should be used.
Stairs are made with treads and stringers,
sometimes called risers. The treads are
the stepping surface and are supported
by the stringers. Stair treads should be a
minimum of 11 inches deep and between
6 and 7 inches apart. For wide stairs,
notched stringers placed 24 inches apart
provide proper support. If only two steps
are planned, a 2 x12 can be laid on edge
or notched as a stringer. If more steps
are needed, a sloping stringer should be
used. According to most building codes,
notched stringers must have a minimum
of 3
1
⁄
2
inches of width below the notch.
As an alternative, stair treads can be
set inside a pair of stringers, so that the
stringers enclose them on both sides.
This is referred to as “boxed stringers.”
The tread can then be supported by
cleats nailed to the stringers or by a
separate notched stringer. Stringers
should be 24 inches on center to provide
proper support for the treads.
At the top, anchor the stringers to the
deck framing. At the bottom, anchor them
to the deck at the lower level or rest them
on a concrete pad or footings.
Railings
Although the railings are often the last
of the finishing touches, they need to
be planned in advance. Consult local
building codes for railing requirements.
Railings are necessary for any deck
over 1
1
⁄2 feet off the ground. In many
areas a railing is required by law. For the
most part, form should follow function.
Remember to design a railing that
doesn’t encourage sitting unless it is
intended for that purpose. Railings
should be sturdy barriers erected at the
deck’s edge without completely obscur-
ing the view.
Railing supports should be securely
fastened to the framing of the deck. Toe-
nailing to the surface of the deck is not
adequate. Railing supports should be
bolted to joists or beams, or they may be
an extension of the post.
Vertical grain redwood is suggested for
the cap of a deck rail because it best
resists weathering and splintering.
Benches
Benches aren’t hard to build if a few
basic rules are kept in mind. The best
height is between 15 and 18 inches.
Cushions change the measurement, so
keep a ruler handy. Garden grades are
economical and work well for benches.
Here are plans for two different types of
benches. The first is built-in and is an
extension of the deck railing. The second
is a simple movable bench which can be
built in a matter of minutes.
Bench #1 This built-in bench is part of
the railing. The length of the back and
seat boards can vary according to your
plan. The seat supports shown in the
cross section below should be repeated
every two feet. Many variations are possi-
ble since railings double as bench backs.
The seat slats are 1x 2 boards set on
edge and spaced
1
⁄2 inch apart. Bench
supports extend from the railings’ 2x6
posts which are, in turn, bolted to deck
joists and beams. The horizontal bench
supports are pairs of 4-foot 2 x 4’s
between which posts and legs are sand-
wiched. Each leg is attached to the deck-
ing with a metal angle bracket. Be sure
the railing is strong enough to support
the bench and the weight of people
leaning against the back of the bench.
Bench #2 This simple bench takes
three saw cuts and a short time to build.
It is made from an 8-foot 2 x 12 and is
braced with a 2x 4. Cut two 14-inch
pieces from the plank’s ends for legs,
leaving a seating area 68 inches long.
Center the 2x 4 brace between legs and
attach with 16-penny nails. Attach legs to
the top by toenailing from below. If unsea-
soned lumber is used, assemble brace
and top with deck screws.
Bench #1
Bench #2
2 ✕ 4
2
✕ 6
1
✕ 2s With
1
/2'' Spaces
2
✕ 4
2 ✕ 4 Decking
2
✕ 6 Joist
Metal
Angle
16''
20
5
/8''
2 ✕ 4 ✕ 48
2
✕ 12
14''
8''
68''
12'' Min.
4
1
⁄2''