
User's Guide


Quantum 2200 Installation Guide v2.1
Page 33
Step 1:
Use wire strippers to remove about 1/4 inch of insulation from each wire and approximately
1” of outer cable insulation. It is important that each wire be the same length, with equal
lengths of stripped wire.
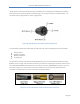
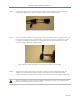
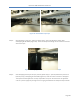
Step 2:
Slide the circular socket connector over the power cable as shown in Figure 20.
Figure 20: Slide connector onto cable before crimping.
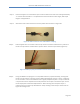
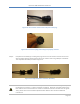
Step 3:
Place stripped wire into circular socket crimp contact such that insulated wire is present at
the first crimp location and bare wire is present at the second crimp location (Figure 21).
Figure 21: Wire properly inserted into circular socket crimp contact
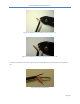
Step 4:
Using the Waldom crimping tool in crimp head location B, squeeze carefully, assuring that
the first crimp location is forming properly before wielding full pressure. Give it a slight tug
to ensure that it is secure and that the wire is tightly crimped into place. The pin connector
crimp locations are U-shaped and must be placed in the crimper such that the open end of
the U-shape points toward the A/B locations. When forming the U-shaped crimp it is
important to ensure the crimp folds back on itself, creating a heart-shape. Please refer to
Figure 22 and Figure 23.