1MCoen 4/13/99 2:29 PM Page 2 Contents Before driving Introduction 2 Instrumentation 4 Controls and features 20 Seating and safety restraints 72 Starting and driving Starting 104 Driving 112 Roadside emergencies 137 Servicing Maintenance and care 158 Capacities and specifications 217 Customer assistance 223 Reporting safety defects (U.S.
11MIten 4/13/99 2:08 PM Page 2 Introduction ICONS Indicates a warning. Read the following section on Warnings for a full explanation. Indicates that vehicle information related to recycling and other environmental concerns will follow. We must all play our part in protecting the environment. Correct vehicle usage and the authorized disposal of waste cleaning and lubrication materials are significant steps toward this aim.
11MIten 4/13/99 2:08 PM Page 3 Introduction If possible, you should avoid hard braking for the first 1 600 km (1 000 miles). From 1 600 km (1 000 miles) onwards, you can gradually increase the performance of your vehicle up to the permitted maximum speeds. INFORMATION ABOUT THIS GUIDE The information found in this guide was in effect at the time of printing. Ford may change the contents without notice and without incurring obligation.
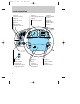
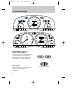
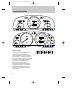
12MInen 4/13/99 2:10 PM Page 4 Instrumentation Page 22 Traction control* Page 55 Turn signal/high beam Page 23 Power mirrors* Page 6 Instrument cluster Page 54 Hazard flasher control Page 56 Windshield wiper/washer control Page 22 Rear window defroster control* 3 4 5 6 2 7 1 C H 8 0 x 1000 TRACTION CONTROL O/D OFF 55 60 70 80 50 100 120 90 40 60 800 0 0 1 2 3140 160100 30 40 180 110 20 20 0 0 0 0 200 120 10 130 BRAKE E CHECK ENGINE On MI F MPH Res RRORS Set Acc Off 4 Coast P
12MInen 4/13/99 2:10 PM Page 5 Instrumentation Page 23 Instrument panel dimmer switch On various models the appearance and location of some items may differ from those shown here. However, the page references given still apply.
12MInen 4/13/99 2:10 PM Page 6 Instrumentation C 55 60 70 80 50 100 120 90 40 60 800 0 0 1 2 3140 160100 30 40 180 110 20 20 0 0 0 0 200 120 10 130 H BRAKE E F MPH O/D OFF TRACTION CONTROL 3 CHECK ENGINE 4 5 6 2 7 1 C H 8 0 x 1000 TRACTION CONTROL O/D OFF 55 60 70 80 50 100 120 90 40 60 800 0 0 1 2 3140 160100 30 40 180 110 20 20 0 0 0 0 200 120 10 130 BRAKE E MPH CHECK ENGINE INSTRUMENT CLUSTER LIGHTS AND CHIMES There are two different instrument cluster designs.
12MInen 4/13/99 2:10 PM Page 7 Instrumentation Charging system Briefly illuminates when the ignition is turned on and the engine is off. The light also illuminates when the battery is not charging properly and the vehicle may require electrical system service. Safety belt Illuminates when the ignition is switched on as a reminder to fasten the safety belts. For more information, refer to Safety belt indicator light and warning chime in the Seating and safety restraints chapter.
12MInen 4/13/99 2:10 PM Page 8 Instrumentation C 55 60 70 80 50 100 120 90 40 60 800 0 0 1 2 3140 160100 30 40 180 110 20 20 0 0 0 0 200 120 10 130 H BRAKE E F MPH O/D OFF TRACTION CONTROL 3 CHECK ENGINE 4 5 6 2 7 1 C H 8 0 x 1000 TRACTION CONTROL O/D OFF Traction control system light (if equipped) This light comes on when the traction control system has been disengaged. It may flash on and off while driving to indicate the system is operating.
12MInen 4/13/99 2:11 PM Page 9 Instrumentation If the light stays on for more than three (3) seconds after the ignition is turned to the ON position or stays on continuously while you are driving, have the traction control system checked by a qualified technician as soon as possible. For more information, refer to Traction Control in the Driving chapter. Low coolant (if equipped) Briefly illuminates when the ignition is turned on and the engine is off. Illuminates when the engine coolant level is low.
12MInen 4/13/99 2:11 PM Page 10 Instrumentation C 55 60 70 80 50 100 120 90 40 60 800 0 0 1 2 3140 160100 30 40 180 110 20 20 0 0 0 0 200 120 10 130 H BRAKE E F MPH O/D OFF TRACTION CONTROL 3 CHECK ENGINE 4 5 6 2 7 1 C H 8 0 x 1000 TRACTION TRACTION CONTROL CONTROL MPH O/D OFF Check engine Your vehicle is equipped with a computer that monitors the engine’s emission control system. This system is commonly known as the On Board Diagnostics (OBD II) system.
12MInen 4/13/99 2:11 PM Page 11 Instrumentation The check engine indicator light illuminates when the ignition is first turned to the ON position to check the bulb. If it comes on after the engine is started, one of the engine’s emission control systems may be malfunctioning. The light may illuminate without a driveability concern being noted. The vehicle will usually be drivable and will not require towing.
MInen 4/13/99 2:11 PM Page 12 Instrumentation These temporary malfunctions can be corrected by filling the fuel tank with good quality fuel and/or properly tightening the fuel cap. After three drive cycles without these or any other temporary malfunctions present, the check engine light should turn off. (A driving cycle consists of a cold engine startup followed by mixed city/highway driving.) No additional vehicle service is required.
12MInen 4/13/99 2:11 PM Page 13 Instrumentation Low fuel Illuminates when the fuel tank has approximately eight liters (two gallons) remaining. The lamp will also illuminate when the ignition key is turned to ON and the engine is off. CHECK ENGINE Air bag readiness Briefly illuminates when the ignition is turned on. If the light fails to illuminate, continues to flash, or remains on, have the system serviced immediately.
12MInen 4/13/99 2:11 PM Page 14 Instrumentation C 55 60 70 80 50 100 120 90 40 60 800 0 0 1 2 3140 160100 30 40 180 110 20 20 0 0 0 0 200 120 10 130 H BRAKE E F MPH O/D OFF TRACTION CONTROL 3 CHECK ENGINE 4 5 6 2 7 1 C H 8 0 x 1000 TRACTION CONTROL 55 60 70 80 50 100 120 90 40 60 800 0 0 1 2 3140 160100 30 40 180 110 20 20 0 0 0 0 200 120 10 130 E MPH O/D OFF Brake system warning Extinguishes when the parking brake is released.
12MInen 4/13/99 2:11 PM Page 15 Instrumentation Have the system checked by your dealer or qualified technician before continuing your journey. Anti-lock brake system (ABS) (if equipped) Momentarily illuminates when the ignition is turned on and the engine is off. If the light stays on or continues to flash, the ABS needs to be serviced.
12MInen 4/13/99 2:11 PM Page 16 Instrumentation C 55 60 70 80 50 100 120 90 40 60 800 0 0 1 2 3140 160100 30 40 180 110 20 20 0 0 0 0 200 120 10 130 H BRAKE E F MPH O/D OFF TRACTION CONTROL 3 CHECK ENGINE 4 5 6 2 7 1 C H 8 0 x 1000 TRACTION CONTROL BRAKE E MPH O/D OFF Engine oil pressure Illuminates when the ignition is turned on and the engine is off. The light also illuminates when engine oil pressure has been lost.
12MInen 4/13/99 2:11 PM Page 17 Instrumentation Testing the warning and indicator lights and chimes Turn the ignition key to the on position without starting the engine. The following warning and indicator lights will illuminate briefly: charging system, safety belt (does not illuminate, if the driver’s safety belt is fastened), traction control, ABS, brake, low coolant, low fuel, engine oil pressure, check engine and air bag readiness.
12MInen 4/13/99 2:11 PM Page 18 Instrumentation C 55 60 70 80 50 100 120 90 40 60 800 0 0 1 2 3140 160100 30 40 180 110 20 20 0 0 0 0 200 120 10 130 H BRAKE E F MPH O/D OFF TRACTION TRACTION CONTROL CONTROL 3 CHECK ENGINE 4 5 6 2 7 1 C H 8 0 x 1000 TRACTION CONTROL 55 60 70 80 50 100 120 90 40 60 800 0 0 1 2 3140 160100 30 40 180 110 20 20 0 0 0 0 200 120 10 130 MPH O/D OFF CHECK ENGINE INSTRUMENT CLUSTER GAUGES Engine coolant temperature gauge Indicates the temperature of the eng
12MInen 4/13/99 2:11 PM Page 19 Instrumentation Tachometer Indicates the engine speed in revolutions per minute (rpm). 3 4 5 6 2 7 1 8 0 x 1000 Speedometer Indicates the current vehicle speed. Odometer Registers the total mileage of the vehicle. Trip odometer The trip odometer can register the mileage of individual journeys. To reset, depress the button. Fuel gauge The fuel gauge displays the approximate level of usable fuel left in the fuel reservoir.
13MCten 4/13/99 3:35 PM Page 20 Controls and features 3 4 5 6 2 7 1 C H 8 0 55 60 70 80 50 100 120 90 40 60 800 0 0 1 2 3140 160100 30 40 180 110 20 20 0 0 0 0 200 120 10 130 x 1000 TRACTION CONTROL O/D OFF BRAKE E F MPH CHECK ENGINE LO OFF PANEL A/C HI MI PNL/FLR FLOOR FLR/ DEF MAX A/C DEF RRORS SIDE POWER AUDIO VOLUME INSTRUMENT PANEL CONTROLS Headlamp control Lamps off.
13MCten 4/13/99 3:35 PM Page 21 Controls and features Foglamp control (if equipped) Pull out the control while the headlamps are on to turn the foglamps on. Push the control in to deactivate the foglamps. Daytime running light (DRL) (Canadian vehicles only) The DRL system turns on the highbeam headlamps, with a reduced light output, when: • the vehicle is running and the ignition is in the on position and • the headlamp system is in the off position.
13MCten 4/13/99 3:35 PM Page 22 Controls and features 3 4 5 6 2 7 1 C H 8 0 55 60 70 80 50 100 120 90 40 60 800 0 0 1 2 3140 160100 30 40 180 110 20 20 0 0 0 0 200 120 10 130 x 1000 TRACTION TRACTION TROL CONTROL O/D OFF E F MPH CHECK ENGINE LO OFF PANEL A/C HI MI PNL/FLR FLOOR FLR/ DEF MAX A/C DEF RRORS SIDE POWER AUDIO VOLUME Rear window defroster (if equipped) Press the defroster control to clear the rear window of thin ice and fog.
13MCten 4/13/99 3:35 PM Page 23 Controls and features Panel dimmer control Adjust the control to vary the intensity of the panel lighting. Operates only when the exterior lights are switched on. To switch on the interior lamp, rotate the control completely to the left. Power mirrors The control can be swivelled and turned. Turn the control counterclockwise to adjust the driver’s side mirror, clockwise to adjust the passenger’s side mirror.
13MCten 4/13/99 3:35 PM Page 24 Controls and features 3 4 5 6 2 7 1 C H 8 0 x 1000 TRACTION ROL CONTROL O/D OFF 55 60 70 80 50 100 120 90 40 60 800 0 0 1 2 3140 160100 30 40 180 110 20 20 0 0 0 0 200 120 10 130 E F MPH CHECK ENGINE LO OFF PANEL A/C HI MI PNL/FLR FLOOR FLR/ DEF MAX A/C DEF RRORS SIDE POWER AUDIO VOLUME Climate control system Your vehicle has one of the following climate control systems: • Manual heating system • Manual heating and air conditioning system In some
13MCten 4/13/99 3:35 PM Page 25 Controls and features Heater only system (if equipped) LO OFF PANEL PNL/FLR FLOOR FLR/ DEF HI DEF Fan speed control Controls the volume of air circulated in the vehicle. LO HI Temperature control knob Controls the temperature of the airflow inside the vehicle. On heater-only systems, the air cannot be cooled below the outside temperature. Mode selector control Controls the direction of the airflow to the inside of the vehicle.
13MCten 4/13/99 3:35 PM Page 26 Controls and features • FLR/DEF – Distributes outside air through the floor ducts and the windshield defroster ducts. • DEF – Distributes outside air through the windshield defroster ducts. It can be used to clear ice or fog from the windshield. Operating tips • In humid weather, select DEF before driving. This will help to prevent your windshield from fogging. After a few minutes, select any desired position.
13MCten 4/13/99 3:35 PM Page 27 Controls and features Manual heating and air conditioning system (if equipped) LO OFF PANEL A/C HI PNL/FLR FLOOR FLR/ DEF MAX A/C Fan speed control Controls the volume of air circulated in the vehicle. DEF LO HI Temperature control knob Controls the temperature of the airflow inside the vehicle. Mode selector control Controls the direction of the airflow to the inside of the vehicle.
13MCten 4/13/99 3:35 PM Page 28 Controls and features Under normal conditions, your vehicle’s climate control system should be left in any position other than MAX A/C or OFF when the vehicle is parked. This allows the vehicle to “breathe” through the outside air inlet duct. • MAX A/C – Uses recirculated air to cool the vehicle. MAX A/C is noisier than A/C but more economical and will cool the inside of the vehicle faster. Airflow will be from the instrument panel registers.
13MCten 4/13/99 3:35 PM Page 29 Controls and features • PNL/FLR – Distributes outside air through the instrument panel registers and the floor ducts. However, the air will not be cooled below the outside temperature because the air conditioning does not operate in this mode.
13MCten 4/13/99 3:35 PM Page 30 Controls and features • DEF – Distributes outside air through the windshield defroster ducts. It can be used to clear ice or fog from the windshield. If the temperature is about 10°C (50°F) or higher, the air conditioner will automatically dehumidify the air to prevent fogging. Operating tips • In humid weather, select DEF before driving. This will prevent your windshield from fogging. After a few minutes, select any desired position.
13MCten 4/13/99 3:35 PM Page 31 Controls and features • When placing objects on top of your instrument panel, be careful to not place them over the defroster outlets. These objects can block airflow and reduce your ability to see through your windshield. Also, avoid placing small objects on top of your instrument panel. These objects can fall down into the defroster outlets and block airflow and possibly damage your climate control system.
13MCten 4/13/99 3:35 PM Page 32 Controls and features 3 4 5 6 2 7 1 C H 8 0 x 1000 TRACTION TRACTION TROL CONTROL O/D OFF 55 60 70 80 50 100 120 90 40 60 800 0 0 1 2 3140 160100 30 40 180 110 20 20 0 0 0 0 200 120 10 130 E F MPH CHECK ENGINE LO OFF PANEL A/C HI MI PNL/FLR FLOOR FLR/ DEF MAX A/C DEF RRORS SIDE POWER AUDIO VOLUME AUDIO SYSTEMS Compact disc radio 32 AM/FM 1 2 4 5 3 CLOCK SCAN ANS SEEK 1-2 EJECT
13MCten 4/13/99 3:35 PM Page 33 Controls and features Electronic stereo radio with cassette Electronic stereo radio 33
13MCten 4/13/99 3:35 PM Page 34 Controls and features SIDE 34 1-2
13MCten 4/13/99 3:35 PM Page 35 Controls and features SIDE 1-2 1-2 SIDE 35
13MCten 4/13/99 3:35 PM Page 36 Controls and features Power control Press the control to turn the audio system on or off. Volume control Press the control to raise or lower volume. If the volume is set above a certain level and the ignition is turned off, the volume will come back on at a “nominal” listening level when the ignition switch is turned back on. AM/FM select The AM/FM select control works in radio mode and allows you to select AM or FM frequency bands.
13MCten 4/13/99 3:35 PM Page 37 Controls and features The tune adjust with electronic stereo radio • Press (–) to move to the next frequency down the band (whether or not a listenable station is located there). Hold the control to move through the frequencies quickly. • Press (+) to move to the next frequency up the band (whether or not a listenable station is located there). Hold for quick movement. Tune adjust with compact disc radio • Press the SCAN/TUNE control twice.
13MCten 4/13/99 3:35 PM Page 38 Controls and features • Within approximately five seconds, press and release either or on the SEEK control to change to the next frequency up or down. • Press and hold down or quickly move through the frequencies. to Seek function The seek function control works in radio or tape mode. Seek function in radio mode • Press to find the next listenable station down the frequency band. • Press to find the next listenable station up the frequency band.
13MCten 4/13/99 3:35 PM Page 39 Controls and features Scan function The scan function works in radio and CD mode (if equipped). Scan function with electronic stereo cassette radio Press the SCAN control to hear a brief sampling of all listenable stations on the frequency band. Press the control again to stop the scan mode. Scan function with compact disc radio • Press the SCAN/TUNE control once. • Push on the SEEK control to hear a brief sampling of listenable stations up the frequency band.
13MCten 4/13/99 3:35 PM Page 40 Controls and features Setting memory preset stations 1. Select the frequency band with the AM/FM select control. 2. Select a station. Refer to Tune adjust or Seek function for more information on selecting a station. 3. Press and hold a memory preset control until the sound returns, indicating the station is held in memory on the control you selected. If the battery is disconnected, the memory preset stations will need to be reset.
13MCten 4/13/99 3:35 PM Page 41 Controls and features 2. Press the AUTO PRESET control. 3. When the first six strong stations are filled, the station stored in memory preset control 1 will start playing. If there are less than six strong stations available on the frequency band, the remaining memory preset controls will all store the last strong station available.
13MCten 4/13/99 3:35 PM Page 42 Controls and features Treble adjust The treble adjust control allows you to increase or decrease the audio system’s treble output. • Push the AUDIO control repeatedly until the display reads TREB. • Press (+) or (–) on the volume control to increase or decrease treble output. Speaker balance adjust Speaker sound distribution can be adjusted between the right and left speakers. • Push the AUDIO control repeatedly until the display reads BAL.
13MCten 4/13/99 3:35 PM Page 43 Controls and features Speaker fade adjust Speaker sound distribution can be adjusted between the front and rear speakers. • Push the AUDIO control repeatedly until the display reads FADE. • Press the (+) side of the volume control to shift sound to the front speakers. • Press the (–) side of the volume control to shift sound to the rear speakers. Clock Viewing the clock Press the CLOCK control to display the time on the audio system display.
13MCten 4/13/99 3:35 PM Page 44 Controls and features Setting the clock Press and hold CLOCK, then press SEEK to increase the hours or to increase minutes. The clock will display 12-hour time with no AM/PM indications. On the single CD audio system, the clock can be set with the radio power on or off. Tape play select Insert a tape to begin tape play. Push only slightly when inserting a cassette tape (with the open edge to the right).
13MCten 4/13/99 3:35 PM Page 45 Controls and features Rewind/fast forward function in tape mode • Press to rewind the tape. Play will continue once the beginning of the tape is reached or rewind is stopped. • Press to fast forward the tape. Once the end of the tape is reached, tape direction reverses and the opposite side of the tape plays. Rewind/fast forward in CD mode • Press the control for less than three seconds for slow rewind. • Press the control for more than three seconds for fast rewind.
13MCten 4/13/99 3:36 PM Page 46 Controls and features CD eject Press the control to stop and eject a CD. If a disc is ejected from the CD player but is not removed within approximately 10 seconds, the player will automatically reload the disc for storage (unless the disc is automatically ejected because it was inserted upside down, in which case the disc will not be automatically reloaded).
13MCten 4/13/99 3:36 PM Page 47 Controls and features DISPLAY SCREEN The display screen gives information on the status of the audio system. Display Information AM, FM1 or FM2 Indicates which frequency band the audio system is in 87.9 to 107.
13MCten 4/13/99 3:36 PM Page 48 Controls and features Troubleshooting the CD Player The laser beam used in the compact disc player is harmful to the eyes. Do not attempt to disassemble the case. If sound skips: • You may be travelling on a rough road, playing scratched discs or the disc may be dirty. Skipping will not scratch the discs or damage the player. If player does not work: • The disc is inserted with the label surface downward. • The disc is dusty or defective.
13MCten 4/13/99 3:36 PM Page 49 Controls and features CD and CD player care • Handle discs by their edges only. Never touch the playing surface. • Do not insert more than one disc at a time. • Do not expose discs to direct sunlight or heat sources for extended periods of time. • After playing, store the disc in its case. Cleaning cassette player (if equipped) Clean the tape player head with a cassette cleaning cartridge after ten to twelve hours of play in order to maintain the best sound and operation.
13MCten 4/13/99 3:36 PM Page 50 Controls and features • Remove loose labels before inserting tapes. • Do not leave tapes in the cassette player for a long time when not being played. RADIO FREQUENCY INFORMATION The Federal Communications Commission (FCC) and the Canadian Radio and Telecommunications Communications (CRTC) establish the frequencies AM and FM stations may use for their broadcasts. Allowable frequencies are: AM 530, 540–1600, 1610 kHz FM 87.9, 88.1–107.1, 107.
13MCten 4/13/99 3:36 PM Page 51 Controls and features • Terrain. Hills, mountains and tall buildings between your vehicle’s antenna and the radio station signal can cause FM reception problems. Static can be caused on AM stations by power lines, electric fences, traffic lights and thunderstorms. Moving away from an interfering structure (out of its “shadow”) returns your reception to normal. • Station overload. Weak signals are sometimes captured by stronger signals when you pass a broadcast tower.
13MCten 4/13/99 3:36 PM Page 52 Controls and features STEERING COLUMN CONTROLS 3 Ignition 1. Ignition off, steering wheel locked. On vehicles with automatic transaxles, the ignition key can return to this position only if the gearshift lever is in P (Park). 4 5 6 2 7 1 C H 8 0 x 1000 TRACTION CONTROL O/D OFF 52 F CHECK ENGINE On Res Set Acc MI RRORS Off Coast The ignition key should not be left in this position for too long to avoid discharging the battery unnecessarily. 4.
13MCten 4/13/99 3:36 PM Page 53 Controls and features 3 4 5 6 2 7 1 C H 8 0 55 60 70 80 50 100 120 90 40 60 800 0 0 1 2 3140 160100 30 40 180 110 20 20 0 0 0 0 200 120 10 130 x 1000 TRACTION TRACTION TROL CONTROL O/D OFF E F MPH CHECK ENGINE LO OFF PANEL A/C HI MI PNL/FLR FLOOR FLR/ DEF MAX A/C DEF RRORS SIDE POWER AUDIO VOLUME AM/FM 1 2 4 5 3 CLOCK SCAN ANS 1-2 EJECT SEEK Tilt steering Pull the locking lever on the steering column cover up to adjust the steering col
13MCten 4/13/99 3:36 PM Page 54 Controls and features Hazard flasher control Use only in an emergency to warn traffic of vehicle breakdown or approaching danger. Depress to activate. Depress again to switch off. The hazard lights can be operated when the ignition is off. On Res Set Acc Off Coast Horn Press the pad. The horn can be operated when the ignition is off.
13MCten 4/13/99 3:36 PM Page 55 Controls and features 3 4 5 6 2 7 1 C H 8 0 55 60 70 80 50 100 120 90 40 60 800 0 0 1 2 3140 160100 30 40 180 110 20 20 0 0 0 0 200 120 10 130 x 1000 TRACTION TRACTION TROL CONTROL O/D OFF E F MPH CHECK ENGINE LO OFF PANEL A/C HI MI PNL/FLR FLOOR FLR/ DEF MAX A/C DEF RRORS SIDE POWER AUDIO VOLUME AM/FM 1 2 4 5 3 CLOCK SCAN ANS 1-2 EJECT SEEK Multi-function switch The turn signal functions are available only with the ignition switch on.
13MCten 4/13/99 3:36 PM Page 56 Controls and features Windshield wipers and washer Wipers Lift the windshield wiper lever to the desired speed interval. • Intermittent: push lever up to the first position. • Low: push lever up to the second position. • High: push lever up to the third position. For a single wipe, push the lever downward. Intermittent wiper control (if equipped) Rotate the variable intermittent wiper control to the desired speed.
13MCten 4/13/99 3:36 PM Page 57 Controls and features 3 4 5 6 2 7 1 C H 8 0 55 60 70 80 50 100 120 90 40 60 800 0 0 1 2 3140 160100 30 40 180 110 20 20 0 0 0 0 200 120 10 130 x 1000 TRACTION TRACTION TROL CONTROL O/D OFF BRAKE E F MPH CHECK ENGINE LO On MI OFF PANEL A/C HI Res PNL/FLR FLOOR FLR/ DEF MAX A/C DEF RRORS Set Acc Off SIDE Coast POWER AUDIO AM/FM VOLUME 1 2 4 5 3 CLOCK SCAN ANS 1-2 EJECT SEEK Speed control (if equipped) Do not use the speed control in
13MCten 4/13/99 3:36 PM Page 58 Controls and features To set a speed Press Set Acc. For speed control to operate, the speed control must be on and the vehicle speed must be greater than 48 km/h (30 mph). If you drive up or down a steep hill, your vehicle speed may vary momentarily slower or faster than the set speed. This is normal. Res Set Acc Coast Speed control cannot reduce the vehicle speed if it increases above the set speed on a downhill.
13MCten 4/13/99 3:36 PM Page 59 Controls and features To set a higher speed • Press and hold Set Acc. Release when the desired set speed is reached, or • press and release Set Acc. Each press will increase the set speed by 1.6 km/h (1 mph), or Res Set Acc Coast • accelerate with your accelerator pedal, then press Set Acc. You may accelerate with the accelerator pedal at any time during speed control usage. Releasing the accelerator pedal will return your vehicle speed to the previously set speed.
13MCten 4/13/99 3:36 PM Page 60 Controls and features To return to a set speed • Press Res. For Res to operate, the vehicle speed must be faster than 48 km/h (30 mph). Res Set Acc Coast To disengage speed control • Depress the brake pedal. Disengaging the speed control will not erase the previously programmed set speed. OVERHEAD CONTROLS Interior lamps with reading lamps (if equipped) The reading lamps and controls are located on the dome lamp.
13MCten 4/13/99 3:36 PM Page 61 Controls and features Interior lamps (sunroof equipped vehicles) The reading lamps are operated by separate on/off switches and can be adjusted to point in the desired direction. 12 SEC On Off 12 SEC Sunroof (if equipped) The electric sunroof can be operated only when the ignition is switched on. To open and close the sunroof Press the rear part of the control on the rocker switch in the roof console to open the sunroof. Press the front control to close it.
13MCten 4/13/99 3:36 PM Page 62 Controls and features DOOR MOUNTED CONTROLS Power door locks (if equipped) Push to lock or unlock all doors. LOCK U L Power windows (if equipped) The windows will only operate when the ignition is switched on. Press the appropriate control to operate the power windows at each door position. All of the windows can be controlled from the control on the driver door.
13MCten 4/13/99 3:36 PM Page 63 Controls and features Safety switch Move the switch to the left to prevent passengers from operating the windows. Move the switch to the right to allow passengers to operate the windows. Rear door childproof safety locks When the lever in the rear door lock is pushed inwards, the door can be opened only from the outside of the vehicle. WHEN LOCKED, DOOR WON`T OPEN FROM INSIDE.
13MCten 4/13/99 3:36 PM Page 64 Controls and features FLOOR MOUNTED CONTROLS Remote luggage compartment control Pull the control located on the left of the driver seat to open the luggage compartment. 64 PULL Parking brake For information on the parking brake, refer to Preparing to start the vehicle in the Starting chapter.
13MCten 4/13/99 3:36 PM Page 65 Controls and features Fuel pump shut-off switch For information on the fuel pump shut-off switch, refer to Fuel pump shut-off switch in the Roadside emergencies chapter. Positive retention floor mat Position the floor mat in the footwell. Place the mat eyelet over the pointed end of the retention post from the rear and rotate forward to install. Adjust the floor mat position to allow proper operation of accelerator pedal, brake pedal and clutch pedal (if equipped).
13MCten 4/13/99 3:36 PM Page 66 Controls and features REMOTE KEYLESS ENTRY SYSTEM (if equipped) If your vehicle has a remote entry system, you can lock and unlock the vehicle doors and open the luggage compartment without using a key. The remote also has a personal alarm feature. The remote entry feature only operates with the ignition in the off position. UN K C LO CK LO UN K C LO K UN TR 66 NIC PA To unlock the other doors, press the UNLOCK control a second time within five seconds.
13MCten 4/13/99 3:36 PM Page 67 Controls and features CK LO UN K C LO K UN TR CK LO NIC PA K UN TR UN K C LO Sounding the panic alarm Press the PANIC control. The horn will sound and the headlamps and tail lamps will flash for approximately 2 minutes and 45 seconds. NIC PA Opening the luggage compartment Press the TRUNK control. To deactivate the alarm, press the PANIC control again or turn the ignition key to the on position.
13MCten 4/13/99 3:36 PM Page 68 Controls and features To replace the batteries: 1. Twist a thin coin between the two halves of the transmitter. Do not take the front part of the transmitter apart. 2. Remove the old batteries. 3. Place the positive (+) side of the new batteries down. 4. Snap the two halves of the transmitter back together. Replacing lost transmitters Take your transmitters to the dealer for reprogramming if: • a transmitter is lost, or • you want to purchase additional transmitters.
13MCten 4/13/99 3:36 PM Page 69 Controls and features PASSIVE ANTI-THEFT SYSTEM (if equipped) The Passive Anti-Theft system (PATS) is an engine immobilization system. It is an additional theft protection feature that prevents the engine from being started unless a coded key is used.. 70 80 120 90 140 12 3 100 160 180 110 0 0 200 120 130 BRAKE E F PH CHECK ENGINE LO OFF PANEL A/C HI PNL/FLR FLOOR FLR/ DEF MAX A/C DEF This system is only available with 2.5 litre engines.
13MCten 4/13/99 3:36 PM Page 70 Controls and features Functional check When the ignition is switched on, the control light will illuminate for approximately three seconds to indicate that the system is operating correctly. If the control light flashes rapidly for approximately one minute and then repeatedly at irregular intervals, the system did not recognize the key code. Remove the key and try again.
13MCten 4/13/99 3:36 PM Page 71 Controls and features Spare key programming A maximum of 8 keys in all can be coded with any two coded keys. • Insert the first key in the ignition switch and turn to position 3. 1 2 3 4 • Turn the key back to position 1 and remove from the ignition switch within 5 seconds. • Insert the second key in the ignition switch and turn to position 3 within 5 seconds.
Push or pull the head restraint to the desired height. SEATING Manually adjusting the seats Pull the lever located at the front edge of the seat to move the seat forward or backward. Reclining the seats Pull the lever on the outside of the seat to recline the seat. Never adjust the driver seat or seat back when the vehicle is moving.
respective direction to adjust the seat as follows: Seat (1) Forward and backward 1 3 2 4 (2) Height of the entire seat (3) Height of the front of the seat (4) Height of the rear of the seat Lumbar support Pull the lever to adjust lumbar support.
the seat. The seat back cannot be released while the built-in child seat (if equipped) is open. If you are carrying objects that might damage the center rear three-point safety belt, you can unbuckle the end of the belt from the small buckle on the seat cushion and let the retractor reel it up. Reconnect the belt tongue to the buckle when you fold the seat back up. Refer to Center position three-point safety belts in this chapter.
The use of safety belts helps to restrain both driver and passenger in case of a collision. In most states and Canada, the law requires the use of safety belts. Front and rear seat occupants including pregnant women, should wear safety belts for optimum protection in an accident. Always drive and ride with your seatback upright and the lap belt snug and low across the hips. Lock the doors of your vehicle before driving to lessen the risk of the door coming open in a collision.
Insert the tongue into the slot in the buckle to fasten. Push the red release button and remove the tongue from the slot to unfasten. The passenger safety restraints in the vehicle are combination lap and shoulder belts. The front and rear seat passenger safety belts have two types of locking modes. Each seating position in your vehicle has a specific safety belt assembly which is made up of one buckle and one tongue that are designed to be used as a pair. Use the shoulder belt on the outside shoulder only.
normal retractor mode which locks the belts in response to vehicle movement. For example, if the driver brakes suddenly, turns a corner sharply or your vehicle receives an impact of 8 km/h (5 mph) or more the combination safety belts will lock to help reduce the forward movement of the driver and passengers. The retractor can be made to lock by pulling sharply on the belt.
safety seat in any passenger seat. 1. Buckle the combination lap and shoulder belt. 2. Grasp the shoulder belt portion and pull downward until the entire belt is extracted. 3. Allow the belt to retract. As the belt retracts, you will hear a clicking sound. This indicates that the safety belt is now in the automatic locking mode. Canceling automatic locking mode Disconnect the combination lap and shoulder belt and allow it to completely retract.
height adjuster so that the belt rests across the middle of your shoulder. Be sure the shoulder belt is properly positioned on your shoulder each time you use the belt. If the shoulder belt is off your shoulder, on your upper arm or neck, there is a greater risk of severe injury in a collision. To lower the height of the shoulder belt: 1. Push the control down. 2. Slide down. To raise the height of the shoulder belt: 1. Slide up. 2. Pull down on the height adjuster to make sure that it is locked in place.
been unbuckled, pull the belt steadily from the reel and insert the small tongue into the small buckle until a distinct “click” is heard. This buckle should be left buckled except when the seatback is folded down and cargo that might damage the seatbelt or get it dirty is being hauled. Pull the seat belt across the hips and insert the big (sliding) tongue into the appropriate buckle until a distinct “click” is heard.
turned to on, the safety belt indicator illuminates for 1-2 minutes and the warning chime sounds for 4-8 seconds. If the driver safety belt is buckled while the indicator light is illuminated and the reminder chime is sounding, the safety belt indicator light and reminder turn off. Safety belt extension assembly The safety belt may be too short even when fully extended. Approximately 20 cm (8 inches) may be added to the length of the belt with a safety belt extension (part number 611C22).
security of the anchorage points and the locking action of the inertia reels by giving each belt a sharp tug. Belts subjected to strain, as in the result of an accident, should be replaced and the anchorages checked by your dealer or a qualified technician. Failure to follow these instructions will affect the performance of the safety belts and increase the risk of personal injury. Safety belt warning label A warning label has been placed on the buckle of each of your vehicle’s front seat safety belts.
OFF ENGINE LO OFF PANEL A/C HI PNL/FLR FLOOR FLR/ DEF MAX A/C DEF MI RRORS SIDE POWER AUDIO VOLUME AM/FM 1 2 4 5 3 CLOCK SCAN ANS 1-2 EJECT SEEK AIR BAG SUPPLEMENTAL RESTRAINT SYSTEM (SRS) Important supplemental restraint system (SRS) precautions The supplemental restraint system (SRS) is designed to: • work with the safety belt to protect the driver and right front passenger. • reduce certain upper body injuries.
bag. Do not attempt to service, repair, or modify the air bag Supplemental Restraint System (SRS) or its fuses. See your Ford or Lincoln-Mercury dealer. Children and air bags For additional important safety information, read all information on safety restraints in this guide. Children should always wear safety belts. Failure to follow these instructions may increase the risk of injury in a collision.
The SRS is designed to activate when the vehicle is in a collision, similar to hitting a fixed barrier head-on at 12-24 km/h (8-14 mph). The fact that the air bags did not inflate in a collision does not mean that something is wrong with the system. Rather, it means the forces were not of the type sufficient to cause activation. The air bags inflate and deflate rapidly upon activation. After air bag deployment, it is normal to notice a smoke-like, powdery residue or smell the burned propellant.
If the air bag is inflated, the air bag will not function again and must be replaced immediately. If the air bag is not replaced, the unrepaired area will increase the risk of injury in a collision. The SRS consists of the following: • driver and passenger air bag modules (which include the inflators and air bags), • one impact and one safing sensor, • a readiness light and secondary warning light, and • the electrical wiring and components.
the instrument cluster or a secondary warning light to indicate the condition of the system. Refer to the Air bag readiness section in the Instrumentation chapter. Routine maintenance of the air bag is not required. TRACTION CONTROL O/D OFF A difficulty with the system is indicated by one or more of the following: • The readiness light will either flash or stay lit. • The readiness light will not illuminate after ignition is turned on. • The air bag secondary warning light will flash five times.
equipped vehicles, see your local dealership or a qualified technician. Air bags MUST BE disposed of by qualified personnel.
make sure children sit where they can be properly restrained. Whenever possible, put children in one of the rear seats in your vehicle. Accident statistics indicate that children are safer when properly restrained in the rear seats than in the front seats. Do not leave children, unreliable adults, or pets unattended in your vehicle. Safety belts and seats can become hot in a vehicle that has been closed up in sunny weather; they could burn a small child.
safety restraints for children in the U.S. and Canada. If small children ride in your vehicle (generally children who are 4 years old or younger and who weigh 18 kg [40 lbs] or less), you must put them in safety seats made especially for children. Check your local and state or provincial laws for specific requirements regarding the safety of children in your vehicle. Never let a passenger hold a child on his or her lap while the vehicle is moving.
child safety seat manufacturer) should always wear safety belts. Follow all the important safety restraints and air bag precautions that apply to adult passengers in your vehicle. If the shoulder belt portion of a combination lap and shoulder belt can be positioned so it does not cross or rest in front of the child’s face or neck, the child should wear the lap and shoulder belt. Moving the child closer to the center of the vehicle may help provide a good shoulder belt fit.
positioning booster seat that is labelled as conforming to all federal motor vehicle safety standards. Belt-positioning booster seats raise the child and provide a shorter, firmer seating posture and better fit of lap and shoulder belts on the child.
The rear seat may include a built-in child seat. This child seat conforms to all federal and local motor vehicle safety standards. Read the labels located on the child seat cushion and shoulder belt for information on the built-in child seat. Use the built-in child seat only if the child is at least one year old, weighs 10-27 kg (22-60 lbs) and the child’s shoulders fit below the shoulder harness slots on the builtin child seat.
is not placed in the integrated child seat when the folding seatback is not securely latched. It prevents the seatback from being unlatched while the child seat is in use. When the child seat is deployed, the seatback cannot be released. Built-in child seat retractors The belts on built-in child seats are equipped with a retractor. The retractor will automatically snug the belts around the child.
instructions on the use of this child restraint system can result in your child striking the vehicle’s interior during a sudden stop or crash. Never use the built-in child seat as a booster cushion with the adult safety belts. A child using the adult belts could slide forward and out from under the safety belts. The rear seatback must be fully locked before operating the child safety restraint system. 1. Make sure that the seatback is securely latched in place. 2.
child seat. 4. If connected, squeeze the tabs on the top and bottom of the chest clip and pull the halves apart to open the chest clip. Then release the lower half of belt by pressing the red button. 5. Place the child in the child seat and position the shoulder belts over each shoulder.
tongue is inserted first). Insert the other tongue. The color green must appear in the indicator window on each tongue when buckled. Allow belts to retract and fit snugly. If both tongues do not latch in the buckle, do not use the child seat. See your dealer for repairs. 7. Fasten both halves of the chest clip below the child’s shoulders and adjust it to comfortably hold the shoulder belts in place on the child’s chest. The color green must appear in the indicator window when fastened. 8.
the bottom of the chest clip and pull the halves apart to open the chest clip. 2. Press the release button on the crotch safety belt buckle. 3. Slide the shoulder belts off the child’s shoulders and remove the child. To stow the built-in child seat Return the child seat cushion to the upright position, then press firmly in the center and top of the child seat.
included with the safety seat you put in your vehicle. If you do not install and use the safety seat properly, the child may be injured in a sudden stop or collision. Ford recommends the use of a child safety seat having a top tether strap. Install the child safety seat in a seating position which is capable of providing a tether anchorage. For more information on top tether straps see Attaching safety seats with tether straps in this chapter.
1. Position the child safety seat in a seat with a combination lap and shoulder belt. When using forward-facing child seats move the passenger seat as far back from the instrument panel as possible. Never secure rear-facing infant seats in the front seat. 2. Pull down on the shoulder belt and then grasp the shoulder belt and lap belt together. 3. While holding the shoulder and lap belt portions together, route the tongue through the child seat according to the child seat manufacturer’s instructions.
is latched securely by pulling on it. 5. To put the retractor in the automatic locking mode, grasp the shoulder portion of the belt and pull downward until all of the belt is extracted and a click is heard. 6. Allow the belt to retract. The belt will click as it retracts to indicate it is in the automatic locking mode. 7. Pull the lap belt portion across the child seat toward the buckle and pull up on the shoulder belt while pushing down with your knee on the child seat.
seat, forcibly tilt the seat forward and back to make sure the seat is securely held in place. 10. Try to pull the belt out of the retractor to make sure the retractor is in automatic locking mode (you should not be able to pull more belt out). If the retractor is not locked, unbuckle the belt and repeat steps two through nine. Check to make sure the child seat is properly secured before each use.
tether hook into the hole in the tongue of the center rear lap belt. After the hook is in the hole, pull on the loose end of the lap belt webbing to shorten the belt and tighten the tether strap. To install a tethered child safety seat in the rear seat, you will need tether anchor hardware. Tighten the anchor according to specifications. Otherwise, the safety seat may not be properly secured and the child may be injured in a sudden stop or collision.
21MSten 4/13/99 2:23 PM Page 104 Starting IMPORTANT SAFETY PRECAUTIONS A computer system controls the engine’s idle revolutions per minute (rpm). When the engine starts, the idle rpm runs faster to warm the engine. If the engine idle speed does not slow down automatically, have the vehicle checked by your dealer or a qualified service technician. Do not allow the vehicle to idle for more than ten minutes.
21MSten 4/13/99 2:23 PM Page 105 Starting Do not start your vehicle in a closed garage or in other enclosed areas. Exhaust fumes can be toxic. Always open the garage door before you start the engine. See Guarding against exhaust fumes in this chapter for more instructions. IMPORTANT VENTILATION INFORMATION If the engine is idling while the vehicle is stopped in an open area for long periods of time, open the windows at least 2.5 cm (1 inch).
21MSten 4/13/99 2:23 PM Page 106 Starting Improve vehicle ventilation by keeping all air inlet vents clear of snow, leaves, and other debris. Guarding against exhaust fumes Although odorless and colorless, carbon monoxide is present in exhaust fumes. Take precautions to avoid its dangerous effects. If you ever smell exhaust fumes of any kind inside your vehicle, have your dealer inspect and fix your vehicle immediately. Do not drive if you smell exhaust fumes.
21MSten 4/13/99 2:23 PM Page 107 Starting PREPARING TO START THE VEHICLE Engine starting is controlled by the spark ignition system. This system meets all Canadian InterferenceCausing Equipment standard requirements regulating the impulse electrical field strength of radio noise. When starting a fuel-injected engine, avoid pressing the accelerator pedal before or during starting. Only use the accelerator pedal when you have difficulty starting the engine.
21MSten 4/13/99 2:23 PM Page 108 Starting If starting a vehicle with an automatic transaxle: • Make sure the parking brake is set. • Make sure the gearshift is in P (Park). If starting a vehicle with a manual transaxle: • Make sure the parking brake is set. • Push the clutch pedal to the floor. Otherwise, the engine will not crank (turn over). • Put the gearshift into neutral.
21MSten 4/13/99 2:23 PM Page 109 Starting 3. Turn the key to the on position (without turning the key to start). Make sure the following lights illuminate briefly. If a light fails to illuminate, have the vehicle serviced by your dealer or a qualified service technician. BRAKE BRAKE Alternative design CHECK ENGINE TRACTION CONTROL O/D OFF • If the driver’s safety belt is fastened the safety belt warning light does not illuminate.
21MSten 4/13/99 2:23 PM Page 110 Starting STARTING THE ENGINE 1. Turn the key to the start position (4) without pressing the accelerator pedal and release as soon as the engine starts. The key will return to the on (3) position. 2. If the engine does not start within five seconds, wait ten seconds and try again. 3. If the engine does not start in two attempts OR the temperature is below -12°C (10°F), depress the accelerator pedal and start the engine while holding the accelerator pedal down.
21MSten 4/13/99 2:23 PM Page 111 Starting USING THE ENGINE BLOCK HEATER (if equipped) An engine block heater warms the engine coolant, which improves starting, warms up the engine faster and allows the heaterdefroster system to respond quickly. It is strongly recommended if you live in a region where temperatures reach –23°C (–10°F) or below. For best results, plug the heater in at least three hours before starting the vehicle.
22MDren 4/13/99 3:40 PM Page 112 Driving BRAKES Your brakes are self-adjusting. Refer to the “Scheduled Maintenance Guide” for maintenance intervals. Anti-lock braking system (ABS) (if equipped) The ABS operates by detecting the onset of wheel lock-up during brake applications and compensating for this tendency. The wheels are prevented from locking even when the brakes are firmly applied, helping to ensure that the vehicle can be steered and the driver can avoid obstacles.
22MDren 4/13/99 3:40 PM Page 113 Driving Braking with ABS • In an emergency, apply full force on the brake pedal. In vehicles with manual transaxles, you must also depress the clutch pedal. The anti-lock braking system will be activated immediately, allowing you to retain full steering control of your vehicle and, providing there is sufficient space, will enable you to avoid obstacles. • We recommend that you familiarize yourself with this braking technique. However, avoid taking any unnecessary risks.
22MDren 4/13/99 3:40 PM Page 114 Driving Parking brake To engage the parking brake: Pull the handle upward. To release the parking brake: 1. Press and hold the release button. 2. Push handle downward to the off position. Always set the parking brake fully and make sure that the gearshift is securely latched in P (Park) (automatic transaxle) or in 1 (first) (manual transaxle). To prevent personal injury, do not release the parking brake while outside the vehicle.
22MDren 4/13/99 3:40 PM Page 115 Driving TRACTION CONTROL (if equipped) This system prevents wheel spin at all speeds. The control will toggle this function on and off, but the feature defaults to on after each cycle of the ignition key. The traction control system controls excessive wheel spin by automatically applying and releasing the brakes in conjunction with engine torque reductions. This can occur when accelerating on a slippery road, a loose surface or when pulling away on a hill.
22MDren 4/13/99 3:40 PM Page 116 Driving Switching off traction control If you become stuck in snow or on a slippery road surface, try switching off the traction control system by pressing the switch. This may allow the excess wheel spin to “dig“ the vehicle out or enable a successful “rocking“ maneuver. Do not rock the vehicle for more than a few minutes, because it could damage the vehicle. The light in the control illuminates continuously when the system has been switched off.
22MDren 4/13/99 3:40 PM Page 117 Driving Speed sensitive power steering (if equipped) The steering system is speed sensitive. This means that the steering effort is light for parking and heavier for highway driving. However, if you have to swerve around an object or another vehicle, your vehicle will have full power assist.
22MDren 4/13/99 3:40 PM Page 118 Driving Overriding the brake-shift interlock feature If it is necessary to use this procedure to move the gearshift lever, it is possible that a fuse has blown and the vehicle’s brakelamps may not be working. Refer to Fuses and relays in the Roadside emergencies chapter. If you cannot move the gearshift lever from P (Park) with the brake pedal depressed: 1. Turn the ignition off and remove the ignition key. 2. Apply the parking brake and the brake pedal. 3.
22MDren 4/13/99 3:40 PM Page 119 Driving The console-mounted gearshift will lock when you turn the key to the lock position. When the gearshift is in any position except P (Park), the ignition key cannot be turned to lock or removed from the steering column. To remove the key, the gearshift lever must be in P (Park). Once the gearshift is secure in the desired position, release the brake pedal and use the accelerator as necessary. Driving Never leave a vehicle unattended while it is running.
22MDren 4/13/99 3:40 PM Page 120 Driving • N (Neutral) The wheels of the transaxle are not locked. Your vehicle will roll freely, even on the slightest incline, unless the parking brake or brakes are on. • D (Overdrive) Note that the vehicle’s gearshift is console-mounted on the floor. The transaxle control switch (TCS) is located on the gearshift handle. The transaxle control indicator light (O/D light) is located on the instrument panel.
22MDren 4/13/99 3:40 PM Page 121 Driving • D (Drive) D (Drive) provides more engine braking than overdrive and is useful when driving through hilly terrain or if your vehicle requires additional power for climbing hills. Activate by pressing the transaxle control switch (TCS) located on the gearshift handle. The O/D OFF indicator light will illuminate in the instrument cluster. Transaxle operates in gears one through three.
22MDren 4/13/99 3:40 PM Page 122 Driving • 2 (Second) Use the 2 (Second) position to start up on slippery roads or to provide additional braking on downgrades. When your vehicle is in 2 (Second), it automatically starts off in second gear. Do not go faster than 90 km/h (55 mph) in this gear. • 1 (First) Use the 1 (First) position to provide maximum engine braking on steep downgrades. Upshifts will not occur while the gearshift lever remains in the 1 (First) position.
22MDren 4/13/99 3:40 PM Page 123 Driving Manual transaxle (if equipped) Vehicles equipped with a manual transaxle have a starter interlock that prevents cranking the engine unless the clutch pedal is fully depressed. Using the clutch When starting a vehicle with a manual transaxle: 1. Hold down the brake pedal. 2. Depress the clutch pedal. 3. Put the gearshift lever in neutral. 4. Start the vehicle. 5. Put the gearshift in 1 (First) or R (Reverse). 6.
22MDren 4/13/99 3:40 PM Page 124 Driving Recommended shift speeds 2.0 litre engine 5-speed transaxle shift speed schedules Recommended During acceleration: During cruise*: upshifts: Shift from km/h mph km/h mph First to second 22 14 19 12 Second to third 40 25 32 20 Third to fourth 53 33 46 29 Fourth to fifth 77 48 64 40 2.
22MDren 4/13/99 3:40 PM Page 125 Driving Parking 1. Apply the brake and the clutch and shift into neutral. 2. Engage the parking brake. 3. Shift into 1 (First) or R (Reverse). 4. Turn the ignition off. Do not park your vehicle in Neutral, it may move unexpectedly and injure someone. Use 1 (first) gear and set the parking brake. Reverse To shift into R (Reverse): 1. Completely stop your vehicle. 2. Depress the clutch pedal to the floor and place the gearshift lever in the neutral position.
22MDren 4/13/99 3:40 PM Page 126 Driving LOADING YOUR VEHICLE Before loading your vehicle, familiarize yourself with these terms. Base curb weight Weight of the vehicle including any standard equipment, fluids and lubricants. It does not include passengers or aftermarket equipment. Payload Combined maximum allowable weight of passengers, cargo and optional equipment. GVW (Gross Vehicle Weight) Base curb weight plus the payload weight. The GVW is not a limit or a specification.
22MDren 4/13/99 3:40 PM Page 127 Driving GVWR (Gross Vehicle Weight Rating) Maximum total weight of the base vehicle, passengers, optional equipment and cargo. The GVWR is specific to each vehicle and is listed on the Safety Compliance Certification Label on the driver’s door pilar. GAWR (Gross Axle Weight Rating) Carrying capacity for each axle system (front and rear). The GAWR is specific to each vehicle and is listed on the Safety Compliance Certification Label on the driver’s door pillar.
22MDren 4/13/99 3:40 PM Page 128 Driving Payload = GVWR minus Base curb weight To obtain the correct weight for your vehicle, try taking your vehicle to a shipping company or an inspection station for trucks. Do not use replacement tires with lower weight capacities than the originals because they might lower the vehicle’s GVWR and GAWR. (Replacement tires with a higher weight limit than the originals do not increase the GVWR and GAWR limitations.
22MDren 4/13/99 3:40 PM Page 129 Driving It is extremly dangerous to ride in a cargo area, inside or outside of a vehicle. In a collision, people riding in these areas are more likely to be seriously injured or killed. Do not allow people to ride in any area of your vehicle that is not equipped with seats and safety belts. Be sure everyone in your vehicle is in a seat and using a safety belt properly.
22MDren 4/13/99 3:40 PM Page 130 Driving TRAILER TOWING Your vehicle is capable of towing a trailer of up to a maximum of 454 kg (1 000 lbs) gross trailer weight with a maximum tongue load of 45 kg (100 lbs). It should also have 2.3 sq. meters (25 sq. feet) or less frontal area. Do not drive faster than 72 km/h (45 mph) while towing a 454 kg (1 000 lb) trailer. Your vehicle does not come from the factory fully equipped to tow. No towing packages are available through Ford or Lincoln/Mercury dealers.
22MDren 4/13/99 3:40 PM Page 131 Driving Follow these guidelines to ensure safe towing procedure: • Stay within your vehicle’s load limits. • Thoroughly prepare your vehicle for towing. Refer to Preparing to tow in this chapter. • Use extra caution when driving while trailer towing. Refer to Driving while towing a trailer in this chapter. • Service your vehicle more frequently if you tow a trailer. Refer to the severe duty schedule in the maintenance guide and or service guide.
22MDren 4/13/99 3:40 PM Page 132 Driving Do not exceed the maximum loads listed on the Safety Compliance Certification Label. For load specification terms found on the label, refer to Loading your vehicle in this chapter. Remember to figure in the tongue load of your loaded vehicle when figuring the total weight.
22MDren 4/13/99 3:40 PM Page 133 Driving Using a hitch Do not use hitches that: • Clamp onto the vehicle bumper. • Attach to the axle. Distribute the load so that only 10 to 15% of the total weight of the trailer is on the tongue. Tie down the load so that it does not shift and change weight on the hitch. Follow the instructions of a reputable rental agency. Using trailer lamps See your local trailer retailer or rental agency for proper instructions and equipment for hooking up trailer lamps.
22MDren 4/13/99 3:40 PM Page 134 Driving Using trailer brakes Use electric brakes or manual, automatic or surge type hydraulic brakes that meet federal and local regulations. Install and adjust brakes according to the manufacturer’s instructions. Do not connect a trailer’s hydraulic brake system directly to your vehicle’s brake system. Your vehicle may not have enough braking power and your chances of having a collision greatly increase.
22MDren 4/13/99 3:40 PM Page 135 Driving Driving while towing a trailer Do not drive faster than 72 km/h (45 mph) while towing a 454 kg (1 000 lb) trailer. Do not drive faster than 72 km/h (45 mph) with any weight trailer while towing in hilly terrain or on hot days. Speed control (if equipped) may not work properly while towing on long, steep grades.
23MREen 4/13/99 3:41 PM Page 136 Driving FUEL CONSUMPTION Fuel economy can be improved by avoiding: • lack of regular, scheduled maintenance, • excessive speed, • rapid acceleration, • driving with the brake pedal depressed, • sudden stops, • extended engine idling, • use of speed control in hilly terrain, • extended use of the air conditioner, defroster, rear window defroster and other accessories, • underinflated tires, • heavy loads, • aftermarket add-ons such as bike, ski or luggage racks, bug defle
23MREen 4/13/99 3:41 PM Page 137 Roadside emergencies HAZARD FLASHER CONTROL Use only in an emergency to warn traffic of vehicle breakdown or approaching danger. Depress to activate. Depress again to switch off. The hazard lights can be operated when the ignition is off. On Res Set Acc Off Coast FUEL PUMP SHUT-OFF SWITCH If the engine cranks, but does not start or does not start after a collision, the fuel pump shut-off switch may have been activated.
23MREen 4/13/99 3:41 PM Page 138 Roadside emergencies If you see or smell fuel, do not reset the switch or try to start your vehicle. Have all the passengers get out of the vehicle and call the local fire department or a towing service. If your engine cranks but does not start after a collision or substantial jolt: 1. Turn the ignition key to the off position. 2. Check under the vehicle for leaking fuel. 3. If you do not see or smell fuel, push the red reset button down.
23MREen 4/13/99 3:42 PM Page 139 Roadside emergencies FUSES AND RELAYS If electrical components in the vehicle are not working, a fuse may have blown. Blown fuses are identified by a broken wire. Check the appropriate fuses before replacing any electrical components. Always replace a fuse with one that has the specified amperage rating. Using a fuse with higher amperage rating can cause severe wire damage and could start a fire.
23MREen 4/13/99 3:42 PM Page 140 Roadside emergencies Power distribution box To check or replace a fuse or a relay, remove the cover of the fuse box in the engine compartment by releasing the latch (1) and lifting up. 1 A blown fuse can be identified by a break in the wire. All fuses are a push fit. Five reserve fuses with different current ratings are attached to the inside cover of the power distribution box in case of emergency fuse replacement.
23MREen 4/13/99 3:42 PM Page 141 Roadside emergencies Power distribution box (engine compartment) Ampere Circuits protected Fuse rating 1 — Not used 2 7.5 Alternator 3 20 Foglamps 4 — Not used 5 — Not used 6 3 EEC ignition module (memory) 7 20 Horn and hazard flasher warning system 8 — Not used 9 15 Fuel pump 10 — Not used 11 20 Ignition, Electronic Engine Control 12 — Not used 13 20 HEGO sensor 14 7.5 ABS module 15 7.5 Low beam headlamp (passenger’s side) 16 7.5 Low beam headlamp (driver’s side) 17 7.
23MREen 4/13/99 3:42 PM Page 142 Roadside emergencies Power distribution box (engine compartment) Relay R1 R2 R3 R4 R5 R6 R7 R8 R9 R 10 R 11 D1 D2 Circuits switched Fuel pump EEC module Air conditioning Low beam High beam Horn Starter solenoid Engine cooling fan (high speed) Engine cooling fan Not used Daytime running lights Reverse voltage protection Not used Passenger compartment fuse panel To check or change a fuse or a relay, open the fuse box by pulling down the lock release lever (1).
23MREen 4/13/99 3:42 PM Page 143 Roadside emergencies A blown fuse can be identified by a break in the wire. All fuses are a push fit. R13 R12 Five reserve fuses with different current ratings are attached to the inside cover of the power distribution box in case of emergency fuse replacement.
23MREen 4/13/99 3:42 PM Page 144 Roadside emergencies Passenger compartment fuse panel (below instrument panel) Fuse 144 Ampere rating Circuits protected 19 20 21 22 23 24 25 26 27 28 29 30 31 32 33 34 — C10 40 7.5 15 15 20 7.5 15 30 30 7.5 7.5 7.5 7.5 7.5 35 36 37 38 7.
23MREen 4/13/99 3:42 PM Page 145 Roadside emergencies Standard fuse amperage ratings and colors Color violet brown red light blue yellow light green pink orange yellow black blue Fuse rating 3 amp 7.
23MREen 4/13/99 3:42 PM Page 146 Roadside emergencies CHANGING TIRES Park your vehicle in such a position that neither the traffic nor you are hindered or endangered when changing the tire. Ensure that the vehicle is on firm, level ground. Secure your vehicle further by blocking the wheels. Activate the hazard lights. Apply the parking brake and engage first or reverse gear if the vehicle has a manual transaxle or, if the vehicle has an automatic transaxle, select the P (Park) position.
23MREen 4/13/99 3:42 PM Page 147 Roadside emergencies When driving with a temporary spare tire: • Do not exceed the maximum speed of 80 km/h (50 mph) and only drive the shortest possible distance. • Do not exceed the permissible gross weight of the vehicle. MAX 80 km/h • Do not install more than one spare wheel on your vehicle at any one time. • Do not use snow chains on this type of wheel. • Do not drive through an automatic car wash.
23MREen 4/13/99 3:42 PM Page 148 Roadside emergencies Tire changing procedure Removing a tire 1. Apply the parking brake and 1 (first) gear (manual transaxle) or the P (Park) position (automatic transaxle). 2. Activate the hazard flashers. 3. The driver and all passengers must leave the vehicle. 4. Secure the vehicle against rolling or sliding. 5. Insert the tapered end of the jack handle between the rim and hub cover and push in. Twist off to remove the cover. 6. Loosen the wheel nuts slightly. 7.
23MREen 4/13/99 3:42 PM Page 149 Roadside emergencies Replacing a tire 1. Push the spare tire onto the wheel studs. 2. Screw on the wheel nuts, ensuring the tapered end of the wheel nuts are facing the wheel, and secure in a clockwise direction. 3. Lower the vehicle and remove the jack by turning the handle counterclockwise. 4. Fully tighten the wheel nuts in a crosswise pattern. 5. Align the hub cap with the valve and push firmly into position with the ball of the hand. 6.
23MREen 4/13/99 3:42 PM Page 150 Roadside emergencies JUMP STARTING YOUR VEHICLE The gases around the battery can explode if exposed to flames, sparks, or lit cigarettes. An explosion could result in injury or vehicle damage. Do not push start your vehicle. You could damage the catalytic converter. Batteries contain sulfuric acid which burns skin, eyes, and clothing if contacted. Do not attempt to push start your vehicle. Automatic transaxles do not have pushstart capability. Preparing your vehicle 1.
23MREen 4/13/99 3:42 PM Page 151 Roadside emergencies 3. Park the booster vehicle close to the hood of the disabled vehicle, making sure the two vehicles do not touch. Set the parking brake on both vehicles and stay clear of the engine cooling fan and other moving parts. 4. Check all battery terminals and remove any excessive corrosion before you attach the battery cables. Ensure that vent caps are tight and level. 5. Turn the heater fan on in both vehicles to protect from any electrical surges.
23MREen 4/13/99 3:42 PM Page 152 Roadside emergencies 2. Connect the other end of the positive (+) cable to the positive (+) terminal of the assisting battery. 3. Connect the negative (-) cable to the negative (-) terminal of the assisting battery. 4. Make the final connection of the negative (-) cable to an exposed metal part of the stalled vehicle’s engine, away from the battery and the carburetor.
23MREen 4/13/99 3:42 PM Page 153 Roadside emergencies Do not connect the end of the second cable to the negative (-) terminal of the battery to be jumped. A spark may cause an explosion of the gases that surround the battery. • 2.0 litre engine • 2.
23MREen 4/13/99 3:42 PM Page 154 Roadside emergencies 5. Be sure that the cables are clear of fan blades, belts and other moving parts of both engines. Jump starting 1. Start the engine of the booster vehicle and run the engine at a moderately increased speed. 2. Start the engine of the disabled vehicle. 3. Once the disabled vehicle has been started, run both engines for a further three minutes before disconnecting the jumper cables.
23MREen 4/13/99 3:42 PM Page 155 Roadside emergencies 2. Remove the jumper cable on the negative (-) connection of the booster vehicle’s battery. 3. Remove the jumper cable from the positive (+) terminal of the booster vehicle’s battery 4. Remove the jumper cable from the positive (+) terminal of the disabled vehicle’s battery. After the disabled vehicle has been started and the jumper cables removed, allow it to idle for several minutes so the engine computer can “relearn” its idle conditions.
23MREen 4/13/99 3:42 PM Page 156 Roadside emergencies WRECKER TOWING If towing is necessary, it is recommended that your vehicle be towed with a wheel lift or flatbed equipment. Do not tow with slingbelt equipment. Ford Motor Company has not developed or approved a T-hook or slingbelt towing procedure.
23MREen 4/13/99 3:42 PM Page 157 Roadside emergencies TOWING YOUR VEHICLE BEHIND ANOTHER VEHICLE Before you have your vehicle towed: • release the parking brake, • move the gearshift to N (Neutral), • turn the ignition to the off position and • unlock the steering wheel. Automatic transaxle Do not tow your vehicle at a speed faster than 55 km/h (35 mph) or for a distance greater than 80 km (50 miles) unless the drive wheels are placed on dollies.
31MMCen 4/13/99 2:17 PM Page 158 Maintenance and care SERVICE RECOMMENDATIONS • We highlight do-it-yourself items in the engine compartment for easy location. • As possible, we design parts that can be replaced without tools. • We provide you with a maintenance guide and or service guide which makes tracking routine service for your vehicle easy. If your vehicle requires professional service, your Ford or Lincoln/Mercury dealership can provide necessary parts and service.
31MMCen 4/13/99 2:17 PM Page 159 Maintenance and care Precautions when servicing your vehicle Be especially careful when inspecting or servicing your vehicle. Here are some general precautions for your safety: • Do not work on a hot engine. The cooling fan is automatic and may come on at any time. Always disconnect the negative terminal of the battery before working near the fan. • If you must work with the engine running, avoid wearing loose clothing or jewelry that could get caught in moving parts.
31MMCen 4/13/99 2:17 PM Page 160 Maintenance and care Working with engine off (automatic transaxle) 1. Set the parking brake fully and ensure the gearshift is securely latched in P (Park). 2. Turn off the engine and remove the key. 3. Block the wheels to prevent the vehicle from moving unexpectedly. Working with engine off (manual transaxle) 1. Set the parking brake, depress the clutch and place the gearshift in 1 (first) or R (Reverse). 2. Turn off the engine and remove the key. 3.
31MMCen 4/13/99 2:17 PM Page 161 Maintenance and care Working with engine on (automatic transaxle) 1. Set the parking brake fully and ensure the gearshift is securely latched in P (Park). 2. Block the wheels to prevent the vehicle from moving unexpectedly. Do not start your engine with the air cleaner removed and do not remove it while the engine is running. Working with engine on (manual transaxle) 1. Set the parking brake, depress the clutch and place the gearshift in neutral. 2.
31MMCen 4/13/99 2:17 PM Page 162 Maintenance and care Opening the hood • Pull the handle (1) located under the instrument panel. 3 4 7 1 C H 8 0 x 1000 TRACTION TRACTION TROL CONTROL O/D OFF 1 • Release the safety catch by reaching under the hood (2) (adjacent to the Mercury emblem) and pushing it to the left. To close, replace the support strut in its retaining clip, lower the hood and allow it to drop into the catch for the last 20 – 30 cm (8 – 12 inches).
31MMCen 4/13/99 2:17 PM Page 163 Maintenance and care 2.0 litre EFI-engine compartment Power steering reservoir Engine coolant reservoir Windshield Engine oil washer fluid dipstick reservoir Automatic Brake fluid transaxle reservoir dipstick (if equipped) Engine oil filler cap Battery Air cleaner Power distribution box For ease of identification, all filler caps and the engine oil dipstick are marked yellow/black.
31MMCen 4/13/99 2:17 PM Page 164 Maintenance and care 2.5 litre EFI-engine compartment Power steering reservoir Engine coolant reservoir Windshield washer fluid reservoir Engine oil dipstick Automatic Brake fluid transaxle reservoir dipstick (if equipped) Engine oil filler cap Battery Air cleaner Power distribution box For ease of identification, all filler caps and the engine oil dipstick are marked yellow/black.
31MMCen 4/13/99 2:17 PM Page 165 ROLEUM PET I FOR GASOLINE ENGINES PET R TIFIE D CE ROLEUM I UTE AMERI CA N FOR GASOLINE ENGINES TIT CE Motorcraft NS Do not use supplemental engine oil additives, oil treatments or engine treatments. They are unnecessary and could, under certain conditions, lead to engine damage which is not covered by Ford Warranty. N UTE TIT NS Engine oil Use SAE 5W-30 motor oil CERTIFIED FOR GASOLINE ENGINES by the American Petroleum Institute.
31MMCen 4/13/99 2:17 PM Page 166 Maintenance and care 6. If the oil level is below the minimum line, add engine oil as necessary. If the oil level is beyond the maximum line, engine damage or high oil consumption may occur and some oil must be removed from the engine by a service technician. 7. Put the dipstick back in and ensure it is fully seated. Continuous contact with used motor oil has caused cancer in laboratory mice. Adding engine oil 1. Check the engine oil.
31MMCen 4/13/99 2:17 PM Page 167 Maintenance and care Refer to the maintenance guide and or service guide for additional information. It is recommended you use the appropriate Motorcraft oil filter (or another brand meeting Ford specifications) for your engine application. Always dispose of used automotive fluids in a responsible manner. Follow your community’s standards for disposing of these types of fluids. Call your local recycling center to find out more about recycling automotive fluids.
31MMCen 4/13/99 2:17 PM Page 168 Maintenance and care Brake/clutch fluid reservoir Brake and clutch fluid systems are supplied from the same reservoir. The level of the fluid must lie between the MIN and MAX marks on the side of the reservoir. If the level falls below the MIN mark, the brake fluid level warning light on the instrument cluster will illuminate. Add only DOT 3, DOT 4 or Super DOT 4 brake fluid that meets the Ford specification (see the chapter Capacities and specifications).
31MMCen 4/13/99 2:17 PM Page 169 Maintenance and care Engine coolant maintenance Checking and adding engine coolant Check the level of the coolant in the reservoir at least once a month. Be sure to read and understand Precautions when servicing your vehicle in this chapter. If the engine coolant has not been checked for a long period of time, the engine coolant reservoir may eventually empty. If this occurs, add engine coolant to the coolant reservoir.
31MMCen 4/13/99 2:17 PM Page 170 Maintenance and care When adding engine coolant Ford recommends Ford Premium Cooling System Fluid, which is an optimized formula that will protect all metals and rubber elastomers used in Ford engines for four years or 80 000 km (50 000 miles). It is neither necessary nor recommended to use supplemental coolant additives in your gasolinepowered vehicle. These additives may harm your engine coolant system.
31MMCen 4/13/99 2:17 PM Page 171 Maintenance and care Recycled engine coolant Ford Motor Company recommends that Ford and Lincoln-Mercury dealers use recycled engine coolant produced by Ford-approved processes. Not all coolant recycling processes produce coolant which meets Ford specifications ESEM97B44-A, and use of such coolant may harm engine and cooling system components. Always dispose of used automotive fluids in a responsible manner.
31MMCen 4/13/99 2:17 PM Page 172 Maintenance and care Adding engine coolant 1. Before removing the engine coolant recovery cap, turn the engine off and allow it to cool. 2. When the engine is cool, turn and remove the cap. X A M Never remove the coolant recovery cap while the engine is running or hot. • Step back for a moment while the pressure in the reservoir is released. • Stand away from the reservoir opening. Hot steam or coolant spray may be released. 3.
31MMCen 4/13/99 2:17 PM Page 173 Maintenance and care Severe winter climate If you drive in extremely cold climates (less than -36°C [-34°F]), it may be necessary to increase the coolant concentration above 50%. Refer to the chart on the coolant container to ensure the coolant concentration in your vehicle is such that the coolant will not freeze at the temperature level in which you drive during the winter months. Never increase the engine coolant concentration above 60%.
31MMCen 4/13/99 2:17 PM Page 174 Maintenance and care Automatic transaxle fluid Follow the scheduled service intervals outlined in the maintenance guide and or service guide. Before adding any fluid, make sure the correct type is used. The type of fluid used is normally indicated on the dipstick and/or dipstick handle and also in the Lubricant specifications section in the Capacities and specifications chapter.
31MMCen 4/13/99 2:17 PM Page 175 Maintenance and care The transaxle fluid should be in this range if at normal operating temperature 66°C - 77°C (150°F - 170°F). The transaxle fluid should be in this range if at room temperature 10°C - 35°C (50°F - 95°F). If the vehicle has been operated for an extended period at high speeds, in the city during hot weather or pulling a trailer, the vehicle should be turned off for about thirty minutes to allow the fluid to cool before checking. 1.
31MMCen 4/13/99 2:17 PM Page 176 Maintenance and care 6. Remove the dipstick and inspect the fluid level. The fluid level should be in the crosshatched area on the dipstick. 7. If necessary, add fluid in .25 litre (1/2 pint) increments through the filler tube until the level is correct. 8. If an overfill occurs, excess fluid should be removed by a qualified technician. An overfill condition of transaxle fluid may cause shift and/or engagement concerns and/or possible damage.
31MMCen 4/13/99 2:17 PM Page 177 Maintenance and care If you see any corrosion on the battery cables or terminals, remove the cables from the terminal(s) and clean with a wire brush. You can neutralize the acid with a solution of baking soda and water. Reinstall the cables when you are done cleaning them, and apply a small quantity of grease to the top of each battery terminal to help prevent corrosion.
31MMCen 4/13/99 2:17 PM Page 178 Maintenance and care Applying too much pressure on the ends when lifting a battery could cause acid to spill. Lift the battery with a carrier or with your hands on the opposite corners. Batteries normally produce explosive gases which can cause personal injury. Do not allow flames, sparks or lit tobacco to come near the battery. Always cover your face and protect your eyes and also provide ventilation. Follow these steps to minimize risk of personal injury.
31MMCen 4/13/99 2:17 PM Page 179 Maintenance and care Relearning the idle function Because your vehicle’s engine is electronically controlled, some control conditions are maintained by power from the battery. When the battery is disconnected or a new battery is installed, the computer must “relearn” its idle conditions before your vehicle can drive properly. To begin this process: 1. Put the automatic transaxle gearshift in P (Park). Put the manual transaxle gearshift in neutral. 2.
31MMCen 4/13/99 2:17 PM Page 180 Maintenance and care Checking wiper blades Check the wiper blades on your vehicle for roughness by running the tips of your fingers over the edge of the blade. Traces of grease, silicone and fuel prevent wiper blades from functioning properly. We recommend Ford cleaning solutions or equivalent to clean wiper blades. Change the wiper blades on your vehicle at least once a year.
31MMCen 4/13/99 2:17 PM Page 181 Maintenance and care 2. Remove the plastic caps from the screws on the grille. Remove the screws. 3. Open the hood. Pull off the rubber weatherstrip at the back of the engine compartment. Remove the screws that hold the grille, separate the two halves and remove the grille. 4. The filter is in a housing at the back of the engine compartment, on the passenger side. Pull off the two clips on the sides of the housing. Slide out the top part of the housing and filter. 5.
31MMCen 4/13/99 2:17 PM Page 182 Maintenance and care INFORMATION ABOUT TIRE QUALITY GRADES New vehicles are fitted with tires that have their Tire Quality Grade (described below) molded into the tire’s sidewall. These Tire Quality Grades are determined by standards that the United States Department of Transportation has set. Tire Quality Grades apply to new pneumatic tires for use on passenger cars.
31MMCen 4/13/99 2:17 PM Page 183 Maintenance and care Treadwear The treadwear grade is a comparative rating based on the wear rate of the tire when tested under controlled conditions on a specified government test course. For example, a tire graded 150 would wear one and one-half (1 1/2) times as well on the government course as a tire graded 100.
31MMCen 4/13/99 2:17 PM Page 184 Maintenance and care Temperature A B C The temperature grades are A (the highest), B, and C, representing the tire’s resistance to the generation of heat and its ability to dissipate heat when tested under controlled conditions on a specified indoor laboratory test wheel. Sustained high temperature can cause the material of the tire to degenerate and reduce tire life, and excessive temperature can lead to sudden tire failure.
31MMCen 4/13/99 2:17 PM Page 185 Maintenance and care Checking tire pressure Check the tire pressure periodically after the vehicle has been parked for at least one hour or has been driven less than 5 km (3 miles). Inflate the tires as necessary. To check the tire pressure, insert the tire pressure gauge into the valve. The cold pressure amount is listed on the Safety Compliance Certification label.
31MMCen 4/13/99 2:17 PM Page 186 Maintenance and care Replacing tires Replace tires when the wear band is visible through the tire treads. When replacing full size tires, never mix radial, biasbelted, or bias-type tires. Use only the tire sizes that are listed on the tire pressure decal. Make sure that all tires are the same size, speed rating, and load-carrying capacity. Use only the tire combinations recommended on the decal.
31MMCen 4/13/99 2:17 PM Page 187 Maintenance and care Dispose of worn tires in accordance with local environmental regulations. Refer to the Safety Compliance Certification label to determine the specific size tire and wheel Ford Motor Company recommends for use on this vehicle. When purchasing replacement tires for your vehicle, consult your dealer or a qualified service technician to ensure that the correct tire type is used.
31MMCen 4/13/99 2:17 PM Page 188 Maintenance and care Using snow tires and chains Snow tires must be the same size and grade as the tires you currently have on your vehicle. The tires on your vehicle have allweather treads to provide traction in rain and snow. However, in some climates, using snow tires and chains may be necessary. Ford offers snow chains as a Ford approved accessory and recommends use of these or their equivalents on approved tires.
31MMCen 4/13/99 2:17 PM Page 189 Maintenance and care • Drive cautiously. If you hear the chains rub or bang against the vehicle, stop and retighten them. If this does not work, remove the chains to prevent vehicle damage. • Local regulations may prohibit or restrict the use of tire chains. Investigate the laws and regulations in your area before installing chains. • Avoid overloading your vehicle. • Do not use tire chains on temporary spare tires.
31MMCen 4/13/99 2:17 PM Page 190 Maintenance and care IMPORTANT FUEL INFORMATON Important safety precautions Do not overfill the fuel tank. The pressure in an overfilled tank may cause leakage and lead to fuel spray and fire. If you do not use the proper fuel cap, the pressure in the fuel tank can damage the fuel system or cause it to work improperly in a collision. The fuel system may be under pressure.
31MMCen 4/13/99 2:17 PM Page 191 Maintenance and care Observe the following guidelines when handling automotive fuel: • Extinguish all smoking materials and any open flames before fueling your vehicle. • Always turn off the vehicle before fueling. • Make sure the fuel cap is correctly fitted after fueling. Failure to do so may cause the on board diagnostic system to illuminate the CHECK ENGINE light. • Automotive fuels can be harmful or fatal if swallowed.
31MMCen 4/13/99 2:17 PM Page 192 Maintenance and care Choosing the right fuel Use only UNLEADED FUEL. The use of leaded fuel is prohibited by law and could damage your vehicle. The damage may not be covered by your warranty. Your vehicle was not designed to use fuel containing manganesebased additives such as MMT.
31MMCen 4/13/99 2:17 PM Page 193 Maintenance and care Octane recommendations Your vehicle is designed to use regular gasoline with an (R+M)/2 octane rating of 87. We do not recommend gasolines labeled as “regular” in high altitude areas that are sold with octane ratings of 86 or even less. MINIMUM OCTANE RATING (R+M)/2 Method 87 Do not be concerned if your vehicle sometimes knocks lightly.
31MMCen 4/13/99 2:17 PM Page 194 Maintenance and care Cleaner air Ford approves the use of gasolines to improve air quality, including reformulated gasolines that contain oxygenates such as a maximum of 10% ethanol or 15% MTBE. There should be no more than 5% methanol with cosolvents and additives to protect the fuel system. Fuel filler cap If the “check engine” indicator comes on and stays on when you start the engine, the fuel filler cap may not be properly installed.
31MMCen 4/13/99 2:17 PM Page 195 Maintenance and care Calculating fuel economy To accurately calculate your vehicle’s fuel economy: 1. Fill the tank completely and record the initial odometer reading. 2. Each time you fill the tank, record the amount of fuel added (in litres or gallons). 3. After at least three to five fillups, fill the fuel tank and record the current mileage reading. 4. Use one of the following equations to calculate fuel economy. Litres used x 100 / Total kilometres traveled.
31MMCen 4/13/99 2:17 PM Page 196 Maintenance and care EMISSION CONTROL SYSTEM Your vehicle is equipped with various emission control components and a catalytic converter which will enable your vehicle to comply with applicable exhaust emission standards. To make sure that the catalytic converter and other emission control components continue to work properly: • Use unleaded fuel only. • Avoid running out of fuel. • Do not turn off the ignition while your vehicle is moving, especially at high speeds.
31MMCen 4/13/99 2:17 PM Page 197 Maintenance and care Do not park, idle or drive your vehicle in dry grass or other dry ground cover. The emission system heats up the engine compartment and exhaust system, which can start a fire. Alternative design Watch for fluid leaks, strange odors, smoke, loss of oil pressure, engine overheating, illumination of the charging system warning light or the check engine warning light. These events could indicate that the emission control system is not working properly.
31MMCen 4/13/99 2:17 PM Page 198 Maintenance and care Do not make any unauthorized changes to your vehicle or engine. By law, vehicle owners and anyone who manufactures, repairs, services, sells, leases, trades vehicles, or supervises a fleet of vehicles are not permitted to intentionally remove an emission control device or prevent it from working. Information about your vehicle's emission system is on the Vehicle Emission Control Information Decal located under the hood.
31MMCen 4/13/99 2:17 PM Page 199 Maintenance and care If the vehicle’s powertrain system or its battery has just been serviced, the OBD-II system is reset to a “not ready for I/M test“ condition. To ready the OBD-II system for I/M testing, a minimum of 30 minutes of city and highway driving is necessary as described below: • First, at least 10 minutes of driving on an expressway or highway. • Next, at least 20 minutes of driving in stop and go, city-type traffic with at least four idle periods.
31MMCen 4/13/99 2:17 PM Page 200 Maintenance and care BULB REPLACEMENT Removing the headlamps assembly Handle a halogen headlamp bulb carefully and keep out of children’s reach.Grasp the bulb only by its plastic base and do not touch the glass. The oil from your hand could cause the bulb to break the next time the headlamps are operated. The bulbs for the low beam, high beam, turn signals and side lamps are housed in the lamp assembly.
31MMCen 4/13/99 2:17 PM Page 201 Maintenance and care Reinstalling the headlamp assembly The gasket lining must be seated properly around the lamp assembly when reinstalling. All bulb connectors must be correctly connected. Install in the reverse order. Headlamp – low beam Pull off the connector, release the wire clip and replace the bulb. Pay attention to the tab guides when replacing. Headlamps – high beam Replacement instructions are the same as for the low beam headlamp.
31MMCen 4/13/99 2:17 PM Page 202 Maintenance and care Front turn signal/side lamps Pull the socket out. Pull the bulb out and replace it. Foglamps (if equipped) 1. Turn the bulb counterclockwise and pull it out of the light assembly. 2. Remove the electrical connector. 3. Fit the new bulb in reverse order (do not touch the glass part of the bulb).
31MMCen 4/13/99 2:17 PM Page 203 Maintenance and care Brake/turn signal/tail lamps 1. Disconnect the electrical connector. 2. Turn the socket counterclockwise and pull it out. 3. Turn the bulb counterclockwise and pull it out. 4. To install, fit the new bulb in reverse order. Backup lamps The backup lamps are located in the trunk lid. Replacement instructions are the same as for the brake/turn signal/tail lamps. License plate lamp Unscrew the bulb holder with a screwdriver.
31MMCen 4/13/99 2:18 PM Page 204 Maintenance and care High-mounted brake lamp Enter the rear seat compartment. 1. Remove the high mounted stop lamp assembly. 2. Remove the red bulb cover. 3. Remove inoperative stop lamp bulb. To install, fit the new bulb in reverse sequence. On vehicles equipped with a rear spoiler, the high-mounted brake lamp is included in the spoiler. See your dealer for repair. Luggage compartment lamp Pry out the light assembly from the holder with a flat screwdriver.
31MMCen 4/13/99 2:18 PM Page 205 Maintenance and care Interior lamps with reading lamps (if equipped) Remove the clip located on lens to access the center bulb. To replace the reading lamp bulbs, remove the two retaining screws to access the back of the lamp. Then, unclip the bulb covers and replace the bulb. Interior lamps (sunroof equipped vehicles) Open the lamp assembly. The bulbs can be replaced after the contact plate has been hinged back.
31MMCen 4/13/99 2:18 PM Page 206 Maintenance and care Bulb specifications Function Trade number Front /turn lamp 3457 NA Headlamp (high) 9005 Headlamp (low) 9006 Foglamp/License plate lamp 893 Rear tail/turn/brake lamp 1157 Backup lamp 1156 High-mounted brake lamp 2723 License plate lamp C5W Interior lamp 211-2 Reading lamp 578 206
31MMCen 4/13/99 2:18 PM Page 207 Maintenance and care AIMING THE HEADLAMPS The alignment of your headlamps should be checked if: • Oncoming motorists frequently signal you to deactivate your high beams, and your high beams are not activated. • The headlamps do not seem to provide enough light for clear night vision. • The headlamp beams are pointed substantially away from a slightly down and to the right position.
31MMCen 4/13/99 2:18 PM Page 208 Maintenance and care You will need one 7 mm box wrench, open end wrench or T-15 Torx drive. If the vehicle has been in an accident, the vehicle’s front structure should be properly aligned before aiming the headlamps. Adjusting the horizontal aim 1. Make sure the vehicle is on a level surface. 2.With the hood open, locate the horizontal indicator and adjusting screw. Through the viewing hole on the outboard side of the headlamp. 3.
31MMCen 4/13/99 2:18 PM Page 209 Maintenance and care Adjusting the vertical aim The numbers shown on the vial indicate beam direction in degrees up or down. 1. Make sure the vehicle is on level ground. 2. With the hood open, locate the bubble level vertical aim indicator, and adjusting screw. It is visible when viewed from the above the rear of the headlamp. 3. Turn the vertical adjusting screw until the bubble is centered over the “0” reference mark on the vertical indicator. 4.
31MMCen 4/13/99 2:18 PM Page 210 Maintenance and care VEHICLE CARE Washing your vehicle Only use car washing areas that have environmentally friendly drainage systems. Wash your vehicle regularly with cold or lukewarm water. Never use strong detergents or soap. If your vehicle is particularly dirty, use a quality car wash detergent. Always use a clean sponge, washing glove or similar device and plenty of water for best results.
31MMCen 4/13/99 2:18 PM Page 211 Maintenance and care During winter months, it is especially important to wash the vehicle on a regular basis. Large quantities of dirt and road salt are difficult to remove, and they also cause damage to the vehicle. Remove or lower any exterior accessories, such as antennas, before entering a car wash. Remove particles such as bird droppings, tree sap, insect remains, tar spots, road salt and industrial fallout immediately.
31MMCen 4/13/99 2:18 PM Page 212 Maintenance and care Repairing paint chips Minor scratches or paint damage from road debris may be repaired with touch-up paint, paint repair foil or aerosol spray from the Ford accessories line. Observe the application instructions on the products. Cleaning the wheels Wash the wheels with the same detergent you use to clean the body of your vehicle. Do not use acid-based wheel cleaners, steel wool, fuel or strong detergents.
31MMCen 4/13/99 2:18 PM Page 213 Maintenance and care Cleaning the engine Engines are more efficient when they are clean because grease and dirt buildup act as insulators and keep the engine warmer than normal. Follow these guidelines to clean your engine: • Take care when using a power washer to clean the engine. The high pressure fluid could penetrate the sealed parts and cause damage. • Do not spray with cold water, to avoid cracking the engine block.
31MMCen 4/13/99 2:18 PM Page 214 Maintenance and care Cleaning plastic exterior parts Use a vinyl cleaner for routine cleaning of plastic. Clean with a tar remover if necessary. Do not clean plastic parts with thinners, solvents or petroleum-based cleaners. Cleaning the exterior lamps Wash the exterior lamps with the same detergent you use to wash the exterior of your vehicle. Use glass cleaner or tar remover if necessary.
31MMCen 4/13/99 2:18 PM Page 215 Maintenance and care Cleaning the instrument panel Clean the instrument panel with a damp cloth, then dry with a dry cloth. 3 4 H 7 8 0 x 1000 TRACTION CONTROL Any cleaner or polish that increases the gloss of the upper portion of the instrument panel should be avoided. The dull finish in this area is to help protect the driver from undesirable windshield reflection.
32MCSen 4/13/99 2:21 PM Page 216 Maintenance and care Cleaning and maintaining the safety belts Clean the safety belts with a mild soap solution recommended for cleaning upholstery or carpets and warm water. Do not bleach or dye the belts, because these actions may weaken the belt webbing. Check the safety belt system periodically to make sure there are no nicks, wear or cuts.
32MCSen 4/13/99 2:21 PM Page 217 Capacities and specifications Motorcraft parts Part number Component 2.0 litre engine 2.
32MCSen 4/13/99 2:21 PM Page 218 Capacities and specifications Capacities Engine oil - with filter - without Manual transaxle Automatic transaxle with oil cooler Power steering Cooling system with heating Windshield washer fluid Fuel tank Braking system * Total capacity ** with automatic transaxle 218 2.0 litre engine 2.5 litre engine 4.25 l (4.5 qts) 3.75 l (4.0 qts) 5.5 l (5.8 qts) 5.0 l (5.3 qts) 1.9 l (2.0 qts) 8.5 l (9.0 qts.) 9.6 l (10.2 qts) Fill to MAX mark 6.6 l (7.0 qts)* 7.1 l (7.
32MCSen 4/13/99 2:21 PM Page 219 Capacities and specifications Lubricant Specifications Ford part name or equivalent Ford part number Ford specification High performance DOT 3 brake fluid, DOT 4 brake fluid or Super DOT 4 C6AZ-19542-AB for DOT 3 ESA-M6C25-A (DOT 3) ESD-M6C57-A (Super DOT 4) Engine coolant Premium engine coolant E2FZ-19549-AA CXC-8-B ESE-M97B44-A Engine oil Motorcraft motor oil 5W-30 super premium XO-5W30-QSP American Petroleum Institute Certification Mark and WSS-M2C153-G
32MCSen 4/13/99 2:21 PM Page 220 Capacities and specifications Engine data Engine Capacity Power output Max. torque 2.0 litre Engine 2.5 litre Engine cm3 kW (HP) at rpm 1988 2544 96 (125) 5500 125 (170) 6250 Nm (lb-ft) at rpm 176 (130) 4000 220 (162) 4250 87 Octane Fuel required Continuous engine speed rpm 6150 6700 Max.
32MCSen 4/13/99 2:21 PM Page 221 Capacities and specifications D A C E B Dimensions mm (inches) A = Maximum length 4556 (179.4) B = Overall width (without mirrors) 1751 (68.9) C = Overall height (curb weight) D = Wheelbase E = Track 1380 - 1427 (54.3 - 56.2) 2704 (106.5) Front 1499 - 1518* (59.0 - 59.8) Rear 1483 - 1502* (58.4 - 59.
33MMCAen 04/14/1999 9:49 AM Page 222 Capacities and specifications VEHICLE IDENTIFICATION NUMBER The vehicle identification number (VIN) is attached to a metal tag and is located on the front driver’s side of the instrument panel. The VIN tag may be seen by looking through the windshield from the outside of the vehicle.
33MMCAen 04/14/1999 9:49 AM Page 223 Customer assistance GETTING ROADSIDE ASSISTANCE To fully assist you should you have a vehicle concern. Ford offers a complimentary roadside assistance program. This program is separate from the New Vehicle Limited Warranty. The service is available: • 24-hours, seven days a week • for the Basic warranty period (Canada) or New Vehicle Limited Warranty period (U.S.
33MMCAen 04/14/1999 9:49 AM Page 224 Customer assistance Ford extended service plan You can get more protection for your new car or light truck by purchasing Ford Extended Service Plan (Ford ESP) coverage. Ford ESP is an optional service contract which is backed by Ford Motor Company or Ford Motor Service Company (in the U.S.) and Ford of Canada (in Canada). It provides: If you did not take advantage of the Ford Extended Service Plan at the time of purchasing your vehicle, you may still be eligible.
33MMCAen 04/14/1999 9:49 AM Page 225 Customer assistance Getting the service you need At home Ford Motor Company and Ford of Canada have authorized dealerships to service your vehicle. When you need warranty repairs your selling dealer would like you to return to it for that service, but you may also take your vehicle to another Ford Motor Company dealership authorized for warranty repairs.
33MMCAen 04/14/1999 9:49 AM Page 226 Customer assistance Please have the following information available when contacting Ford Customer Assistance: THE DISPUTE SETTLEMENT BOARD (U.S.
33MMCAen 04/14/1999 9:49 AM Page 227 Customer assistance • sales disputes between customer and dealer except those associated with warranty repairs or concerns with the vehicle's performance as designed • a request for reimbursement of consequential expenses unless a service or product concern being reviewed • items not covered by the New Vehicle Limited Warranty (including maintenance and wear items) • alleged personal injury/property damage claims • cases currently in litigation • vehicles not used prima
33MMCAen 04/14/1999 9:49 AM Page 228 Customer assistance To properly review your case, the Board needs the following information: • legible copies of all documents and maintenance or repair orders relevant to the case • the year, make, model, and Vehicle Identification Number (VIN) listed on your vehicle ownership license • the date of repair(s) and mileage at the time of occurrence(s) • the current mileage • the name of the dealer who sold or serviced the vehicle • a brief description of your unresolved c
33MMCAen 04/14/1999 9:49 AM Page 229 Customer assistance After a case is reviewed, the Board mails you a decision letter and a form on which to accept or reject the Board's decision. The decisions of the Board are binding on Ford (and, in some cases, on the dealer) but not on consumers who are free to pursue other remedies available to them under state or federal law.
33MMCAen 04/14/1999 9:49 AM Page 230 Customer assistance If your vehicle must be serviced while you are traveling or living in Central or South America, the Caribbean, or the Middle East, contact the nearest Ford dealership. If the dealership cannot help you, write or call: FORD MOTOR COMPANY WORLDWIDE DIRECT MARKET OPERATIONS 1555 Fairlane Drive Fairlane Business Park #3 Allen Park, Michigan 48101 U.S.A.
33MMCAen 04/14/1999 9:49 AM Page 231 Customer assistance Ford Triple Clean Ford Ultra-Clear Spray Glass Cleaner * May be sold with the Motorcraft name A wide selection of accessories is available through your local authorized Ford, Lincoln-Mercury or Ford of Canada dealer. These quality accessories have been specifically engineered to fulfill your automotive needs; they are custom designed to complement the style and aerodynamic appearance of your vehicle.
33MMCAen 04/14/1999 9:49 AM Page 232 Customer assistance Travel equipment Console Console armrest Daytime running lights Factory luggage rack Factory luggage rack adapters Fog lights Framed luggage covers Heavy-duty battery Neutral towing transfer case kit (Explorer 4.
33MMCAen 04/14/1999 9:49 AM Page 233 Customer assistance For maximum vehicle performance, keep the following information in mind when adding accessories or equipment to your vehicle: • When adding accessories, equipment, passengers and luggage to your vehicle, do not exceed the total weight capacity of the vehicle or of the front or rear axle (GVWR or GAWR as indicated on the Safety compliance certification label). Consult your dealer for specific weight information.
33MMCAen 04/14/1999 9:49 AM Page 234 Customer assistance ORDERING ADDITIONAL OWNER'S LITERATURE To order the publications in this portfolio in the United States: Make checks payable to: HELM, INCORPORATED P.O. Box 07150 Detroit, Michigan, 48207 For a free publication catalog, order toll free: 1-800-782-4356 Monday-Friday 8:00 a.m. - 6:00 p.m. EST., for credit card holders only. To order the publications in this portfolio in Canada Make cheques payable to: Ford Motor Company of Canada, Ltd.
33MMCAen 04/14/1999 9:49 AM Page 235 Reporting safety defects REPORTING SAFETY DEFECTS (U.S. ONLY) If you believe that your vehicle has a defect that could cause a crash, or could cause injury or death, you should immediately inform the National Highway Traffic Safety Administration (NHTSA) in addition to Ford Motor Company. If NHTSA receives similar complaints, it may open an investigation, and if it finds that a safety defect exists in a group of vehicles, it may order a recall and remedy campaign.
4MInden 04/14/1999 9:51 AM Page 236 Index A Page Accessory position on the ignition . . . . . . . . . . . . . . . . . .52 Additives, engine oil . . . . . . . . .165 Air bag supplemental restraint system and child safety seats . . . . . . . .84 description . . . . . . . . . . . . . . . . .83 disposal . . . . . . . . . . . . . . . . . . .88 indicator light . . . . . . . . . . .13, 87 operation . . . . . . . . . . . . . . . . . .85 wearing safety belts . . . . . . . . .
4MInden 04/14/1999 9:51 AM Page 237 Index C Page Child safety restraints built-in child seat . . . . . . . . . . .93 child safety seats . . . . . . . . . . . .99 children and safety belts . . .89, 91 Child safety seats and air bags . . . . . . . . . . . . . . . .84 attaching with tether straps . .102 automatic locking mode . . . . . .77 Childproof safety locks . . . . . . . .63 Chimes . . . . . . . . . . . . . . . . . . . . .17 Circuit breakers . . . . . . . . . . . . .
4MInden 04/14/1999 9:51 AM Page 238 Index E Page Engine oil changing oil and filter . . . . . . .165 checking and adding . . . . . . . .165 dipstick . . . . . . . . . . . . . . . . . .163 disposal . . . . . . . . . . . . . . . . . .167 engine oil pressure warning light . . . . . . . . . . . . . . .16 filter specifications . . . . . . . . .217 refill capacities . . . . . . . . . . . .218 specifications . . . . . . . . . . . . . .219 Exhaust fumes . . . . . . . . . .
4MInden 04/14/1999 9:51 AM Page 239 Index H Page High-mount brakelamp . . . . . . .204 Hood latch location . . . . . . . . . . . . . .162 release lever . . . . . . . . . . . . . .162 Horn . . . . . . . . . . . . . . . . . . . . . . .54 I Identification Number, Vehicle (VIN) . . . . . . . . . . . . . . . . . . . . .222 Idle, relearning . . . . . . . . . . . . .179 Idle, speed . . . . . . . . . . . . .179, 220 Ignition chime . . . . . . . . . . . . . . . . . . . . .17 positions on the ignition . . . . . .
4MInden 04/14/1999 9:51 AM Page 240 Index M Page Maintenance (see Servicing) Manual transaxle backing up (reverse) . . . . . . . .125 clutch . . . . . . . . . . . . . . . . . . . .123 fluid, capacity . . . . . . . . . . . . .218 shift speeds . . . . . . . . . . . . . . .124 Mileage, calculating fuel economy . . . . . . . . . . . . . . . . . . .195 Mirrors side view mirrors (power) . . . .23 Motorcraft parts . . . . . . . . . . . .217 N National Highway Traffic Safety Administration . . . . . . . . . . . .
4MInden 04/14/1999 9:51 AM Page 241 Index S Page Safety belts (see Safety restraints) Safety chains, when towing a trailer . . . . . . . . . . . . . . . . . . . .134 Safety Compliance Certification Label . . . . . . . . . . . . . . . . . . . . . .132 Safety defects, reporting . . . . . .235 Safety restraints adjusting the safety belts . .77, 79 automatic locking mode (retractors) . . . . . . . . . . . . . . . .77 cleaning the safety belts . . . . .216 extention assembly . . . . . . . . . .81 for children .
4MInden 04/14/1999 9:51 AM Page 242 Index T Page Tires changing . . . . . . . . . . . . . . . . .146 checking tire pressure . . . . . .185 cleaning . . . . . . . . . . . . . . . . . .212 inspection and maintenance . .185 replacing . . . . . . . . . . . . . . . . .149 rotating . . . . . . . . . . . . . . . . . .185 snow tires and chains . . . . . . .188 spare tire . . . . . . . . . . . . . . . . .147 tire grades . . . . . . . . . . . . . . . .182 treadwear . . . . . . . . . . . . .183, 186 wearbands . . . .
4MInden 04/14/1999 9:51 AM Page 243 243
4MInden 04/14/1999 9:51 AM Page 244 Filling station information Fuel UNLEADED FUEL ONLY Octane 87 Fuel tank capacity 58.5 litres (15.4 gallons) Engine oil Use Motorcraft 5W-30 Formula E Fuel Economy Motor Oil, Ford specification WSS-M2C153-G.