
User`s manual


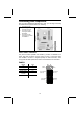
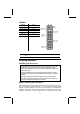


Table Of Contents
- Preface
- Chapter 1
- Introducing the Mainboard
- Chapter 2
- Installing the Mainboard
- Safety Precautions
- Quick Guide
- Installing the Mainboard in a Case
- Checking Jumper Settings
- Connecting Case Components
- Installing Hardware
- Installing the Processor
- Installing Memory Modules
- Installing a Hard Disk Drive/CD-ROM
- Installing a Floppy Diskette Drive
- Installing Add-on Cards
- Connecting Optional Devices
- Connecting I/O Devices
- Chapter 3
- Using BIOS
- About the Setup Utility
- Using BIOS
- Standard CMOS Features
- Advanced BIOS Setup Option
- Anti-Virus Protection (Disabled)
- Y2K Monitor (Disabled)
- CPU Internal Cache CPU Internal Cache (Enabled)
- External Cache (Enabled)
- CPU L2 Cache ECC Checking (Enabled)
- Quick Power On Self Test (Enabled)
- 1st/2nd/3rd Boot Device (Floppy/HDD-0/LS120)
- Boot Other Device (Enabled)
- Swap Floppy Drive (Disabled)
- Boot Up Floppy Seek (Enabled)
- Boot Up NumLock Status (On)
- ATA 66/100 IDE Cable MSG (Enabled)
- Gate A20 Option (Fast)
- Typematic Rate Setting (Disabled)
- Security Option (Setup)
- OS Select For DRAM > 64 MB (Non-OS2)
- HDD S.M.A.R.T Capability (Disabled)
- Report No FDD For WIN95 (Yes)
- Advanced Chipset Features Option
- Integrated Peripherals Option
- OnChip IDE Device
- OnChip PCI Device
- SuperIO Device
- POWER ON Function (Hot KEY)
- KB Power ON Password
- Hot Key Power ON (Ctrl-F12)
- Onboard FDC Controller (Enabled)
- Onboard Serial Port 1 (3F8/IRQ4)
- Onboard Serial Port 2 (2F8/IRQ3)
- UART Mode Select (Normal)
- UR2 Duplex Mode (Half)
- Onboard Parallel Port (378/IRQ7)
- Parallel Port Mode (ECP)
- ECP Mode Use DMA (3)
- Game Port Address (201)
- Midi Port Address (330)
- Midi Port IRQ (10)
- Init Display First (PCI Slot)
- OnChip USB Controller (All Enabled)
- USB Keyboard Support (Disabled)
- IDE HDD Block Mode (Enabled)
- Power Management Setup Option
- Power Management Timeouts
- Wake Up Calls
- ACPI Function (Enabled)
- ACPI Suspend Type (S1 (POS))
- Power Management Option (User Define)
- HDD Power Down (Disable)
- Suspend Mode (Disable)
- Video Off Option (Suspend --> Off)
- Video Off Method (DPMS Support)
- MODEM Use IRQ (3)
- Soft-Off by PWRBTN (Instant-Off)
- AC Resume Function (Always Off)
- IRQ/Event Activity Detect
- Press
to return to the previous screen. - PNP/PCI Configuration Option
- PC Health Status Option
- Frequency/Voltage Control
- Load Fail-Safe Defaults Option
- Load Optimized Defaults Option
- Set Password Option
- Save & Exit Setup Option
- Exit Without Saving
- Chapter 4
- Using the Mainboard Software
speed.
Warning: Overclocking components can adversely affect the reliability of
the system and introduce errors into your system. Overclocking can per-
manently damage the mainboard by generating excess heat in
components that are run beyond the rated limits.
This mainboard has a Socket 462 processor socket. When choosing a proc-
essor, consider the performance requirements of the system. Performance is
based on the processor design, the clock speed and system bus frequency of
the processor, and the quantity of internal cache memory and external cache
memory.
CPU Installation Procedure
The following illustration shows CPU installation components:
Note: The pin-1 corner is marked with an arrow
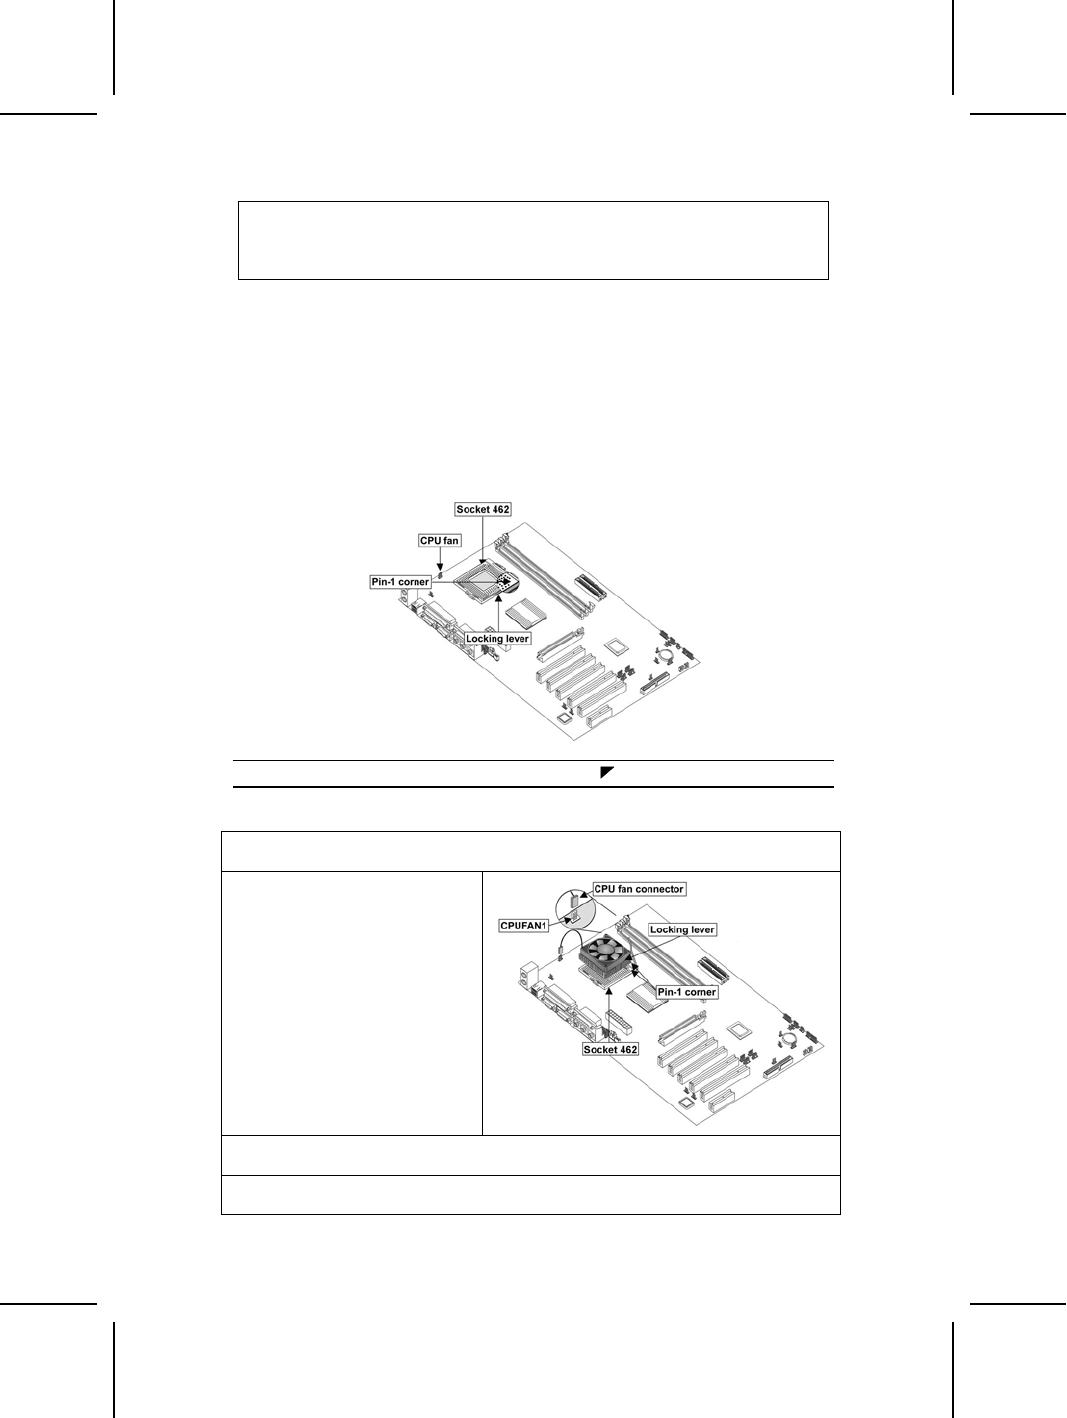
Follow these instructions to install the CPU:
1. Pull the CPU socket locking lever away from the socket to unhook it and raise
the locking lever to the upright position.
2. Identify the pin Pin-1 corner
on the CPU socket and the
pin Pin-1 corner on the
processor.
3. Match the Pin-1 corners and insert the processor into the socket. Do not use
force.
4. Swing the locking lever down and hook it under the latch on the edge of the
socket.
12