
User`s manual

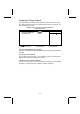
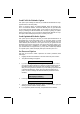
Table Of Contents
- Preface
- Chapter 1
- Introducing the Mainboard
- Chapter 2
- Installing the Mainboard
- Safety Precautions
- Quick Guide
- Installing the Mainboard in a Case
- Checking Jumper Settings
- Connecting Case Components
- Installing Hardware
- Installing the Processor
- Installing Memory Modules
- Installing a Hard Disk Drive/CD-ROM
- Installing a Floppy Diskette Drive
- Installing Add-on Cards
- Connecting Optional Devices
- Connecting I/O Devices
- Chapter 3
- Using BIOS
- About the Setup Utility
- Using BIOS
- Standard CMOS Features
- Advanced BIOS Setup Option
- Anti-Virus Protection (Disabled)
- Y2K Monitor (Disabled)
- CPU Internal Cache CPU Internal Cache (Enabled)
- External Cache (Enabled)
- CPU L2 Cache ECC Checking (Enabled)
- Quick Power On Self Test (Enabled)
- 1st/2nd/3rd Boot Device (Floppy/HDD-0/LS120)
- Boot Other Device (Enabled)
- Swap Floppy Drive (Disabled)
- Boot Up Floppy Seek (Enabled)
- Boot Up NumLock Status (On)
- ATA 66/100 IDE Cable MSG (Enabled)
- Gate A20 Option (Fast)
- Typematic Rate Setting (Disabled)
- Security Option (Setup)
- OS Select For DRAM > 64 MB (Non-OS2)
- HDD S.M.A.R.T Capability (Disabled)
- Report No FDD For WIN95 (Yes)
- Advanced Chipset Features Option
- Integrated Peripherals Option
- OnChip IDE Device
- OnChip PCI Device
- SuperIO Device
- POWER ON Function (Hot KEY)
- KB Power ON Password
- Hot Key Power ON (Ctrl-F12)
- Onboard FDC Controller (Enabled)
- Onboard Serial Port 1 (3F8/IRQ4)
- Onboard Serial Port 2 (2F8/IRQ3)
- UART Mode Select (Normal)
- UR2 Duplex Mode (Half)
- Onboard Parallel Port (378/IRQ7)
- Parallel Port Mode (ECP)
- ECP Mode Use DMA (3)
- Game Port Address (201)
- Midi Port Address (330)
- Midi Port IRQ (10)
- Init Display First (PCI Slot)
- OnChip USB Controller (All Enabled)
- USB Keyboard Support (Disabled)
- IDE HDD Block Mode (Enabled)
- Power Management Setup Option
- Power Management Timeouts
- Wake Up Calls
- ACPI Function (Enabled)
- ACPI Suspend Type (S1 (POS))
- Power Management Option (User Define)
- HDD Power Down (Disable)
- Suspend Mode (Disable)
- Video Off Option (Suspend --> Off)
- Video Off Method (DPMS Support)
- MODEM Use IRQ (3)
- Soft-Off by PWRBTN (Instant-Off)
- AC Resume Function (Always Off)
- IRQ/Event Activity Detect
- Press
to return to the previous screen. - PNP/PCI Configuration Option
- PC Health Status Option
- Frequency/Voltage Control
- Load Fail-Safe Defaults Option
- Load Optimized Defaults Option
- Set Password Option
- Save & Exit Setup Option
- Exit Without Saving
- Chapter 4
- Using the Mainboard Software

Load Fail-Safe Defaults Option
This option opens a dialog box that lets you install fail-safe defaults for all ap-
propriate items in the Setup Utility:
Press <Y> and then <Enter> to install the defaults. Press <N> and then <En-
ter> to not install the defaults. The fail-safe defaults place no great demands
on the system and are generally stable. If your system is not functioning cor-
rectly, try installing the fail-safe defaults as a first step in getting your system
working properly again. If you only want to install fail-safe defaults for a spe-
cific option, select and display that option, and then press <F6>.
Load Optimized Defaults Option
This option opens a dialog box that lets you install optimized defaults for all
appropriate items in the Setup Utility. Press <Y> and then <Enter> to install
the defaults. Press <N> and then <Enter> to not install the defaults. The opti-
mized defaults place demands on the system that may be greater than the
performance level of the components, such as the CPU and the memory. You
can cause fatal errors or instability if you install the optimized defaults when
your hardware does not support them. If you only want to install setup defaults
for a specific option, select and display that option, and then press <F7>.
Set Password Option
This item can be used to install a password. To install a password, follow
these steps:
1. Highlight the item Set Password on the main menu and press <Enter>.
2. The password dialog box appears.
Enter Password:
3. If you are installing a new password, type in the password. You cannot
use more than eight characters or numbers. The Set Password item dif-
ferentiates between upper and lower case characters. Press <Enter>
after you have typed in the password. If you are deleting a password that
is already installed press <Enter> when the password dialog box ap-
pears. You see a message that indicates that the password has been
disabled.
PASSWORD DISABLED !!!
Press any key to continue . . .
4. Press any key. You are prompted to confirm the password:
Confirm Password:
5. Type the password again and press <Enter>, or press <Enter> if you are
deleting a password that is already installed.
6. If you typed the password correctly, the password will be installed.
45