
User manual


User Manual : Tracks
User Manual
122
Tracks
Each Project has a user defined number of audio Tracks on which audio clips can be placed, or audio
inputs can be recorded. Blocks representing placed or recorded clips will appear on the Track as soon
as a clip has been placed or recorded onto it. The Track itself extends horizontally beneath the Time
Scale bar, and multiple Tracks are stacked vertically.
On the left side of each Track is a Header panel with various controls and information displays. Please
see: Track Header Panel on page 123
Some operations only apply to a selected track. A Track can be selected by left-clicking anywhere on
the Header which will then appear in a darker shade of gray. However, when selecting a Track, be care-
ful NOT to inadvertently click on any of the Track buttons, thereby changing a Track function: the Track
Name is often a good place to click in order to select it.
Adding and Deleting Tracks
A Project opens with the same number of Tracks as there are Input Strips defined in the Mixer for the
Project. However, Tracks can easily be added or deleted.
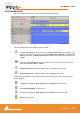
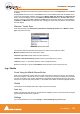
To add Tracks to the Timeline, select Tracks > New Audio Track from the Project window pull-down
menu. This opens a Create New Track dialog box. Type in the number of new Tracks to create and
click OK. The chosen number of Tracks will be added immediately above the currently selected Track.
To delete a Track, first select the Track to delete. Then choose Tracks > Delete from the Project win-
dow pull-down menu. The Track and all clips placed on it will be deleted. Note that only the clip or
pointer will be deleted, not the original Media File.
You can also right-click in the Track Header to add or delete Tracks.
Routing Tracks to / from the Mixer
When a Mixer is created, Pyramix will automatically create the same number of Tracks as Mixer Input
Strips (channels).
Pyramix will attempt to automatically route the output of each Track to a corresponding Mixer channel
input, so that Track 1 output routes to Mixer channel 1 input, Track 2 to Mixer channel 2, etc.
Similarly, Pyramix will attempt to automatically route each Mixer channel output to a corresponding
Track input, so that Mixer channel 1 output routes to Track 1 input, Mixer channel 2 to Track 2, etc.
These default Track I/O assignments can easily be changed by the user. See also: Adding Strips on
page 74
Virtual Tracks
A virtual track is a "mirror" of another existing track. It has the same output routing and contains the
same clips as an existing track, but it appears in the Project Editor as a separate track.
Note: Virtual tracks contain non-overlapping clips - that is, each clip on a virtual track is
not allowed to overlap with clips on a related virtual track. However, clips on the exact
same track can still be crossfaded. Virtual tracks can be used for the purpose of visual-
izing clips that may have a logical reason to appear on separate tracks of the editor,
even though they will be routed to the same mixer channel. An example of typical use
is to create virtual tracks to allow the display of various automation curves for a single
track.