
User manual


User Manual : Installing Pyramix Virtual Studio Software
User Manual
26
Installing Pyramix Virtual Studio Software
Driver Signing
Important! Before attempting to install the Pyramix Virtual Studio software please check the
following setting:
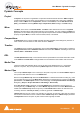
Start > Settings > Control Panel > System : Hardware
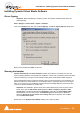
Click on the Hardware Tab, then click on Driver Signing. The Driver Signing Options dialog opens:
Make sure the middle option Warn is selected.
Running the Installer
Pyramix Virtual Studio and Virtual Transport software is provided on a CD-ROM. You may also
receive software updates as a download from our ftp site. In either case, install the Pyramix and Virtual
Transport software by running the Virtual Transport and Pyramix Virtual Studio Installer programs.
Choose the default location to install the software unless you have good reason to do otherwise. You
will also be asked to a create folders for your media files and for CD Images (these can be changed
later). If you receive any error messages regarding the Microsoft Digital Signature, ignore these and
continue on with the installation by clicking ‘Yes’.
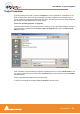
Important! After installation, please reboot the PC before attempting to launch Pyramix Virtual
Studio. Then open the VS3 control panel application (Start > Programs > Pyramix > VS3
control panel). The default Tab page is Configuration. Select 8 in the Internal Return Bus-
ses drop down menu box then click on the Autorouting button followed by the OK button.
When the VS3 panel, Do you want to save routing? dialogue box appears, click on OK to
close the VS3 control panel.
Double-click on the Pyramix Virtual Studio desktop icon to launch Pyramix.
Driver Signing Options dialog