
User manual


User Manual : Editing
User Manual
56
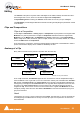
Clip Selection
Clicking in a clip selects it (the color becomes darker and Handles appear). The whole clip is ready for
editing. Clicking on other clips while holding down the Shift key adds them to the selection. If the clip is
grouped with other clips, this will select the entire group. To select a single clip in a group, first ungroup
the clips, then select the desired clip.
Region Selection
A Region Selection is a selected area of the Composition. A Region can include many clips on many
tracks or only a portion of a single clip. It is indicated as a darker gray rectangular area over one or more
Tracks. When selecting a clip within a group, the Region is automatically extended to the whole group.
This can be avoided by pressing the Shift key while selecting. A Region can be made by clicking and
dragging the mouse across one or more Tracks.
Of course, keyboard shortcuts exist for making Regions, and this is one of the most useful ways to
mark a region. The Pyramix default method of marking a Region in point is to press [ on the keyboard:
this selects everything to the right of the current Play Head Cursor location on the currently selected
track. ] marks a region out point: this selects everything to the left of the current Play Head Cursor loca-
tion, up to a previously marked in point. Once a Region has been defined in this manner it can be
extended or ‘grown’ across more tracks by using Ctrl +Shift +Cursor UP or DOWN arrows. Ctrl +Alt
+Shift +Cursor UP or DOWN shrinks. (Assuming the standard Pyramix keyboard shortcut assignments
are in use.)
Using the keyboard short-cuts, Regions can be easily made on-the-fly while playing or scrubbing the
Timeline. This is particularly efficient when used in conjunction with the Numerical Keypad transport
control short-cuts.
Dragging Clips into a Composition
The simplest way to place an audio clip into your Composition is by dragging it from a Media Drive or
Library. To drag from a Media Drive:
1. Click on the Media Management Tab to open the Project Management Panel Media window.
2. Under the Media list in the window, click on a mounted Media Drive or subfolder to select it. It will
turn dark blue. The Master Clips contained in that Media Drive will all be listed on the right side of
that window.
3. Select a Master Clip from the right side by clicking on it with the left mouse button. It will turn dark
blue.
4. Drag that Master Clip into a Track. You can place it into any Track, at any point on the Track.
The procedure for dragging a clip from a Library is virtually identical to that outlined above for Media
Drives. However, access the Library using the Global Libraries or Document Libraries Tabs in the
Project Management Panel.
Copy and Paste
Another way to get Master Clips into a Composition is by copying and pasting them.
1. Select a Master Clip in a Media Drive or Library.
2. Right-click on the Master Clip, and choose Copy from the pop-up.
3. Place the Play Head Cursor where you want to paste the beginning of the Master Clip.
4. Right-click on the Track to which you wish to place the clip, and choose Paste to Cursor from the
pop-up. The beginning of the clip will be placed at the Play Head in the Track on which you right-