
Manual


10
Important note: After the lockout code is entered, the user must cycle the power to activate the
lockout mechanism! BE SURE TO SAVE THIS CODE IN A SAFE PLACE IN THE EVENT YOU
FORGET THE NUMBER. ACCESS TO LOCKED-OUT FEATURES WILL BE DENIED WITHOUT THE
PROPER CODE.
Important note
: Check Lockout status after each MFT firmware update install session to ensure
desired status has been maintained.
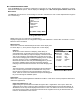
Clock/Timers
Clock Edit – option allows the user to correct the date and time of
the MFT’s internal clock. To select the Clock Edit feature, select the
Clock Edit option and press Chng. Choose a clock or date option to
adjust by selecting the desired menu line. Press Chng to choose that
option. Enter the correct value using the numeric keypad and text edit
key if needed. When complete, press Done. You will be asked if you
wish to save the new data. Press Yes to accept the new value. Pressing
No will take you back to the Clock Edit without making any changes
to the MFT clock.
The Backlight Timer – can be used to conserve battery life by setting the time to shut off after a fixed time
period. To change the Backlight Timer on the unit, select the Backlight option and press the Chng until the
desired time period is displayed. The Backlight Timer can be disabled or set to shut off after time periods from 1
to 30 minutes.
The Off Timer – can be used to conserve battery life by setting the timer to shut off after a period of keypad
inactivity. To change the Off Timer on the unit, select the Off Timer option and press Chng until the desired
time period is displayed. The Off Timer can be disabled or set to shut off after time periods from 1 minute up to
2 hours.
NOTE: The Off Timer is disabled when the optional AC Adapter (P/N 9B000007) is powering the MFT.
NOTE: When replacing the batteries, the date and time will remain active. Date & time information is
continuously powered by an internal, 10-year life back-up battery. This battery is not serviceable by the
user.
Other
This menu option provides access to Model Information, Battery type setup
and PC Comm Mode setup
Model Info menu option gives all the information about the model. It
shows the model name, serial number, firmware version, and date of last
firmware update. It also displays information about number of DOFs
installed, number of configuration stored, and percentage of free memory
for each.
Battery menu option allows the user to set the battery type being used. Alkaline, NiMH and Lithium batteries
all have different discharge curves. Selecting the correct battery type provides the most accurate battery gauge
icon performance. To change the battery type, select the menu option line until the correct type is shown.
HART menu option allows the user to select communication modes of Compatible or Fast. Compatible mode
sets the MFT 4010 as a secondary master (default mode per HART guidelines for handheld communicators).
Fast sets the MFT as a primary master and it then ignores all other masters that may be on line.
Enter PC Comm Mode menu option could be needed for communication with a PC. When the MFT is
connected to a PC for updates via DPC Manager (see DPC Manager section in this manual), a DB-9 serial
cable is used. Occasionally a DB-9 Serial cable is encountered that does not have a DTR line. The DTR line is
important to the update process because it is used to initiate and confirm communication between the two
machines. If a DB-9 cable without a DTR line is used, the MFT must be manually placed in the Enter PC
Configuration #
Current Settings:
Clock Edit
Backlight: 1 min
Off Timer: 1 min
Up Down Chng Back
Lockout Enable / Disable
Configuration #
Current Settings:
Model Info
Battery: Alkaline
HART: Compatible
Enter PC Comm. Mode
Up Down Chng Back
Current Settin
g
s: Other Menu