90003010 Rev C Merit Industries, Inc. 2525 State Rd. Bensalem, PA 19020-8529 (215) 639-4700; (800) 523-2760 http://www.meritind.
Megatouch MAXX Technical Service Manual Contents Section 1 - Cabinet Information General Information- All Cabinet Styles Dimensions/Shipping Weights General Information - Countertop Parts Illustrations General Information - Upright Parts Illustrations MAXX Parts List Section 2 - Hard Drive Information Hard Drive Numbers Program Numbers Part Numbers Security Key Numbers Section 3 - Troubleshooting Information Touchscreens Troubleshooting Touchscreen Calibration Motherboard Handling Precautions Motherboard
Megatouch MAXX Technical Service Manual Contents (cont’d) TN 46 (Linking MAXX games) TN 47 (Double Diamond name change) TN 48 (Motherboard identification) TN 49 (Telco motherboards and TournaMAXX operation) FLDBLL 22 (Thumbscrew on Elite MAXX games with integrated bill acceptor) FLDBLL 23 (Manufacturer defect in security keys) TN 54 (Replacing touchscreen controllers on EZ MAXX and MAXX Elite games) FLDBLL 26 (Software bug affecting high scores) FLDBLL 27 (Bill acceptor failures in New Jersey games) FLDBL
Section 1 Cabinet Information General Information- All Cabinet Styles Dimensions/Shipping Weights General Information - Countertop Parts Illustrations General Information - Upright Parts Illustrations MAXX Parts List
COPYRIGHT © 2005 MERIT INDUSTRIES, INC. Cabinet Information Section General Information The Megatouch MAXX video games were available in several different cabinet styles: Megatouch Full MAXX Dimensions: H - 15-1/4”; W - 20”; D - 18-1/4” Shipping dimensions: H - 26-1/2"; W - 23"; D - 21-1/4" Shipping Weight: 95 lbs. Megatouch Blue MAXX - MAXX Classic Dimensions: H - 15-1/4”; W - 20”; D - 18-1/4” Shipping dimensions: H - 26-1/2"; W - 23"; D - 21-1/4" Shipping weight: 95 lbs.
COPYRIGHT © 2005 MERIT INDUSTRIES, INC. Megatouch Full MAXX Dimensions: H - 15-1/4”; W - 20”; D - 18-1/4” Shipping dimensions: H - 26-1/2"; W - 23"; D - 21-1/4" Shipping weight: 95 lbs.
COPYRIGHT © 2005 MERIT INDUSTRIES, INC.
COPYRIGHT © 2005 MERIT INDUSTRIES, INC.
COPYRIGHT © 2005 MERIT INDUSTRIES, INC. Megatouch Blue MAXX - MAXX Classic Dimensions: H - 15-1/4”; W - 20”; D - 18-1/4” Shipping dimensions: H - 26-1/2"; W - 23"; D - 21-1/4" Shipping weight: 95 lbs.
COPYRIGHT © 2005 MERIT INDUSTRIES, INC.
COPYRIGHT © 2005 MERIT INDUSTRIES, INC.
COPYRIGHT © 2005 MERIT INDUSTRIES, INC.
COPYRIGHT © 2005 MERIT INDUSTRIES, INC. Megatouch MAXX Select - Slim MAXX Dimensions: H - 20"; W - 16"; D - 16-1/2" Shipping dimensions: H - 22”; W - 20”; D - 17-1/2” Shipping weight: 88 lbs.
COPYRIGHT © 2005 MERIT INDUSTRIES, INC.
COPYRIGHT © 2005 MERIT INDUSTRIES, INC.
COPYRIGHT © 2005 MERIT INDUSTRIES, INC. Megatouch EZ MAXX - MAXX Elite Dimensions: H - 16”; W - 17-1/2”; D - 15-1/2” Shipping dimensions: H - 18-1/2”; W - 21”; D - 20” Shipping weight: 75 lbs.
COPYRIGHT © 2005 MERIT INDUSTRIES, INC.
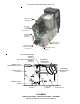
COPYRIGHT © 2005 MERIT INDUSTRIES, INC. HARD DRIVE (PA3021-01 - JADE 2 EDITION) MITSUBISHI 2 SLOT RISER BOARD (EC0028-02) LEFT END CAP (MP0001-01) EZ MAXX (MP0001-07) ELITE MAXX 586 MITSUBISHI MOTHERBOARD (SA0163-08) (SA0163-13) (NOVA) WITH PRINTER RIGHT END CAP (MP0001-02) EZ MAXX (MP0001-08) ELITE MAXX UNICORN MOTHERBOARD (EC0026-09) COIN DISTRIBUTION BOARD (SA10052-XX) POWER SUPPLY (EC7529-01) EZ MAXX (EC7531-01) ELITE MAXX SPEAKER ASSY.
COPYRIGHT © 2005 MERIT INDUSTRIES, INC.
COPYRIGHT © 2005 MERIT INDUSTRIES, INC.
COPYRIGHT © 2005 MERIT INDUSTRIES, INC. MAXX Upright Dimensions: H - 54 -1/4”; W - 24”; D - 26-1/2” Shipping dimensions: H - 57-3/4"; W - 28"; D - 30" Shipping weight: 250 lbs.
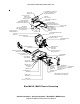
COPYRIGHT © 2005 MERIT INDUSTRIES, INC. I/O BOARD (SA10052-01) HARD DRIVE (PA3021-01) JADE 2 EDITION MONITOR SIGNAL CABLE 586 MITSUBISHI MOTHERBOARD (SA0163-08) (SA0163-13) (NOVA) WITH PRINTER UNICORN MOTHERBOARD (EC0026-09) TOUCHSCREEN CONTROLLER CABLE CONNECTOR CONTRONICS RIBBON CABLE CONNECTOR (EC2198-01) POWER SUPPLY (EC7531-01) 19" BEZEL (HW9500-01) 19"OVERLAY (SA9823-01) FOAM TAPE KIT (SB0016-01) 19" MONITOR ASSY.
COPYRIGHT © 2005 MERIT INDUSTRIES, INC. BEZEL ASSY. (SA3243-02) RIGHT SIDE PANEL (WD0030-01) LEFT SIDE PANEL (WD0030-02) STAY ARM (MW0095-01) COIN BOX ASSY.
COPYRIGHT © 2005 MERIT INDUSTRIES, INC. LAMP ASSY.-USA (SA0177-04-OA) EURO-(SA0177-03-OA) BULB-(LB1130-01) FAN ASSY (SA5117-05-XX) B/A ASSY.(EC9796-01) BRKT.
COPYRIGHT © 2005 MERIT INDUSTRIES, INC.
COPYRIGHT © 2005 MERIT INDUSTRIES, INC.
COPYRIGHT © 2005 MERIT INDUSTRIES, INC.
COPYRIGHT © 2005 MERIT INDUSTRIES, INC.
COPYRIGHT © 2005 MERIT INDUSTRIES, INC. Megatouch MAXX Parts List continued Item Description EC7529-01 PWR SPLY, OPEN FR, 100W+12, + 5 EC7531-01 PWR SPLY, 145W =/- 12, +5, +3.3 (Mini Globe or ATX) EC9154 COUNTER, 12V FROG EYE MOUNTING EC9154-02 COUNTER, 12V, FROG EYE MOUNTING EC9304-01 FLTR, LINE, 250VAC@6AMP, IEC EC9360-XX VGA CRT, 13" (INDICATE TYPE) EC9361-XX VGA 13" MONITOR CHASSIS BD (INDICATE TYPE) (NOT ALL CHASSIS AND CRT TYPES ARE AVAILABLE / PRICES MAY VARY.
COPYRIGHT © 2005 MERIT INDUSTRIES, INC. Megatouch MAXX Parts List continued Item Description HW0028-01 DISCONTINUED - USE PART # WD0030-01 HW0028-02 DISCONTINUED - USE PART # WD0030-02 HW0031-01-0A BEZEL TRIM, REAR, UR, XL2 HW0034-01 SPACER RING, LAZY SUSAN HW0041-01 1"WX.06T MAG TAPE, HD,W/PSA (TAPE FOR SIGN HOLDER) HW0088-01-0A BEZEL, MARS, XL2 HW0088-02-0A BEZEL, SMILEY HW0088-03 BZL,BLK,MARS,XL3 HW0089-01-0A BUTTON, REJECT, MARS HW0089-02 CLASSIC MAXX REJECTOR BUTTON HW0091-01 AIR FILTER W/GUARD, 3.
COPYRIGHT © 2005 MERIT INDUSTRIES, INC.
COPYRIGHT © 2005 MERIT INDUSTRIES, INC.
COPYRIGHT © 2005 MERIT INDUSTRIES, INC.
COPYRIGHT © 2005 MERIT INDUSTRIES, INC.
COPYRIGHT © 2005 MERIT INDUSTRIES, INC.
COPYRIGHT © 2005 MERIT INDUSTRIES, INC.
COPYRIGHT © 2005 MERIT INDUSTRIES, INC.
COPYRIGHT © 2005 MERIT INDUSTRIES, INC.
Section 2 Hard Drive Information Hard Drive Numbers Program Numbers Part Numbers Security Key Numbers
COPYRIGHT © 2005 MERIT INDUSTRIES, INC. MAXX Hard Drive Program Numbers, Part Numbers, and Compatible Security Keys JADE 2 EDIT ION Program # PG3002 V15.00 Part # PA3018-01 Security Key # SA3079-01 JADE EDIT ION Program # PG3002 (V14.00) Part # PA3018-01 Security Key # SA3079-01 SAPPH IRE 2 EDIT ION Program # PG3002 (V13.00, V13.01, V13.02, V13.10) Part # PA3017-01 Security Key # SA3065-01 SAPPH IRE EDITION Program # PG3002 (V12.00, V12.01, V12.02, V12.03, V12.10, V12.
COPYRIGHT © 2005 MERIT INDUSTRIES, INC. MAXX Hard Drive Program Numbers, Part Numbers, and Compatible Security Keys (cont’d) MAXX 2K PLUS Program # PG3002 (V5.00, V5.01) Part # PA3002-05 Security Key # SA3035-01 CHAMPIONSHIP MAXX 2K PLUS Program # PG3002 (V5.00, V5.01) Part # PA3002-05 Security Key # SA3036-07 MAXX 2K Program # PG3002 (V4.00, V4.01) Part # PA3002-04 Security Key # SA3035-01 CHAMPIONSHIP MAXX 2K Program # PG3002 (V4.00, V4.
Section 3 Troubleshooting Information Touchscreens Troubleshooting Touchscreen Calibration Motherboard Handling Precautions Motherboard Diagrams Access/Removal of Major Assemblies Motherboard Hard drive Monitor Touchscreen Troubleshooting Guide CMOS Setup Mars 2000 Bill Acceptor DIP Switch Settings
COPYRIGHT © 2005 MERIT INDUSTRIES, INC. Troubleshooting Your Touchscreen MICROTOUCH: Features: • SMT-3 Controller in white box • Green LED on controller lit at half brightness, full brightness when screen is touched • Overlay functions on capacitance. • Touchscreen cable is on right side of CRT. Troubleshooting: • LED Flashing from 1 to 5 times - detected error or possible defective controller • LED not lit - Check +12 vdc. The SMT-3 controller may also be defective.
COPYRIGHT © 2005 MERIT INDUSTRIES, INC. Troubleshooting Your Touchscreen (cont’d) • • • • If these solutions do not correct the problem, replace the touchscreen. If the calibration is off in one area, check for scratches or nicks on the screen. If you detect scratches or nicks, replace the touchscreen. If the screen loses calibration entirely, check the ground pin on the line cord.
COPYRIGHT © 2005 MERIT INDUSTRIES, INC. Touchscreen Calibration NOTE: The machine must be in the idle mode or game select mode to calibrate the touchscreen. 1. Locate and press the CALIBRATE button on the game. 2. With your index finger, touch the center of the first circle that appears on the screen. Once touched and released, a second circle will appear on the screen. NOTE: YOU MUST HOLD YOUR FINGER ON THE CIRCLE FOR APPROXIMATELY 2 SECONDS FOR THE CALIBRATION TO BE RECOGNIZED. 3.
COPYRIGHT © 2005 MERIT INDUSTRIES, INC. ATTENTION: OBSERVE PRECAUTIONS FOR HANDLING ELECTROSTATIC DEVICES Motherboard Handling Precautions NOTE: Before handling any boards, observe the following procedures: • Remove any static charge from your body before handling the boards. • Use a ground strap when handling the boards. • When plugging in connectors to the board, make sure the connector is inserted straight onto the header and that the connector covers all header pins.
COPYRIGHT © 2005 MERIT INDUSTRIES, INC.
COPYRIGHT © 2005 MERIT INDUSTRIES, INC.
COPYRIGHT © 2005 MERIT INDUSTRIES, INC.
COPYRIGHT © 2005 MERIT INDUSTRIES, INC. ATTENTION: OBSERVE PRECAUTIONS FOR HANDLING ELECTROSTATIC DEVICES Removal/Installation of Major Assemblies Full MAXX Motherboard Removal 1. Turn off and unplug the game. 2. Unlock and remove the lid. 3. Unscrew the 2 thumbnuts and remove the electronics box access panel at the rear of the game. You will need to unplug the 2 fan power connectors in order to completely remove the panel. Also remove the black plate along the bottom of the game. See Figure 1. 4.
COPYRIGHT © 2005 MERIT INDUSTRIES, INC. ATTENTION: OBSERVE PRECAUTIONS FOR HANDLING ELECTROSTATIC DEVICES Removal/Installation of Major Assemblies Full MAXX (cont’d) Hard Drive Installation 1. Plug the power connector and ribbon cable into the new hard drive. 2. Fasten the cable clamp to the hard drive with the 2 screws (1 per side), then secure the hard drive to the mounting brackets with the 4 screws and shoulder washers. See Figure 3. 3.
COPYRIGHT © 2005 MERIT INDUSTRIES, INC. ATTENTION: OBSERVE PRECAUTIONS FOR HANDLING ELECTROSTATIC DEVICES Removal/Installation of Major Assemblies Full MAXX (cont’d) Monitor Installation 1. Place the new monitor assembly on the mounting studs in the game. 2. Tighten the 2 nuts to secure the monitor assembly to the cabinet base on the opposite side of the cash box. 3. Replace the 2 nuts to secure the monitor assembly to the cabinet base on the cash box side. 4.
COPYRIGHT © 2005 MERIT INDUSTRIES, INC. ATTENTION: OBSERVE PRECAUTIONS FOR HANDLING ELECTROSTATIC DEVICES Removal/Installation of Major Assemblies Full MAXX (cont’d) 9. Remove the 2 nuts securing the monitor assembly to the cabinet base on the cash box side. 10. Loosen (do not remove) the 2 nuts securing the monitor assembly to the cabinet base on the side opposite the cash box. 11. Slide the monitor assembly back and lift it off the mounting studs until you’re able to remove it from the game. 12.
COPYRIGHT © 2005 MERIT INDUSTRIES, INC. ATTENTION: OBSERVE PRECAUTIONS FOR HANDLING ELECTROSTATIC DEVICES Removal/Installation of Major Assemblies Full MAXX (cont’d) 14. Replace and lock the lid. 15. Replace and lock the coin mech. 16. Plug in and turn on the game.
COPYRIGHT © 2005 MERIT INDUSTRIES, INC.
COPYRIGHT © 2005 MERIT INDUSTRIES, INC. ATTENTION: OBSERVE PRECAUTIONS FOR HANDLING ELECTROSTATIC DEVICES Removal/Installation of Major Assemblies Blue MAXX/MAXX Classic Countertop Motherboard Removal 1. Turn off and unplug the game. 2. Unlock and open the lid. 3. Use the Motherboard Diagrams section to determine the board type in your game, then disconnect all connections to the board. 4. Using a 1/4” nut driver, remove the 2 nuts securing the motherboard assembly to the game and remove the board.
COPYRIGHT © 2005 MERIT INDUSTRIES, INC. ATTENTION: OBSERVE PRECAUTIONS FOR HANDLING ELECTROSTATIC DEVICES Removal/Installation of Major Assemblies Blue MAXX/MAXX Classic Countertop (cont’d) 3. Connect the monitor signal cable to the motherboard. 4. Reconnect the monitor power connector to the monitor board. 5. Reconnect the touchscreen cable in the back of the controller, then reconnect the Molex connector to the main harness. 6.
COPYRIGHT © 2005 MERIT INDUSTRIES, INC. ATTENTION: OBSERVE PRECAUTIONS FOR HANDLING ELECTROSTATIC DEVICES Removal/Installation of Major Assemblies Blue MAXX/MAXX Classic Countertop (cont’d) 4. Remove the two nuts and washers securing the touchscreen controller to the game and remove the controller from the mounting screws.
COPYRIGHT © 2005 MERIT INDUSTRIES, INC.
COPYRIGHT © 2005 MERIT INDUSTRIES, INC. HIGH VOLTAGE WIRE HEATSINK MONITOR POWER CONNECTOR NUTS (TYP.
COPYRIGHT © 2005 MERIT INDUSTRIES, INC. ATTENTION: OBSERVE PRECAUTIONS FOR HANDLING ELECTROSTATIC DEVICES Removal/Installation of Major Assemblies MAXX Select/Slim MAXX Countertop Motherboard Removal 1. Turn off and unplug the game. 2. Unlock and open the rear door. 3. Lift the spring-loaded pin (see Figure 1) and carefully slide the CPU shelf out from the game and into its service position. 4.
COPYRIGHT © 2005 MERIT INDUSTRIES, INC. ATTENTION: OBSERVE PRECAUTIONS FOR HANDLING ELECTROSTATIC DEVICES Removal/Installation of Major Assemblies MAXX Select/Slim MAXX Countertop (cont’d) 4. Remove the screw and washer fastening the hard drive mounting plate to the CPU tray and carefully pull the hard drive assembly away from the game. See Figure 2. 5. Remove the 4 screws and shoulder washers fastening the hard drive to the mounting plate. See Figure 2. 6.
COPYRIGHT © 2005 MERIT INDUSTRIES, INC. ATTENTION: OBSERVE PRECAUTIONS FOR HANDLING ELECTROSTATIC DEVICES Removal/Installation of Major Assemblies MAXX Select/Slim MAXX Countertop (cont’d) Monitor Installation 1. Place the new monitor in the cabinet and fasten it with the 3 nuts. 2. Replace the front bezel, then replace the 4 screws on top of the bezel and the 2 screws (one on each side) fastening the bezel to the game. 3. Fasten the power supply mounting bracket to the monitor with the thumbnut. 4.
COPYRIGHT © 2005 MERIT INDUSTRIES, INC. ATTENTION: OBSERVE PRECAUTIONS FOR HANDLING ELECTROSTATIC DEVICES Removal/Installation of Major Assemblies MAXX Select/Slim MAXX Countertop (cont’d) 3. Replace the new touchscreen over the monitor (with the cable on the left if you are facing the game), making sure the screen is properly and evenly aligned over the picture tube. Then clean the front of the screen with the supplied alcohol wipe. 4.
COPYRIGHT © 2005 MERIT INDUSTRIES, INC.
COPYRIGHT © 2005 MERIT INDUSTRIES, INC. ATTENTION: OBSERVE PRECAUTIONS FOR HANDLING ELECTROSTATIC DEVICES Removal/Installation of Major Assemblies EZ MAXX/MAXX Elite Countertop Motherboard Removal 1. Turn off and unplug the game. 2. Unlock and open the rear door. 3. Use the Motherboard Diagrams section to determine the board type in your game, then disconnect all connections to the board. NOTE: Be sure to read the Motherboard Handling Precautions before handling the board. 4.
COPYRIGHT © 2005 MERIT INDUSTRIES, INC. ATTENTION: OBSERVE PRECAUTIONS FOR HANDLING ELECTROSTATIC DEVICES Removal/Installation of Major Assemblies EZ MAXX/MAXX Elite Countertop (cont’d) 5. Replace the centronics cable in the cable clamp. 6. Close and lock the rear door. 7. Plug in and turn on the game. Monitor Removal 1. Turn off and unplug the game. 2. Unlock and open the rear door. 3. Disconnect the monitor power connection (black and yellow wires) running to the power supply. 4.
COPYRIGHT © 2005 MERIT INDUSTRIES, INC. ATTENTION: OBSERVE PRECAUTIONS FOR HANDLING ELECTROSTATIC DEVICES Removal/Installation of Major Assemblies EZ MAXX/MAXX Elite Countertop (cont’d) 3. Disconnect the monitor power connection (black and yellow wires) running to the power supply. 4. Disconnect the monitor signal cable from the motherboard and remove it from the cable clamps. 5. Inside the game, access the latches for each side panel and remove both panels (see Figure 2). 6.
COPYRIGHT © 2005 MERIT INDUSTRIES, INC. ATTENTION: OBSERVE PRECAUTIONS FOR HANDLING ELECTROSTATIC DEVICES Removal/Installation of Major Assemblies EZ MAXX/MAXX Elite Countertop (cont’d) 11. Reconnect the monitor power connector to the power supply. 12. Route the monitor signal connector through the cable clamps and reconnect it to the motherboard. 13. Plug in and turn on the game. 14. When the game is finshed booting, calibrate the touchscreen. 15. Close and lock the rear door.
COPYRIGHT © 2005 MERIT INDUSTRIES, INC.
COPYRIGHT © 2005 MERIT INDUSTRIES, INC. ATTENTION: OBSERVE PRECAUTIONS FOR HANDLING ELECTROSTATIC DEVICES Removal/Installation of Major Assemblies MAXX Upright Hard Drive Removal 1. Turn off and unplug the game. 2. Unlock and open the front bezel. 3. Slide the CPU shelf out of the game and into its service position. 4. Remove the screw and washer fastening the hard drive mounting plate to the CPU shelf and carefully pull the hard drive assembly away from the game. See Figure 1. 5.
COPYRIGHT © 2005 MERIT INDUSTRIES, INC. ATTENTION: OBSERVE PRECAUTIONS FOR HANDLING ELECTROSTATIC DEVICES Removal/Installation of Major Assemblies MAXX Upright Monitor Removal 1. Turn off and unplug the game. 2. Unlock and open the rear door to gain access to the monitor. See Figure 2. 3. Disconnect all harnesses from the monitor. 4. Remove the two nuts and washers securing the touchscreen controller to the game (see Figure 3) and remove the controller from the mounting screws.
COPYRIGHT © 2005 MERIT INDUSTRIES, INC. ATTENTION: OBSERVE PRECAUTIONS FOR HANDLING ELECTROSTATIC DEVICES Removal/Installation of Major Assemblies MAXX Upright 5. Use dental floss to carefully cut the foam tape holding the touchscreen to the picture tube until you are able to completely remove the touchscreen. 6. Remove any remaining adhesive residue with denatured alcohol, then wipe the surface of the picture tube with the supplied alcohol wipe. Touchscreen Installation 1.
COPYRIGHT © 2005 MERIT INDUSTRIES, INC. FIGURE 2 – MAXX UPRIGHT - MONITOR ACCESS HEX BOLT (TYP.
COPYRIGHT © 2005 MERIT INDUSTRIES, INC. ATTENTION: OBSERVE PRECAUTIONS FOR HANDLING ELECTROSTATIC DEVICES Removal/Installation of Major Assemblies Blue MAXX Upright Motherboard Removal 1. Turn off the game and unplug it from its power source. 2. Open the front door and slide the CPU shelf into its service position. See Figure 1. 3. Use the Mitsubishi motherboard diagram in the Motherboard Diagrams section to determine connector locations, then disconnect all connections to the board.
COPYRIGHT © 2005 MERIT INDUSTRIES, INC. ATTENTION: OBSERVE PRECAUTIONS FOR HANDLING ELECTROSTATIC DEVICES Removal/Installation of Major Assemblies Blue MAXX Upright Monitor Installation 1. Place the new monitor assembly in the game through the rear door. 2. Fasten the monitor shelf with the front and rear bolts (2 per side). See Figure 2. 3. Close and lock the front bezel and rear door. 4. Plug in and turn on the game. Touchscreen Removal 1. Turn off and unplug the game. 2.
COPYRIGHT © 2005 MERIT INDUSTRIES, INC.
COPYRIGHT © 2005 MERIT INDUSTRIES, INC. Merit Industries, Inc. Troubleshooting Guide for Megatouch MAXX™ Games Refer to the list below if you are experiencing a problem with your Megatouch MAXX™ Game.
COPYRIGHT © 2005 MERIT INDUSTRIES, INC. Merit Industries, Inc. Troubleshooting Guide for Megatouch MAXX™ Games (continued) Refer to the list below if you are experiencing a problem with your Megatouch MAXX™ Game. PROBLEM • coin jam • • • meter not advancing • game locks up while being played or in the attract mode no movement on the screen power has to be cycled off and on to get the game to function again • • • • • Check the coin mech and coin chute for coins blocking the pathway.
COPYRIGHT © 2005 MERIT INDUSTRIES, INC. Merit Industries, Inc. Troubleshooting Guide for Megatouch MAXX™ Games (continued) Refer to the list below if you are experiencing a problem with your Megatouch MAXX™ Game.
COPYRIGHT © 2005 MERIT INDUSTRIES, INC. Merit Industries, Inc. Troubleshooting Guide for Megatouch MAXX™ Games (continued) Refer to the list below if you are experiencing a problem with your Megatouch MAXX™ Game. • PROBLEM game will not download CD • • • • CORRECTIVE ACTION Make sure the CD is installed correctly, with the logo facing up. Check for scratches or a defective disc. Try a different set of CDs. If you’re downloading a CD set, make sure each disc is of the same revision.
COPYRIGHT © 2005 MERIT INDUSTRIES, INC. CMOS Configuration Procedure for Megatouch MAXX The CMOS configuration should only be performed if your Megatouch MAXX game experiences problems booting up. MITSUBISHI/ITOX MOTHERBOARD CMOS CONFIGURATION: 1. 2. 3. 4. 5. 6. 7. 8. 9. Make sure the game is turned off. Plug in your keyboard. Turn on the power. Press F2 to enter Phoenix BIOS Setup Utility. Press F9 to load Setup Default. At Setup confirmation, press ENTER with YES shaded.
COPYRIGHT © 2005 MERIT INDUSTRIES, INC. CMOS Configuration Procedure for Megatouch MAXX (cont’d) 9. Press ENTER. The Settings should be as follows: Date: Current date Time: Approximate time Hard Disks: All TYPE and MODE fields set to AUTO Drive A: 1.44M, 3.5 in. Drive B: None Video: EGA/VGA Halt On: All but keyboard 10. After all settings have been changed or verified, press ESC. 11. Press F10. 12. Press Y for YES. 13. Press ENTER. Configuration is now complete--the system should reboot. 14.
COPYRIGHT © 2005 MERIT INDUSTRIES, INC.
Section 4 Power Supplies Power Supplies Used in MAXX Games GlobTek ST-230WHF EOS VTL100-4000 Mini-Globtek AT145-S/GPS145-MATX Enhance SFX-1211J
COPYRIGHT © 2005 MERIT INDUSTRIES, INC.
COPYRIGHT © 2005 MERIT INDUSTRIES, INC.
COPYRIGHT © 2005 MERIT INDUSTRIES, INC.
COPYRIGHT © 2005 MERIT INDUSTRIES, INC.
Section 5 Motherboards Circuit Board Cross Reference Chart Telco Mitsubishi Itox Unicorn I/O Board Pinouts
COPYRIGHT © 2005 MERIT INDUSTRIES, INC.
COPYRIGHT © 2005 MERIT INDUSTRIES, INC.
COPYRIGHT © 2005 MERIT INDUSTRIES, INC.
Section 6 Monitors Monitors Used in MAXX Games Tatung--type 38 Tatung--type 58 Tatung--type 66 Tatung VS-20475TZ21 Tatung VT19726Z Wells-Gardner--type 41 Wells-Gardner--type 67 Tatung/Wells--type 40 Kortek flatscreen Monitor Adjustments Degaussing Monitor Adjustment Procedures
Monitors Used in MAXX Games Tatung--Type 38 Used in: MAXX Select and Slim MAXX Tatung--Type 58 Used in: MAXX Upright and Blue MAXX Upright Tatung--Type 66 Used in: Blue MAXX and MAXX Classic Tatung VS-20475TZ21 Used in: Full MAXX Tatung VT19726Z Used in: MAXX Upright Wells-Gardner--Type 41 Used in: MAXX Select and Slim MAXX Wells-Gardner--Type 67 Used in: Blue MAXX and MAXX Classic Tatung/Wells--Type 40 Used in: MAXX Select and Slim MAXX Kortek flatscreen Used in: EZ MAXX and MAXX Elite Monitor Information
COPYRIGHT © 2005 MERIT INDUSTRIES, INC. Degaussing your Monitor If your monitor is displaying “purity problems,” (a display with purity problems will have parts of an all-white screen affected by blotches of color) the monitor needs to be degaussed using a “degaussing coil.” A degaussing coil is a circular electromagnet used to cancel out any stray magnetic fields that may build up on a metal object. All of our monitors have built-in degaussing coils that are automatically activated on power-up.
COPYRIGHT © 2005 MERIT INDUSTRIES, INC. Monitor Adjustment Procedures For adjusting the picture on MAXX games, we suggest following the procedures described below. The vertical/horizontal controls and brightness/contrast controls are located on the monitor control panel that is Velcroed inside the game. The monitor RGB controls are located on the monitor neck board. Tatung/Wells Gardner Monitors For games running software versions prior to Emerald: 1. Under STRATEGY, select the 11-Ball game. 2.
Section 7 Technical Service Bulletins