
Service manual


COPYRIGHT © 2005 MERIT INDUSTRIES, INC.
Troubleshooting Information - Removal/Installation of Major Assemblies -
MAXX Select - Slim MAXX Countertop
Megatouch MAXX Technical Reference Manual
ATTENTION:
OBSERVE PRECAUTIONS FOR HANDLING ELECTROSTATIC DEVICES
Removal/Installation of Major Assemblies -
MAXX Select/Slim MAXX Countertop (cont’d)
3. Replace the new touchscreen over the monitor (with the cable on the left if you are facing the
game), making sure the screen is properly and evenly aligned over the picture tube. Then clean
the front of the screen with the supplied alcohol wipe.
4. Remembering the manner in which the tape was placed around the touchscreen you removed,
place and cut a length of supplied black poly tape evenly over an entire edge of the touchscreen
and repeat until all four edges are covered.
5. Replace the front bezel, then replace the 4 screws on top of the bezel and the 2 screws (one on
each side) fastening the bezel to the game.
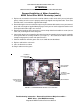
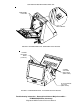
6. Connect the touchscreen controller cable in the back of the controller, then fasten the controller
to the game with the existing hardware (see Figure 1). Also connect the Molex connector
(orange and gray wires) to the main power harness.
7. Slide the hood back onto the game and secure it with the two thumbnuts.
8. Replace and lock the coin mech.
9. Close and lock the rear door.
10. Plug in and turn on the game.
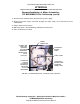
FIGURE 1 - SLIM MAXX/MAXX SELECT - CPU SECTION
THUMBNUT
SECURING HOOD
(2 PLACES)
THUMBNUT
SECURING HOOD
(2 PLACES)
TOUCHSCREEN
CONTROLLER
SPRING-LOADED
PIN SECURING
CPU SHELF
MOTHERBOARD