Benutzerinformation Notice d'utilisation Istruzioni per l’uso User manual Geschirrspülmaschine Lave-vaisselle Lavastoviglie Dishwasher Silent 42 I Product No.
Inhalt Sicherheitshinweise Gerätebeschreibung Bedienblende Vor der ersten Inbetriebnahme Einstellen des Wasserenthärters Gebrauch von Salz für Geschirrspüler Gebrauch von Klarspülmittel Laden von Besteck und Geschirr Gebrauch von Spülmittel Funktion "Multitab" 2 4 5 8 8 9 9 10 14 15 Auswählen und Starten eines Spülprogramms Spülprogramme Reinigung und Pflege Was tun, wenn … Technische Daten Gerät aufstellen Wasseranschluss Elektrischer Anschluss Umwelttipps 16 18 19 21 23 23 24 25 26 Änderungen vorbe
• Setzen oder stellen Sie sich nie auf die offene Tür. Kindersicherheit • Nur Erwachsene dürfen dieses Gerät bedienen. Kinder müssen beaufsichtigt werden, so dass sie nicht mit dem Gerät spielen können. • Halten Sie das Verpackungsmaterial von Kindern fern. Andernfalls besteht Erstickungsgefahr. • Bewahren Sie alle Reinigungsmittel an einem sicheren Ort auf. Achten Sie darauf, dass Reinigungsmittel nicht in die Hände von Kindern gelangen. • Halten Sie Kinder vom geöffneten Geschirrspüler fern.
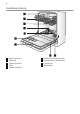
Gerätebeschreibung 1 2 3 4 5 Deckensprüharm Oberkorb Oberer Sprüharm Filter Unterer Sprüharm 6 7 8 9 Behälter für Reinigungsmittel Dosiergerät für Klarspülmittel Typenschild Salzbehälter
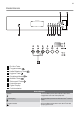
Bedienblende 1 2 3 4 5 6 7 Ein/Aus-Taste Programmtaste Halbe Beladung-Taste Hygiene-Taste Extraklarspültaste Multitab-Taste Zeitvorwahl-Taste 8 Kontrolllampen 9 Digital-Display 10 Funktionstasten Kontrolllampen Spülen Die Kontrolllampe leuchtet während der Reinigungsphase oder der Klarspülphase. Trockengang Die Kontrolllampe leuchtet während der Trockenphase. Programmende Die Kontrolllampe leuchtet nach dem Ende des Spülprogramms auf.
Kontrolllampen Klarspüler 1) Salz 1) Die Kontrollampe leuchtet auf, wenn der Klarspüler nachgefüllt werden muss. Siehe Kapitel "Verwendung von Klarspüler". Die Kontrollampe leuchtet auf, wenn der Salzbehälter aufgefüllt werden muss. Siehe Kapitel "Verwendung von Geschirrspülsalz". Die Kontrolllampe für Salz kann nach dem Nachfüllen von Salz noch einige Stunden leuchten. Dies hat jedoch keine unerwünschte Auswirkung auf den Gerätebetrieb.
19 Stunden zu verzögern. Siehe den Abschnitt 'Einstellen und Starten eines Spülprogramms'. Löschen Sie das Programm, um in den Einstellmodus zurückzukehren. Siehe Kapitel "Wählen und Starten eines Spülprogramms". Digital-Display Das Display zeigt an: • Härtegrad, auf den der Wasserenthärter eingestellt ist. • Nummer des Spülprogramms. • Restlaufzeit bis zum Programmende. • Ein-/Abschaltung des Klarspülmitteldosierers (nur bei aktiver Funktion Multitab). • Ende des Spülprogramms.
Vor der ersten Inbetriebnahme Bitte halten Sie sich für die folgenden Schritte genau an die Anweisung: 1. Überprüfen Sie, ob der Wasserenthärter (Weichwasserbereiter) korrekt auf den Härtegrad des Wassers in Ihrer Region eingestellt ist. Stellen Sie den Wasserenthärter bei Bedarf auf die richtige Stufe ein. 2. Füllen Sie den Salzbehälter mit Geschirrspülsalz. 3. Füllen Sie den Klarspüldosierer mit Klarspüler. 4. Ordnen Sie Geschirr und Besteck in den Geschirrspüler ein. 5.
Beispiel: Das Digital-Display zeigt an / 5 aufeinander folgende Signaltöne = Stufe 5. 6. Drücken Sie die Funktionstaste A einmal, um die Einstellung des Wasserenthärters um jeweils eine Stufe zu erhöhen. 7. Drücken Sie die Ein-/Aus-Taste, um die Einstellung zu speichern. Gebrauch von Salz für Geschirrspüler Vorsicht! Verwenden Sie nur Spezialsalz für Geschirrspüler. Die Verwendung von Salzarten, die nicht für Geschirrspüler geeignet sind, führt zur Beschädigung des Wasserenthärters. 4.
1. Drücken Sie die Entriegelungstaste (A), um den Klarspüldosierer zu öffnen. ße Schaumbildung beim nächsten Spülprogramm zu vermeiden. 4. Schließen Sie den Klarspülerdosierer. Einstellung des Klarspüldosierers Der Wasserenthärter ist werkseitig auf Härtestufe 4 eingestellt. Sie können den Klarspüldosierer auf die Stufen 1 (niedrigste Dosierung) bis 6 (höchste Dosierung) einstellen. 2. Füllen Sie den Klarspüldosierer mit Klarspüler. Der maximale Füllstand wird durch die Markierung "max"angezeigt. 1.
• Achten Sie beim Einordnen von Geschirr und Besteck auf Folgendes: – Ordnen Sie Hohlgefäße (z. B. Tassen, Gläser, Pfannen) mit der Öffnung nach unten ein. – Achten Sie darauf, dass sich kein Wasser in Höhlungen oder Vertiefungen sammeln kann. – Achten Sie darauf, dass Geschirr- und Besteckteile nicht ineinander zu liegen kommen. – Achten Sie darauf, dass Geschirr- und Besteckteile nicht übereinander zu liegen kommen. – Achten Sie darauf, dass Gläser einander nicht berühren.
Klappen Sie den Griff des Besteckkorbs nach unten, um das Einräumen des Bestecks in den Korb zu erleichtern. Die Breite der linken Stachelreihen ist verstellbar. 1. Greifen Sie die Stachelreihe im hinteren Teil des Korbs. 2. Ziehen Sie die Stachelreihe hoch, bis sie sich löst. 3. Drücken Sie die Stachelreihe aus der Führungsschiene heraus. 4. Setzen Sie die Stachelreihe in die andere Führungsschiene ein. 5. Drücken Sie die Stachelreihe nach unten, bis sie einrastet. Verwenden Sie das Besteckgitter.
Oberkorb Der Oberkorb ist für Untertassen, Salatschüsseln, Tassen, Gläsern, Töpfen und Deckeln geeignet. Ordnen Sie das Spülgut so an, dass das Wasser die Oberflächen aller Geschirrteile erreicht. Verstellbare Tassenablagen Für größeres Geschirr können die Tassenablagen nach oben umgeklappt werden. Die Tassenablagen können in der mittleren Position benutzt werden. Stellen oder hängen Sie Kelchgläser in die Schlitze der Tassenablagen.
1. Ziehen Sie den Korb bis zum Anschlag heraus. 2. Heben Sie den Oberkorb an und bewegen Sie ihn nach unten, bis er in der oberen oder unteren Position einrastet. Maximale Geschirrhöhe für Teller mit Oberkorb in der unteren Position 20 30 Maximale Geschirrhöhe für Teller mit Oberkorb in der oberen Position.
4. Wenn Sie Geschirrspüler-Tabs verwenden, legen Sie diese in den Reinigungsmittelbehälter ( A). 2. Füllen Sie den Spülmittelbehälter ( A) mit Spülmittel. Die Markierung zeigt die Dosierung an: 20 = ca. 20 g Reinigungsmittel 30 = ca. 30 g Reinigungsmittel. 3. Geben Sie bei einem Spülprogramm mit Vorspülgang zusätzlich etwas Spülmittel ins Vorspülfach ( B). A 5. Schließen Sie den Deckel des Spülmittelbehälters. Drücken Sie auf den Deckel, bis er einrastet.
Schalten Sie die Funktion Multitab vor dem Beginn eines Spülprogramms ein oder aus. Sie können die Funktion Multitab nicht ein- oder ausschalten, wenn das Programm angelaufen ist. Brechen Sie das Spülprogramm ab und stellen Sie das Programm dann erneut ein. Schalten Sie die Funktion Multitab wie folgt ein: • Drücken Sie die Multitab-Taste. Die Multitab-Kontrolllampe leuchtet auf. Schalten Sie die Funktion Multitab wie folgt aus: • Drücken Sie die Multitab-Taste. Die Multitab-Kontrolllampe erlischt.
– Das Spülprogramm startet automatisch. – Die Kontrolllampen der Programmphasen erlöschen bis auf die Kontrolllampe für die laufende Phase. – Die Kontrolllampe der Programmtaste leuchtet kontinuierlich. – Das Digital-Display zeigt die Zeitdauer des Spülprogramms an. Ein laufendes Spülprogramm kann nicht geändert werden. Sie müssen dann das Spülprogramm abbrechen. Warnung! Sie sollten ein Spülprogramm nur dann abbrechen oder unterbrechen, wenn es unbedingt notwendig ist.
Drücken Sie eine der Tasten (nicht die Ein/ Aus-Taste), um in den Programmende-Modus zurückzugehen. • An den Innenseiten und der Tür des Geräts kann sich Wasser niederschlagen, denn Edelstahl kühlt schneller ab als Geschirr. Entnehmen des Spülguts • Nehmen Sie erst das Spülgut aus dem Unterkorb, dann das aus dem Oberkorb heraus.
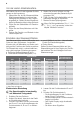
Wählbare Optionen Programm Halbe Beladung Hygiene Extraklarspülen P1 Auto Nein Ja Ja P2 Gläser Nein Nein Ja P3 Intensiv Ja Ja Ja P4 Normal Ja Ja Ja P5 ECO Nein Nein Ja P6 Kurz Nein Ja Ja P7 Vorspülen Nein Nein Nein Programmdauer (in Minuten) Energieverbrauch (in kWh) P1 Auto 85 - 105 1,1 - 1,5 12 - 22 P2 Gläser 65 - 75 0,8 - 0,9 13 - 14 P3 Intensiv 105 - 115 1,8 - 2,0 22 - 24 P4 Normal 100 - 110 1,3 - 1,5 15 - 17 P5 ECO 165 - 175 1,0 - 1,1 14 - 15 P6
Der Grobfilter muss nach jedem Spülprogramm kontrolliert werden. Der Feinfilter muss regelmäßig geprüft und gereinigt werden. Grobfilter (1) 1. Öffnen Sie die Tür. 2. Entfernen Sie den Unterkorb. 3. Ziehen Sie den Grobfilter heraus und reinigen Sie ihn sorgfältig unter fließendem Wasser. 4. Setzen Sie den Grobfilter wieder ein. Reinigung der Sprüharme Kontrollieren Sie regelmäßig, dass die Düsen der Sprüharme nicht zugesetzt sind.
4. Bringen Sie den Sprüharm mit der Befestigungsschraube an. Drehen Sie dazu die Schraube im Uhrzeigersinn fest. Oberkorb-Sprüharm 1. Um den Sprüharm des Oberkorbs auszubauen, drehen Sie ihn seitlich weg. 3. Den Sprüharm und die Befestigungsschraube reinigen. 4. Bringen Sie den Sprüharm mit der Befestigungsschraube an. Drehen Sie dazu die Schraube im Uhrzeigersinn fest. Reinigung der Außenseiten Reinigen Sie die Außenseiten und die Bedienblende des Geräts mit einem weichen feuchten Tuch.
Fehlercode und Störung Mögliche Ursachen und Abhilfe • Akustische Signalabfolge • Das Digital-Display zeigt an Der Geschirrspüler füllt sich nicht mit Wasser • Der Wasserhahn ist blockiert oder durch Kalkablagerungen verstopft. Reinigen Sie den Wasserhahn. • Der Wasserhahn ist zugedreht. Drehen Sie den Wasserhahn auf. • Der Filter im Wasserzulaufschlauch ist verstopft. Reinigen Sie den Filter. • Der Wasserzulaufschlauch ist falsch angeschlossen.
Das Spülergebnis ist nicht zufriedenstellend Schlieren, Streifen, milchige Flecken oder blau schimmernde Beläge befinden sich auf Gläsern und Geschirr • Verwenden Sie weniger Klarspüler. Getrocknete Wassertropfen • Verwenden Sie mehr Klarspüler. befinden sich auf Gläsern und • Die Ursache kann beim Spülmittel liegen.
2. Zusatzhalterung oben. Als Sonderzubehör erhältlich. Wenden Sie sich an den Kundendienst. 105 50 Wasseranschluss Wasseranschluss Schließen Sie das Gerät an einen Heißwasseranschluss (max. 60 °C) oder einen Kaltwasseranschluss an. Wenn Sie Heißwasser mithilfe umweltfreundlicher, alternativer Energiequellen (z. B. Solaroder Photovoltaikanlagen oder Windkraft) aufbereiten, können Sie durch den Anschluss des Geräts an die Heißwasserversorgung Energie sparen.
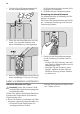
ser abpumpt, um zu verhindern, dass das Wasser wieder in das Gerät zurückfließt. Der Anschluss des Abwasserschlauchs darf sich in einer Höhe von maximal 70 cm vom Boden befinden. D C 105 C 600 A 70 400 N 762+3 K E G 759 W max. 700 D Wenn der Ablaufschlauch an einen Siphon unter einem Spülbecken angeschlossen wird, muss die Kunststoffmembran (A) entfernt werden.
Umwelttipps Das Symbol auf dem Produkt oder seiner Verpackung weist darauf hin, dass dieses Produkt nicht als normaler Haushaltsabfall zu behandeln ist, sondern an einem Sammelpunkt für das Recycling von elektrischen und elektronischen Geräten abgegeben werden muss. Durch Ihren Beitrag zum korrekten Entsorgen dieses Produkts schützen Sie die Umwelt und die Gesundheit Ihrer Mitmenschen. Umwelt und Gesundheit werden durch falsches Entsorgen gefährdet.
Sommaire Consignes de sécurité 27 Description de l'appareil 28 Bandeau de commande 29 Avant la première utilisation 32 Réglage de l'adoucisseur d'eau 32 Utilisation du sel régénérant 33 Utilisation du liquide de rinçage 34 Rangement des couverts et de la vaisselle 35 Utilisation du produit de lavage 38 Fonction "Tout en 1" 39 Sélection et départ d'un programme de lavage 40 Programmes de lavage Entretien et nettoyage En cas d'anomalie de fonctionnement Caractéristiques techniques Installation Raccordeme
• Fermez toujours la porte de l'appareil lorsqu'il n'est pas utilisé pour empêcher tout risque de blessure ou de chute accidentelle. • Ne vous asseyez pas ou ne montez pas sur la porte ouverte. Sécurité enfants • Seuls les adultes doivent utiliser cet appareil. Veillez à ce que les enfants ne jouent pas avec l'appareil. • Rangez les emballages hors de la portée des enfants. Ils présentent un risque de suffocation. • Rangez les détergents dans un endroit sûr.
1 2 3 4 5 Bras d'aspersion supérieur Panier supérieur Bras d'aspersion supérieur Filtres Bras d'aspersion inférieur Bandeau de commande 1 2 3 4 5 6 7 Touche Marche/Arrêt Touche Programme Touche Demi-charge Touche Sanitize Touche Rinçage plus Touche "Tout en 1" Touche Départ différé 8 Voyants 9 Affichage numérique 10 Touches de fonction 6 7 8 9 Distributeur de produit de lavage Distributeur de liquide de rinçage Plaque signalétique Réservoir à sel régénérant
Voyants Lavage Le voyant s'allume quand la phase de lavage ou de rinçage est en cours. Séchage Le voyant s'allume dès que le programme de lavage est terminé. Fin de programme Le voyant s'allume dès que le programme de lavage est terminé. Produit rinçage 1) Le voyant s'allume lorsque le distributeur de liquide de rinçage doit être rempli. Reportez-vous au chapitre "Utilisation du liquide de rinçage". Sel 1) Le voyant s'allume lorsque le réservoir à sel régénérant doit être rempli.
Lorsque cette fonction est activée, le programme effectue un rinçage supplémentaire. L'option Rinçage Plus n'est pas compatible avec tous les programmes de lavage. Reportez-vous au chapitre "Programmes de lavage". Appuyez sur la touche Rinçage Plus pour sélectionner la fonction. Le voyant Rinçage plus s'allume quand la fonction est disponible. Touche "Tout en 1" Appuyez sur cette touche pour activer/désactiver la fonction "Tout en 1". Reportezvous au chapitre "Fonction Tout en 1".
7. Mettez l'appareil à l'arrêt pour mémoriser l'opération. Pour activer les signaux sonores, procédez comme suit : 1. Appliquez la procédure décrite ci-dessus jusqu'à ce que le réglage souhaité apparaisse sur l'affichage numérique. Avant la première utilisation Appliquez la procédure pas à pas en vous reportant aux instructions suivantes : 1. Réglez l'adoucisseur d'eau en fonction du degré de dureté de l'eau de votre région. Si nécessaire, ajustez le niveau de l'adoucisseur d'eau. 2.
– Les voyants des touches de fonction B et C s'éteignent. – Le voyant de la touche de fonction A continue de clignoter. – L'affichage numérique indique le niveau actuel. – Un signal sonore retentit. Exemple : l'affichage numérique indique / 5 signaux sonores intermittents retentissent = niveau 5. 6. Chaque pression de la touche de fonction A détermine le passage au niveau suivant. 7. Appuyez sur la touche Marche/Arrêt pour mémoriser l'opération.
Utilisation du liquide de rinçage Attention Utilisez uniquement un liquide de rinçage pour lave-vaisselle. N'utilisez aucun autre produit qui n'est pas adapté au lave-vaisselle (par ex, agent nettoyant pour lave-vaisselle, détergent liquide). Cela aurait pour effet d'endommager l'appareil. Le liquide de rinçage permet de sécher la vaisselle sans laisser de traces. Le liquide de rinçage est automatiquement ajouté à la dernière phase du rinçage. 3.
Rangement des couverts et de la vaisselle Conseils utiles Attention Ce lave-vaisselle est conçu pour laver la vaisselle et les ustensiles de cuisine pouvant être lavés en machine. Tout objet absorbant l'eau (chiffon, éponges de nettoyage, ...) ne doit pas être lavé au lave-vaisselle. • Avant de charger la vaisselle, veillez à : – Enlever tous les restes d'aliments. – Laisser tremper les casseroles au fond desquelles adhèrent des restes d'aliments brûlés ou attachés.
Il est possible de régler la largeur de la rangée d'ergots de gauche. 1. Saisissez la rangée d'ergots à l'arrière du panier. 2. Soulevez-la afin de la dégager. 3. Poussez la rangée d'ergots pour la faire sortir du guide. 4. Placez la rangée d'ergots dans l'autre rail. 5. Appuyez dessus pour qu'elle s'enclenche. Utilisez les séparateurs à couverts. Si la taille et la forme des couverts ne permettent pas leur utilisation, retirez les séparateurs.
Panier supérieur Le panier supérieur est conçu pour y ranger des sous-tasses, des saladiers, des tasses, des verres, des casseroles et des couvercles. Placez les ustensiles dans la machine de façon à ce que l'eau puisse accéder à toutes les surfaces. Supports réglables pour tasses Pour les ustensiles longs, rabattez les supports de tasses vers le haut. Vous pouvez régler les supports pour tasses sur une position intermédiaire.
1. Tirez sur le panier jusqu'à ce qu'il s'arrête. 2. Soulevez le panier supérieur et verrouillez-le dans sa position la plus haute ou la plus basse. Dimensions maximum des assiettes lorsque le panier supérieur est dans sa position la plus basse 20 30 Dimensions maximum des assiettes lorsque le panier supérieur est dans sa position la plus haute.
4. Si vous utilisez des pastilles de détergent, placez-les dans le distributeur ( A). 2. Remplissez le distributeur ( A). Le repère indique le niveau de dosage : 20 = environ 20 g de produit de lavage 30 = environ 30 g de produit de lavage. 3. Si vous sélectionnez un programme de lavage avec prélavage, versez une dose supplémentaire dans le compartiment ( B). A 5. Fermez le couvercle du distributeur. Appuyez sur le couvercle jusqu'à ce qu'il soit verrouillé.
Activez ou désactivez la fonction "Tout en 1" avant le départ du programme de lavage. Dès que le cycle a démarré, la fonction "Tout en 1" ne peut plus être modifiée. Si vous souhaitez exclure cette fonction, il vous faudra d'abord annuler le réglage du programme de lavage, désactivez la fonction "Tout en 1". Dans ce cas, vous devrez régler à nouveau le programme de lavage. Pour activer la fonction "Tout en 1" : • Appuyez sur la touche "Tout en 1". Le voyant de la fonction "Tout en 1" s'allume.
– Les voyants de phase s'éteignent sauf le voyant de la phase en cours qui reste allumé. – Le voyant du programme reste allumé de manière fixe. – La durée du programme est visible sur l'affichage numérique. Il n'est désormais plus possible de modifier le programme en cours. Vous devez pour cela, annuler le programme. Avertissement Annulez ou interrompez un programme de lavage uniquement si cela est absolument nécessaire. Attention Ouvrez la porte avec précaution.
Déchargement du lave-vaisselle • Déchargez d'abord le panier inférieur, puis le panier supérieur. • Les côtés et la porte de l'appareil peuvent être mouillés. L'acier inox refroidit plus rapidement que la vaisselle.
Vidange Demi-charge Sanitize Rinçage plus P2 Verres non non oui P3 Intensif oui oui oui P4 Normal oui oui oui P5 ECO non non oui P6 Bref non oui oui P7 Prélavage non non non Valeurs de consommation Programme Durée (en minutes) Énergie (en kWh) Eau (en litres) P1 Auto 85 - 105 1,1 - 1,5 12 - 22 P2 Verres 65 - 75 0,8 - 0,9 13 - 14 P3 Intensif 105 - 115 1,8 - 2,0 22 - 24 P4 Normal 100 - 110 1,3 - 1,5 15 - 17 P5 ECO 165 - 175 1,0 - 1,1 14 - 15 P6 Bref 30
Contrôlez le filtre grossier après chaque programme de lavage. Contrôlez régulièrement le filtre fin. Filtre grossier (1) 1. Ouvrez la porte. 2. Retirez le panier inférieur. 3. Retirez le filtre grossier et nettoyez-le minutieusement à l'eau courante. 4. Replacez le filtre grossier. Filtre fin (2) 1. Ouvrez la porte, sortez le panier inférieur. 2. Saisissez le filtre fin par la poignée. 3. Sortez le filtre fin en tournant la poignée vers la droite. 4.
4. Bloquez le bras d'aspersion avec la vis de fixation en la tournant dans le sens des aiguilles d'une montre. Bras d'aspersion du panier supérieur 1. Pour sortir le bras d'aspersion supérieur, tournez-le latéralement. 3. Nettoyez le bras d'aspersion et la vis de fixation. 4. Bloquez le bras d'aspersion avec la vis de fixation en la tournant dans le sens des aiguilles d'une montre.
Code d'erreur et anomalie de fonctionnement • un signal sonore intermittent est émis • L'affichage numérique indique Le lave-vaisselle n'est pas approvisionné en eau • un signal sonore intermittent est émis • L'affichage numérique indique Le lave-vaisselle ne vidange pas • un signal sonore intermittent est émis • L'affichage numérique indique Cause possible et solution • Le robinet d'arrivée d'eau est obstrué ou incrusté de tartre. Nettoyez le robinet d'arrivée d'eau.
Les résultats de lavage sont insatisfaisants Les verres et la vaisselle présentent des rayures, des taches blanches ou un film bleuâtre • Réduisez le dosage du liquide de rinçage. Des gouttes d'eau ont séché sur les verres et la vaisselle • Augmentez le dosage du liquide de rinçage. • Il se peut que le détergent en soit la cause.
qu'accessoire (en option). Pour cela, contactez le Service Après-vente. 105 50 2. Une patte de fixation supplémentaire audessus. Celle-ci est disponible en tant Raccordement à l'arrivée d'eau Tuyau d'arrivée d'eau Branchez l'appareil à une arrivée d'eau chaude (max. 60°) ou d'eau froide. Si l'eau chaude est produite à partir de sources énergétiques alternatives plus respectueuses de l'environnement (par ex.
Enlevez le bouchon d'évier lorsque l'appareil évacue l'eau pour empêcher tout reflux de l'eau vers l'appareil. Le raccordement de vidange doit être situé à une hauteur maximum de 70 cm du sol. D C 105 C 600 A 70 400 N 762+3 K E G 759 W max. 700 D Lorsque vous raccordez le tuyau de vidange à un embout du siphon sous l'évier, n'oubliez pas d'enlever toute la membrane en plastique (A).
des conséquences négatives pour l’environnement et la santé humaine qui, sinon, seraient le résultat d’un traitement inapproprié des déchets de ce produit. Pour obtenir plus de détails sur le recyclage de ce produit, veuillez prendre contact avec le bureau municipal de votre région, votre service d’élimination des déchets ménagers ou le magasin où vous avez acheté le produit.
Indice Informazioni per la sicurezza 51 Descrizione del prodotto 52 Pannello dei comandi 53 Preparazione al primo utilizzo 55 Regolazione del decalcificatore dell’acqua 56 Uso del sale per lavastoviglie 57 Uso del brillantante 57 Sistemazione di posate e stoviglie 58 Uso del detersivo 62 Uso di pastiglie combinate 63 Selezione e avvio di un programma di lavaggio Programmi di lavaggio Pulizia e cura Cosa fare se… Dati tecnici Installazione Collegamento dell’acqua Collegamento elettrico Considerazioni am
• Conservare i detersivi in un luogo sicuro. Evitare che i bambini tocchino i detersivi. • Tenere i bambini lontano dalla lavastoviglie quando lo sportello è aperto. Installazione • Controllare che la lavastoviglie non presenti danni dovuti al trasporto. Non collegare l'apparecchio se è danneggiato. Se necessario, contattare il fornitore. • Rimuovere tutti i materiali di imballaggio prima dell'uso. • Gli interventi elettrici devono essere eseguiti da un tecnico qualificato e competente.
Pannello dei comandi 1 2 3 4 5 6 7 Tasto On/Off Tasto programmi Tasto Mezzo carico Tasto Lavaggio igienizzante Tasto Extra risciacquo Tasto Funzione MULTITAB Tasto Partenza ritardata 8 Spie 9 Display digitale 10 Tasti funzione Spie Lavaggio principale La spia si accende quando la fase di lavaggio o risciacquo è in funzione. Asciugatura La spia si accende quando la fase di asciugatura è in funzione. Fine programma La spia si accende quando il programma di lavaggio è terminato.
Spie Brillantante 1) Sale 1) La spia si accende quando è necessario aggiungere il brillantante. Fare riferimento al capitolo 'Uso del brillantante'. La spia si accende quando è necessario riempire il contenitore del sale. Fare riferimento al capitolo 'Uso del sale da lavastoviglie'. Dopo avere riempito il contenitore, la spia del sale può rimanere ancora accesa per qualche ora. Ciò non compromette il buon funzionamento dell'apparecchio.
'Impostazione e avvio di un programma di lavaggio'. Display digitale Il display digitale mostra: • Il livello impostato del decalcificatore. • Il numero del programma di lavaggio. • Il tempo residuo al termine di un programma. • L'attivazione/disattivazione dell'erogazione del brillantante (solo con la funzione MULTITAB attiva). • La fine del programma di lavaggio. Nel display compare uno zero. • Il conto alla rovescia della partenza ritardata. • Codici di errore.
2. 3. 4. 5. qua. Se necessario, impostare il decalcificatore dell'acqua. Riempire il contenitore del sale con sale per lavastoviglie. Riempire l'erogatore del brillantante con brillantante. Mettere posate e piatti nella lavastoviglie. Impostare il programma corretto per il tipo di carico e il grado di sporcizia. 6. Riempire l'erogatore del detersivo con un quantitativo corretto di detersivo. 7. Avviare il programma di lavaggio. Se si utilizzano pastiglie combinate ('3 in 1', '4 in 1', '5 in 1' ecc.
Uso del sale per lavastoviglie Attenzione Utilizzare solo sale per lavastoviglie. Altri tipi di sale possono danneggiare il decalcificatore. Attenzione La presenza di grani di sale o acqua salata sul fondo della lavastoviglie può causare corrosione. Riempire di sale l'apparecchio prima di iniziare un programma di lavaggio per impedire la corrosione. Procedere nel modo seguente per riempire il contenitore del sale: 1. Ruotare il tappo in senso antiorario per aprire il contenitore del sale. 2.
3. Togliere l'eventuale brillantante fuoriuscito con un panno assorbente per evitare la formazione di schiuma eccessiva durante il lavaggio successivo. 4. Chiudere l'erogatore del brillantante. Regolazione del quantitativo di brillantante L'apparecchio viene impostato in fabbrica a livello 4. È possibile impostare il livello del brillantante da 1 (dosaggio minimo) a 6 (dosaggio massimo). 1. Ruotare il selettore del brillantante per aumentare o diminuire il dosaggio.
Cestello inferiore Il cestello inferiore è destinato a contenere pentole, coperchi, piatti, insalatiere e posate. Disporre i piatti di portata nella parte anteriore del cestello. La larghezza della fila di supporti a sinistra può essere regolata. 1. Prendere la fila di supporti nella parte posteriore del cestello. 2. Tirarla fino a sbloccarla. 3. Sganciare la fila di supporti dalla guida. 4. Inserire la fila di supporti nell'altra guida. 5.
Usare il separatore del cestello portaposate. Se le dimensioni delle posate impediscono l'uso dei separatori, è possibile toglierli. Il cestello portaposate è costituito da due parti. Per garantire una maggiore flessibilità di carico, è possibile utilizzare le due parti separatamente. Per separarle, farle scorrere orizzontalmente in senso opposto l'una rispetto all'altra, quindi separarle. Per montarle, avvicinarle e farle scorrere l'una verso l'altra.
2. Sollevare il cestello superiore o abbassarlo fino ad agganciarlo, rispettivamente, alla posizione superiore o inferiore. Supporto per i bicchieri Per bicchieri a calice e per i bicchieri da bibita, ripiegare il supporto (fig. 1). Se non si utilizza il supporto, ripiegarlo verso destra (fig. 2). Dimensione massima dei piatti con il cestello superiore nella posizione più alta. 18 32 Mettere i bicchieri sui supporti.
Dimensione massima dei piatti con il cestello superiore nella posizione più bassa. Disposizione di piatti di grandi dimensioni nel cestello inferiore 20 30 25 Uso del detersivo Usare solo detersivi specifici per lavastoviglie (in polvere, liquidi o in pastiglie). Seguire le istruzioni riportate sulla confezione: • Dosaggio consigliato dal produttore. • Consigli per la conservazione. Non utilizzare un quantitativo di detersivo maggiore di quello indicato per non danneggiare l'ambiente. 2.
5. Chiudere il coperchio del contenitore del detersivo. Premere il coperchio fino a quando non si blocca. Detersivi di marca diversa si sciolgono in tempi differenti. Alcune pastiglie combinate non garantiscono ottimi risultati di pulizia nei programmi brevi. Per eliminare completamente il detersivo, usare programmi di lavaggio lunghi con il detersivo in pastiglie. Uso di pastiglie combinate La funzione Multitab è per pastiglie di detersivo combinate.
Per usare nuovamente un detersivo normale: 1. Disattivare la funzione Multitab. 2. Riempire il contenitore del sale e l'erogatore del brillantante. 3. Impostare il decalcificatore al livello più alto. 4. Eseguire un programma di lavaggio senza piatti. 5. Regolare il decalcificatore in base alla durezza locale dell'acqua. 6. Regolare l'erogatore del brillantante. Selezione e avvio di un programma di lavaggio Selezionare il programma di lavaggio con la porta leggermente aperta.
Il conto alla rovescia viene interrotto se si apre la porta. Quando si chiude nuovamente la porta, il conto alla rovescia viene ripreso dal punto in cui era stato interrotto. Annullamento della "partenza ritardata" Quando si annulla una partenza ritardata, si annulla anche il programma di lavaggio. 1. Tenere contemporaneamente premuti i due tasti funzione B e C fino a quando nel display digitale compaiono 2 trattini orizzontali. 2. Rilasciare i tasti funzione B e C per annullare la partenza ritardata.
Programma Grado di sporco Tipo di carico Descrizione programma P5 ECO 2) Sporco normale Stoviglie miste Prelavaggio Lavaggio principale fino a 50°C 1 risciacquo intermedio Risciacquo finale Asciugatura P6 Breve 3) Sporco normale o leggero Stoviglie miste Lavaggio principale fino a 65°C Risciacquo finale P7 Prelavaggio Qualsiasi Carico parziale (da completare successivamente nel corso della giornata). 1 risciacquo a freddo (per impedire che i residui di cibo si attacchino alle stoviglie).
Programma Durata (minuti) Consumo energetico (in kWh) Acqua (in litri) P5 ECO 165 - 175 1,0 - 1,1 14 - 15 P6 Breve 30 0,9 8 P7 Prelavaggio 7 0,1 4 I valori di consumo possono variare a seconda della pressione e della temperatura dell'acqua, delle variazioni dell'a- limentazione elettrica e della quantità di stoviglie. Pulizia e cura Avvertenza Spegnere l'apparecchio prima di pulirle i filtri. Pulizia dei filtri Attenzione Non usare la lavastoviglie senza i filtri.
Mulinello cestello superiore 1. Per estrarre il mulinello del cestello superiore, ruotarlo lateralmente. Pulizia dei mulinelli Controllare periodicamente che gli ugelli dei mulinelli non siano ostruiti. Se necessario, pulire gli ugelli con un filo metallico o un ago sotto l'acqua corrente. Attenzione Prestare attenzione a non danneggiare le aperture degli ugelli. 2. Pulire il mulinello. 3. Per riposizionare il mulinello, premerlo verso l'alto fino allo scatto. Mulinello inferiore 1.
Cosa fare se… La lavastoviglie non si avvia o si blocca durante il funzionamento. In caso di malfunzionamento, cercare dapprima di risolvere il problema senza contattare l'assistenza tecnica. Qualora non sia possibile trovare una soluzione al problema, contattare il centro di assistenza locale. Codice guasto e malfunzionamento Attenzione Spegnere l'apparecchio prima di eseguire le seguenti azioni correttive consigliate.
I risultati del lavaggio non sono soddisfacenti Le stoviglie non sono pulite • Il programma di lavaggio selezionato non è corretto per il tipo di carico e il grado di sporcizia. • I cestelli non sono stati caricati correttamente per cui l'acqua non raggiunge tutte le superfici. • I mulinelli non girano liberamente, per la sistemazione non corretta delle stoviglie. • I filtri sono sporchi o non sono correttamente installati.
di ingresso e di scarico dell'acqua e il cavo elettrico non siano piegati o schiacciati. 3. Incassare a filo l'apparecchio e fissarlo a entrambi i lati nella parte superiore. 2. Staffa aggiuntiva sul lato superiore. Questo pezzo è disponibile come accessorio speciale. Contattare il Centro di assistenza locale. Altre possibilità di fissaggio 1. Allo zoccolo.
Avvertenza Apparecchio sotto tensione D 400 C 105 C 600 A 70 max. 700 N 762+3 K E G 759 W G 546 100 180 50 550 G 570 N 550 N 600 Il tubo di carico ha una doppia parete e ha un cavo interno di rete e una valvola di sicurezza. Il tubo di carico dell'acqua è sotto pressione solo durante il passaggio dell'acqua. In caso di una perdita nel tubo di carico dell'acqua, la valvola di sicurezza interrompe il passaggio dell'acqua.
Collegamento elettrico Avvertenza Il produttore non è responsabile qualora non siano applicate queste precauzioni di sicurezza. Mettere a terra l'apparecchio conformemente alle precauzioni di sicurezza. Assicurarsi che la tensione e l'alimentazione elettrica corrispondano alla tensione e al tipo di alimentazione riportate nella targhetta della lavastoviglie. Utilizzare sempre una presa antishock elettrico correttamente installata. Non utilizzare prese multiple, connettori e prolunghe.
Contents Safety information Product description Control panel Use of the appliance Setting the water softener Use of dishwasher salt Use of rinse aid Loading cutlery and dishes Use of detergent Multitab function 74 75 76 78 79 79 80 81 84 85 Setting and starting a washing programme 86 Washing programmes 87 Care and cleaning 89 What to do if… 90 Technical data 92 Installation 92 Water connection 93 Electrical connection 94 Environment concerns 94 Subject to change without notice Safety information For
• A qualified and competent person must do the electrical installation. • A qualified and competent person must do the plumbing installation. • Do not change the specifications or modify this product. Risk of injury and damage to the appliance. • Do not use the appliance: – if the mains cable or water hoses are damaged, – if the control panel, worktop or plinth area are damaged, that you can get access to the inner side of the appliance. Contact your local Service Force Centre.
Control panel 1 2 3 4 5 6 7 On/off button Programme button Half-load button Sanitize button Extra-rinse button Multitab button Delay start button 8 Indicator lights 9 Digital display 10 Function buttons Indicator lights Wash The indicator light comes on when the washing phase or the rinsing phase operates. Dry The indicator light comes on when the drying phase operates. End-of-programme The indicator light comes on when the washing programme is completed.
Indicator lights Rinse aid 1) Salt 1) The indicator light comes on when it is necessary to fill the rinse aid. Refer to the chapter 'Use of rinse aid'. The indicator light comes on when it is necessary to fill the salt container. Refer to the chapter 'Use of dishwasher salt'. After you fill the container, the salt indicator light can continue to stay on for some hours. This does not have an unwanted effect on the operation of the appliance.
Digital display The display shows: • the set level of the water softener. • The number of the washing programme. • Remaining time to the end of the programme. • Activation/deactivation of the rinse aid dispenser (only with multitab function on). • End of the washing programme. The display shows a zero. • Number of hours in delay start. • Fault codes. • Activation/deactivation of the audible signals. Function buttons Use the function buttons for these operations: • To set the water softener.
5. Set the correct washing programme for the type of load and soil. 6. Fill the detergent dispenser with the correct quantity of detergent. 7. Start the washing programme. If you use combi detergent tablets ('3 in 1', '4 in 1', '5 in 1', etc.), refer to the chapter 'Multitab function'. Setting the water softener The water softener removes minerals and salts from the water supply. Minerals and salts can have bad effect on the operation of the appliance.
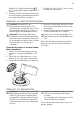
salt before you start a washing programme to prevent corrosion. Do these steps to fill the salt container: 1. Turn the cap anticlockwise to open the salt container. 2. Fill the salt container with 1 litre of water (only the first operation). 3. Fill the salt container with salt. 4. Remove the salt around the opening of the salt container. 5. Turn the cap clockwise to close the salt container. It is normal that water overflows from the salt container when you fill it with salt.
1. Turn the rinse aid dial to increase or decrease the dosage. – Increase the dosage if there are water droplets or limescale on the dishes. – Decrease the dosage if there are streaks, whitish stains or bluish layers on the dishes. Loading cutlery and dishes Helpful hints and tips Caution! Only use the appliance for household utensils that are applicable for dishwashers. Do not use the appliance to clean objects that can absorb water (sponges, household cloths, etc.).
1. Hold the two rows of prongs on the left side at the rear part of the basket. 2. Lift the rows of prongs out of the guides. 3. Fold the rows of prongs in. You can adjust the width of the left row of prongs. 1. Hold the row of prongs at the rear part of the basket. 2. Pull the row of prongs until it disengages. 3. Push the row of prongs out of the guide. 4. Put the row of prongs into the other guide. 5. Push the row of prongs down until it engages in position.
The cutlery basket has two parts. You can use these parts separately for more loading flexibility. To disassemble the parts, move them horizontally in opposite directions and pull them apart. To assemble the parts, put them together and move horizontally to each other. Glass holder For glasses with long stems and longer glasses, fold the glass holder up (fig. 1). If you do not use the glass holder, put it to the right side (fig. 2).
2. Lift the upper basket and move it down until it latches in the upper or lower position. Maximum dimensions for plates with upper basket in lower position 20 30 25 Maximum dimensions for plates with upper basket in upper position. 18 32 25 Use of detergent Only use detergents (powder, liquid or tablet) that are applicable for dishwashers. Follow the data on the packaging: • Dosage recommended by the manufacturer. • Storage recommendations.
2. Fill the detergent dispenser (A) with detergent. The marking shows the dosage: 20 = approximately 20 g of detergent 30 = approximately 30 g of detergent. 3. If you use a washing programme with prewash phase, put more detergent in the prewash detergent compartment (B). A B 4. If you use detergent tablets, put the detergent tablet in the detergent dispenser (A). 5. Close the lid of the detergent dispenser. Press the lid until it locks into position.
5. Press function button B. – The indicator lights for function buttons A and C go off. – The indicator light for function button B continues to flash. – The digital display shows the setting. Rinse aid dispenser deactivated Rinse aid dispenser activated 6. Press function button B again. – The digital display shows the new setting. 7. Switch off the appliance to save the operation. To use normal detergent again: 1. Deactivate the multitab function. 2. Fill the salt container and rinse aid dispenser.
– When the countdown is completed, the washing programme starts automatically. Do not open the door during the countdown to prevent interruption of the countdown. When you close the door again, the countdown continues from the point of interruption. Cancelling a delay start When you cancel a delay start, you also cancel the washing programme. 1. Press and hold function buttons B and C until 2 horizontal bars show in the digital display. 2. Release function buttons B and C to cancel the delay start. 3.
Programme Degree of soil Type of load Programme description P5 ECO 2) Normal soil Crockery and cutlery Prewash Main wash up to 50°C 1 intermediate rinse Final rinse Drying P6 Quick 3) Normal or light soil Crockery and cutlery Main wash up to 65°C Final rinse P7 Prewash Any Partial load (to be completed later in the day). 1 cold rinse (to prevent food scraps to bond). Detergent is not necessary with this programme.
Programme P7 Prewash Duration (in minutes) 7 The pressure and temperature of the water, the variations of power supply Energy (in kWh) 0,1 Water (in litres) 4 and the quantity of dishes can change these values. Care and cleaning Warning! Switch the appliance off before you clean the filters. Cleaning the filters 3. To remove the fine filter, turn the handle to the right. 4. Clean the fine filter fully with a brush under running water. Caution! Do not use the appliance without the filters.
Caution! To prevent damage to the nozzle openings, clean them carefully. 2. Clean the spray arm. 3. To attach again the spray arm, press upwards until it goes back into position. Lower spray arm 1. Turn the fixing screw B) counterclockwise. 2. Pull the spray arm off the shaft. Ceiling spray arm 1. Turn the fixing screw (A) counterclockwise. 2. Pull the spray arm off the shaft. 3. Clean the spray arm and the fixing screw. 4. Attach the spray arm with the fixing screw by turn it clockwise.
Fault code and malfunction Possible cause and solution • intermittent audible signal • The water tap is blocked or furred with limescale. • digital display shows Clean the water tap. The dishwasher does not fill with wa- • The water tap is closed. Open the water tap. ter • The filter in the water inlet hose is blocked. Clean the filter. • The connection of the water inlet hose is not correct. The hose can be kinked or squashed. Make sure that the connection is correct.
Technical data Dimensions Width cm 54,6 Height cm 75,9 Depth cm 57,1 Electrical connection - Voltage Overall power - Fuse Information on the electrical connection is given on the rating plate on the inner edge of the dishwasher door. Water supply pressure Minimum 0,5 bar (0,05 MPa) Maximum 8 bar (0,8 MPa) Capacity Place settings 11 Installation Warning! Make sure that mains plug is disconnected from the mains socket during installation.
Water connection Water inlet hose Connected the appliance to a hot (max. 60°) or cold water supply. If the hot water comes from alternative sources of energy that are more environmentally friendly (e.g. solar or photovoltaic panels and aeolian), use a hot water supply to decrease energy consumption. Connect the inlet hose to a water tap with an external thread of 3/4”. • Do not put the water inlet hose or the safety valve in water.
D C 105 C 600 A 70 400 N 762+3 K E G 759 W max. 700 D If you connect the water drain hose to a trap spigot under the sink, remove the plastic membrane (A).
materials in the applicable container at the community waste disposal facilities. Warning! To discard the appliance, follow the procedure: • Pull the mains plug out of the socket. • Cut off the mains cable and mains plug and discard them. • Discard the door catch. This prevents the children to close themselves inside the appliance and endanger their lives.
Service DirecTel 0844 844 222 Service Fax 0844 844 223 E-Mail service@merker.ch Merker AG Althardstrasse 70 CH-8105 Regensdorf Tel. 044 - 847 20 00 Fax 044 - 2847 21 01 info@merker.ch www.merker.