www.merlingo.
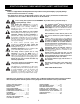
START BY READING THESE IMPORTANT SAFETY INSTRUCTIONS WARNING • Failure to comply with the following instructions may result in serious personal injury or property damage. • Read and follow all instructions carefully. • The garage door opener is designed and tested to offer safe service provided it is installed and operated in strict accordance with the instructions in this manual. These safety alert symbols mean WARNING : A possible risk to personal safety or property damage exists.
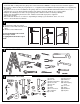
BEFORE YOU BEGIN: 1. Look at the wall or ceiling above the garage door. The header bracket must be securely fastened to structural supports. 2. Do you have a finished ceiling in your garage? If so, a support bracket and additional fastening hardware (not supplied) may be required. 3. Do you have an access door in addition to the garage door? If not, model CM1702 Outside Quick Release Accessory is required. This accessory allows manual operation of the garage door from outside in case of power failure. 4.
COMPLETED INSTALLATION (TILT DOOR EXAMPLE SHOWN) As you proceed with the assembly, installation and adjustment procedures in this manual, you may find it helpful to refer back to this illustration of a completed installation.
ASSEMBLY 5 ASSEMBLE THE RAIL 4 2 3 2 5 1 Grease inside edges of rail sections using grease (1). Place rail pieces (2) on flat surface for assembly. All four rail sections are interchangeable. Slide rail brace (3) onto rail section. Connect rail by sliding rail brace onto next rail section. Tap rail assembly (4) on piece of wood (5) until rail sections are flush. Repeat with remaining rail sections.
8 ATTACH TROLLEY TO RAIL Slide outer trolley (1) into the back end of the rail assembly (2), be sure end with trolley release arm (3) is pointing in direction of the opener end. Slide outer trolley down rail until it engages with inner trolley. 2 1 3 Turn rail assembly over ready for next operation. Opener end 9 1 FASTEN RAIL TO OPENER AND INSTALL CHAIN 3 5 6 Remove four washered bolts (1) from top of opener. Place rail (2) on opener, flush with stop (3) on top of opener.
11 ASSEMBLE HEADER SLEEVE 2 3 Thread spring nut on carriage bolt until finger tight. Insert a screwdriver tip (1) into one of the slots of the nut ring (2) and brace it firmly against the header sleeve. Place an open end wrench (3) on the square end of the spring nut (4), slightly rotate nut about 1/4 turn clockwise until nut ring (2) is released against header sleeve (5). This sets spring to optimum chain tension. Chain may slip off sprocket if chain is too loose.
14 ATTACH RAIL TO HEADER BRACKET 2 Position opener on garage floor below the header bracket. Use packing material to protect the cover. Raise rail until holes in the header sleeve and holes in the header bracket align. Join with clevis pins (1). Insert ring fasteners (2) to secure. 2 1 1 NOTE:To enable the rail to clear sectional door springs, it may be necessary to lift opener onto a temporary support. The opener must either be secured to a support or held firmly in place by another person.
16 HANG THE OPENER A The opener must be securely fastened to a structural support of the garage. Three representative installations are shown. Yours may be different. Hanging brackets (1) should be angled (Figure A) to provide rigid support. On finished ceilings, (Figure B) attach a sturdy metal bracket (not supplied) (4) to a structural support before installing the opener. For concrete ceiling mount, (Figure C), use concrete anchors (5) provided.
20 FASTEN DOOR BRACKET Sectional and One-Piece Door Installation Procedure: Door bracket (1) has left and right side fastening holes. If your installation requires top and bottom fastening holes use both the door bracket and door bracket plate (2) as shown. 1. Center door bracket (with or without door bracket plate, as required) at the top inside face of door as shown. Mark holes. A. One-piece doors: locate bracket at inside face of the door 0-100mm down. B.
21 CONNECT DOOR ARM SECTIONAL DOORS 200mm Make sure garage door is fully closed. Pull the emergency release handle to disengage the trolley. Slide the trolley assembly back 200mm from the idler pulley. Outer Trolley Ring Fas tener Clevis Pin Figure 1. • Fasten straight door arm section to trolley assembly using the hardware provided with your opener. Door Bracket Figure 2. • Bring arm section together. Find two pairs of holes that line up and join sections.
ADJUSTMENT SECTION 22 SETTING THE LIMITS 1 2 Travel limits regulate the points at which the door will stop when moving up or down. Follow the steps below to set the limits. 3 NOTE: The door must be in the mid or closed position to begin setting the limits. Turn power on Setting the limits : 1. Press and hold the black button until the yellow indicator light starts flashing slowly then release. 2. Adjust the desired up position of the door by using the black and orange buttons.
24 TEST THE SAFETY REVERSE SYSTEM The safety reverse system test is important. Garage door must reverse on contact with a 40mm obstacle laid flat on the floor. Failure to properly adjust opener may result in serious personal injury from a closing garage door. Repeat test once a month and adjust as needed. Procedure: Place a 40mm obstacle (1) laid flat on the floor under the garage door. Operate the door in the down direction. The door must reverse on the obstacle.
26 INSTALL DOOR CONTROL (OPTIONAL) Locate door control where the garage door is visible, away from door and door hardware and out of the reach of children. Mount at least 1.5m (5 feet) above the floor Serious personal injury from a moving garage door may result from misuse of opener. Do not allow children to operate the door control or transmitter. Permanently fasten the caution label permanently to the wall near the door control as a reminder of safe operating procedures.
27 WIRELESS PROGRAMMING (OPTIONAL ACCESSORIES) Activate the opener only when door is in full view, free of obstruction and properly adjusted. No one should enter or leave garage while door is in motion. Do not allow children to operate push button(s) or remote(s). Do not allow children to play near the door. NOTE: The transmitter(s) and wireless wall button supplied with your opener are factory programmed.
29 ACCESSORIES (1) Model CM844 (2) Model CM128 (3) Model C940 (4) Model C943 (5) Model C945 (6) Model C98 (7) Model C840 4 Channel transmitter Wireless Wall Button Single-Channel transmitter 3-Channel transmitter 3-Channel Mini transmitter Motion Detecting Control Panel Keyless Entry System CM844 C940 CM128 1 2 The Protector SystemTM IR Beams Quick Release Lock Outside Keyswitch Wireless Fingerprint Access System 433MHz Antenna, Cable and Adaptor LCD Motion Detecting Control Panel (8) Model C77 (9)
31 REPLACEMENT PARTS 158A0049 041A5797 041A5908 041A5735C 041A0079 041D0577 204C0240-2 If the supply cord is damaged, it must be replaced by the manufacturer, its service agent or similarly qualified persons in order to avoid hazard.
TROUBLE SHOOTING 1. Opener doesn't operate from either door control or transmitter: • Check jumper installed between 7 & 8 see page 14. • Does the opener have electric power? Plug lamp into outlet. If it doesn't light, check the fuse box or the circuit breaker. (Some outlets are controlled by a wall switch.) • Have you disengaged all door locks? Review installation instruction warnings on page 2. • Is there a build-up of ice or snow under door? The door may be frozen to ground. Remove any obstruction.
CARE OF YOUR OPENER MAINTENANCE OF YOUR OPENER When properly installed, opener will provide high performance with a minimum of maintenance. The opener does not require additional lubrication. Limit and Force Settings: These settings must be checked and properly set when opener is installed. Weather conditions may cause some minor changes in the door operation, requiring some re-adjustments, particularly during the first year of operation. Refer to Setting the Limits and Force on page 12.
CHAMBERLAIN LIMITED WARRANTY Merlin Professional MT60 Sectional Garage Door Opener consumer, charge you a fee to repair, replace and/or return the Unit to you. This Chamberlain Limited Warranty does not cover any failure of, or defect in, the Unit due to: Chamberlain Australia Pty Limited / Chamberlain New Zealand Limited (Chamberlain), the manufacturer of Merlin® automatic garage door openers, is committed to manufacturing and supplying high quality goods.